Detailed example of event modifiers in Vue

Event Modifier
In Vue, Event Modifier handles the details of many DOM events , so that we no longer need to spend a lot of time dealing with these annoying things, but can have more energy to focus on the logical processing of the program. (Learning video sharing: vue video tutorial)
The main event modifiers in Vue are:
-
.stop: Equivalent toevent.stopPropagation()in JavaScript, preventing events from bubbling -
.prevent: Equivalentevent.preventDefault()in JavaScript prevents the execution of the default behavior (if the event can be canceled, cancel the event without stopping the further propagation of the event) -
.capture: Contrary to the direction of event bubbling, event capture is from outside to inside -
.self: It will only trigger Events within its own scope, excluding child elements .once: will only be triggered once
Next, let's look at the role of event modifiers through some simple examples.
.stop Prevent event bubbling
Bubble events: nest two or three layers of parent-child relationships, and then all have click events. Click on the child node to trigger From inside to outside, click event of child node->parent node
<!-- HTML -->
<div>
    <div>
        <div>
            <button>点击我(^_^)</button>
        </div>
    </div>
    <p>{{ message }}</p>
</div>

let app = new Vue({
    el: '#app',
    data () {
        return {
            message: '测试冒泡事件'
        }
    },
    methods: {
        inner: function () {
            this.message = 'inner: 这是最里面的Button'
        },
        middle: function () {
            this.message = 'middle: 这是中间的Div'
        },
        outer: function () {
            this.message = 'outer: 这是外面的Div'
        }
    }
})
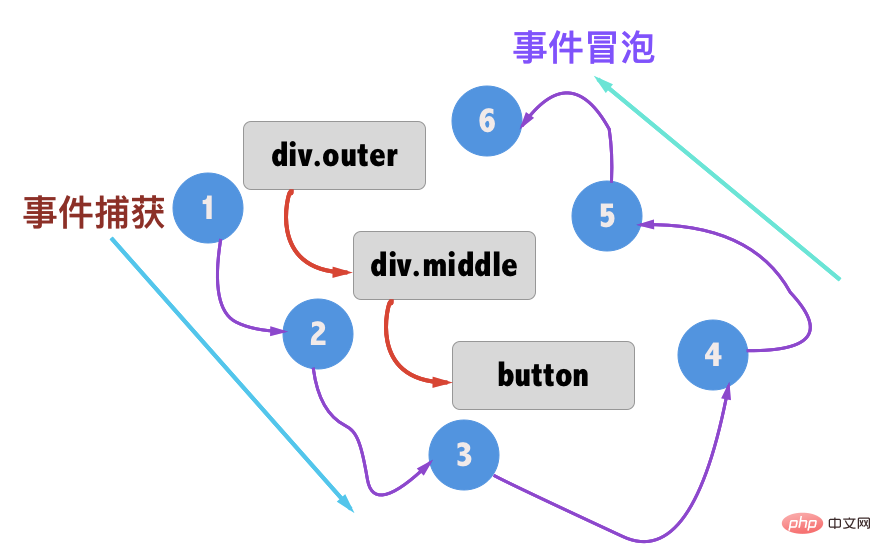
The diagram of the entire event is as follows:

The way to prevent bubbling events is: adding .stop to the click is equivalent to calling the equivalent of event.stopPropagation() in each method. Clicking on child nodes will not capture it. Events to the parent node
<!-- HTML -->
<div id="app">
  <div class="outeer" @click.stop="outer">
    <div class="middle" @click.stop="middle">
      <button @click.stop="inner">点击我(^_^)</button>
     </div>
   </div>
</div>
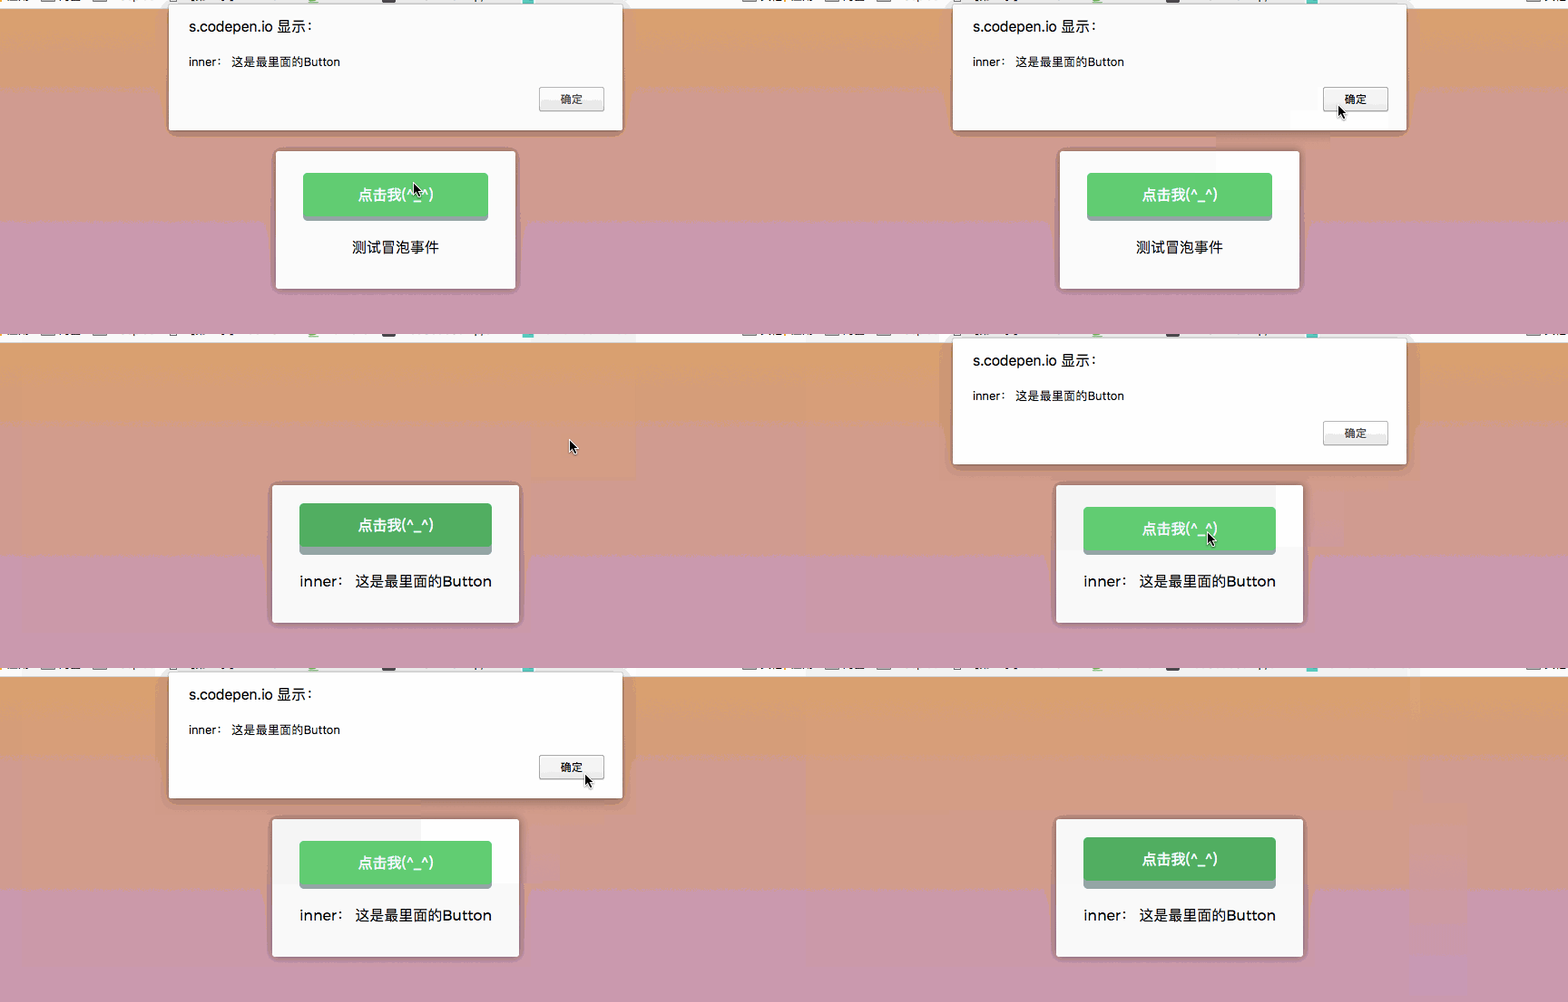
At this time, when the button is clicked, the events on div.middle and div.outer will not be captured:

.preventCancel the default event
.prevent is equivalent to JavaScript's event.preventDefault(), used to cancel the default event. For example, when the user clicks on the <a href="#"> tag on our page, # is usually listed in the browser's URL:

In JavaScript, event.preventDefault() is often used to prevent # from appearing in the browser's URL. In Vue, you can use the event modifier .prevent to cancel the default event. At this time, after clicking the link, # will no longer appear in the browser's URL.
<div id="app">
<a href="#" @click.prevent="prompt">点击我(^_^)</a>
<p>{{ message }}</p>
</div>
let app = new Vue({
el: '#app',
data () {
return {
message: '我是一个文本信息'
}
},
methods: {
prompt: function (e) {
this.message = location.href
}
}
})
.capture Capture event
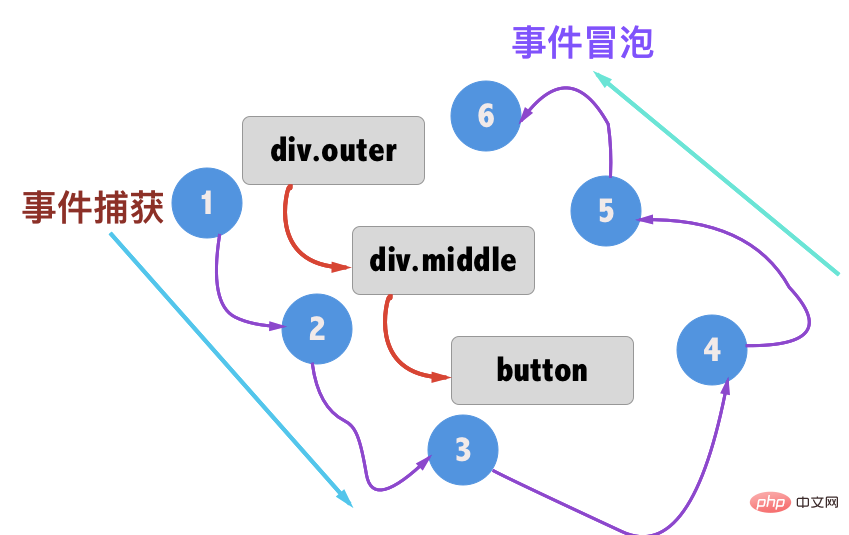
Capture event: nest two or three layers of parent-child relationships, and then all have click events, Clicking on a child node will trigger a click event from the outside to the parent node -> child node. The
.capture modifier is exactly the opposite of the .stop. .stop is to prevent events from bubbling, while .capture is similar to JavaScript event capture, which is from outside to inside. As shown in the figure below:

Used in our Vue event modifier:
<!-- HTML -->
<div id="app">
<div class="outeer" @click.capture="outer">
<div class="middle" @click.capture="middle">
<button @click.capture="inner">点击我(^_^)</button>
</div>
</div>
<p>{{ message }}</p>
</div>
let app = new Vue({
el: '#app',
data () {
return {
message: '事件捕获'
}
},
methods: {
inner: function () {
this.message = 'inner: 这是最里面的Button'
alert(this.message)
},
middle: function () {
this.message = 'middle: 这是中间的Div'
alert(this.message)
},
outer: function () {
this.message = 'outer: 这是外面的Div'
alert(this.message)
}
}
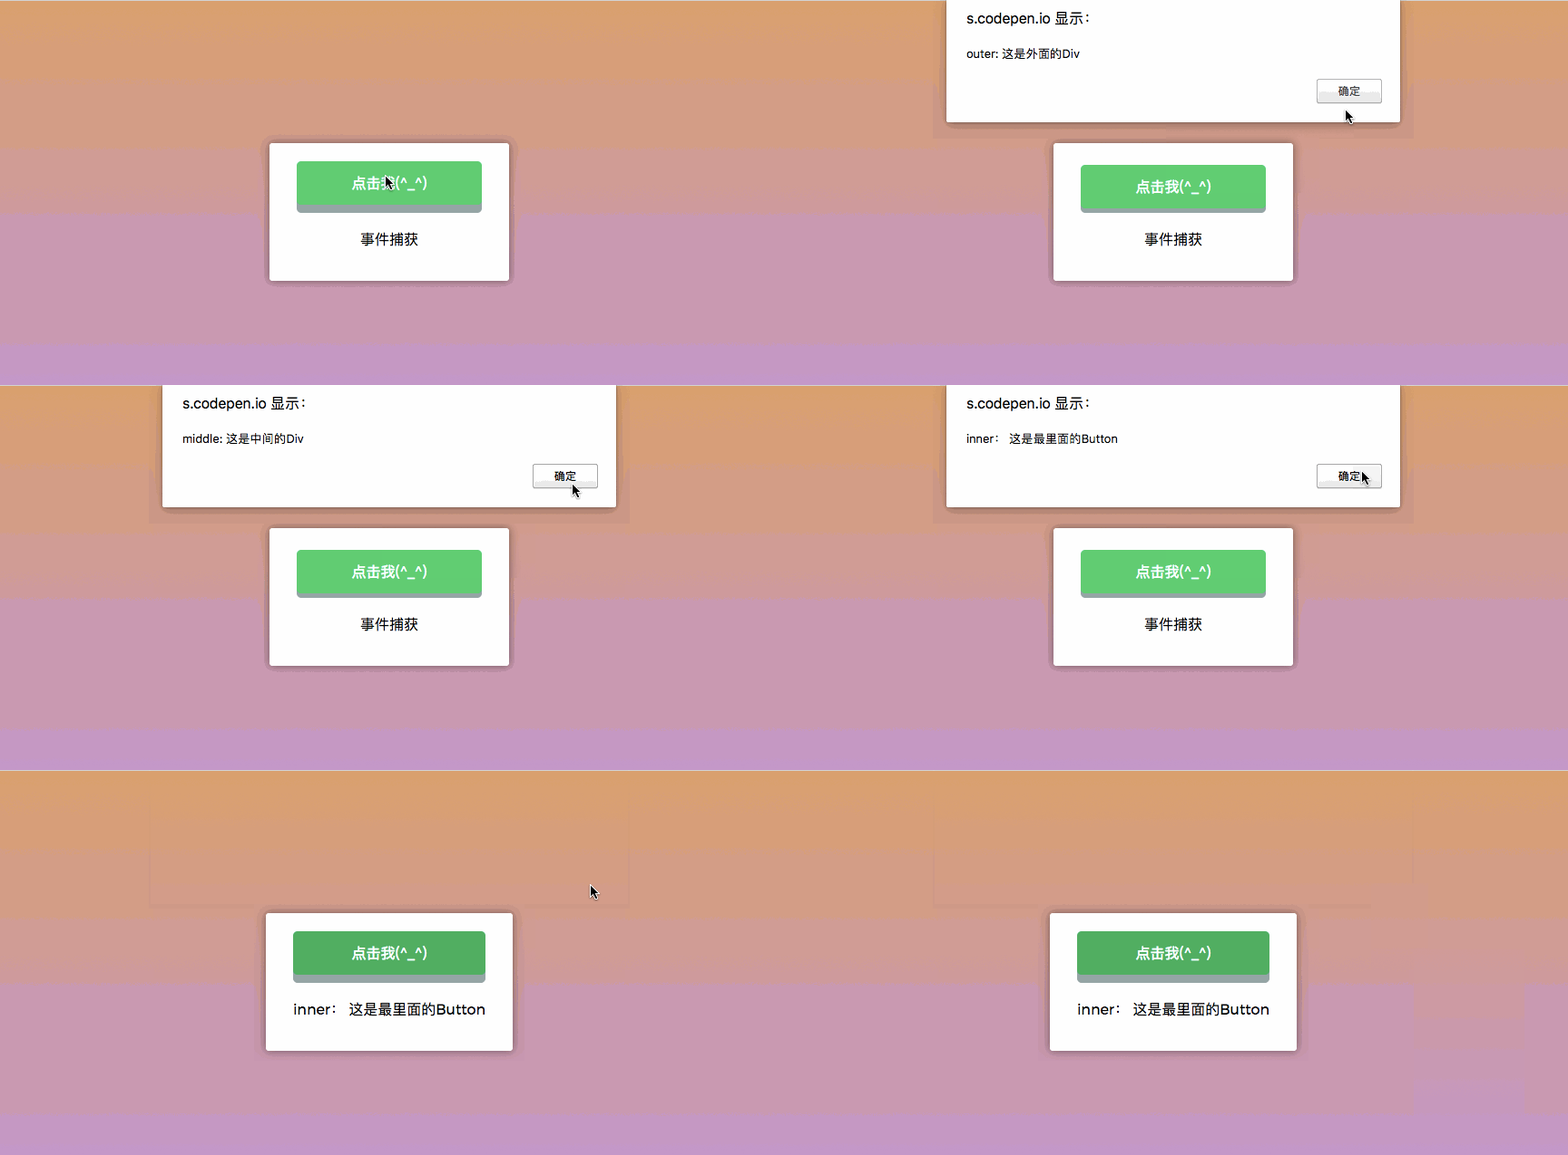
})The behavior seen is as follows:

.self
Modifier .self will only trigger events within its own scope and will not include child elements.
<!-- HTML -->
<div id="app">
<div class="outer" @click.self="outer">
<div class="middle" @click.self="middle">
<button @click="inner">点击我(^_^)</button>
</div>
</div>
<p>{{ message }}</p>
</div>
let app = new Vue({
el: '#app',
data () {
return {
message: '修饰符:.self'
}
},
methods: {
inner: function () {
this.message = 'inner: 这是最里面的Button'
alert(this.message)
},
middle: function () {
this.message = 'middle: 这是中间的Div'
alert(this.message)
},
outer: function () {
this.message = 'outer: 这是外面的Div'
alert(this.message)
}
}
})We clicked on div.outer, div.middle and button respectively, and click events were bound to these elements. , and added the .self modifier:
.once only executes one click
Remember we used Vue to write it before For a counter, click and it will increase by 1. If you continue to click, it will continue to accumulate. On the contrary, if you click on -, it will decrease by 1. If you continue to click, it will continue to decrease.
<div id="app">
<button v-on:click="increase">+</button>
<span>{{ count }}</span>
<button v-on:click="reduce">-</button>
</div>
let app = new Vue({
el: '#app',
methods: {
increase: function() {
this.count++
},
reduce: function() {
this.count--
}
},
data: {
count: 0
}
})If we add the .once modifier on the @click event, it will only be executed once when the button is clicked.
<div id="app">
  <button @click.once="increase">+</button>
  <span>{{ count }}</span>
  <button @click.once="decrease">-</button>
</div>Demo address: https://codepen.io/airen/pen/dVQoRN
键盘修饰符
在JavaScript事件中除了前面所说的事件,还有键盘事件,也经常需要监测常见的键值。在Vue中允许v-on在监听键盘事件时添加关键修饰符。记住所有的keyCode比较困难,所以Vue为最常用的键盘事件提供了别名:
.enter:回车键.tab:制表键.delete:含delete和backspace键.esc:返回键.space: 空格键.up:向上键.down:向下键.left:向左键.right:向右键
<div id="app">
<button @keyup.enter="enter" @keyup.tab="tab" @keyup.delete="delete1" @keyup.esc="esc" @keyup.space="space" @keyup.up="up" @keyup.down="down" @keyup.left="left" @keyup.right="right">{{ message }}</button>
<p>{{ message }}</p>
</div>
let app = new Vue({
el: '#app',
data () {
return {
message: '将光标置于按钮上后,按下键盘上不同的按键,会有不同的效果'
}
},
methods: {
enter: function (){
this.message = '你按了回车键:enter'
},
tab: function (){
this.message = '你按了tab键: tab'
},
delete1: function (){
this.message = '你按了删除键: delete'
},
esc: function (){
this.message = '你按了取消键: esc'
},
space: function (){
this.message = '你按了空格键:space'
},
up: function (){
this.message = '你按了向上键:up'
},
down: function (){
this.message = '你按了向下键:down'
},
left: function (){
this.message = '你按了向左键:left'
},
right: function (){
this.message = '你按了向右键:right'
}
}
})当你把鼠标移动按钮上,然后按下不同的键盘,将会监听到对应的键盘事件:
演示demo地址::https://codepen.io/airen/pen/RLqPYx
鼠标修饰符
鼠标修饰符用来限制处理程序监听特定的滑鼠按键。常见的有:
.left:鼠标左键.middle:鼠标中间滚轮.right:鼠标右键
修饰键
可以用如下修饰符开启鼠标或键盘事件监听,使在按键按下时发生响应:
.ctrl.alt.shift.meta
自定义按键修饰符别名
在Vue中可以通过config.keyCodes自定义按键修饰符别名。例如,由于预先定义了keycode 116(即F5)的别名为f5,因此在文字输入框中按下F5,会触发prompt方法,出现alert。
<!-- HTML -->
<div id="app">
<input type="text" v-on:keydown.f5="prompt()">
</div>
Vue.config.keyCodes.f5 = 116;
let app = new Vue({
el: '#app',
methods: {
prompt: function() {
alert('我是 F5!');
}
}
});总结
在Vue中,使用v-on来给元素绑定事件,而为了更好的处理逻辑方面的事物,Vue提供了一个methods。在methods中定义一些方法,这些方法可以帮助我们处理一些逻辑方面的事情。而在这篇文章中,我们主要介绍了一些事件的修饰符,比如常见的阻止事件冒泡,键盘修饰符等。除此之外,还提供了config.keyCodes提供自定义按键修饰符别名。
The above is the detailed content of Detailed example of event modifiers in Vue. For more information, please follow other related articles on the PHP Chinese website!

Hot AI Tools

Undresser.AI Undress
AI-powered app for creating realistic nude photos

AI Clothes Remover
Online AI tool for removing clothes from photos.

Undress AI Tool
Undress images for free

Clothoff.io
AI clothes remover

AI Hentai Generator
Generate AI Hentai for free.

Hot Article

Hot Tools

Notepad++7.3.1
Easy-to-use and free code editor

SublimeText3 Chinese version
Chinese version, very easy to use

Zend Studio 13.0.1
Powerful PHP integrated development environment

Dreamweaver CS6
Visual web development tools

SublimeText3 Mac version
God-level code editing software (SublimeText3)

Hot Topics
 How to disable the change event in vue
May 09, 2024 pm 07:21 PM
In Vue, the change event can be disabled in the following five ways: use the .disabled modifier to set the disabled element attribute using the v-on directive and preventDefault using the methods attribute and disableChange using the v-bind directive and :disabled
 Adaptation of Java framework and front-end Vue framework
Jun 01, 2024 pm 09:55 PM
The Java framework and Vue front-end adaptation implement communication through the middle layer (such as SpringBoot), and convert the back-end API into a JSON format that Vue can recognize. Adaptation methods include: using the Axios library to send requests to the backend and using the VueResource plug-in to send simplified API requests.
 What does async mean in vue
May 09, 2024 pm 07:03 PM
Vue's async modifier is used to create asynchronous components or methods to achieve dynamic loading of components and execution of asynchronous operations to avoid blocking the main thread.
 The function of render function in vue
May 09, 2024 pm 07:06 PM
The render function in Vue.js is responsible for converting component data into virtual DOM, which can improve performance, enable templating, and support cross-platform. Specific functions include: 1. Generating virtual DOM; 2. Improving performance; 3. Implementing templates; 4. Supporting cross-platform.
 How to use v-show in vue
May 09, 2024 pm 07:18 PM
The v-show directive is used to dynamically hide or show elements in Vue.js. Its usage is as follows: The syntax of the v-show directive: v-show="booleanExpression", booleanExpression is a Boolean expression that determines whether the element is displayed. The difference with v-if: v-show only hides/shows elements through the CSS display property, which optimizes performance; while v-if conditionally renders elements and recreates them after destruction.
 Nuxt.js: a practical guide
Oct 09, 2024 am 10:13 AM
Nuxt is an opinionated Vue framework that makes it easier to build high-performance full-stack applications. It handles most of the complex configuration involved in routing, handling asynchronous data, middleware, and others. An opinionated director
 From PHP to Go or Front-end? The suggestions and confusions of reality from experienced people
Apr 01, 2025 pm 02:12 PM
Confusion and the cause of choosing from PHP to Go Recently, I accidentally learned about the salary of colleagues in other positions such as Android and Embedded C in the company, and found that they are more...
 How to use elementui for render function in vue
May 09, 2024 pm 07:09 PM
The render function is used to create the virtual DOM in a Vue.js application. In Element UI, you can integrate Element UI components into the render function by rendering the component directly, using JSX syntax, or using scopedSlots. When integrating, you need to import the Element UI library, set properties in kebab-case mode, and use scopedSlots to render slot content (if the component has slots).


