

vue-router Essence is a third-party package that needs to be downloaded when used [Related recommendations:vue.js video tutorial】
Steps (7 steps):
1. Downloadvue- routerModule to current project
yarn add vue-router
2.Introduce VueRouter function in main.js
// 引入路由import VueRouter from "vue-router";
3.Add to Vue. use() – Register global RouterLink and RouterView components
// 注册全局Vue.use(VueRouter)
4. Create routing rule array – Correspondence between path and component name
Create Array of routing rules (page components that need to be switched) Introduce the prepared page components into main.js
const routes = [{
            path: "/",
            redirect: "find" //默认显示推荐组件(路由的重定向)
        },
        {
            path: "/find",
            name: "Find",
            component: Find,
            //二级路由
            children: [{
                    path: "/",
                    redirect: "recom" //默认显示推荐组件
                },
                {
                    path: "ranking", //注意二级路由的路径千万不要加/
                    component: Ranking                },
                {
                    path: "songlist",
                    component: SongList                },
            ]
        },
        {
            path: "/my",
            name: "My",
            component: My        },
        {
            path: "/part",
            name: "Part",
            component: Part        },

        {
            path: "*",
            component: NotFound //定义找不到已有组件时显示404
        },
]5. Use rules to generate routing objects
    // 创建路由对象并且传入规则const router = new VueRouter({
    routes,
mode: "history" //路由模式(默认为hash模式)})6. Inject the routing object into the new Vue instance
new Vue({
    router, //导入路由对象
render: h => h(App),}).$mount('#app')7. Use router-view as the mount point to switch between different Routing page
When the hash value path of the url is switched, the corresponding component in the rule is displayed
router-viewImplementation Where the routing content is, write the place that needs to be introduced when introducing components. It should be noted that when using vue-router to control routing, router-view must be used as a container. (You can first introduce the root component App.vue for self-test)
Note:Everything must be based on the hash value on the url
router-linkIt is vue-router that provides a global component- router-link will actually eventually be rendered into a link to attribute which is equivalent to providing the href attribute (toNo need#)
- router-link provides the function of declarative navigation highlighting (with its own class name)
The code is as follows :
<template>
  <div>
    <div class="footer_wrap">
      <router-link to="/find">发现音乐</router-link>
      <router-link to="/my">我的音乐</router-link>
      <router-link to="/part">朋友</router-link>
    </div>
    <div class="top">
      <router-view></router-view>
    </div>
  </div>
</template>
//在控制台元素检查时会发现激活的类名 在样式style中定义高亮样式 点击时就会高亮router-link Benefits: It comes with the class name when activated, which can be highlighted
is passed to the to attribute on the router-link. The syntax format is as follows:
(Method 1)
##The corresponding page component receives the passed valueto=/ path?Parameter name=value
Example:
to="/part?name=Xiao Ming"
$route.query.Parameter nameReceive data: $route.query.name(Method 2)
to="/path/value" (/path/: parameter name needs to be configured in routing rules) Example:The corresponding page component receives the passed value (note that dynamic parameters need to be received with params)to="/part/小王"
Configuration:path:"/part/:username"
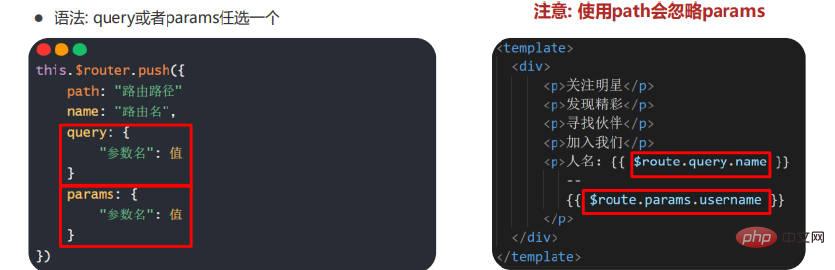
$route.params.Parameter nameReceive data: $route.params.username3. Programming - use JS code to jumpUse JS code to jumpSyntax: Choose either path or name1. The difference between
and $ route $router: It is a routing operation object, a write-only object
$route: A routing information object, a read-only object
$ router operation route jump
this.$router.push({ name:‘hello’, query:{ name:‘word’, age:‘11’ } })$route reads routing parameters and receives
var name = this.$route.query.name;
path and name routing jump methods can both be passed using query parameters
Using path method to jump routing path will ignore params, so path cannot be used with paramsIt is recommended to use name and query methods to implement route jump
When passing parameters in params, push can only be name:'xxx', not path:'/xxx', because params can only use name to introduce routes. If path is written here, the parameter receiving page will be undefined! ! !
Passing parameters through params
==Note: ==You don’t need to addAnother page receives:/# when using the name route jump method here. ## Because it is just a name
this.$router.push({
    name:"Home",
    params:{
        id:this.id    }})
Copy after login
You need to use params to pass parameters here Write params to receive
Pass parameters through querythis.$route.params.idCopy after login
this.$router.push({
    path:"/Search",
    query:{ //query是个配置项
        age:20
}})this.$route.query.age
uery Passing parameters **
this.$router.push({
    path:"/Search",
    query:{ //query是个配置项
        age:20
}})this.$route.query.age
query is equivalent to a GET request. When the page jumps, you can see the request parameters in the address bar.
The above is the detailed content of Super detailed! Summarize the 3 ways Vue implements routing jumps!. For more information, please follow other related articles on the PHP Chinese website!


![[Web front-end] Node.js quick start](https://img.php.cn/upload/course/000/000/067/662b5d34ba7c0227.png)


