 Web Front-end
 Vue.js
 How to communicate between Vue components? Several ways of component communication
How to communicate between Vue components? Several ways of component communication
VueHow to communicate between components? The following article will introduce you to the communication method of Vue components. I hope it will be helpful to you!

#The two major features of vue are responsive programming and componentization. Component is the core function of Vue, but the scope of each component instance is independent of each other, which means that data between different components cannot directly reference each other. If you want to reference data across components, you need to use component communication. Before communicating, you must first understand the relationship between components:
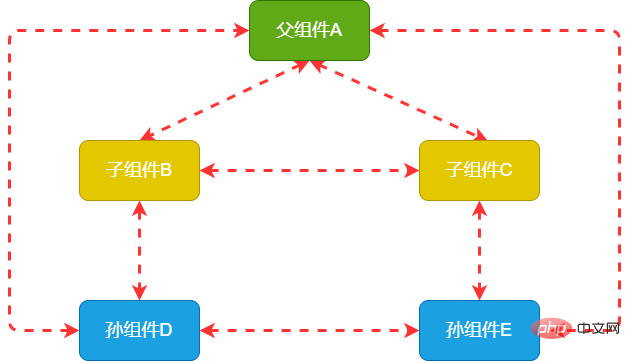
As shown in the figure above:
Father-son relationship: A and B, A and C, B and D, C and E
Brother relationship: B and C
Intergenerational relationship (maybe more generations apart): A and D, A and E
Level relationship: B and E, D and E, etc.
Communication method
1.props/$emit
The parent component binds a custom property through v-bind, and the child component receives the data from the parent component through props; the child component The component triggers the event through $emit, and the parent component uses on() or uses v-on on the custom tag of the child component to listen for events triggered by the child component. Customize events to receive data from subcomponents. (Learning video sharing: vue video tutorial)
1. Parent component passes value to child component
The following uses an example to illustrate the parent component Pass the value to the child component. The parent component parent.vue passes the data books:['JavaScript Advanced Programming', 'CSS New World', 'Illustrated HTTP Color Edition'] to the child component child.vue. And displayed in child.vue
// 父组件parent.vue
<template>
<div>
<child></child>
</div>
</template>
<script>
import Child from './components/Child.vue'
export default {
name: 'parent',
components: {
Child
},
data() {
return {
books: ['JavaScript高级程序设计', 'CSS新世界', '图解 HTTP 彩色版']
}
}
}
</script>// 子组件child.vue
<template>
<div>
<ul>
<li>{{item}}</li>
</ul>
</div>
</template>
<script>
export default {
props: {
books: {
type: Array,
default: () => {
return []
}
}
}
}
</script>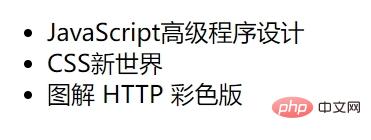
Note: Passing data through props is one-way. When the parent component data changes, it will be passed to the child component, but the child component cannot modify the props. The passed data is used to modify the corresponding state of the parent component, which is the so-called one-way data flow.
2. The child component passes the value to the parent component
Next, click the book list through the child component, trigger it with $emit(), and then get it from the parent component
// 子组件child.vue
<template>
<div>
<ul>
<li>{{item}}</li>
</ul>
</div>
</template>
<script>
export default {
props: {
books: {
type: Array,
default: () => {
return []
}
}
},
methods: {
like(item) {
this.$emit('likeBook', item)
}
}
}
</script>// 父组件parent.vue
<template>
<div>
<child></child>
</div>
</template>
<script>
import Child from './components/Child.vue'
export default {
name: 'parent',
components: {
Child
},
data() {
return {
books: ['JavaScript高级程序设计', 'CSS新世界', '图解 HTTP 彩色版']
}
},
methods: {
likeBook(val) {
alert('我最喜欢的书籍是《' + val + '》')
}
}
}
</script>
2. $parent/$children
- $parent: access the parent component instance
- $children: access child component instances
// 父组件parent.vue
<template>
<div>
<child></child>
<button>获取子组件数据</button>
</div>
</template>
<script>
import Child from './components/Child.vue'
export default {
name: 'parent',
components: {
Child
},
data() {
return {
books: ['JavaScript高级程序设计', 'CSS新世界', '图解 HTTP 彩色版']
}
},
methods: {
getChildData() {
alert(this.$children[0].msg)
}
}
}
</script>// 子组件child.vue
<template>
<div>
<ul>
<li>{{item}}</li>
</ul>
</div>
</template>
<script>
export default {
name: 'child',
data() {
return {
bookLists: [],
msg: '我是子组件的值!'
}
},
mounted() {
this.bookLists = this.$parent.books
}
}
</script>Note: $parent gets the object, if there is no parent component at the top level What you get is undefined; what you get in $children is an array. If there are no sub-components on the bottom layer, you get an empty array; these two communication methods only Can be used for parent-child component communication
3.ref
#If ref is used on a normal Dom element, the reference points to the DOM element; if used on a child component, The reference points to the component instance, and the component's methods and data can be directly called through the instance
// 父组件parent.vue
<template>
<div>
<child></child>
<button>获取子组件数据</button>
</div>
</template>
<script>
import Child from './components/Child.vue'
export default {
name: 'parent',
components: {
Child
},
methods: {
getChildData() {
const msg = this.$refs['child'].msg
console.log(msg)
this.$refs['child'].say()
}
}
}
</script>// 子组件child.vue
<script>
export default {
name: 'child',
data() {
return {
msg: '我是子组件的值!'
}
},
methods: {
say() {
alert('你好,我是子组件!')
}
},
}
</script> 4. provide/inject
The ancestor component passes ##provide to provide variables, descendant components inject variables through inject to obtain the data of ancestor components. No matter how deeply the descendant components are nested, as long as inject is called, the data in provide can be injected. . The following is the specific code:
// 父组件
<template>
<div>
<h1 id="康熙">康熙</h1>
<son></son>
</div>
</template>
<script>
import Son from './components/Son.vue'
export default {
components: {
Son
},
provide() {
return {
FatherToSon: this.FatherToSon,
FatherToGrandson: this.FatherToGrandson,
}
},
data() {
return {
FatherToSon: '我是康熙,雍正,你是我儿子!',
FatherToGrandson: '我是康熙,乾隆,你是我孙子!',
}
}
}
</script>// 子组件
<template>
<div>
<h1 id="雍正">雍正</h1>
<button>接收</button>
<grandson></grandson>
</div>
</template>
<script>
import Grandson from './Grandson.vue'
export default {
components: {
Grandson
},
inject: ['FatherToSon'],
methods: {
receive() {
alert(this.FatherToSon)
}
}
}
</script>// 孙组件
<template>
<div>
<h1 id="乾隆">乾隆</h1>
<button>接收</button>
</div>
</template>
<script>
export default {
inject: ['FatherToGrandson'],
methods: {
receive() {
alert(this.FatherToGrandson)
}
}
}
</script>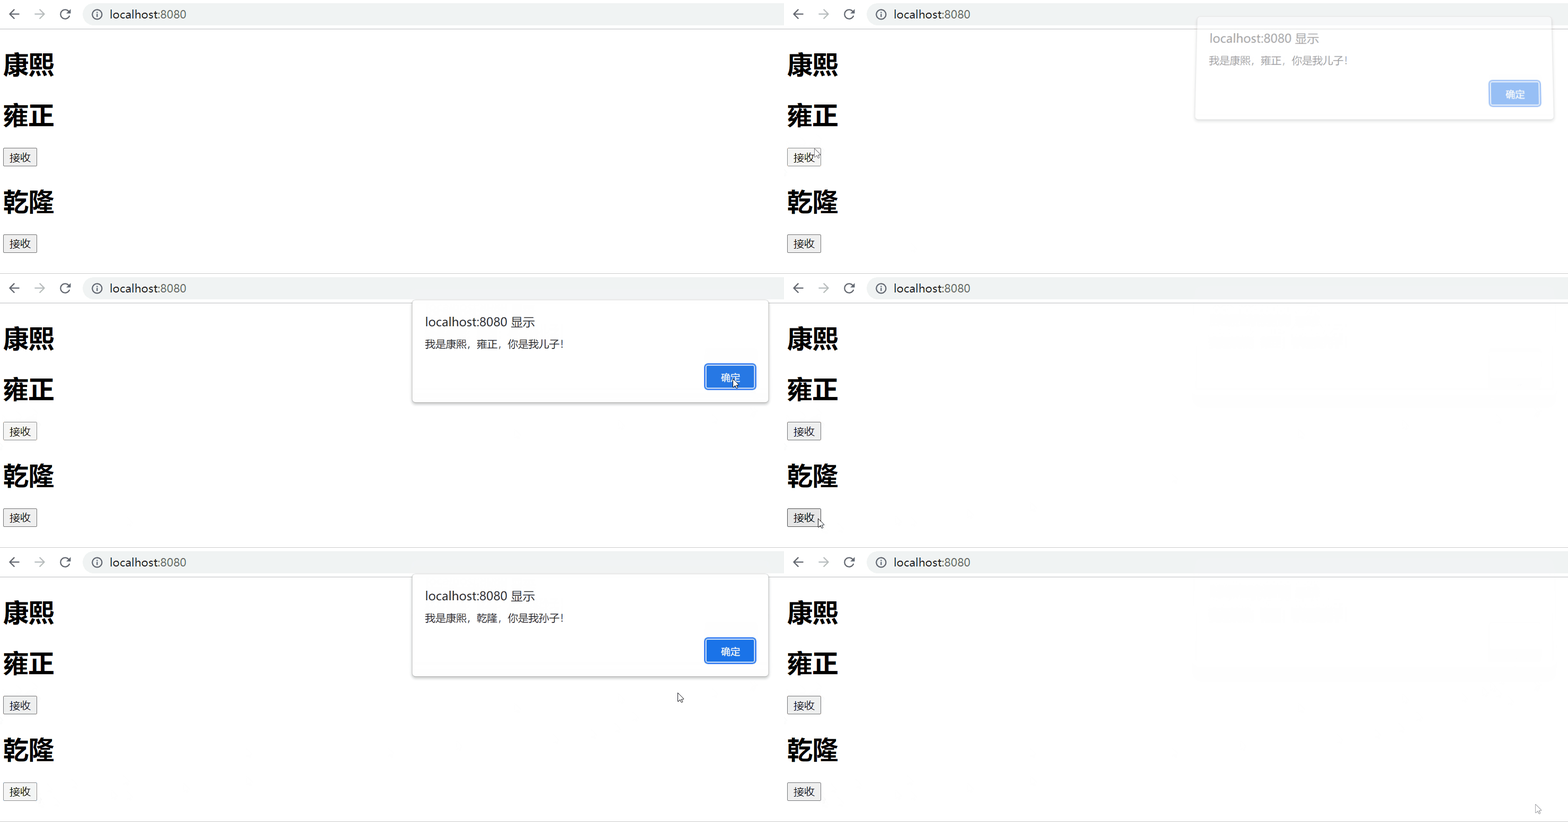 Note: provide/inject can only pass values from top to bottom, and is not responsive. If you want to become a responsive data provide, you need to provide a function
eventBus/$on
eventBus is a way of message passing, based on a The message center, the mode of subscribing and publishing messages, is called the publish-subscriber mode. eventBus is also called event bus. In Vue, eventBus can be used as a communication bridge concept. It is like all components share the same event center and can register to send events or receive events to the center, so components can notify other components in parallel up and down.
-
$emit('name',args): name:发布的消息名称 , args:发布的消息 -
$on('name',fn): name:订阅的消息名称, fn: 订阅的消息 -
$once('name',fn): name:订阅的消息名称, fn: 订阅的消息。与$on相似但是只触发一次,一旦触发之后,监听器就会被移除 -
$off('name',callback):name:事件名称,callback:回调监听器
eventbus可以实现任何组件之前的通信,下面以兄弟组件为例1、初始化,全局引入
// main.js
// 全局添加事件总线
Vue.prototype.$bus = new Vue()
2、发送事件
在parent.vue引入ChildA和ChildB组件,使它们成为兄弟组件
// 父组件parent.vue
<template>
<div>
<childa></childa>
<childb></childb>
</div>
</template>
<script>
import ChildA from './components/childA'
import ChildB from './components/childB'
export default {
components: {
ChildA,
ChildB
}
}
</script>在ChildA组件中用$emit发送事件
// ChildA组件
<template>
<div>
<h1 id="组件A">组件A</h1>
<button>发送</button>
</div>
</template>
<script>
export default {
methods: {
// 发送事件
send() {
this.$bus.$emit('message', '欢迎使用eventBus!')
}
}
}
</script>3、接收事件发送的事件
在ChildB组件中用$on接收ChildA发送的事件
// ChildB组件
<template>
<div>
<h1 id="组件B">组件B</h1>
</div>
</template>
<script>
export default {
mounted() {
// 接收事件
this.$bus.$on('message', data => {
alert('我是组件B,我收到的消息为:' + data)
})
},
beforeDestroy() {
this.$bus.$off('message')
}
}
</script>注意:$on监听的事件不会自动移除监听,因此在不用时最好使用$off移除监听以免产生问题
六、$attrs/$listeners
1、简介
当组件为两级嵌套时,一般采用props和$emit,但遇到多级组件嵌套时这种方法就不太适用了,如果不做中间处理,只传递数据用How to communicate between Vue components? Several ways of component communication有点大材小用了。因此在vue2.4中为了解决这一需求,便引入了$attrs和$listeners, 新增了inheritAttrs属性
-
$attrs:当父组件传递了很多数据给子组件时,子组件没有声明props来进行接收,么子组件中的attrs属性就包含了所有父组件传来的数据(除开已经props声明了的);子组件还可以使用v−bind="$attrs"的形式将所有父组件传来的数据(除开已经props声明了的)传向下一级子组件,通常和interitAttrs属性一起使用。 -
$listeners:包含了父组件中(不含.native修饰器的)v-on 事件监听器,通过v-on="$listeners",可以将这些事件绑定给它自己的子组件2、实例
下面看一个例子:
// 父组件
<template>
<div>
<childa></childa>
</div>
</template>
<script>
import ChildA from './components/childA'
export default {
name: 'parent',
components: {
ChildA,
},
data() {
return {
name: '小明',
age: 18,
sex: '男'
}
},
methods: {
// 获取名字
getName() {
console.log('我的名字是' + this.name)
},
// 获取年龄
getAge() {
console.log('我今年' + this.age + '岁');
}
}
}
</script>// 子组件A
<template>
<div>
<h1 id="组件A">组件A</h1>
{{ msgA }}
<hr>
<childb></childb>
</div>
</template>
<script>
import ChildB from './childB.vue'
export default {
name: 'ChildA',
components: {
ChildB
},
data() {
return {
msgA: null,
height: '175cm'
}
},
props: {
sex: {
type: String,
default: ''
}
},
mounted() {
this.msgA = this.$attrs
console.log('组件A获取的$listeners:', this.$listeners)
},
methods: {
// 获取身高
getHeight() {
console.log('我的身高是' + this.height);
}
}
}
</script>// 孙组件B
<template>
<div>
<h1 id="组件B">组件B</h1>
{{ msgB }}
</div>
</template>
<script>
export default {
name: 'ChildB',
data() {
return {
msgB: null
}
},
mounted() {
this.msgB = this.$attrs
console.log('组件B获取的$listeners:', this.$listeners)
}
}
</script>$attrs获取的结果: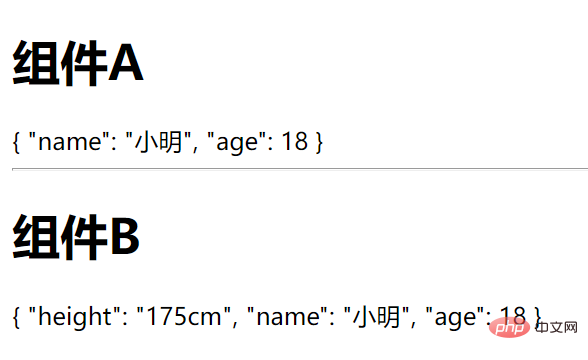
$listeners获取的结果:
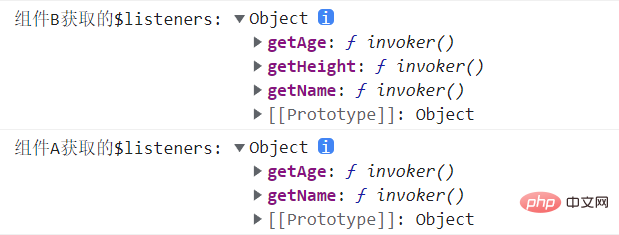
如代码和图所示组件A中props声明接收了sex属性,因此组件中$attrs获取的是父组件中绑定的除去sex属性的值;组件A中使用了v-bind="$attrs"和v-on="$listeners",则组件B获取不仅是组件A中本身绑定的属性和方法还包含组件A获取父组件绑定的属性和方法
3、inheritAttrs
如果父组件传递了很多参数给子组件,而子组件没有用props完全接收,那么没有接收的这些属性作为普通的 HTML attribute 应用在子组件的根元素上
如果你不希望子组件的根元素继承特性,你可以在组件的选项中设置inheritAttrs: false
以上面的组件B为例,当How to communicate between Vue components? Several ways of component communication(inheritAttrs默认为true)
当How to communicate between Vue components? Several ways of component communication
// 孙组件B
export default {
  name: 'ChildB',
  inheritAttrs: false,
  data() {
    return {
      msgB: null
    }
  },
  mounted() {
    this.msgB = this.$attrs
    console.log('组件B获取的$listeners:', this.$listeners)
  }
}
七、Vuex
1、Vuex概述
Vuex 是一个专为 Vue.js 应用程序开发的状态管理模式 + 库。它采用集中式存储管理应用的所有组件的状态,并以相应的规则保证状态以一种可预测的方式发生变化。
状态管理包含以下几个部分: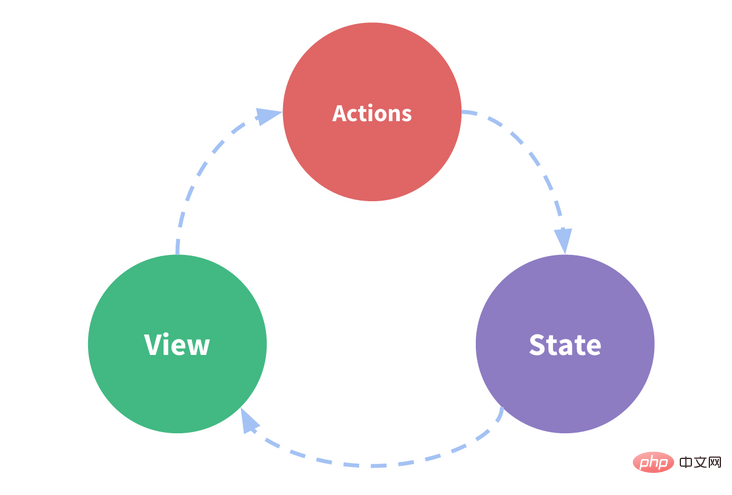
- 状态(State),驱动应用的数据源
- 视图(View),以声明方式将状态映射到视图;
- 操作(Actions),响应在视图上的用户输入导致的状态变化
视图发生变化会导致数据源的改变,数据源发生变化则会改变视图,则上面表示是一个“单向数据流”。但是当我们的应用遇到多个组件共享状态时,单向数据流的简洁性很容易被破坏:
- 多个视图依赖于同一状态。
- 来自不同视图的行为需要变更同一状态。
因此,为了解决这种问题我们把组件的共享状态抽取出来,以一个全局单例模式管理。在这种模式下,我们的组件树构成了一个巨大的“视图”,不管在树的哪个位置,任何组件都能获取状态或者触发行为!
通过定义和隔离状态管理中的各种概念并通过强制规则维持视图和状态间的独立性,我们的代码将会变得更结构化且易维护。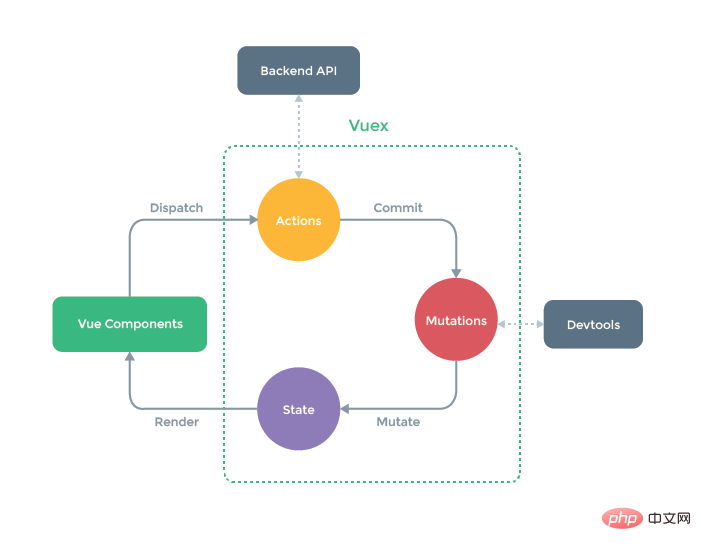
2、 Vuex各个模块
1、state:存储应用中需要共享的状态,是Vuex中的唯一数据源。
2、getters:类似Vue中的计算属性computed,getter 的返回值会根据它的依赖被缓存起 来,且只有当它的依赖值发生了改变才会被重新计算。
3、mutations:更改 Vuex 的 store 中的状态(state)的唯一方法,且mutation 必须是同步函数
4、actions:类似于 mutation,提交的是 mutation,而不是直接变更状态;可以包含任意异步操作
5、modules:将 store 分割成模块(module)。每个模块拥有自己的 state、mutation、action、getter、甚至是嵌套子模块——从上至下进行同样方式的分割
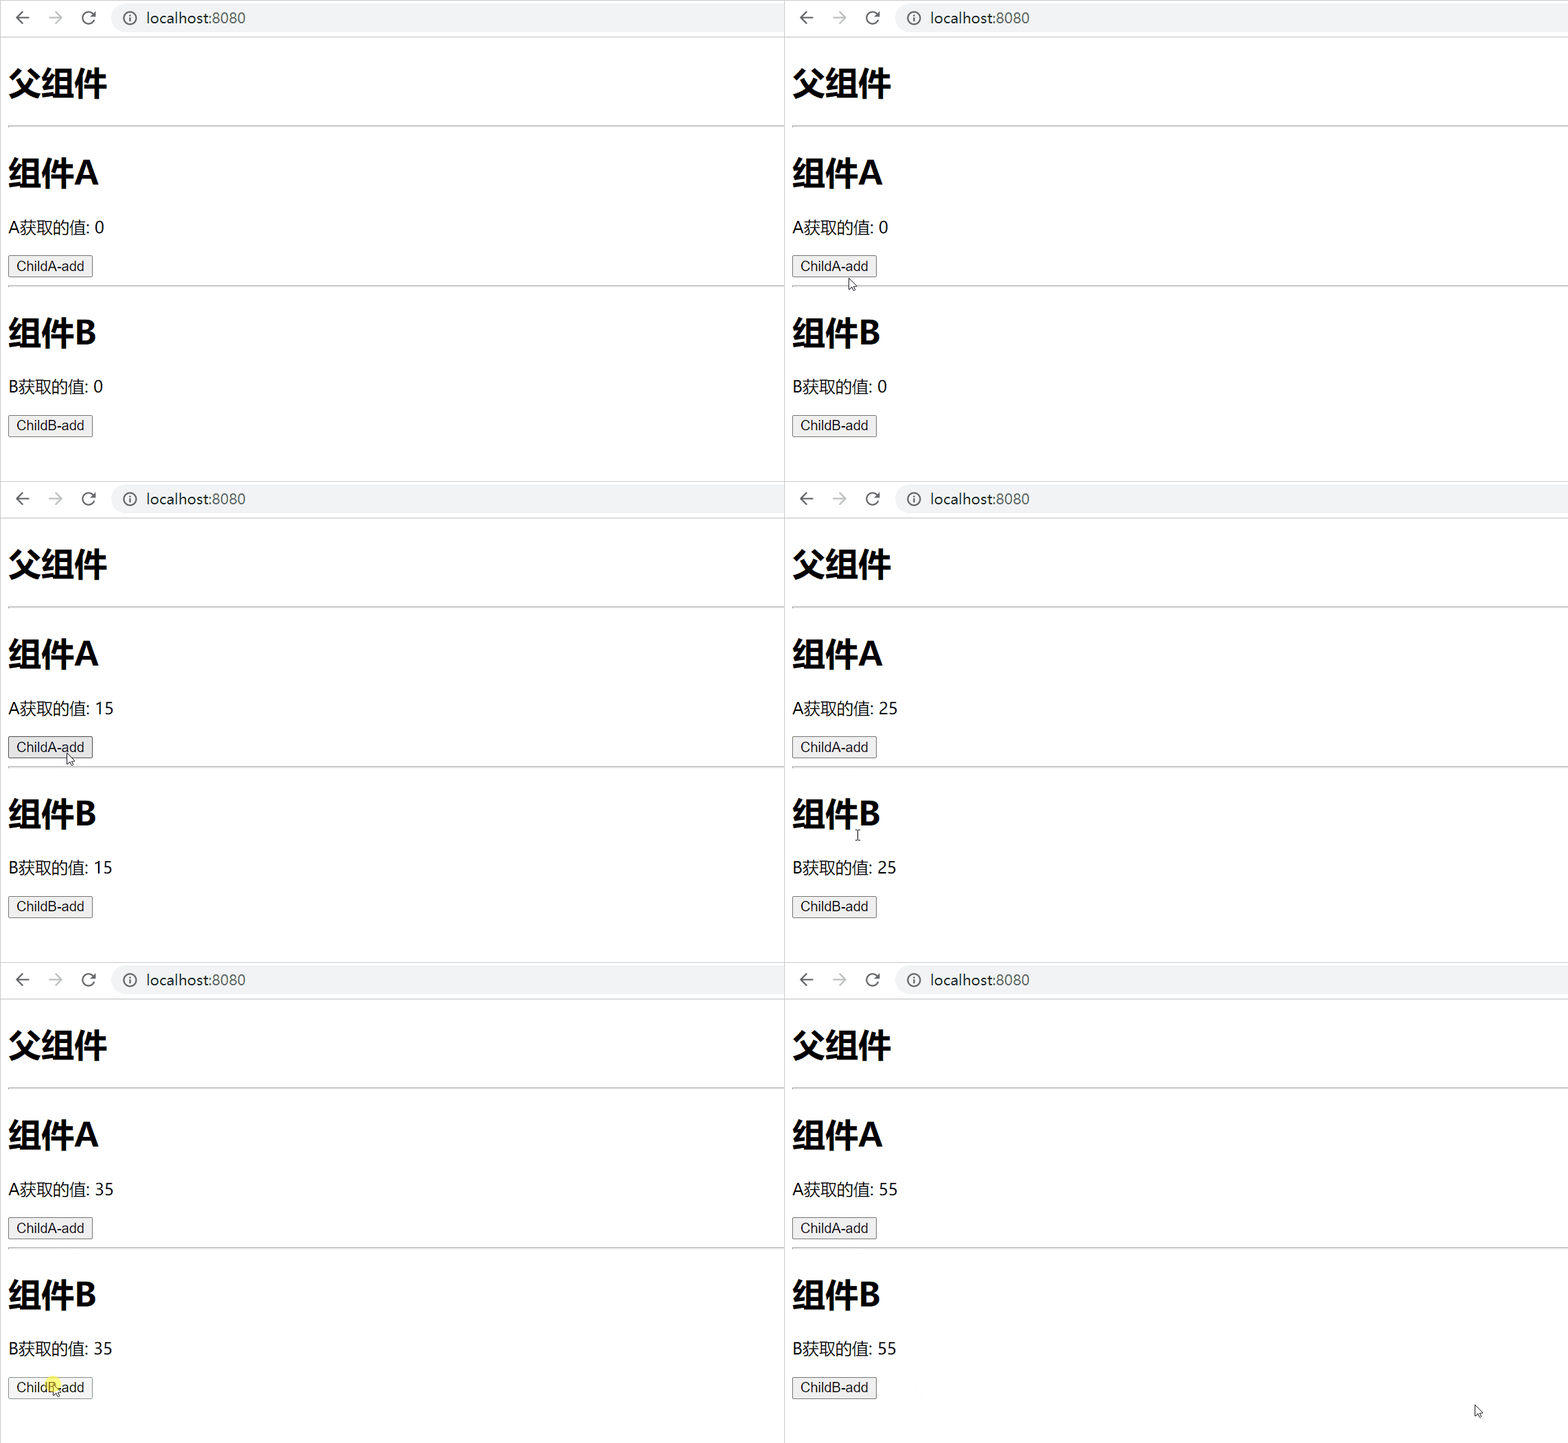
3、Vuex举例
// 父组件
<template>
<div>
<h1 id="父组件">父组件</h1>
<hr>
<childa></childa>
<hr>
<childb></childb>
</div>
</template>
<script>
import ChildA from './components/ChildA'
import ChildB from './components/ChildB'
export default {
name: 'parent',
components: {
ChildA,
ChildB
}
}
</script>// 子组件A
<template>
<div>
<h1 id="组件A">组件A</h1>
<p>A获取的值: {{ count }}</p>
<button>ChildA-add</button>
</div>
</template>
<script>
export default {
computed: {
count() {
return this.$store.state.count
}
},
methods: {
// 改变store里count的值
add(num) {
this.$store.dispatch('countAdd', num)
}
}
}
</script>
<style>
</style>// 子组件B
<template>
<div>
<h1 id="组件B">组件B</h1>
<p>B获取的值: {{ countB }}</p>
<button>ChildB-add</button>
</div>
</template>
<script>
import { mapMutations, mapGetters } from 'How to communicate between Vue components? Several ways of component communication'
export default {
computed: {
...mapGetters({
countB: 'getCount'
})
},
methods: {
...mapMutations(['countAdd']),
// 改变store里count的值
add(num) {
this.countAdd(num)
}
}
}
</script>
<style>
</style>store.js
import Vue from 'vue'
import Vuex from 'How to communicate between Vue components? Several ways of component communication'

Vue.use(Vuex)

export default new Vuex.Store({
  state: {
    count: 0,
  },
  getters: {
    getCount: (state) => {
      return state.count
    }
  },
  mutations: {
    countAdd(state, num) {
      state.count += num
    }
  },
  actions: {
    countAdd(context, num) {
      context.commit('countAdd', num)
    }
  },
  modules: {
  }
})
八、localStorage/sessionStorage
1、介绍
localStorage:本地存储对象,存储的数据是永久性数据,页面刷新,即使浏览器重启,除非主动删除不然存储的数据会一直存在
sessionStorage:与localStorage相似,但是只有在当前页面下有效,关闭页面或浏览器存储的数据将会清空
localStorage和sessionStorage常用的API:
setItem (key, value) ——  保存数据,以键值对的方式储存信息。
getItem (key) ——  获取数据,将键值传入,即可获取到对应的value值。
removeItem (key) ——  删除单个数据,根据键值移除对应的信息。
clear () ——  删除所有的数据
key (index) —— 获取某个索引的key
2、举例
// 存储
setItem() {
  window.localStorage.setItem('name1', '小明')
  window.sessionStorage.setItem('name2', '小红')
}// 接收
receive() {
const name1 = window.localStorage.getItem('name1')
const name2 = window.sessionStorage.getItem('name2')
console.log(name1) // 打印结果为:小明
console.log(name2) // 打印结果为:小红
}3、setItem()和getItem()使用时的类型转换
localStorage和sessionStorage通过setItem()存储数据会自动转换为String类型,但是通过getItem()其类型并不会转换回来(localStorage和sessionStorage使用方法一样,下面均以localStorage为例)
const num = 1
window.localStorage.setItem('num', num)

const numRec = window.localStorage.getItem('num')
console.log(numRec, typeof(numRec)) // 1 string因此正确的存储方式应该为:存储之前用JSON.stringify()方法将数据转换成json字符串形式;需要使用数据的时候用JSON.parse()方法将之前存储的字符串转换成json对象
const num = 1
window.localStorage.setItem('num', JSON.stringify(num))
const obj = {
   name: '小红',
   age: 18
 }
window.localStorage.setItem('obj', JSON.stringify(obj))

const numRec = JSON.parse(window.localStorage.getItem('num'))
console.log(numRec, typeof(numRec)) // 1 'number'
const objRec = JSON.parse(window.localStorage.getItem('obj'))
console.log(objRec, typeof(objRec)) // {name: '小红', age: 18} 'object'注意:localStorage.setItem()和sessionStorage.setItem()不能直接存储对象,必须使用JSON.stringify()和JSON.parse()转换实现
总结
以上8种通信方式主要应用在以下三类场景:
-
Communication between parent and child components: The most commonly used communication method is
props/$emit, and single parent-child component communication uses$parent>/$childrenis also more convenient; parent components often userefto obtain child component instances; you can also useprovide/inject,$attrs/$listeners, andlocalStorage/sessionStorage -
Brother component communication: Simple data transfer can use
eventBus$emit/$on; complex data can useVuexis more convenient; you can also uselocalStorage/sessionStorage; -
Cross-level component communication: Communication methods for nested components such as father, son, and grandson Use
provide/injectand$attrs/$listeners; the data communicated across level components can be used if it is not complicatedeventBusandlocalStorage/sessionStorage; if the data is complex, you can useVuex, but be aware that the data stored in Vuex will disappear when you refresh the interface
End
This article simply records the commonly used component communication methods, and does not introduce its details in depth. If there are any mistakes, please correct me
( Learning video sharing: web front-end development, Basic programming video)
The above is the detailed content of How to communicate between Vue components? Several ways of component communication. For more information, please follow other related articles on the PHP Chinese website!

Hot AI Tools

Undresser.AI Undress
AI-powered app for creating realistic nude photos

AI Clothes Remover
Online AI tool for removing clothes from photos.

Undress AI Tool
Undress images for free

Clothoff.io
AI clothes remover

AI Hentai Generator
Generate AI Hentai for free.

Hot Article

Hot Tools

Notepad++7.3.1
Easy-to-use and free code editor

SublimeText3 Chinese version
Chinese version, very easy to use

Zend Studio 13.0.1
Powerful PHP integrated development environment

Dreamweaver CS6
Visual web development tools

SublimeText3 Mac version
God-level code editing software (SublimeText3)

Hot Topics
 1378
1378
 52
52
 In-depth discussion of how vite parses .env files
Jan 24, 2023 am 05:30 AM
When using the Vue framework to develop front-end projects, we will deploy multiple environments when deploying. Often the interface domain names called by development, testing and online environments are different. How can we make the distinction? That is using environment variables and patterns.
 Detailed graphic explanation of how to integrate the Ace code editor in a Vue project
Apr 24, 2023 am 10:52 AM
Ace is an embeddable code editor written in JavaScript. It matches the functionality and performance of native editors like Sublime, Vim, and TextMate. It can be easily embedded into any web page and JavaScript application. Ace is maintained as the main editor for the Cloud9 IDE and is the successor to the Mozilla Skywriter (Bespin) project.
 Let's talk in depth about reactive() in vue3
Jan 06, 2023 pm 09:21 PM
Foreword: In the development of vue3, reactive provides a method to implement responsive data. This is a frequently used API in daily development. In this article, the author will explore its internal operating mechanism.
 Explore how to write unit tests in Vue3
Apr 25, 2023 pm 07:41 PM
Vue.js has become a very popular framework in front-end development today. As Vue.js continues to evolve, unit testing is becoming more and more important. Today we’ll explore how to write unit tests in Vue.js 3 and provide some best practices and common problems and solutions.
 A simple comparison of JSX syntax and template syntax in Vue (analysis of advantages and disadvantages)
Mar 23, 2023 pm 07:53 PM
In Vue.js, developers can use two different syntaxes to create user interfaces: JSX syntax and template syntax. Both syntaxes have their own advantages and disadvantages. Let’s discuss their differences, advantages and disadvantages.
 A brief analysis of how vue implements file slicing upload
Mar 24, 2023 pm 07:40 PM
In the actual development project process, sometimes it is necessary to upload relatively large files, and then the upload will be relatively slow, so the background may require the front-end to upload file slices. It is very simple. For example, 1 A gigabyte file stream is cut into several small file streams, and then the interface is requested to deliver the small file streams respectively.
 Analyze the principle of Vue2 implementing composition API
Jan 13, 2023 am 08:30 AM
Since the release of Vue3, the word composition API has entered the field of vision of students who write Vue. I believe everyone has always heard how much better the composition API is than the previous options API. Now, due to the release of the @vue/composition-api plug-in, Vue2 Students can also get on the bus. Next, we will mainly use responsive ref and reactive to conduct an in-depth analysis of how this plug-in achieves this.
 Detailed example of vue3 realizing the typewriter effect of chatgpt
Apr 18, 2023 pm 03:40 PM
When I was working on the chatgpt mirror site, I found that some mirror sites did not have typewriter cursor effects, but only text output. Did they not want to do it? I want to do it anyway. So I studied it carefully and realized the effect of typewriter plus cursor. Now I will share my solution and renderings~


