
 Backend Development
Python Tutorial
Briefly introduce the example of automatic downloading of emails in Python
Backend Development
Python Tutorial
Briefly introduce the example of automatic downloading of emails in Python
Briefly introduce the example of automatic downloading of emails in Python

This article brings you relevant knowledge about Python. It introduces in detail how to use Python language to realize automatic downloading of emails and attachment parsing functions. The sample code in the article is explained in detail. Let’s take a look. Take a look, hope it helps everyone.

[Related recommendations: Python3 video tutorial ]
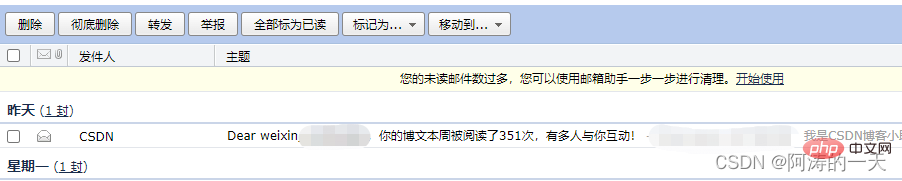
Before we start coding, let’s first understand the three email service protocols :
1. SMTP protocol
SMTP (Simple Mail Transfer Protocol), which is the simple mail transfer protocol. It is equivalent to a transfer station and sends emails to the client.
2. POP3 Protocol
POP3 (Post Office Protocol 3), the third version of the post office protocol, is the first offline protocol standard for email. This protocol downloads emails to the local computer and does not synchronize with the server. The disadvantage is that it is more likely to lose emails or download the same emails multiple times.
3. IMAP protocol
IMAP (Internet Mail Access Protocol), which is the interactive mail access protocol. This protocol connects to remote mailboxes for direct operation and synchronizes content with the server.
Then introduce the email package
The central component of this package is the "object model" that represents the email message. Applications interact with this package primarily through the object model interface defined in the message submodule. Applications can use this API to ask questions about existing emails, construct new emails, or add or remove email subcomponents that themselves use the same object model interface. That is, following the nature of email messages and their MIME subcomponents, the email object model is a tree structure of all objects that provide the EmailMessage API.
Next, we use specific code to implement the functions of logging in to the email client, downloading emails, and parsing the content of email attachments.
First we need to define an email parsing class, which requires three variables:
1. The imap service address to which the email belongs;
2. Email account;
3. Email password [Note: Different email addresses require different security policies. For example, qq email requires SMS verification to obtain a login authorization code instead of a clear text password to log in to the remote client]
class Email_parse:

    def __init__(self,remote_server_url,email_url,password):
    	# imap服务地址
        self.remote_server_url = remote_server_url
        # 邮箱账号
        self.email_url = email_url
        # 邮箱密码
self.password = passwordThen Define the entry function in the class, log in remotely, and get all the emails on the first page by default. We get the subject of the email and print it out [The encoding of different email subjects may be different, and the binary needs to be transcoded to display correctly]
def main_parse_Email(self):
"""入口函数,登录imap服务"""
server = imaplib.IMAP4_SSL(self.remote_server_url, 993)
server.login(self.email_url, self.password)
server.select('INBOX')
status,data = server.search(None,"ALL")
if status != 'OK':
raise Exception('read email error')
emailids = data[0].split()
mail_counts = len(emailids)
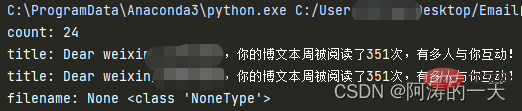
print("count:",mail_counts)
# 邮件的遍历是按时间从后往前,这里我们选择最新的一封邮件
for i in range(mail_counts - 1, mail_counts - 2, -1):
status, edata = server.fetch(emailids[i], '(RFC822)')
msg = email.message_from_bytes(edata[0][1])
#获取邮件主题title
subject = email.header.decode_header(msg.get('subject'))
if type(subject[-1][0]) == bytes:
title = subject[-1][0].decode(str(subject[-1][1]))
elif type(subject[-1][0]) == str:
title = subject[-1][0]
print("title:", title)Among them, the msg variable saves the body of the email, which will be reused later. To msg and tilt, we will construct a class function to return msg and title.
    def get_email_title(msg):
        subject = email.header.decode_header(msg.get('subject'))
        if type(subject[-1][0]) == bytes:
            title = subject[-1][0].decode(str(subject[-1][1]))
        elif type(subject[-1][0]) == str:
            title = subject[-1][0]
        print("title:", title)
return titleWhen parsing the email, we divide it into two parts, the email body [HTML] and the attachment [xlsx, etc.]. If we determine that there is an attachment, we will save it to a fixed path. I won’t go into details about the parsing of the table. Packages such as pandas are enough to handle it.
    def get_att(msg):
        """获取附件并下载"""
        filename = Email_parse.get_email_name(msg)
        for part in msg.walk():
            file_name = part.get_param("name")
            if file_name:
                data = part.get_payload(decode=True)
                if data != None:
                    att_file = open('./src/' + filename, 'wb')
                    att_file.write(data)
                    att_file.close()
                else:
passFor the email body content, we directly parse the html and save the text content directly to the .txt file for easy reading.
    def get_text_from_HTML(msg):
        """获取邮件中的html"""
        filename = Email_parse.get_email_name(msg)
        current_title = Email_parse.get_email_title(msg)
        print("filename:",filename,type(filename))
        for part in msg.walk():
            if not part.is_multipart():
                result = part.get_payload(decode=True)
                result = result.decode('gbk')
                f = open(f'./src/{current_title}.txt','w')
                f.write(result)
                f.close()
return resultThe complete code is as follows:
import email
import imaplib
from email.header import decode_header
import pandas as pd
import datetime


class Email_parse:
    def __init__(self,remote_server_url,email_url,password):
        self.remote_server_url = remote_server_url
        self.email_url = email_url
        self.password = password

    def get_att(msg):
        filename = Email_parse.get_email_name(msg)
        for part in msg.walk():
            file_name = part.get_param("name")
            if file_name:
                data = part.get_payload(decode=True)
                if data != None:
                    att_file = open('./src/' + filename, 'wb')
                    att_file.write(data)
                    att_file.close()
                else:
                    pass

    def get_email_title(msg):
        subject = email.header.decode_header(msg.get('subject'))
        if type(subject[-1][0]) == bytes:
            title = subject[-1][0].decode(str(subject[-1][1]))
        elif type(subject[-1][0]) == str:
            title = subject[-1][0]
        print("title:", title)
        return title


    def get_email_name(msg):
        for part in msg.walk():
            file_name = part.get_param("name")
            if file_name:
                h = email.header.Header(file_name)
                dh = email.header.decode_header(h)
                filename = dh[0][0]
                if dh[0][1]:
                    value, charset = decode_header(str(filename, dh[0][1]))[0]
                    if charset:
                        filename = value.decode(charset)
                        print("附件名称:", filename)
                        return filename


    def main_parse_Email(self):
        server = imaplib.IMAP4_SSL(self.remote_server_url, 993)
        server.login(self.email_url, self.password)
        server.select('INBOX')
        status,data = server.search(None,"ALL")
        if status != 'OK':
            raise Exception('read email error')
        emailids = data[0].split()
        mail_counts = len(emailids)
        print("count:",mail_counts)
        for i in range(mail_counts - 1, mail_counts - 2, -1):
            status, edata = server.fetch(emailids[i], '(RFC822)')
            msg = email.message_from_bytes(edata[0][1])
            subject = email.header.decode_header(msg.get('subject'))
            if type(subject[-1][0]) == bytes:
                title = subject[-1][0].decode(str(subject[-1][1]))
            elif type(subject[-1][0]) == str:
                title = subject[-1][0]
            print("title:", title)
            Email_parse.get_att(msg)
            Email_parse.get_text_from_HTML(msg)


    def get_text_from_HTML(msg):
        filename = Email_parse.get_email_name(msg)
        current_title = Email_parse.get_email_title(msg)
        print("filename:",filename,type(filename))
        for part in msg.walk():
            if not part.is_multipart():
                result = part.get_payload(decode=True)
                result = result.decode('gbk')
                f = open(f'./src/{current_title}.txt','w')
                f.write(result)
                f.close()
                return result

if __name__ == "__main__":
    remote_server_url = 'imap.qq.com'
    email_url = "*********@qq.com"
    password = "**********"
    demo = Email_parse(remote_server_url,email_url,password)
demo.main_parse_Email()Running results:
[Related recommendations:Python3 video tutorial】
The above is the detailed content of Briefly introduce the example of automatic downloading of emails in Python. For more information, please follow other related articles on the PHP Chinese website!

Hot AI Tools

Undresser.AI Undress
AI-powered app for creating realistic nude photos

AI Clothes Remover
Online AI tool for removing clothes from photos.

Undress AI Tool
Undress images for free

Clothoff.io
AI clothes remover

Video Face Swap
Swap faces in any video effortlessly with our completely free AI face swap tool!

Hot Article
Hot Tools

Notepad++7.3.1
Easy-to-use and free code editor

SublimeText3 Chinese version
Chinese version, very easy to use

Zend Studio 13.0.1
Powerful PHP integrated development environment

Dreamweaver CS6
Visual web development tools

SublimeText3 Mac version
God-level code editing software (SublimeText3)
Hot Topics
 1386
1386
 52
52

 Can visual studio code be used in python
Apr 15, 2025 pm 08:18 PM
Can visual studio code be used in python
Apr 15, 2025 pm 08:18 PM
VS Code can be used to write Python and provides many features that make it an ideal tool for developing Python applications. It allows users to: install Python extensions to get functions such as code completion, syntax highlighting, and debugging. Use the debugger to track code step by step, find and fix errors. Integrate Git for version control. Use code formatting tools to maintain code consistency. Use the Linting tool to spot potential problems ahead of time.
 How to run programs in terminal vscode
Apr 15, 2025 pm 06:42 PM
How to run programs in terminal vscode
Apr 15, 2025 pm 06:42 PM
In VS Code, you can run the program in the terminal through the following steps: Prepare the code and open the integrated terminal to ensure that the code directory is consistent with the terminal working directory. Select the run command according to the programming language (such as Python's python your_file_name.py) to check whether it runs successfully and resolve errors. Use the debugger to improve debugging efficiency.
 Can vs code run in Windows 8
Apr 15, 2025 pm 07:24 PM
Can vs code run in Windows 8
Apr 15, 2025 pm 07:24 PM
VS Code can run on Windows 8, but the experience may not be great. First make sure the system has been updated to the latest patch, then download the VS Code installation package that matches the system architecture and install it as prompted. After installation, be aware that some extensions may be incompatible with Windows 8 and need to look for alternative extensions or use newer Windows systems in a virtual machine. Install the necessary extensions to check whether they work properly. Although VS Code is feasible on Windows 8, it is recommended to upgrade to a newer Windows system for a better development experience and security.
 Is the vscode extension malicious?
Apr 15, 2025 pm 07:57 PM
Is the vscode extension malicious?
Apr 15, 2025 pm 07:57 PM
VS Code extensions pose malicious risks, such as hiding malicious code, exploiting vulnerabilities, and masturbating as legitimate extensions. Methods to identify malicious extensions include: checking publishers, reading comments, checking code, and installing with caution. Security measures also include: security awareness, good habits, regular updates and antivirus software.
 Python: Automation, Scripting, and Task Management
Apr 16, 2025 am 12:14 AM
Python: Automation, Scripting, and Task Management
Apr 16, 2025 am 12:14 AM
Python excels in automation, scripting, and task management. 1) Automation: File backup is realized through standard libraries such as os and shutil. 2) Script writing: Use the psutil library to monitor system resources. 3) Task management: Use the schedule library to schedule tasks. Python's ease of use and rich library support makes it the preferred tool in these areas.
 What is vscode What is vscode for?
Apr 15, 2025 pm 06:45 PM
What is vscode What is vscode for?
Apr 15, 2025 pm 06:45 PM
VS Code is the full name Visual Studio Code, which is a free and open source cross-platform code editor and development environment developed by Microsoft. It supports a wide range of programming languages and provides syntax highlighting, code automatic completion, code snippets and smart prompts to improve development efficiency. Through a rich extension ecosystem, users can add extensions to specific needs and languages, such as debuggers, code formatting tools, and Git integrations. VS Code also includes an intuitive debugger that helps quickly find and resolve bugs in your code.
 Can vs code run python
Apr 15, 2025 pm 08:21 PM
Can vs code run python
Apr 15, 2025 pm 08:21 PM
Yes, VS Code can run Python code. To run Python efficiently in VS Code, complete the following steps: Install the Python interpreter and configure environment variables. Install the Python extension in VS Code. Run Python code in VS Code's terminal via the command line. Use VS Code's debugging capabilities and code formatting to improve development efficiency. Adopt good programming habits and use performance analysis tools to optimize code performance.
 Can visual studio code run python
Apr 15, 2025 pm 08:00 PM
Can visual studio code run python
Apr 15, 2025 pm 08:00 PM
VS Code not only can run Python, but also provides powerful functions, including: automatically identifying Python files after installing Python extensions, providing functions such as code completion, syntax highlighting, and debugging. Relying on the installed Python environment, extensions act as bridge connection editing and Python environment. The debugging functions include setting breakpoints, step-by-step debugging, viewing variable values, and improving debugging efficiency. The integrated terminal supports running complex commands such as unit testing and package management. Supports extended configuration and enhances features such as code formatting, analysis and version control.
