

Redis shared session application implements SMS login


Recommended learning: Redis video tutorial
1. Implement SMS login based on session
1.1 SMS login flow chart
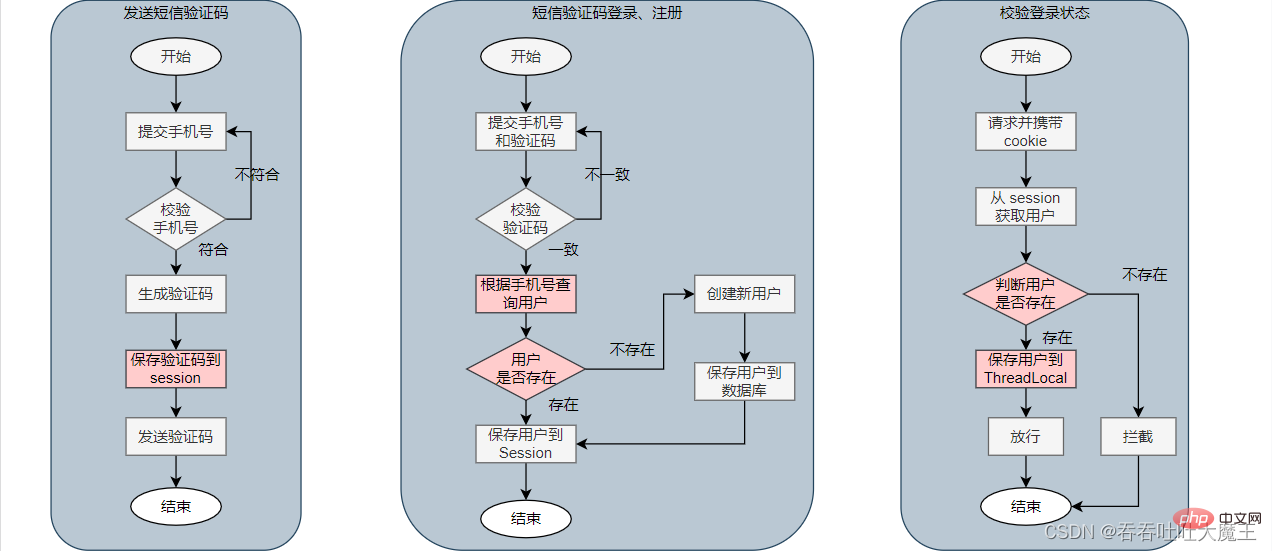
1.2 Implementation of sending SMS verification code
Front-end request instructions:
| Description | |
|---|---|
| Request method | POST |
| Request path | /user/code |
| Request parameters | phone(phone number) |
| Return value | None |
Back-end interface implementation:
@Slf4j
@Service
public class UserServiceImpl extends ServiceImpl<UserMapper, User> implements IUserService {

    @Override
    public Result sendCode(String phone, HttpSession session) {
        // 1. 校验手机号
        if(RegexUtils.isPhoneInvalid(phone)){
            // 2. 如果不符合,返回错误信息
            return Result.fail("手机号格式错误!");
        }
        // 3. 符合,生成验证码(设置生成6位)
        String code = RandomUtil.randomNumbers(6);
        // 4. 保存验证码到 session
        session.setAttribute("code", code);
        // 5. 发送验证码(这里并未实现,通过日志记录)
        log.debug("发送短信验证码成功,验证码:{}", code);
        // 返回 ok
        return Result.ok();
    }
}1.3 Implement SMS verification code login and registration
Front-end request instructions
| Description | |
|---|---|
| Request method | POST |
| /user/login | |
| phone (phone number); code (verification code) | |
| None |
@Slf4j
@Service
public class UserServiceImpl extends ServiceImpl<UserMapper, User> implements IUserService {

    @Override
    public Result login(LoginFormDTO loginForm, HttpSession session) {
        // 1. 校验手机号
        String phone = loginForm.getPhone();
        if(RegexUtils.isPhoneInvalid(phone)){
            // 不一致,返回错误信息
            return Result.fail("手机号格式错误!");
        }
        // 2. 校验验证码
        String cacheCode = (String) session.getAttribute("code");
        String code = loginForm.getCode();
        if(cacheCode == null || !cacheCode.equals(cacheCode)){
            // 不一致,返回错误信息
            return Result.fail("验证码错误!");
        }
        // 4. 一致,根据手机号查询用户(这里使用的 mybatis-plus)
        User user = query().eq("phone", phone).one();
        // 5. 判断用户是否存在
        if(user == null){
            // 6. 不存在,创建新用户并保存
            user = createUserWithPhone(phone);
        }
        	// 7. 保存用户信息到 session 中(通过 BeanUtil.copyProperties 方法将 user 中的信息过滤到 UserDTO 上,即用来隐藏部分信息)
        session.setAttribute("user", BeanUtil.copyProperties(user, UserDTO.class));
        return Result.ok();
    }

    private User createUserWithPhone(String phone) {
        // 1. 创建用户
        User user = new User();
        user.setPhone(phone);
        user.setNickName("user_" + RandomUtil.randomString(10));
        // 2. 保存用户(这里使用 mybatis-plus)
        save(user);
        return user;
    }
}public class LoginInterceptor implements HandlerInterceptor {
@Override
public boolean preHandle(HttpServletRequest request, HttpServletResponse response, Object handler) throws Exception {
// 1. 获取 session
HttpSession session = request.getSession();
// 2. 获取 session 中的用户
UserDTO user = (UserDTO) session.getAttribute("user");
// 3. 判断用户是否存在
if(user == null){
// 4. 不存在,拦截,返回 401 未授权
response.setStatus(401);
return false;
}
// 5. 存在,保存用户信息到 ThreadLocal
UserHolder.saveUser(user);
// 6. 放行
return true;
}
@Override
public void afterCompletion(HttpServletRequest request, HttpServletResponse response, Object handler, Exception ex) throws Exception {
// 移除用户,避免内存泄露
UserHolder.removeUser();
}
}public class UserHolder {
private static final ThreadLocal<UserDTO> tl = new ThreadLocal<>();
public static void saveUser(UserDTO user){
tl.set(user);
}
public static UserDTO getUser(){
return tl.get();
}
public static void removeUser(){
tl.remove();
}
}@Configuration
public class MvcConfig implements WebMvcConfigurer {
@Override
public void addInterceptors(InterceptorRegistry registry) {
registry.addInterceptor(new LoginInterceptor())
.excludePathPatterns(
"/user/login",
"/user/code"
);
}
}| Description | |
|---|---|
| POST | |
| /user/me | |
| None | |
| None |
@Slf4j
@Service
public class UserServiceImpl extends ServiceImpl<UserMapper, User> implements IUserService {
@Override
public Result me() {
UserDTO user = UserHolder.getUser();
return Result.ok(user);
}
}session sharing problem: Multiple tomcats do not share session storage space. When the request is switched to different tomcat services, it will cause data loss. Session alternatives should meet the following conditions:
- Data sharing (different tomcats can access data in Redis) Memory storage (Redis through memory Storage)Key, value structure (Redis is a key-value structure)
3.1 Redis implements sharing session login flow chart
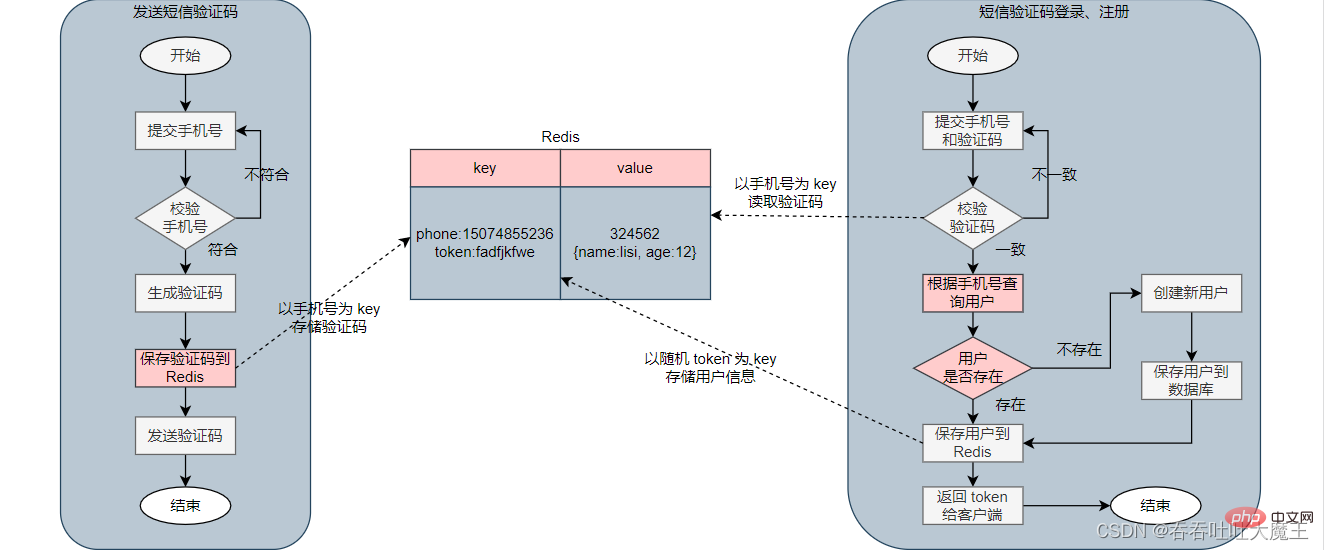
##3.2 Implementation of sending SMS verification code
Front-end request description:
| Description | |
|---|---|
| POST | |
| /user/code | |
| phone(phone number) | |
| None |
@Slf4j
@Service
public class UserServiceImpl extends ServiceImpl<UserMapper, User> implements IUserService {
@Resource
private StringRedisTemplate stringRedisTemplate;
@Override
public Result sendCode(String phone, HttpSession session) {
// 1. 校验手机号
if (RegexUtils.isPhoneInvalid(phone)) {
// 2. 如果不符合,返回错误信息
return Result.fail("手机号格式错误!");
}
// 3. 符合,生成验证码(设置生成6位)
String code = RandomUtil.randomNumbers(6);
// 4. 保存验证码到 Redis(以手机号为 key,设置有效期为 2min)
stringRedisTemplate.opsForValue().set("login:code:" + phone, code, 2, TimeUnit.MINUTES);
// 5. 发送验证码(这里并未实现,通过日志记录)
log.debug("发送短信验证码成功,验证码:{}", code);
// 返回 ok
return Result.ok();
}
}3.3 Implement SMS verification Code login, registration
Front-end request description:
| Description | |
|---|---|
| POST | |
| /user/login | |
| phone (phone number); code (verification code) | |
| None |
@Slf4j
@Service
public class UserServiceImpl extends ServiceImpl<UserMapper, User> implements IUserService {
@Override
public Result login(LoginFormDTO loginForm, HttpSession session) {
// 1. 校验手机号
String phone = loginForm.getPhone();
if(RegexUtils.isPhoneInvalid(phone)){
// 不一致,返回错误信息
return Result.fail("手机号格式错误!");
}
// 2. 校验验证码
String cacheCode = (String) session.getAttribute("code");
String code = loginForm.getCode();
if(cacheCode == null || !cacheCode.equals(cacheCode)){
// 不一致,返回错误信息
return Result.fail("验证码错误!");
}
// 4. 一致,根据手机号查询用户(这里使用的 mybatis-plus)
User user = query().eq("phone", phone).one();
// 5. 判断用户是否存在
if(user == null){
// 6. 不存在,创建新用户并保存
user = createUserWithPhone(phone);
}
// 7. 保存用户信息到 session 中(通过 BeanUtil.copyProperties 方法将 user 中的信息过滤到 UserDTO 上,即用来隐藏部分信息)
session.setAttribute("user", BeanUtil.copyProperties(user, UserDTO.class));
return Result.ok();
}
private User createUserWithPhone(String phone) {
// 1. 创建用户
User user = new User();
user.setPhone(phone);
user.setNickName("user_" + RandomUtil.randomString(10));
// 2. 保存用户(这里使用 mybatis-plus)
save(user);
return user;
}
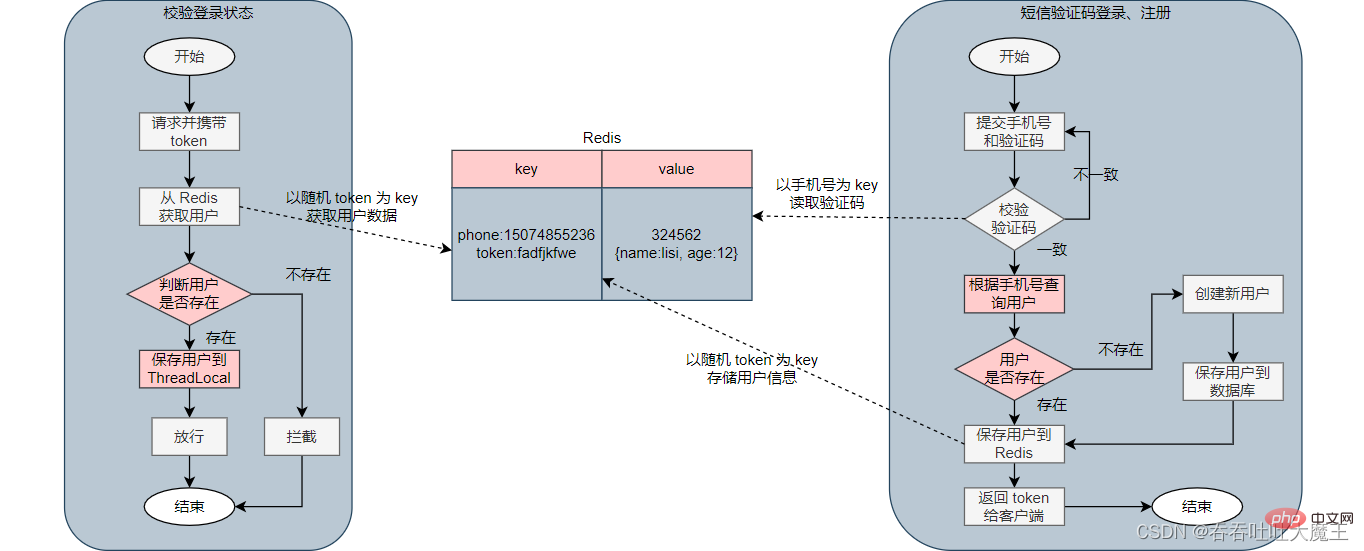
}3.4 Implement login verification interceptor
The original interceptor is divided into two interceptors. The first interceptor intercepts all requests. This interception refreshes the validity period of the token and saves the user information that can be queried into ThreadLocal. The second interceptor performs the interception function and intercepts the path that requires login.
Refresh token interceptor implementation:
public class RefreshTokenInterceptor implements HandlerInterceptor {
private StringRedisTemplate stringRedisTemplate;
public RefreshTokenInterceptor(StringRedisTemplate stringRedisTemplate){
this.stringRedisTemplate = stringRedisTemplate;
}
@Override
public boolean preHandle(HttpServletRequest request, HttpServletResponse response, Object handler) throws Exception {
// 1. 获取请求头中的 token
String token = request.getHeader("authorization");
if (StrUtil.isBlank(token)) {
return true;
}
// 2. 基于 token 获取 redis 中的用户
String tokenKey = "login:token:" + token;
Map<Object, Object> userMap = stringRedisTemplate.opsForHash().entries(tokenKey);
// 3. 判断用户是否存在
if (userMap.isEmpty()) {
return true;
}
// 5. 将查询到的 Hash 数据转为 UserDTO 对象
UserDTO user = BeanUtil.fillBeanWithMap(userMap, new UserDTO(), false);
// 6. 存在,保存用户信息到 ThreadLocal
UserHolder.saveUser(user);
// 7. 刷新 token 有效期 30 min
stringRedisTemplate.expire(tokenKey, 30, TimeUnit.MINUTES);
// 8. 放行
return true;
}
}Login verification interceptor implementation:
public class LoginInterceptor implements HandlerInterceptor {
    @Override
    public boolean preHandle(HttpServletRequest request, HttpServletResponse response, Object handler) throws Exception {
        // 1. 获取 session
        HttpSession session = request.getSession();
        // 2. 获取 session 中的用户
        UserDTO user = (UserDTO) session.getAttribute("user");
        // 3. 判断用户是否存在
        if(user == null){
            // 4. 不存在,拦截,返回 401 未授权
            response.setStatus(401);
            return false;
        }
        // 5. 存在,保存用户信息到 ThreadLocal
        UserHolder.saveUser(user);
        // 6. 放行
        return true;
    }

    @Override
    public void afterCompletion(HttpServletRequest request, HttpServletResponse response, Object handler, Exception ex) throws Exception {
        // 移除用户,避免内存泄露
        UserHolder.removeUser();
    }
}UserHolder class implementation: This class defines a static ThreadLocal
public class UserHolder {
    private static final ThreadLocal<UserDTO> tl = new ThreadLocal<>();

    public static void saveUser(UserDTO user){
        tl.set(user);
    }

    public static UserDTO getUser(){
        return tl.get();
    }

    public static void removeUser(){
        tl.remove();
    }
}Configuration interceptor:
@Configuration
public class MvcConfig implements WebMvcConfigurer {
@Resource
private StringRedisTemplate stringRedisTemplate;
@Override
public void addInterceptors(InterceptorRegistry registry) {
registry.addInterceptor(new RefreshTokenInterceptor(stringRedisTemplate))
.addPathPatterns("/**").order(0);
registry.addInterceptor(new LoginInterceptor())
.excludePathPatterns(
"/user/login",
"/user/code"
).order(1);
}
}Front-end request description:
| Description | |
|---|---|
| POST | |
| /user/me | |
| None | |
| None |
@Slf4j
@Service
public class UserServiceImpl extends ServiceImpl<UserMapper, User> implements IUserService {

    @Override
    public Result me() {
        UserDTO user = UserHolder.getUser();
        return Result.ok(user);
    }
}Recommended learning:
Redis video tutorialThe above is the detailed content of Redis shared session application implements SMS login. For more information, please follow other related articles on the PHP Chinese website!

Hot AI Tools

Undresser.AI Undress
AI-powered app for creating realistic nude photos

AI Clothes Remover
Online AI tool for removing clothes from photos.

Undress AI Tool
Undress images for free

Clothoff.io
AI clothes remover

AI Hentai Generator
Generate AI Hentai for free.

Hot Article
Hot Tools

Notepad++7.3.1
Easy-to-use and free code editor

SublimeText3 Chinese version
Chinese version, very easy to use

Zend Studio 13.0.1
Powerful PHP integrated development environment

Dreamweaver CS6
Visual web development tools

SublimeText3 Mac version
God-level code editing software (SublimeText3)
Hot Topics
 1378
1378
 52
52

 How to build the redis cluster mode
Apr 10, 2025 pm 10:15 PM
How to build the redis cluster mode
Apr 10, 2025 pm 10:15 PM
Redis cluster mode deploys Redis instances to multiple servers through sharding, improving scalability and availability. The construction steps are as follows: Create odd Redis instances with different ports; Create 3 sentinel instances, monitor Redis instances and failover; configure sentinel configuration files, add monitoring Redis instance information and failover settings; configure Redis instance configuration files, enable cluster mode and specify the cluster information file path; create nodes.conf file, containing information of each Redis instance; start the cluster, execute the create command to create a cluster and specify the number of replicas; log in to the cluster to execute the CLUSTER INFO command to verify the cluster status; make
 How to use the redis command
Apr 10, 2025 pm 08:45 PM
How to use the redis command
Apr 10, 2025 pm 08:45 PM
Using the Redis directive requires the following steps: Open the Redis client. Enter the command (verb key value). Provides the required parameters (varies from instruction to instruction). Press Enter to execute the command. Redis returns a response indicating the result of the operation (usually OK or -ERR).
 How to use single threaded redis
Apr 10, 2025 pm 07:12 PM
How to use single threaded redis
Apr 10, 2025 pm 07:12 PM
Redis uses a single threaded architecture to provide high performance, simplicity, and consistency. It utilizes I/O multiplexing, event loops, non-blocking I/O, and shared memory to improve concurrency, but with limitations of concurrency limitations, single point of failure, and unsuitable for write-intensive workloads.
 How to read the source code of redis
Apr 10, 2025 pm 08:27 PM
How to read the source code of redis
Apr 10, 2025 pm 08:27 PM
The best way to understand Redis source code is to go step by step: get familiar with the basics of Redis. Select a specific module or function as the starting point. Start with the entry point of the module or function and view the code line by line. View the code through the function call chain. Be familiar with the underlying data structures used by Redis. Identify the algorithm used by Redis.
 How to clear redis data
Apr 10, 2025 pm 10:06 PM
How to clear redis data
Apr 10, 2025 pm 10:06 PM
How to clear Redis data: Use the FLUSHALL command to clear all key values. Use the FLUSHDB command to clear the key value of the currently selected database. Use SELECT to switch databases, and then use FLUSHDB to clear multiple databases. Use the DEL command to delete a specific key. Use the redis-cli tool to clear the data.
 How to view all keys in redis
Apr 10, 2025 pm 07:15 PM
How to view all keys in redis
Apr 10, 2025 pm 07:15 PM
To view all keys in Redis, there are three ways: use the KEYS command to return all keys that match the specified pattern; use the SCAN command to iterate over the keys and return a set of keys; use the INFO command to get the total number of keys.
 How to read redis queue
Apr 10, 2025 pm 10:12 PM
How to read redis queue
Apr 10, 2025 pm 10:12 PM
To read a queue from Redis, you need to get the queue name, read the elements using the LPOP command, and process the empty queue. The specific steps are as follows: Get the queue name: name it with the prefix of "queue:" such as "queue:my-queue". Use the LPOP command: Eject the element from the head of the queue and return its value, such as LPOP queue:my-queue. Processing empty queues: If the queue is empty, LPOP returns nil, and you can check whether the queue exists before reading the element.
 How to start the server with redis
Apr 10, 2025 pm 08:12 PM
How to start the server with redis
Apr 10, 2025 pm 08:12 PM
The steps to start a Redis server include: Install Redis according to the operating system. Start the Redis service via redis-server (Linux/macOS) or redis-server.exe (Windows). Use the redis-cli ping (Linux/macOS) or redis-cli.exe ping (Windows) command to check the service status. Use a Redis client, such as redis-cli, Python, or Node.js, to access the server.
