
 Development Tools
VSCode
A thorough understanding of the configuration and use of git in VSCode in one article
Development Tools
VSCode
A thorough understanding of the configuration and use of git in VSCode in one article
A thorough understanding of the configuration and use of git in VSCode in one article

This article will talk about the VSCode Git operation and introduce the related configuration and use of git in VSCode. I hope it will be helpful to everyone!
(The operations in this article are all performed on Gitee. The operation methods of Gitee and Github are basically the same.)
1. Build a Git environment (Windows)
1. First download and install Git, and then register your Git username and email. This step is as follows The article has already been described and will not be repeated here;
https://blog.csdn.net/weixin_53072519/article/details/122824860
Introduces the use of GIT in detail, including GIT introduction, installation, related command explanations, and uploading projects to the cloud and cloning them locally.
【Recommended study: "vscode introductory tutorial"】
 https://blog.csdn.net/weixin_53072519/article/details/122824860
2 . Generate SSH public key and secret key;
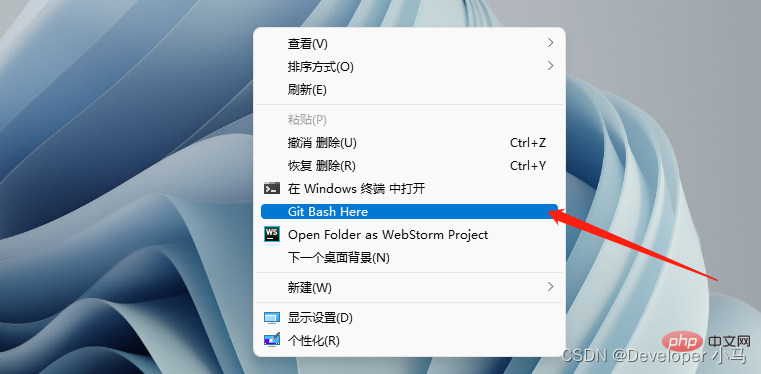
Right-click to open Git Bash Here;
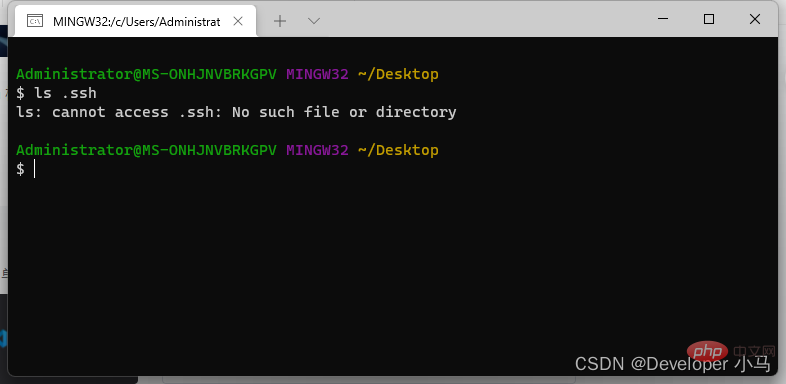
Use command ls .ssh Check whether there is already a public key and a private key in our directory (the following is not available);
Create the public key and private key, use the command ssh-keygen -t rsa -C "mailbox";
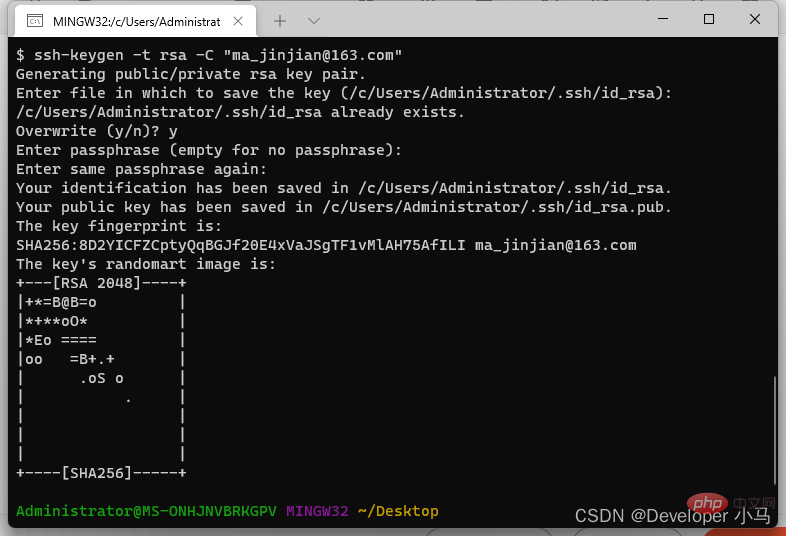
At this point the public and private keys have been generated, pay attention to the path prompted;

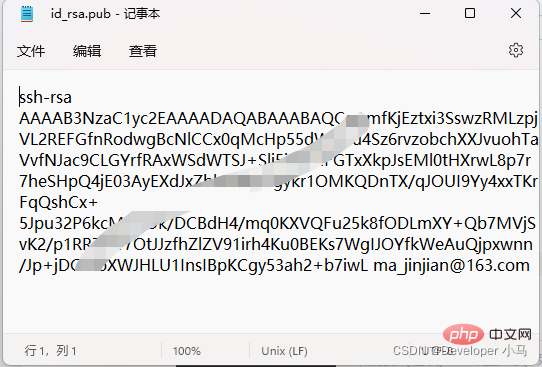
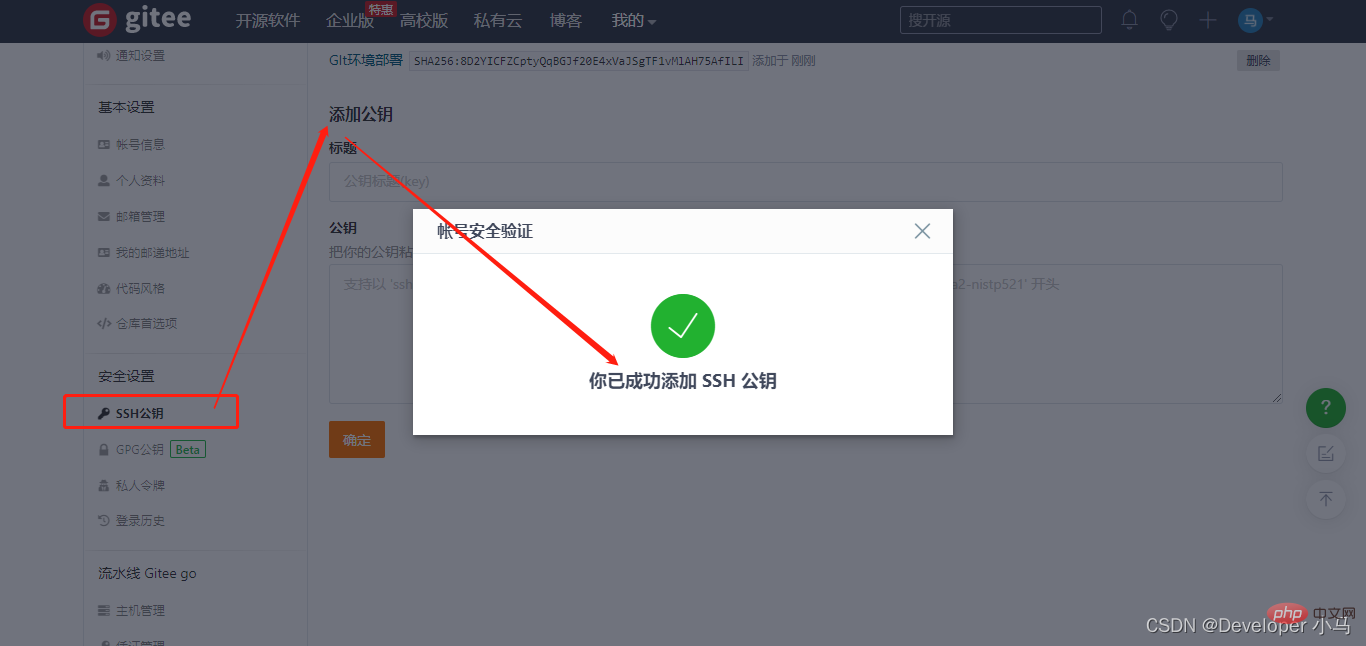
3. Add the public key to GitHub/Gitee;
Copy the public key;

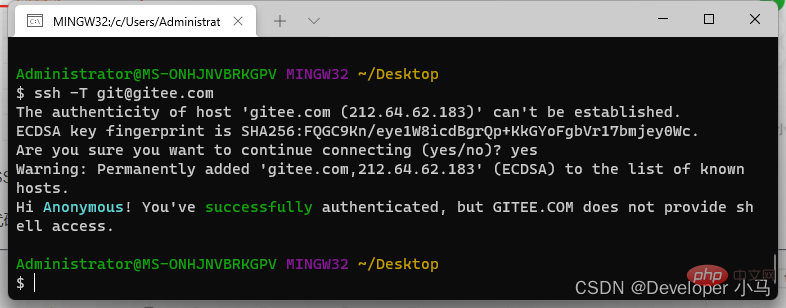
4. Test the SSH connection;
Use the commandssh -T git@gitee.com to test, and hi... . means the connection is successful;
Also use the commandssh -T git@github.com when using Github;
2. GIt related operations in VS Code
(Here I will use an empty folder git as the project File to perform related demonstration operations.)
Local class operations
1. Preparation Project file and initialize the warehouse
Create a new project folder git as a project; enter Git Bash Here on the desktop, enter the command code git and use vs code to open our project folder;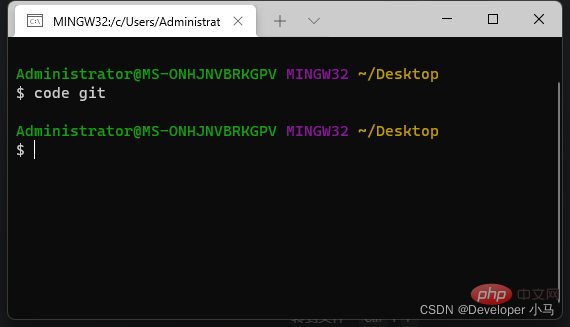
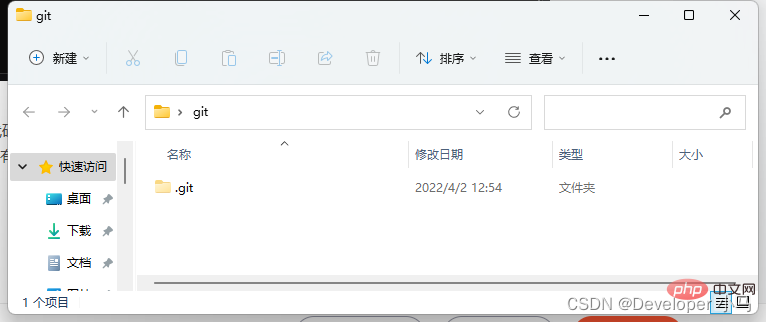
Enter source code management in vs code and click Initialize the repository. This step also completes the initialization of the git warehouse. At this time, you can see that the folder already has a .git folder (hidden by default, you need to set up to show hidden files to see);
Then create a new file demo.html in the project file git;
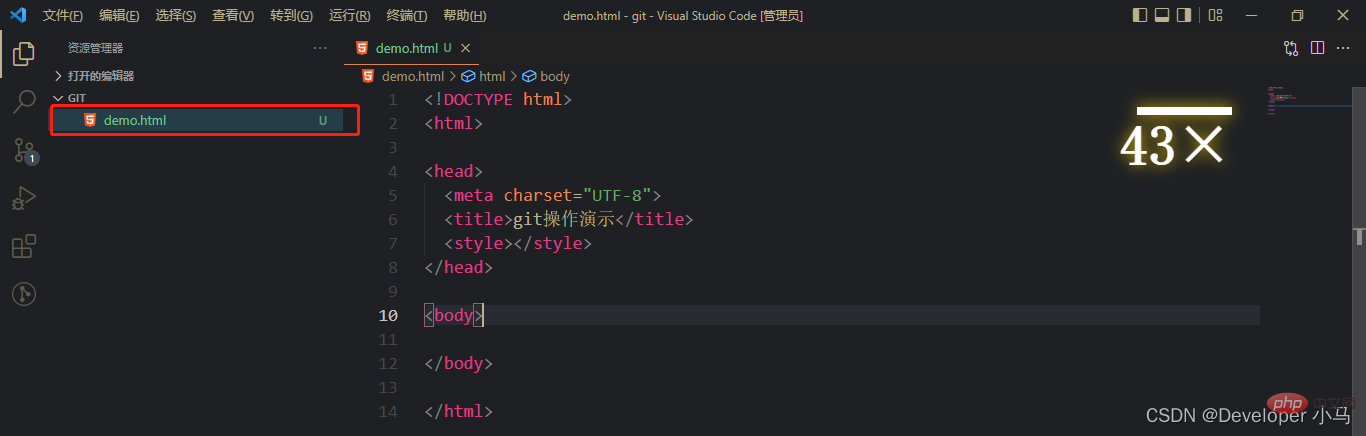
At this time we can see that the newly created file is Green, with a U prompt behind it; U means Untracked, which means that this file is currently only in our local area and is not tracked by git.

2. Add files to the temporary storage area
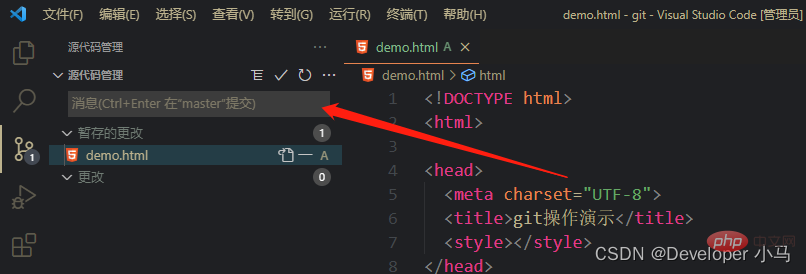
Enter source code management and click the # behind the file you want to operate. ##" ", you can add the file to the temporary storage area, which is equivalent to executing the command git add;

The file name is still green at this time , but the U behind it becomes A, and A means that the file is already in the temporary storage area.

3. Submit the files in the temporary storage area to the git warehouse
Submit the files in the temporary storage area to git, Enter source code management, enter relevant remarks in the message box, and then click"√" to submit once, or use the Ctrl Enter shortcut key to submit directly;
At this time, the file color changes to normal and there is no letter prompt, indicating that the file has been submitted to git.You can also submit using the quick submission method. The so-called quick submission means submitting new files or modified files directly without saving them to the temporary storage area first. The operation of adding to the staging area is omitted; is as follows. If we submit the modified file without saving it to the staging area, vs code will give a warning. In this case, we select "Always" , the operation of adding to the staging area will be automatically omitted in future operations.


4. Modify the submitted file
After modifying the content of the submitted file, the file name will have the following prompt ;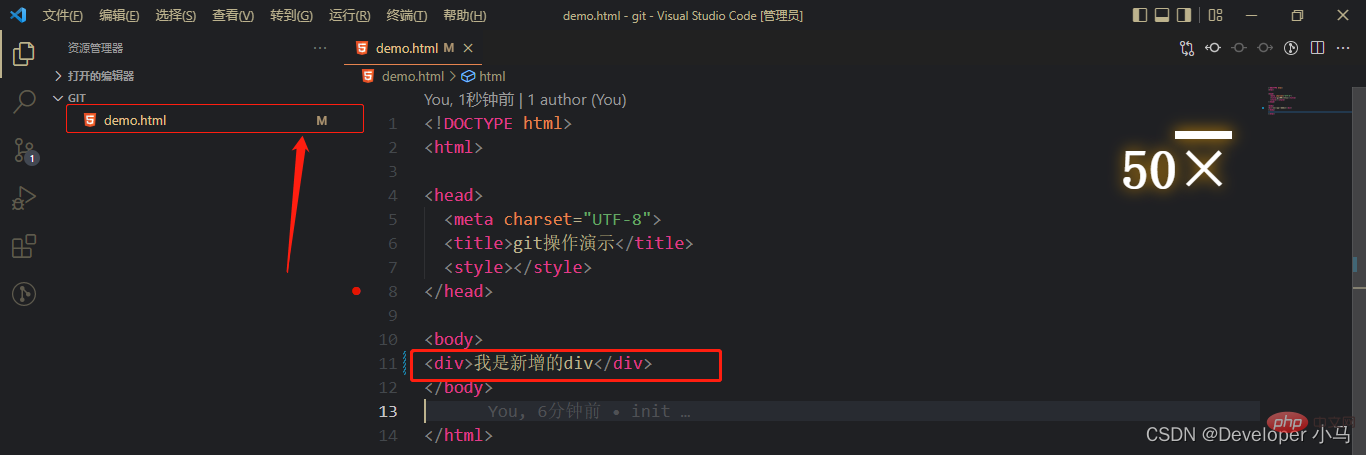
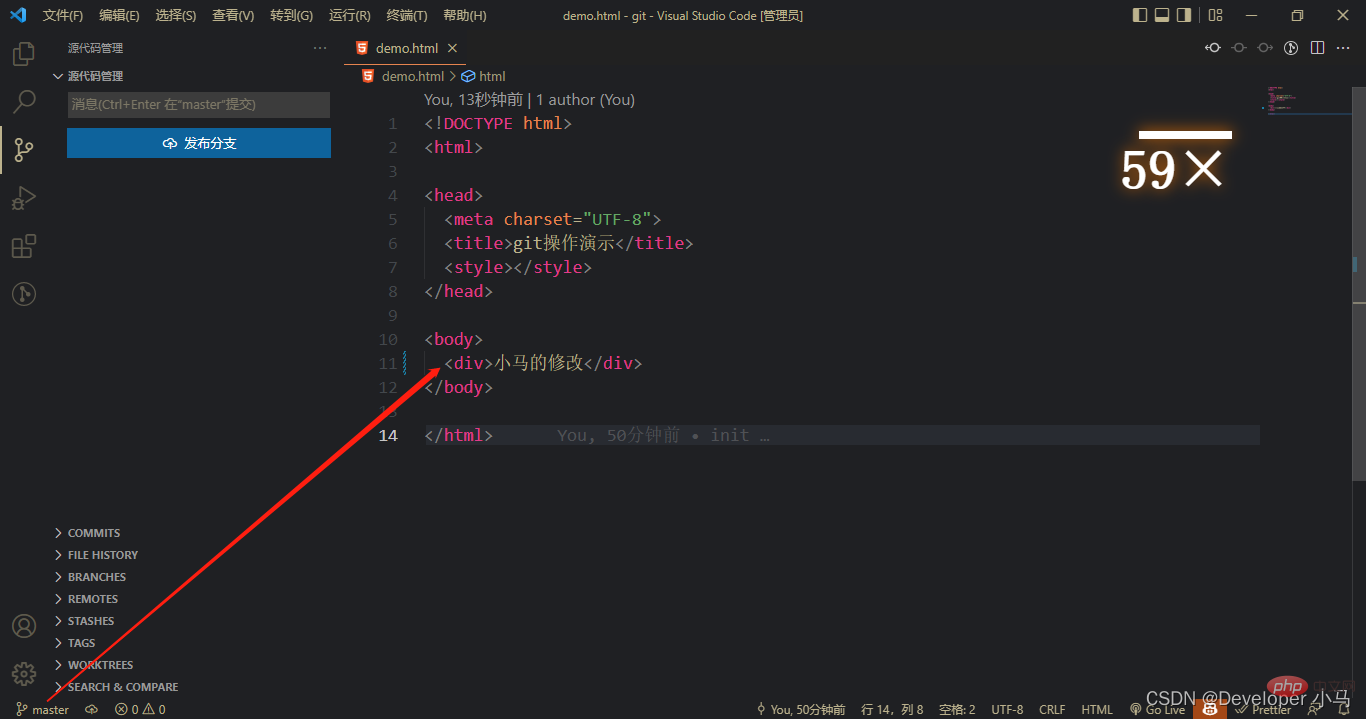
At this time, the file name turns yellow, and there is a prompt letter M; M meansIf you want to undo the changes, enter the source code management and click the return arrow to abandon the changes;modify, that is, it has been modified.

5. View/New /Switch branch
Click "master" in the status bar at the bottom of vs code to display the branches in the project. The master here means that the current branch is master; as shown in the figure below, there are only A master branch;


To switch branches, just click on the corresponding branch name;
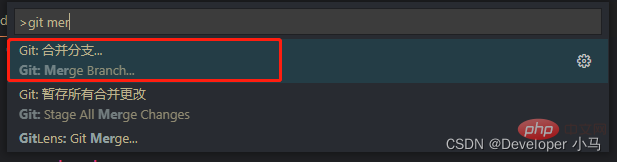
6. Merge branches
We first create a new branch Modify the file content in the xiaoma branch and submit it;
Then switch to the master branch. At this time, the master branch has no modified content;
Next to merge, first click the settings icon"⚙" to open the command panel;
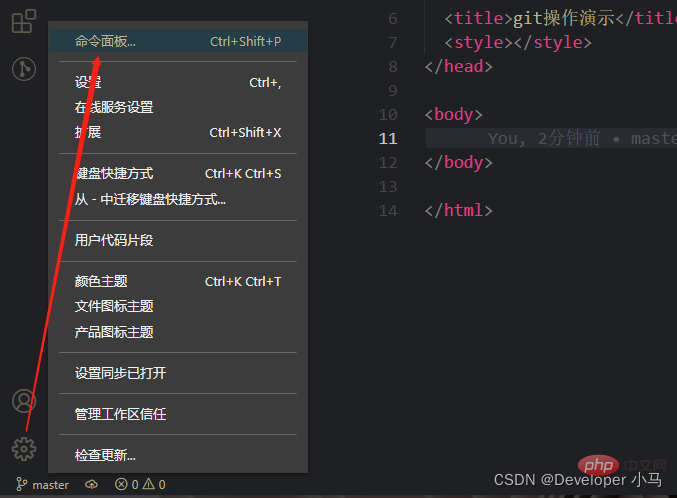
Search for git in the command panel merge, find the merge branch operation, and click Merge Branch;
At this time, the master branch already has xiaoma related operations;
7. Temporarily save the current branch status
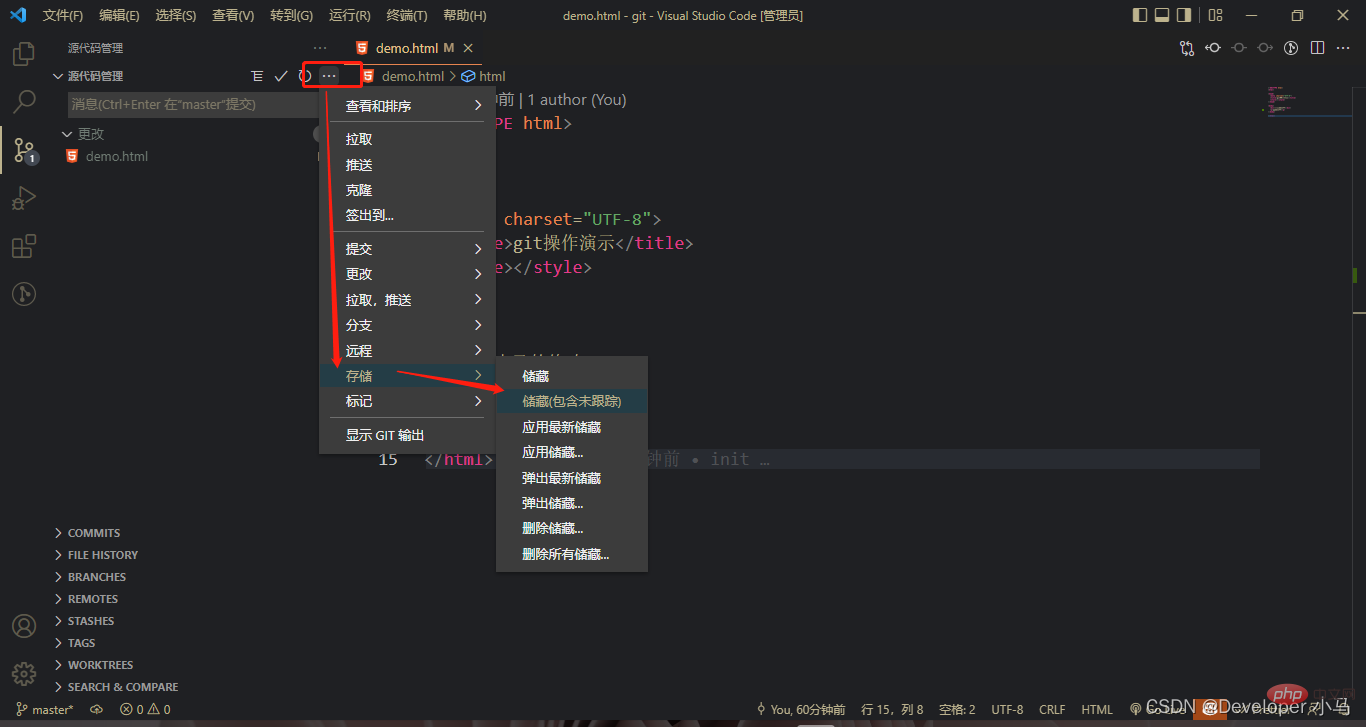
When we are halfway through writing the code and have not completed the development of a certain module, we have to leave the current branch. When switching to another branch, you need to temporarily save (store, hide) the status of the current branch, which is equivalent to the git command git stash;
After making certain modifications to the current branch, click More “···”, find storage-->Storage;
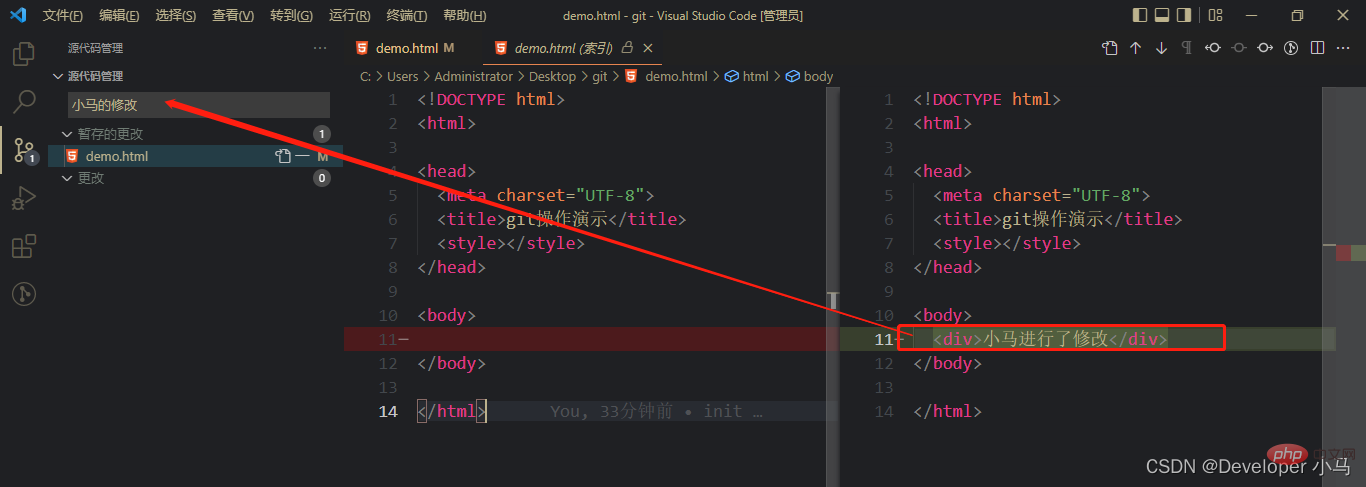
##8. Check what modifications have been made to the current file
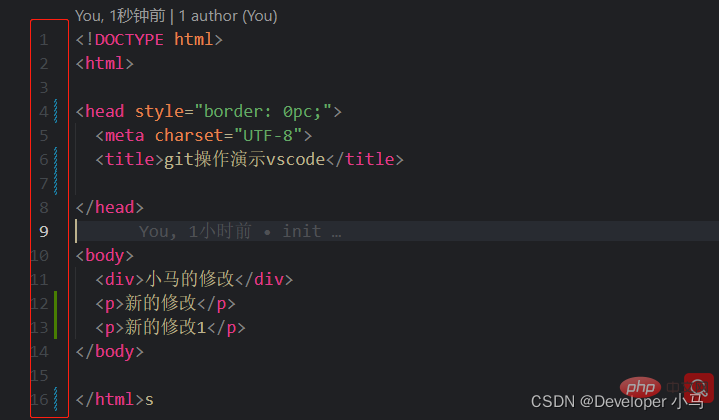
When we are modifying the content of a file that has been submitted to git, vs code will prompt us what operations we have done, which is equivalent to the git command git diff, as follows:Blue It means that the code here has been modified or deletedGreen means that the code here is new content
## Remote class operations
1. Create a new GIt warehouseRemote class operations need to be performed in conjunction with Gitee, so we first create a new one in gitee For a warehouse, go to the gitee homepage and click New Warehouse;
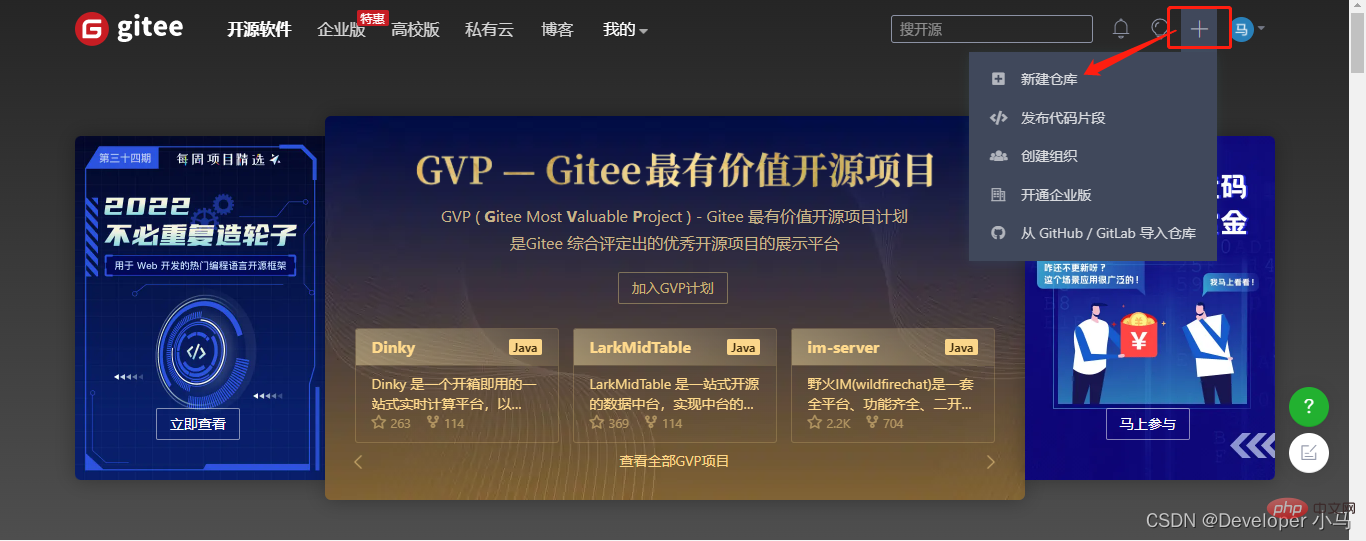 The created warehouse is as follows, we already have the SSH address;
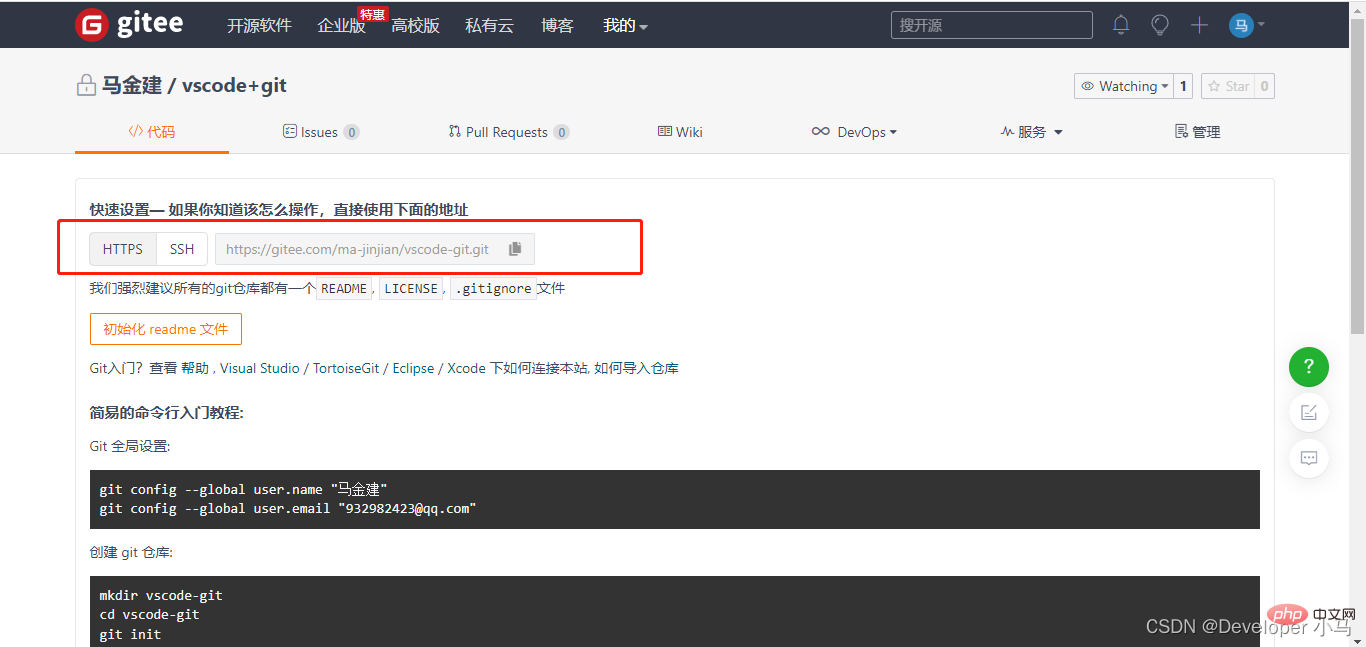
First copy the SSH link obtained by the new warehouse, open the command panel in vs code, enter git clone to find the clone option;
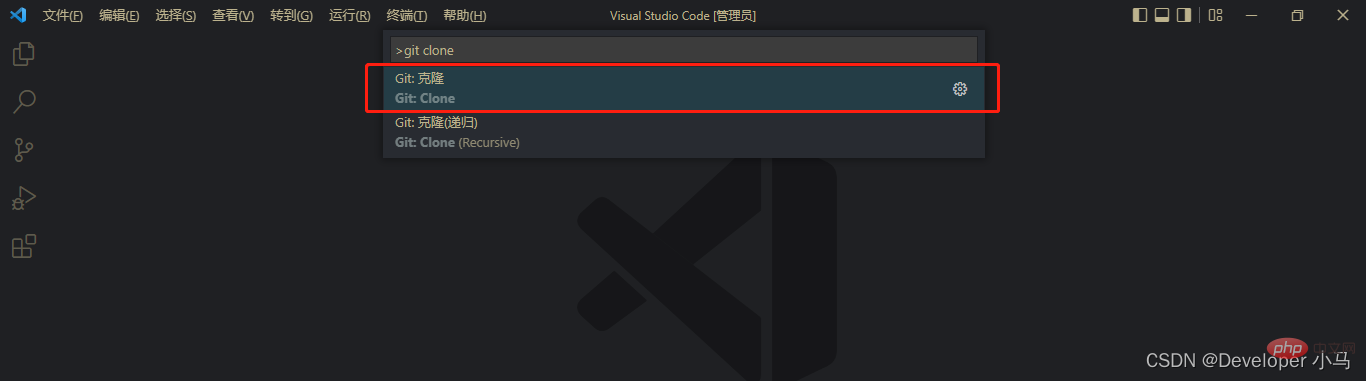 Click and paste our SSH address and press Enter. At this time, vs code will prompt us to select an address to store the cloned project, and then start cloning, as follows;
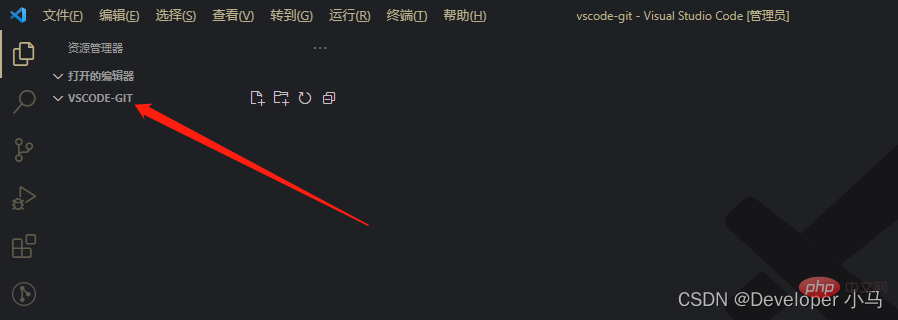
 After successful cloning, the project can be opened locally.
We first create some random files in the project we just cloned and put them submit;

Enter source code management, click more “···” Find push to push;
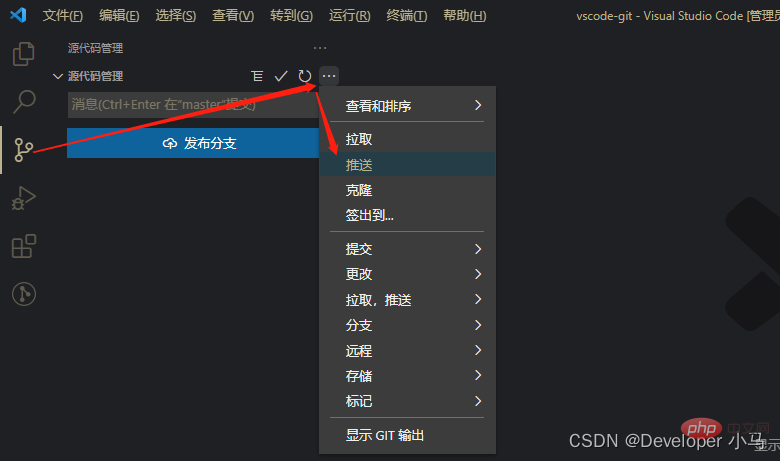
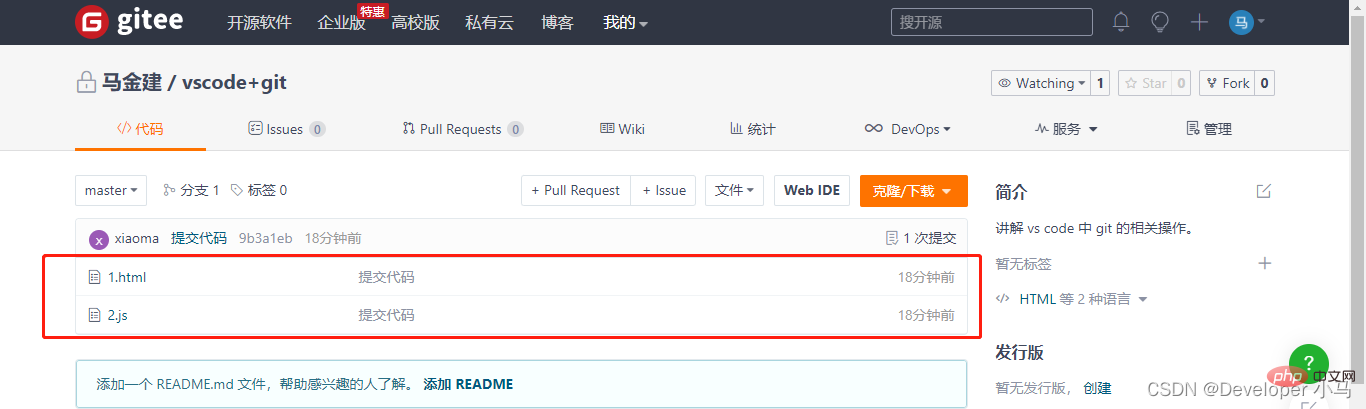
After the push is successful, as follows, you can see our submission record in Gitee;
4. Clone the cloud project to local (git pull)
Pull the cloud project in Vs Code, enter source code management, select more"···", select "Pull" to perform the pull operation;
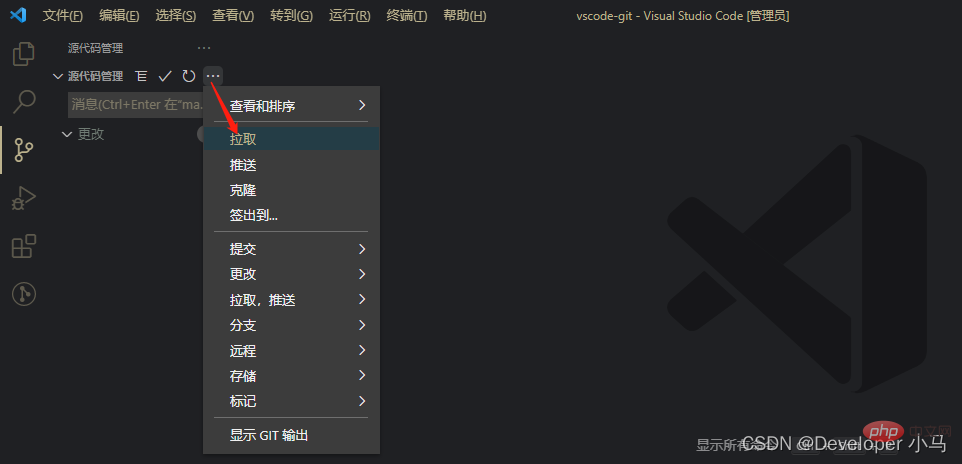
Note: Whenever you push a project (push), it is best to pull the cloud code (pull) first to ensure that the cloud has been updated to the latest status to prevent pushing the project code conflicts;
For more knowledge about VSCode, please visit: vscode tutorial!
The above is the detailed content of A thorough understanding of the configuration and use of git in VSCode in one article. For more information, please follow other related articles on the PHP Chinese website!

Hot AI Tools

Undresser.AI Undress
AI-powered app for creating realistic nude photos

AI Clothes Remover
Online AI tool for removing clothes from photos.

Undress AI Tool
Undress images for free

Clothoff.io
AI clothes remover

AI Hentai Generator
Generate AI Hentai for free.

Hot Article
Hot Tools

Notepad++7.3.1
Easy-to-use and free code editor

SublimeText3 Chinese version
Chinese version, very easy to use

Zend Studio 13.0.1
Powerful PHP integrated development environment

Dreamweaver CS6
Visual web development tools

SublimeText3 Mac version
God-level code editing software (SublimeText3)
Hot Topics


 How to install deepseek
Feb 19, 2025 pm 05:48 PM
How to install deepseek
Feb 19, 2025 pm 05:48 PM
There are many ways to install DeepSeek, including: compile from source (for experienced developers) using precompiled packages (for Windows users) using Docker containers (for most convenient, no need to worry about compatibility) No matter which method you choose, Please read the official documents carefully and prepare them fully to avoid unnecessary trouble.
 How To Set Up Visual Studio Code (VS Code) for PHP Development
Dec 20, 2024 am 11:31 AM
How To Set Up Visual Studio Code (VS Code) for PHP Development
Dec 20, 2024 am 11:31 AM
Visual Studio Code, also known as VS Code, is a free source code editor — or integrated development environment (IDE) — available for all major operating systems. With a large collection of extensions for many programming languages, VS Code can be c
 A new era of VSCode front-end development: 12 highly recommended AI code assistants
Jun 11, 2024 pm 07:47 PM
A new era of VSCode front-end development: 12 highly recommended AI code assistants
Jun 11, 2024 pm 07:47 PM
In the world of front-end development, VSCode has become the tool of choice for countless developers with its powerful functions and rich plug-in ecosystem. In recent years, with the rapid development of artificial intelligence technology, AI code assistants on VSCode have sprung up, greatly improving developers' coding efficiency. AI code assistants on VSCode have sprung up like mushrooms after a rain, greatly improving developers' coding efficiency. It uses artificial intelligence technology to intelligently analyze code and provide precise code completion, automatic error correction, grammar checking and other functions, which greatly reduces developers' errors and tedious manual work during the coding process. Today, I will recommend 12 VSCode front-end development AI code assistants to help you in your programming journey.
 Summary of FAQs for DeepSeek usage
Feb 19, 2025 pm 03:45 PM
Summary of FAQs for DeepSeek usage
Feb 19, 2025 pm 03:45 PM
DeepSeekAI Tool User Guide and FAQ DeepSeek is a powerful AI intelligent tool. This article will answer some common usage questions to help you get started quickly. FAQ: The difference between different access methods: There is no difference in function between web version, App version and API calls, and App is just a wrapper for web version. The local deployment uses a distillation model, which is slightly inferior to the full version of DeepSeek-R1, but the 32-bit model theoretically has 90% full version capability. What is a tavern? SillyTavern is a front-end interface that requires calling the AI model through API or Ollama. What is breaking limit
 How to register for LBank Exchange?
Aug 21, 2024 pm 02:20 PM
How to register for LBank Exchange?
Aug 21, 2024 pm 02:20 PM
To register for LBank visit the official website and click "Register". Enter your email and password and verify your email. Download the LBank app iOS: Search "LBank" in the AppStore. Download and install the "LBank-DigitalAssetExchange" application. Android: Search for "LBank" in the Google Play Store. Download and install the "LBank-DigitalAssetExchange" application.
 What are the AI tools?
Nov 29, 2024 am 11:11 AM
What are the AI tools?
Nov 29, 2024 am 11:11 AM
AI tools include: Doubao, ChatGPT, Gemini, BlenderBot, etc.
 How much margin is needed for Huobi futures contracts to avoid liquidation?
Jul 02, 2024 am 11:17 AM
How much margin is needed for Huobi futures contracts to avoid liquidation?
Jul 02, 2024 am 11:17 AM
Huobi contract liquidation is a forced liquidation caused by insufficient margin. In order to avoid liquidation, the margin ratio is recommended: no less than 10% for mainstream currency contracts and no less than 20% for non-mainstream currency contracts. Margin calculation formula: margin required for liquidation = contract value/(1-stop loss rate/opening price). A high margin ratio helps reduce the risk of liquidation. The leverage ratio of contract trading is high, and returns and risks coexist, so margins need to be managed carefully.
 Delphi Digital: How to change the new AI economy by parsing the new ElizaOS v2 architecture?
Mar 04, 2025 pm 07:00 PM
Delphi Digital: How to change the new AI economy by parsing the new ElizaOS v2 architecture?
Mar 04, 2025 pm 07:00 PM
ElizaOSv2: Empowering AI and leading the new economy of Web3. AI is evolving from auxiliary tools to independent entities. ElizaOSv2 plays a key role in it, which gives AI the ability to manage funds and operate Web3 businesses. This article will dive into the key innovations of ElizaOSv2 and how it shapes an AI-driven future economy. AI Automation: Going to independently operate ElizaOS was originally an AI framework focusing on Web3 automation. v1 version allows AI to interact with smart contracts and blockchain data, while v2 version achieves significant performance improvements. Instead of just executing simple instructions, AI can independently manage workflows, operate business and develop financial strategies. Architecture upgrade: Enhanced A
