

Basic introduction to JavaScript webpack5 configuration and usage

This article brings you relevant knowledge about javascript. Webpack is a static module bundler (module bundler) for modern JavaScript applications. Let’s take a look at the configuration and use of JavaScript webpack5 Basic introduction, I hope it will be helpful to everyone.

[Related recommendations: javascript video tutorial, web front-end】
1. webpack
1.1 Introduction
In the most original front-end development, we introduced files such as js and css by manually inserting script and link tags into html to achieve the purpose of citation. , which is not only cumbersome, but also requires a separate request for each file, and is prone to variable conflicts.
So the concept of JavaScript modularization was proposed, and solutions such as AMD, CommonJS, CMD, and ES6 modularization appeared in sequence.
But in fact, our project using modular development cannot run directly on the browser. For example, many npm modules use CommonJS syntax, which the browser does not support.
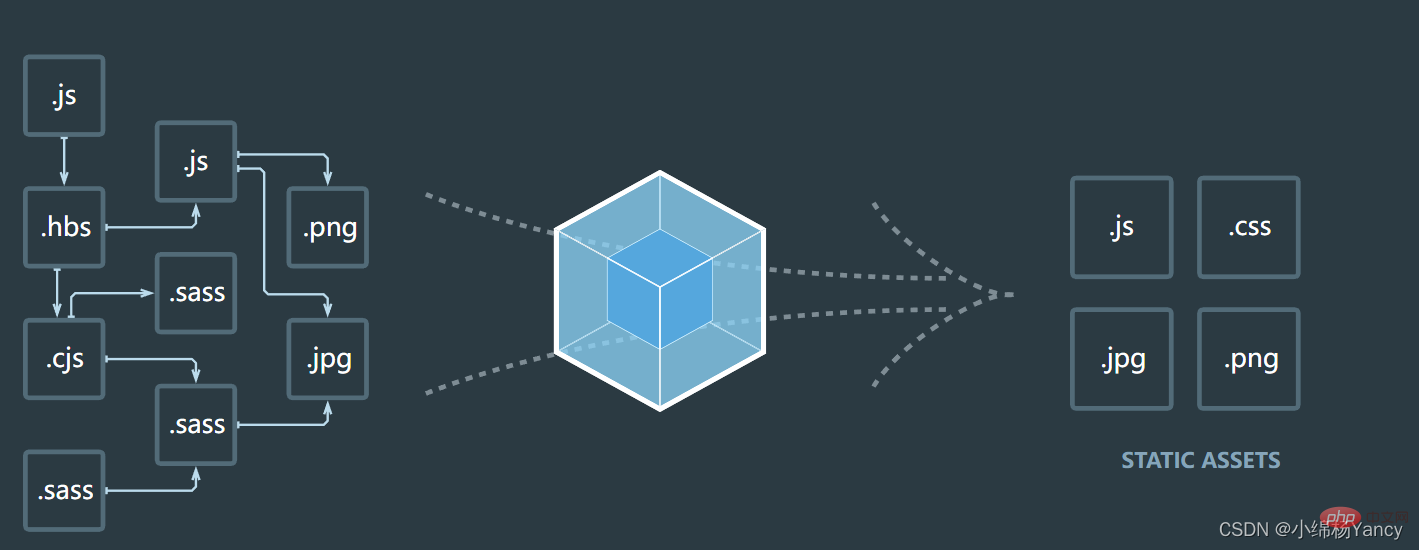
At this time, it is time for the module packaging tool to appear. Its task is to resolve the dependencies between modules and package the project into a JS file that the browser can recognize.
Currently popular packaging tools in the community include Webpack, Parcel, Rollup, etc.
If you have used scaffolding such as vue-cli or create-ract-app, then you have actually used webpack, because they are all secondary packaging based on webpack , Therefore, after mastering the principles of webpack, you can better develop vue and react engineering projects.
1.2 Five core concepts
The webpack configuration file in the project is located in the root directory: webpack.config.js
entry (entry)
The entry point indicates which module webpack should use as the beginning of building its internal dependency graph. For example, main.js in the vue project is the entry file when packaging.
module.exports = {
  entry: './src/main.js'
};All dependencies in the project should be directly or indirectly associated with the entry file. For example, we introduce external modules (axios, router, elementUI, etc.) in main.js. The
output (export)
output attribute tells webpack where to output the bundles it creates, and how to name these files. The default value is ./dist.
const path = require('path');
module.exports = {
  entry: './src/main.js',
  output: {
  	//__dirname是当前目录根目录
    path: path.resolve(__dirname, 'dist'),
    filename: 'bundle.js'
  }
};- The path attribute of ouput determines the location where the packaged files are generated. The default is ./dist. If not, webpack will automatically create this directory.
- The filename attribute of ouput determines the name of the packaged file.
#loader
loader allows webpack to process non-JavaScript files (such as images, css files, vue files, etc., webpack itself only understands JavaScript).
Loader can convert all types of files into valid modules that webpack can process, and then you can use webpack's packaging capabilities to process them.
module.exports = {
  //...
  module: {
    rules: [
      { test: /\.css$/, use: ['style-loader','css-loader'] }
    ]
  }
};When defining loader in webpack configuration, it must be defined in module.rules, where the test attribute is the regular file name that needs to be matched, and the use attribute is the corresponding loader, which can be multiple (array).
For example, the above style-loader and css-loader process the css files introduced in js (if you directly introduce css files into js, an error will be reported).
plugin
oader is used to convert certain types of modules, while plug-ins can be used to perform a wider range of tasks.
Plugins range from packaging optimization and compression to redefining variables in the environment. Plug-ins enhance the functionality of webpack.
To use plug-ins, for the plug-ins built into webpack, we can import webpack and directly access the built-in plug-ins. For external plug-ins, we need to install them first, then require them, and then introduce the plug-ins (new) in the plugin array. Example.
const HtmlWebpackPlugin = require('html-webpack-plugin'); // 通过 npm 安装
const webpack = require('webpack'); // 用于访问内置插件
const config = {
  module: {
    rules: [
      //...
    ]
  },
  plugins: [
    new HtmlWebpackPlugin({template: './src/index.html'})
  ]
};
module.exports = config;The above html-webpack-plugin plug-in automatically generates a corresponding html file in the packaged directory based on the template (template) page, and automatically inserts the script for packaging and generating js files. tag (normal webpack packaging does not generate html files).
mode (mode)
- Development mode (development): optimize packaging speed and code debugging.
- Production mode (production): optimize packaging speed, optimize code running performance

module.exports = {
  mode: 'production'
};That is, the packaging mode is different, then webpack has different requirements for packaging Code optimization strategies are also different.
2. Configuration and use
Let’s build a very simple webpack project.
Project structure

接着我们创建基本的项目结构和文件。
my-webpack-demo
├── src
| └── index.js(入口文件)
├── utils
| └── time.js(时间工具)
├── package-lock.json
├── package.json
├── webpack.config.js(webpack配置)
其中utils下的time.js负责生成当前时间 time.js:
var time = new Date();
var m = time.getMonth() + 1;
var t = time.getFullYear() + "-" + m + "-" + time.getDate() + " " + time.getHours() + ":" + time.getMinutes() + ":" + time.getSeconds();
module.exports = {
  now: t,
};入口文件index.js:
import { now } from "../utils/time.js";
document.write("现在是: " + now);webpack配置文件webpack.config.js:
module.exports = {
  entry: "./src/index.js",
  mode: "development",
  output: {
    filename: "index.js",
  },
};我们在终端执行打包命令:
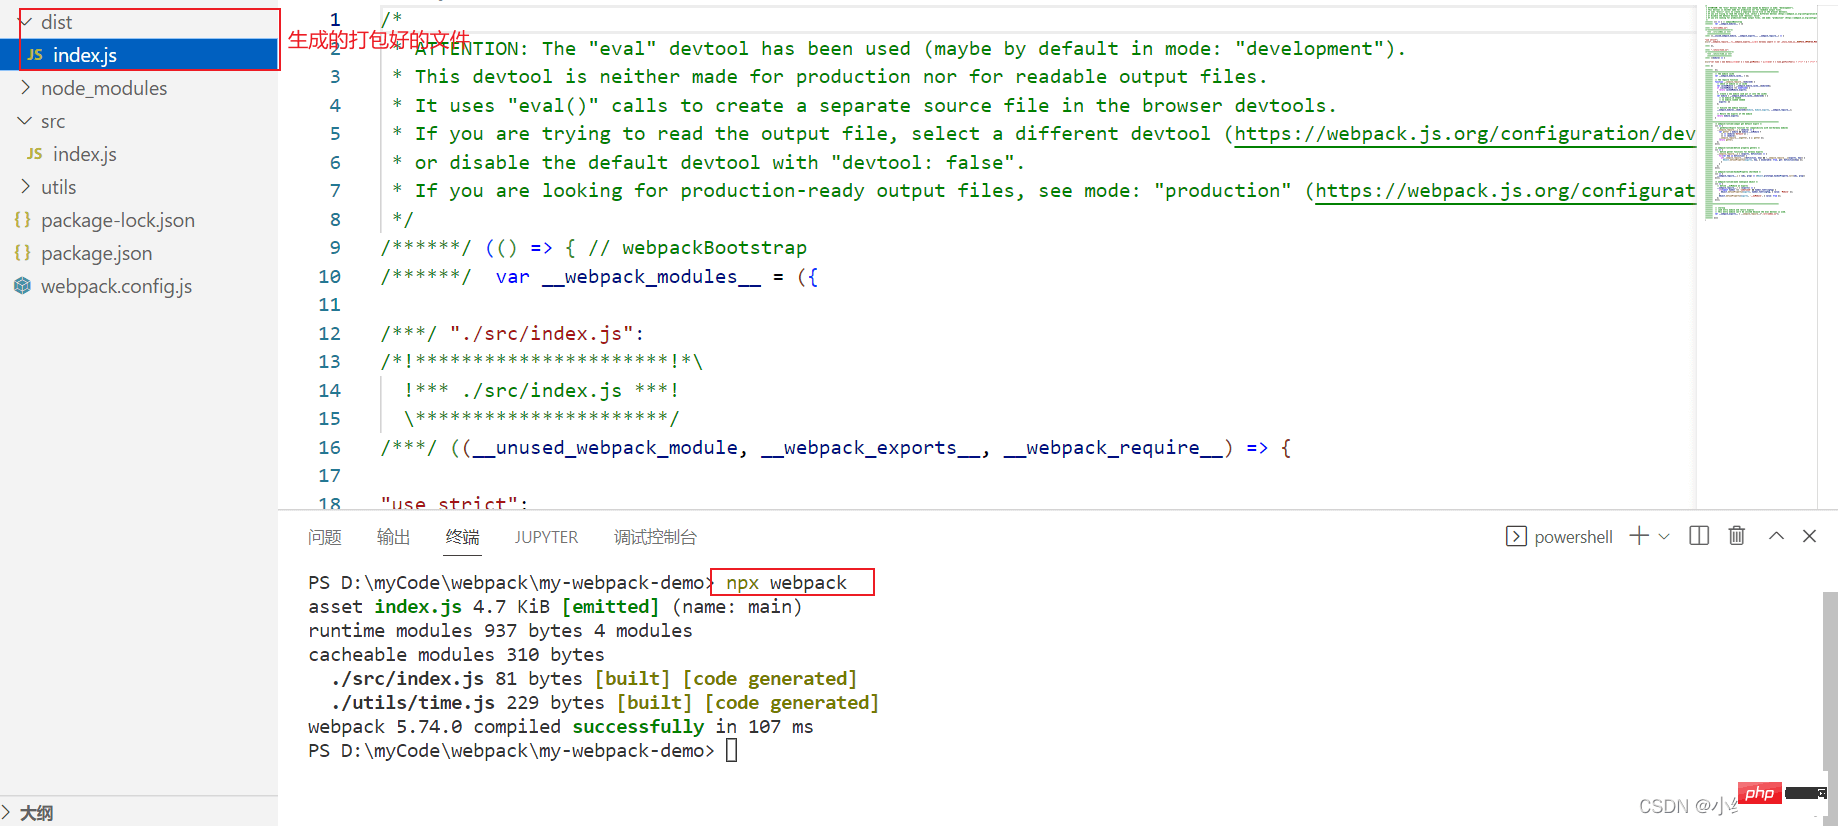
此时webpack自动在项目中创建了dist目录,并生成了打包好的index.js文件,那么我们如何验证index.js文件是否有效呢?
使用html-webpack-plugin
由于webpack并不会自动生成html文件,还记得上面的html-webpack-plugin插件吗?
通过npm安装:

在配置文件中引入:
const HtmlWebpackPlugin = require("html-webpack-plugin"); // 通过 npm 安装
module.exports = {
  entry: "./src/index.js",
  mode: "development",
  output: {
    filename: "index.js",
  },
  plugins: [new HtmlWebpackPlugin({ template: "./src/index.html", scriptLoading: "blocking" })],
};记得在src下创建index.html模板:
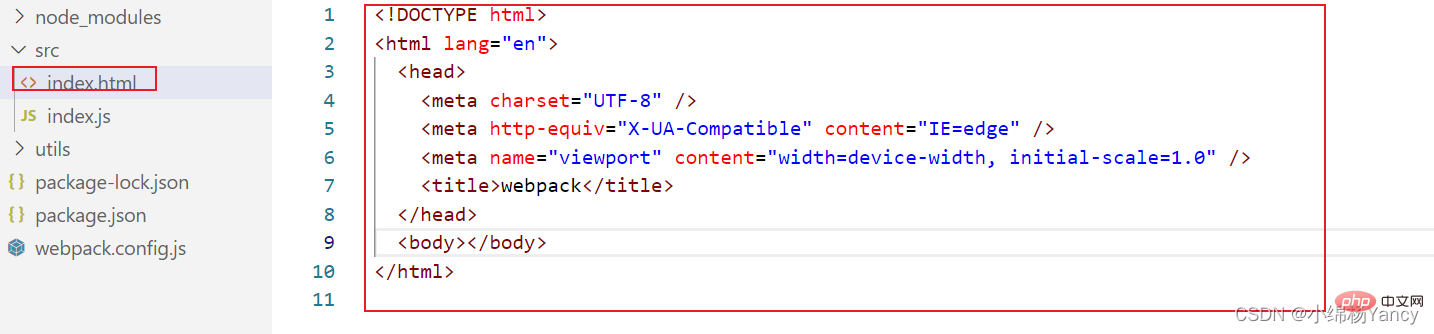
欧克!我们再次执行打包命令npx webpack 。

可以看到,在dist目录下不仅生成了index.js,还有index.html,我们在浏览器中打开它。

time.js成功生效咯 !
三、写在最后
我们完成了一个非常简单的webpack项目,你是否发现了这和vue项目的打包流程十分相似呢?
只是vue-cli的功能是十分强大的,例如可以解析vue文件,热更新等等……
所以这也验证了开始说的,vue-cli是对webpack的二次封装,封装了许多loader和plugin,并且配置好了入口,出口等配置信息,我们可以拿来就用。
【相关推荐:javascript视频教程、web前端】
The above is the detailed content of Basic introduction to JavaScript webpack5 configuration and usage. For more information, please follow other related articles on the PHP Chinese website!

Hot AI Tools

Undresser.AI Undress
AI-powered app for creating realistic nude photos

AI Clothes Remover
Online AI tool for removing clothes from photos.

Undress AI Tool
Undress images for free

Clothoff.io
AI clothes remover

AI Hentai Generator
Generate AI Hentai for free.

Hot Article
Hot Tools

Notepad++7.3.1
Easy-to-use and free code editor

SublimeText3 Chinese version
Chinese version, very easy to use

Zend Studio 13.0.1
Powerful PHP integrated development environment

Dreamweaver CS6
Visual web development tools

SublimeText3 Mac version
God-level code editing software (SublimeText3)
Hot Topics
 1378
1378
 52
52

 How to implement an online speech recognition system using WebSocket and JavaScript
Dec 17, 2023 pm 02:54 PM
How to implement an online speech recognition system using WebSocket and JavaScript
Dec 17, 2023 pm 02:54 PM
How to use WebSocket and JavaScript to implement an online speech recognition system Introduction: With the continuous development of technology, speech recognition technology has become an important part of the field of artificial intelligence. The online speech recognition system based on WebSocket and JavaScript has the characteristics of low latency, real-time and cross-platform, and has become a widely used solution. This article will introduce how to use WebSocket and JavaScript to implement an online speech recognition system.
 WebSocket and JavaScript: key technologies for implementing real-time monitoring systems
Dec 17, 2023 pm 05:30 PM
WebSocket and JavaScript: key technologies for implementing real-time monitoring systems
Dec 17, 2023 pm 05:30 PM
WebSocket and JavaScript: Key technologies for realizing real-time monitoring systems Introduction: With the rapid development of Internet technology, real-time monitoring systems have been widely used in various fields. One of the key technologies to achieve real-time monitoring is the combination of WebSocket and JavaScript. This article will introduce the application of WebSocket and JavaScript in real-time monitoring systems, give code examples, and explain their implementation principles in detail. 1. WebSocket technology
 How to use JavaScript and WebSocket to implement a real-time online ordering system
Dec 17, 2023 pm 12:09 PM
How to use JavaScript and WebSocket to implement a real-time online ordering system
Dec 17, 2023 pm 12:09 PM
Introduction to how to use JavaScript and WebSocket to implement a real-time online ordering system: With the popularity of the Internet and the advancement of technology, more and more restaurants have begun to provide online ordering services. In order to implement a real-time online ordering system, we can use JavaScript and WebSocket technology. WebSocket is a full-duplex communication protocol based on the TCP protocol, which can realize real-time two-way communication between the client and the server. In the real-time online ordering system, when the user selects dishes and places an order
 How to implement an online reservation system using WebSocket and JavaScript
Dec 17, 2023 am 09:39 AM
How to implement an online reservation system using WebSocket and JavaScript
Dec 17, 2023 am 09:39 AM
How to use WebSocket and JavaScript to implement an online reservation system. In today's digital era, more and more businesses and services need to provide online reservation functions. It is crucial to implement an efficient and real-time online reservation system. This article will introduce how to use WebSocket and JavaScript to implement an online reservation system, and provide specific code examples. 1. What is WebSocket? WebSocket is a full-duplex method on a single TCP connection.
 JavaScript and WebSocket: Building an efficient real-time weather forecasting system
Dec 17, 2023 pm 05:13 PM
JavaScript and WebSocket: Building an efficient real-time weather forecasting system
Dec 17, 2023 pm 05:13 PM
JavaScript and WebSocket: Building an efficient real-time weather forecast system Introduction: Today, the accuracy of weather forecasts is of great significance to daily life and decision-making. As technology develops, we can provide more accurate and reliable weather forecasts by obtaining weather data in real time. In this article, we will learn how to use JavaScript and WebSocket technology to build an efficient real-time weather forecast system. This article will demonstrate the implementation process through specific code examples. We
 How to use insertBefore in javascript
Nov 24, 2023 am 11:56 AM
How to use insertBefore in javascript
Nov 24, 2023 am 11:56 AM
Usage: In JavaScript, the insertBefore() method is used to insert a new node in the DOM tree. This method requires two parameters: the new node to be inserted and the reference node (that is, the node where the new node will be inserted).
 Simple JavaScript Tutorial: How to Get HTTP Status Code
Jan 05, 2024 pm 06:08 PM
Simple JavaScript Tutorial: How to Get HTTP Status Code
Jan 05, 2024 pm 06:08 PM
JavaScript tutorial: How to get HTTP status code, specific code examples are required. Preface: In web development, data interaction with the server is often involved. When communicating with the server, we often need to obtain the returned HTTP status code to determine whether the operation is successful, and perform corresponding processing based on different status codes. This article will teach you how to use JavaScript to obtain HTTP status codes and provide some practical code examples. Using XMLHttpRequest
 How to get HTTP status code in JavaScript the easy way
Jan 05, 2024 pm 01:37 PM
How to get HTTP status code in JavaScript the easy way
Jan 05, 2024 pm 01:37 PM
Introduction to the method of obtaining HTTP status code in JavaScript: In front-end development, we often need to deal with the interaction with the back-end interface, and HTTP status code is a very important part of it. Understanding and obtaining HTTP status codes helps us better handle the data returned by the interface. This article will introduce how to use JavaScript to obtain HTTP status codes and provide specific code examples. 1. What is HTTP status code? HTTP status code means that when the browser initiates a request to the server, the service
