In-depth understanding of NgModule (module) in Angular
NgModule module is an important point in Angular, because the basic building block of Angular is NgModule. This article will take you through the NgModule module in Angular. I hope it will be helpful to you!

#NgModule will collect related codes into some function sets to form functional units. When using the Angular CL command to create a new project, a root module will be generated for us, named AppModule. The root module has a root component AppComponent, and the application can be started by guiding this root module. Angular applications are modular. During development, we will establish various large and small modules according to their functions, functions and characteristics to build it into an application. Any module can contain any number of other components. [Related tutorial recommendations: "angularjs video tutorial"]
1.@NgModule()
import { BrowserModule } from '@angular/platform-browser';
import { NgModule } from '@angular/core';

import { AppRoutingModule } from './app-routing.module';
import { AppComponent } from './app.component';

@NgModule({
  declarations: [
    AppComponent
  ],
  imports: [
    BrowserModule,
    AppRoutingModule
  ],
  providers: [],
  bootstrap: [AppComponent]
})
export class AppModule { } by ⬆️ We can see from the code that NgModule is a class with a @NgModule() decorator. It accepts a metadata object whose attributes are used to describe the module.
Click in@NgModule() We can see that the decorator class has the following attributes and the official explanation of its attributes.
export declare interface NgModule {
    providers?: Provider[];// 本模块向全局服务中贡献的那些服务的创建器。 这些服务能被本应用中的任何部分使用。(你也可以在组件级别指定服务提供商,这通常是首选方式。)
    declarations?: Array<Type<any> | any[]>;// 那些属于本 NgModule 的组件、指令、管道
    imports?: Array<Type<any> | ModuleWithProviders<{}> | any[]>;// 那些导出了本模块中的组件模板所需的类的其它模块
    exports?: Array<Type<any> | any[]>;//那些能在其它模块的组件模板中使用的可声明对象的子集
    entryComponents?: Array<Type<any> | any[]>;
    bootstrap?: Array<Type<any> | any[]>;
    schemas?: Array<SchemaMetadata | any[]>;
}The following is my personal colloquial understanding of this metadata attribute after using Angular
providers: Put this module in the component The injected service must be defined in advance here, otherwise there will be an error message when using this service in this module.
declaration: declaration means declaration in English. Declare some components, instructions, pipes, etc. to be used in some modules here.
imports: Import some modules. For example, if I form all the instructions into a module and when I use some of the instructions, I can choose to import the entire instruction module. . You can also import some modules installed through npm install before they can be used.
exports: Export components or instruction pipelines, etc., so that modules that reference this module can use the components or instruction pipelines of this module.
exporyComponents: entry component represents the entry component of angular. The bootable component is an entry component, and Angular will load it into the DOM during the boot process. Other entry components are dynamically loaded at other times. Literal meaning, but when to use it, for example, if I want to pop up a component, then this component needs to be dynamically loaded into the DOM. At this time, the component xxxComponent needs to be written.
bootstrap: The component that should be started when this module is started. From the above code, you can see that AppModule is the startup component of the root module.
schemas: Elements or attributes that do not belong to Angular components or directives need to be declared here.
2. JavaScript module and NgModule
Both JavaScript and Angular use modules to organize code, although their organization The forms are different, but Angular applications will rely on both.
JavaScript Modules:
Modules are independent files that contain JavaScript code. To make the contents available, write an export statement
Example:
export class AppComponent { ... }You need to use it in other files
import { AppComponent } from './app.component';<span class="kwd">And for the NgModulem module we At the beginning of the essay and the metadata that introduces him, we have a certain understanding of it. <br></span>
The NgModule class has the following key differences from the JavaScript module:
1. NgModule only binds declarable classes , these declarable classes are only used by the Angular compiler.
2. NgModule Unlike the JavaScript class that puts all its member classes in a giant file, just list the module's classes in its @NgModule.declarations list.
3.NgModule can only export declarable classes. This may be its own or imported from another module. It does not declare or export any other type of class.
4. Unlike JavaScript modules, NgModule can extend the entire application with services by adding service providers to the @NgModule.providers list.
In comparison, we can see that the NgModulem module is more flexible, scalable and has more advantages.
3. Commonly used modules
First of all, you need to know what basic modules need to be referenced to run a project. The following are some official modules provided by Angular module.
NgModule |
Imported from |
Why use |
|---|---|---|
|
##@angular/platform-browser |
When you want to run the app in the browser |
| ##CommonModule
|
@angular/common | When you want to use NgIf and |
| FormsModule | ##@angular/forms
| NgModel) |
|
|
|
RouterModule |
@angular/router |
To use the routing function, you need to use RouterLink | ,.forRoot() and |
|
|
|
4.特性模块的分类 官方文档将模块分为五大类。
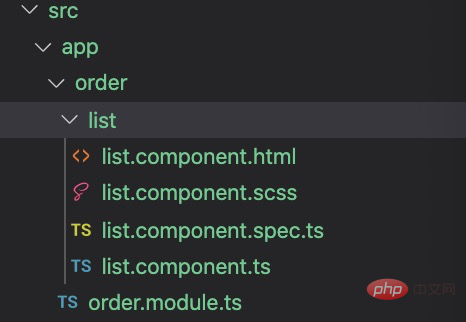
虽然我特么当年根本不知道,但是在开发中慢慢摸索其实发现也是根据模块的特性将模块的分类,结果不经相同。 以下为个人在开发中对功能模块的划分 1).业务型模块:整一个应用程序,根据其业务功能我们可以将程序拆分为一个个模块,有很明确的业务特性,围绕其业务功能的模块。例如:用户模块,订单模块等。它有自己独立的路由,有提供与此模块的服务,有一个or多个组件,它惰性懒加载,不会导出or提供任何组件or指令管道,引用官方、本应用程序or第三方的功能模块。它有明确的业务特性,不与别的模块有耦合性。 2).组件模块:应用程序中通常都有规范化的标准设计 ,比如说统一的table,card date 等。将这些都抽出来,做成一个个组件,在模块中导出此组件以供其他模块使用,这样减少了应用程序中重复的样式代码等。曾经我是将所有这种可能多处要使用的封装为组件后,统一在一个模块中导出,后来演变为每一个组件都拆分为一个模块。这样也是发现如果这种通用性的组件多起来的话,假设有二三十个组件在这个UIComponent模块中,而我因为要使用其中一两个组件而导入这个模块,性能是很差的,所以后来都将组件拆分为一个个模块以供业务模块使用,例:DateModule,InputModule..等。 3).服务模块:提供一些通用型的服务。比如说http服务对httpClient二次包装适用于项目,文件服务,配置服务等。 4).其他模块:应用程序中我们会根据需要会做一些指令管道等,其就形成一个指令模块包含应用程序中所有等指令,管道模块包含应用程序中的所有管道。后来觉得,其实这些指令管道不需要集中起来统一导出引用。因为一个模块并不会引用到指令模块中超过百分之八十的指令,so 只需要把它们集中到一个pipe文件夹下,哪个模块需要用到具体个指令or管道,直接声明在其模块中使用便可。 5.创建,导入特性模块 我们将系统根据其功能 业务划分好模块,有利于合作开发,代码的维护和使用。 创建特性模块 ng g m order Copy after login ng g c order/list // 订单模块下新建一个list 组件 Copy after login 我们看最后cli给我们生成的目录结构
order.module.ts import { NgModule } from '@angular/core';
import { CommonModule } from '@angular/common';
import { ListComponent } from './list/list.component';
@NgModule({
declarations: [ListComponent],//定义list组件
exports: [ListComponent],//导出list组件
imports: [
CommonModule
]
})
export class OrderModule { }Copy after login list.component.ts import { Component, OnInit } from '@angular/core';
@Component({
selector: 'app-list',
templateUrl: './list.component.html',
styleUrls: ['./list.component.scss']
})
export class ListComponent implements OnInit {
constructor() { }
ngOnInit() {
}
}Copy after login 导入使用特性模块 现在我们导入根模块 app.module.ts import { BrowserModule } from '@angular/platform-browser';
import { NgModule } from '@angular/core';
import { AppRoutingModule } from './app-routing.module';
import { AppComponent } from './app.component';
import { OrderModule } from './order/order.module';
@NgModule({
declarations: [
AppComponent
],
imports: [
BrowserModule,
AppRoutingModule,
OrderModule //将order模块导入
],
providers: [],
bootstrap: [AppComponent]
})
export class AppModule { }Copy after login app.component.html 在跟模块使用 <!--The content below is only a placeholder and can be replaced.-->
<div style="text-align:center">
<h1>
Welcome to {{ title }}!
</h1>
</div>
<app-list></app-list>
<router-outlet></router-outlet>Copy after login 我们可以看到渲染了order模块的list组件
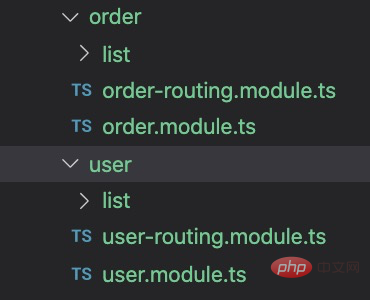
6.惰性加载模块 如果我们将所有的模块都导入根模块,那么应用在初始化加载的时候就会非常慢。这时候我们应该考虑使用惰性加载。根据需求加载相应都模块,减少应用初始化包的大小以及减少加载的时间,提高用户体验性。 惰性加载的模块特点是该模块拥有路由模块。so 接着上面我们创建了一个订单模块 我们给订单模块加上路由。并再创建一个user.module以及user.module模块下的list组件。
order.module import { NgModule } from '@angular/core';
import { CommonModule } from '@angular/common';
import { OrderRoutingModule } from './order-routing.module';
import { ListComponent } from './list/list.component';
@NgModule({
declarations: [ListComponent],
imports: [
CommonModule,
OrderRoutingModule
]
})
export class OrderModule { }Copy after login order-routing.module import { NgModule } from '@angular/core';
import { Routes, RouterModule } from '@angular/router';
import { ListComponent } from './list/list.component';
const routes: Routes = [
{
path: 'list',
component: ListComponent
},
];
@NgModule({
imports: [RouterModule.forChild(routes)],
exports: [RouterModule]
})
export class OrderRoutingModule { }Copy after login user模块如此类推 接下来配置路由 AppRoutingModule在顶级路由中配置 import { NgModule } from '@angular/core';
import { Routes, RouterModule } from '@angular/router';
const routes: Routes = [
{
path: 'orders',
loadChildren: './order/order.module#OrderModule'
},
{
path: 'orders',
loadChildren: './user/user.module#UserModule'
}
];
@NgModule({
imports: [RouterModule.forRoot(routes)],
exports: [RouterModule]
})
export class AppRoutingModule { }Copy after login 我们给app.component.html新增两个button <!--The content below is only a placeholder and can be replaced.-->
<div style="text-align:center">
<h2>
Welcome to {{ title }}!
</h2>
</div>
<button routerLink="/user/list">user</button>
<button routerLink="/order/list">order</button>
<router-outlet></router-outlet>Copy after login 效果图
What are the benefits of lazily loading modules? In large projects, there are often many modules, and they are very large. If a module is 1m, if we enter the address in the browser to open the application, it will be very slow to load 100m in an instant, and we do not necessarily need to use these 100 modules. Split the system business into various modules and draw clear boundaries. Load on demand, I clicked user, I loaded the user module, the user list appeared, and I operated on the user. Loading only when I need to use it greatly reduces the initial loading time of the page and reduces resource consumption.
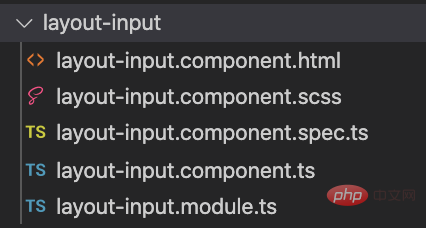
7. Shared module Shared module, as the name suggests, is shared with in all modules. First, you must define the specific functional characteristics of this module, such as instructions, pipelines, and components, etc., which are packaged into modules. Which business modules need to use the functions inside them can be imported into their modules. For a simple example, the inputs of this system are all in the same style. We can make an input module and then directly import it in other modules. This greatly standardizes the unity of the system and reduces future maintenance costs.
For more programming related knowledge, please visit: Programming Video! ! |
The above is the detailed content of In-depth understanding of NgModule (module) in Angular. For more information, please follow other related articles on the PHP Chinese website!

Hot AI Tools

Undresser.AI Undress
AI-powered app for creating realistic nude photos

AI Clothes Remover
Online AI tool for removing clothes from photos.

Undress AI Tool
Undress images for free

Clothoff.io
AI clothes remover

AI Hentai Generator
Generate AI Hentai for free.

Hot Article

Hot Tools

Notepad++7.3.1
Easy-to-use and free code editor

SublimeText3 Chinese version
Chinese version, very easy to use

Zend Studio 13.0.1
Powerful PHP integrated development environment

Dreamweaver CS6
Visual web development tools

SublimeText3 Mac version
God-level code editing software (SublimeText3)

Hot Topics
 Let's talk about metadata and decorators in Angular
Feb 28, 2022 am 11:10 AM
This article continues the learning of Angular, takes you to understand the metadata and decorators in Angular, and briefly understands their usage. I hope it will be helpful to everyone!
 Angular learning talks about standalone components (Standalone Component)
Dec 19, 2022 pm 07:24 PM
This article will take you to continue learning angular and briefly understand the standalone component (Standalone Component) in Angular. I hope it will be helpful to you!
 How to install Angular on Ubuntu 24.04
Mar 23, 2024 pm 12:20 PM
Angular.js is a freely accessible JavaScript platform for creating dynamic applications. It allows you to express various aspects of your application quickly and clearly by extending the syntax of HTML as a template language. Angular.js provides a range of tools to help you write, update and test your code. Additionally, it provides many features such as routing and form management. This guide will discuss how to install Angular on Ubuntu24. First, you need to install Node.js. Node.js is a JavaScript running environment based on the ChromeV8 engine that allows you to run JavaScript code on the server side. To be in Ub
 Detailed explanation of angular learning state manager NgRx
May 25, 2022 am 11:01 AM
This article will give you an in-depth understanding of Angular's state manager NgRx and introduce how to use NgRx. I hope it will be helpful to you!
 A brief analysis of how to use monaco-editor in angular
Oct 17, 2022 pm 08:04 PM
How to use monaco-editor in angular? The following article records the use of monaco-editor in angular that was used in a recent business. I hope it will be helpful to everyone!
 An article exploring server-side rendering (SSR) in Angular
Dec 27, 2022 pm 07:24 PM
Do you know Angular Universal? It can help the website provide better SEO support!
 What should I do if the project is too big? How to split Angular projects reasonably?
Jul 26, 2022 pm 07:18 PM
The Angular project is too large, how to split it reasonably? The following article will introduce to you how to reasonably split Angular projects. I hope it will be helpful to you!
 Angular + NG-ZORRO quickly develop a backend system
Apr 21, 2022 am 10:45 AM
This article will share with you an Angular practical experience and learn how to quickly develop a backend system using angualr combined with ng-zorro. I hope it will be helpful to everyone!


