

Detailed example of tensor data structure in Pytorch


【Related recommendations: Python3 video tutorial】
torch.Tensor
torch.Tensor is a multidimensional matrix containing elements of a single data type, similar to numpy's array. Tensor can be generated using torch.tensor() to convert Python's list or
sequence data. The generated one is dtype and the default is torch.FloatTensor.
Note1. A Tensor of a specified data type can be generated by passing parameterstorch.tensor()
always copies data. If you have a Tensor data and just want to change itsrequires_gradproperties, userequires_grad_()ordetach()to avoid copying. If you have anumpyarray and want to avoid a copy, usetorch.as_tensor().
torch.dtype and/or torch.device to the constructor:
Note that in order to change the torch.device and/or torch.dtype of an existing tensor, consider using the2, Tensor Content can be accessed and modified through Python indexing or slicing:to()
method.>>> torch.ones([2,3], dtype=torch.float64, device="cuda:0") tensor([[1., 1., 1.], [1., 1., 1.]], device='cuda:0', dtype=torch.float64) >>> torch.ones([2,3], dtype=torch.float32) tensor([[1., 1., 1.], [1., 1., 1.]])Copy after login
>>> matrix = torch.tensor([[2,3,4],[5,6,7]])
>>> print(matrix[1][2])
tensor(7)
>>> matrix[1][2] = 9
>>> print(matrix)
tensor([[2, 3, 4],
[5, 6, 9]])torch.Tensor.item() or int() methods from only Get the Python Number from the Tensor of a value:
>>> x = torch.tensor([[4.5]])
>>> x
tensor([[4.5000]])
>>> x.item()
4.5
>>> int(x)
4
requires_grad=True, so torch.autograd will record the relevant The operation realizes automatic derivation:
>>> x = torch.tensor([[1., -1.], [1., 1.]], requires_grad=True)
>>> out = x.pow(2).sum()
>>> out.backward()
>>> x.grad
tensor([[ 2.0000, -2.0000],
 [ 2.0000,  2.0000]])
torch.Storage to save its data. The tensor class provides a multidimensional, strided view and defines numerical operations.
torch. Tensor is the abbreviation of the default tensor type (torch.FloatTensor), which is the 32 bit floating point data type.
- Data type: Different tensor data types can be set by changing the dtype parameter value of the torch.tensor() method. Dimension: Different types of data can be represented by tensors of different dimensions. A scalar is a 0-dimensional tensor, a vector is a 1-dimensional tensor, and a matrix is a 2-dimensional tensor. Color images have three channels, rgb, and can be represented as a 3-dimensional tensor. Video also has a time dimension, which can be expressed as a 4-dimensional tensor with several square brackets [the number of dimensions. The dimensions of a tensor can be obtained using the dim() method. Size: You can use the shape attribute or the size() method to view the length of the tensor in each dimension, and you can use the view() method or the reshape() method to change the size of the tensor.
matrix = torch.tensor([[[1,2,3,4],[5,6,7,8]],
                       [[5,4,6,7], [5,6,8,9]]], dtype = torch.float64)
print(matrix)               # 打印 tensor
print(matrix.dtype)     # 打印 tensor 数据类型
print(matrix.dim())     # 打印 tensor 维度
print(matrix.size())     # 打印 tensor 尺寸
print(matrix.shape)    # 打印 tensor 尺寸
matrix2 = matrix.view(4, 2, 2) # 改变 tensor 尺寸
print(matrix2)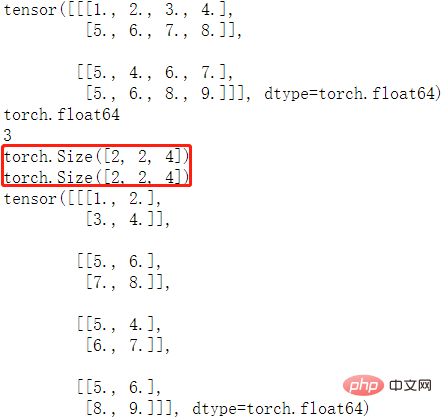
contiguous), while reshape() ) At the same time, you can also operate on tensors that do not meet the continuity conditions. When the tensor continuity condition (contiguous) is satisfied, the result returned by a.reshape() is the same as a.view(), and no new memory space will be opened; if contiguous is not satisfied When using the view() method directly, it will fail. reshape() is still useful, but it will re-open the memory space and will not share the memory with the previous tensor, that is, it will return a "copy" (Equivalent to calling the contiguous() method first and then using the view() method). For more understanding, refer to this article
.numpy() method to get a numpy array from a Tensor, or you can use torch.from_numpy to get a Tensor from a numpy array. The Tensor and numpy arrays associated with these two methods share data memory. You can use the clone method of the tensor to copy the tensor to break this association.
arr = np.random.rand(4,5) print(type(arr)) tensor1 = torch.from_numpy(arr) print(type(tensor1)) arr1 = tensor1.numpy() print(type(arr1)) """ <class 'numpy.ndarray'> <class 'torch.Tensor'> <class 'numpy.ndarray'> """
item() method and tolist() method can convert tensors into Python numbers and lists of numbers
# item方法和tolist方法可以将张量转换成Python数值和数值列表 scalar = torch.tensor(5) # 标量 s = scalar.item() print(s) print(type(s)) tensor = torch.rand(3,2) # 矩阵 t = tensor.tolist() print(t) print(type(t)) """ 1.0 <class 'float'> [[0.8211846351623535, 0.20020723342895508], [0.011571824550628662, 0.2906131148338318]] <class 'list'> """
创建 Tensor
创建 tensor ,可以传入数据或者维度,torch.tensor() 方法只能传入数据,torch.Tensor() 方法既可以传入数据也可以传维度,强烈建议 tensor() 传数据,Tensor() 传维度,否则易搞混。
传入维度的方法
| 方法名 | 方法功能 | 备注 |
|---|---|---|
torch.rand(*sizes, out=None) → Tensor | 返回一个张量,包含了从区间 [0, 1) 的均匀分布中抽取的一组随机数。张量的形状由参数sizes定义。 | 推荐 |
torch.randn(*sizes, out=None) → Tensor | 返回一个张量,包含了从标准正态分布(均值为0,方差为1,即高斯白噪声)中抽取的一组随机数。张量的形状由参数sizes定义。 | 不推荐 |
torch.normal(means, std, out=None) → Tensor | 返回一个张量,包含了从指定均值 means 和标准差 std 的离散正态分布中抽取的一组随机数。标准差 std 是一个张量,包含每个输出元素相关的正态分布标准差。 | 多种形式,建议看源码 |
torch.rand_like(a) | 根据数据 a 的 shape 来生成随机数据 | 不常用 |
torch.randint(low=0, high, size) | 生成指定范围(low, hight)和 size 的随机整数数据 | 常用 |
torch.full([2, 2], 4) | 生成给定维度,全部数据相等的数据 | 不常用 |
torch.arange(start=0, end, step=1, *, out=None) | 生成指定间隔的数据 | 易用常用 |
torch.ones(*size, *, out=None) | 生成给定 size 且值全为1 的矩阵数据 | 简单 |
zeros()/zeros_like()/eye() | 全 0 的 tensor 和 对角矩阵 | 简单 |
样例代码:
>>> torch.rand([1,1,3,3])
tensor([[[[0.3005, 0.6891, 0.4628],
          [0.4808, 0.8968, 0.5237],
          [0.4417, 0.2479, 0.0175]]]])
>>> torch.normal(2, 3, size=(1, 4))
tensor([[3.6851, 3.2853, 1.8538, 3.5181]])
>>> torch.full([2, 2], 4)
tensor([[4, 4],
        [4, 4]])
>>> torch.arange(0,10,2)
tensor([0, 2, 4, 6, 8])
>>> torch.eye(3,3)
tensor([[1., 0., 0.],
        [0., 1., 0.],
[0., 0., 1.]])【相关推荐:Python3视频教程 】
The above is the detailed content of Detailed example of tensor data structure in Pytorch. For more information, please follow other related articles on the PHP Chinese website!

Hot AI Tools

Undresser.AI Undress
AI-powered app for creating realistic nude photos

AI Clothes Remover
Online AI tool for removing clothes from photos.

Undress AI Tool
Undress images for free

Clothoff.io
AI clothes remover

AI Hentai Generator
Generate AI Hentai for free.

Hot Article
Hot Tools

Notepad++7.3.1
Easy-to-use and free code editor

SublimeText3 Chinese version
Chinese version, very easy to use

Zend Studio 13.0.1
Powerful PHP integrated development environment

Dreamweaver CS6
Visual web development tools

SublimeText3 Mac version
God-level code editing software (SublimeText3)
Hot Topics
 1378
1378
 52
52

 Python: Exploring Its Primary Applications
Apr 10, 2025 am 09:41 AM
Python: Exploring Its Primary Applications
Apr 10, 2025 am 09:41 AM
Python is widely used in the fields of web development, data science, machine learning, automation and scripting. 1) In web development, Django and Flask frameworks simplify the development process. 2) In the fields of data science and machine learning, NumPy, Pandas, Scikit-learn and TensorFlow libraries provide strong support. 3) In terms of automation and scripting, Python is suitable for tasks such as automated testing and system management.
 The 2-Hour Python Plan: A Realistic Approach
Apr 11, 2025 am 12:04 AM
The 2-Hour Python Plan: A Realistic Approach
Apr 11, 2025 am 12:04 AM
You can learn basic programming concepts and skills of Python within 2 hours. 1. Learn variables and data types, 2. Master control flow (conditional statements and loops), 3. Understand the definition and use of functions, 4. Quickly get started with Python programming through simple examples and code snippets.
 Navicat's method to view MongoDB database password
Apr 08, 2025 pm 09:39 PM
Navicat's method to view MongoDB database password
Apr 08, 2025 pm 09:39 PM
It is impossible to view MongoDB password directly through Navicat because it is stored as hash values. How to retrieve lost passwords: 1. Reset passwords; 2. Check configuration files (may contain hash values); 3. Check codes (may hardcode passwords).
 How to use AWS Glue crawler with Amazon Athena
Apr 09, 2025 pm 03:09 PM
How to use AWS Glue crawler with Amazon Athena
Apr 09, 2025 pm 03:09 PM
As a data professional, you need to process large amounts of data from various sources. This can pose challenges to data management and analysis. Fortunately, two AWS services can help: AWS Glue and Amazon Athena.
 How to start the server with redis
Apr 10, 2025 pm 08:12 PM
How to start the server with redis
Apr 10, 2025 pm 08:12 PM
The steps to start a Redis server include: Install Redis according to the operating system. Start the Redis service via redis-server (Linux/macOS) or redis-server.exe (Windows). Use the redis-cli ping (Linux/macOS) or redis-cli.exe ping (Windows) command to check the service status. Use a Redis client, such as redis-cli, Python, or Node.js, to access the server.
 How to read redis queue
Apr 10, 2025 pm 10:12 PM
How to read redis queue
Apr 10, 2025 pm 10:12 PM
To read a queue from Redis, you need to get the queue name, read the elements using the LPOP command, and process the empty queue. The specific steps are as follows: Get the queue name: name it with the prefix of "queue:" such as "queue:my-queue". Use the LPOP command: Eject the element from the head of the queue and return its value, such as LPOP queue:my-queue. Processing empty queues: If the queue is empty, LPOP returns nil, and you can check whether the queue exists before reading the element.
 How to view server version of Redis
Apr 10, 2025 pm 01:27 PM
How to view server version of Redis
Apr 10, 2025 pm 01:27 PM
Question: How to view the Redis server version? Use the command line tool redis-cli --version to view the version of the connected server. Use the INFO server command to view the server's internal version and need to parse and return information. In a cluster environment, check the version consistency of each node and can be automatically checked using scripts. Use scripts to automate viewing versions, such as connecting with Python scripts and printing version information.
 How secure is Navicat's password?
Apr 08, 2025 pm 09:24 PM
How secure is Navicat's password?
Apr 08, 2025 pm 09:24 PM
Navicat's password security relies on the combination of symmetric encryption, password strength and security measures. Specific measures include: using SSL connections (provided that the database server supports and correctly configures the certificate), regularly updating Navicat, using more secure methods (such as SSH tunnels), restricting access rights, and most importantly, never record passwords.
