 Web Front-end
 Vue.js
 An article provides an in-depth analysis of the responsive mechanism in Vue3
An article provides an in-depth analysis of the responsive mechanism in Vue3

Today I will take you to have an in-depth understanding of the responsive mechanism of Vue 3. I believe that after learning today’s content, you will have a deeper understanding of the responsive mechanism; I will also combine it with code examples , to help you master the advanced usage of responsive mechanisms, let’s officially start learning! [Related recommendations: vuejs video tutorial]
What is responsiveness
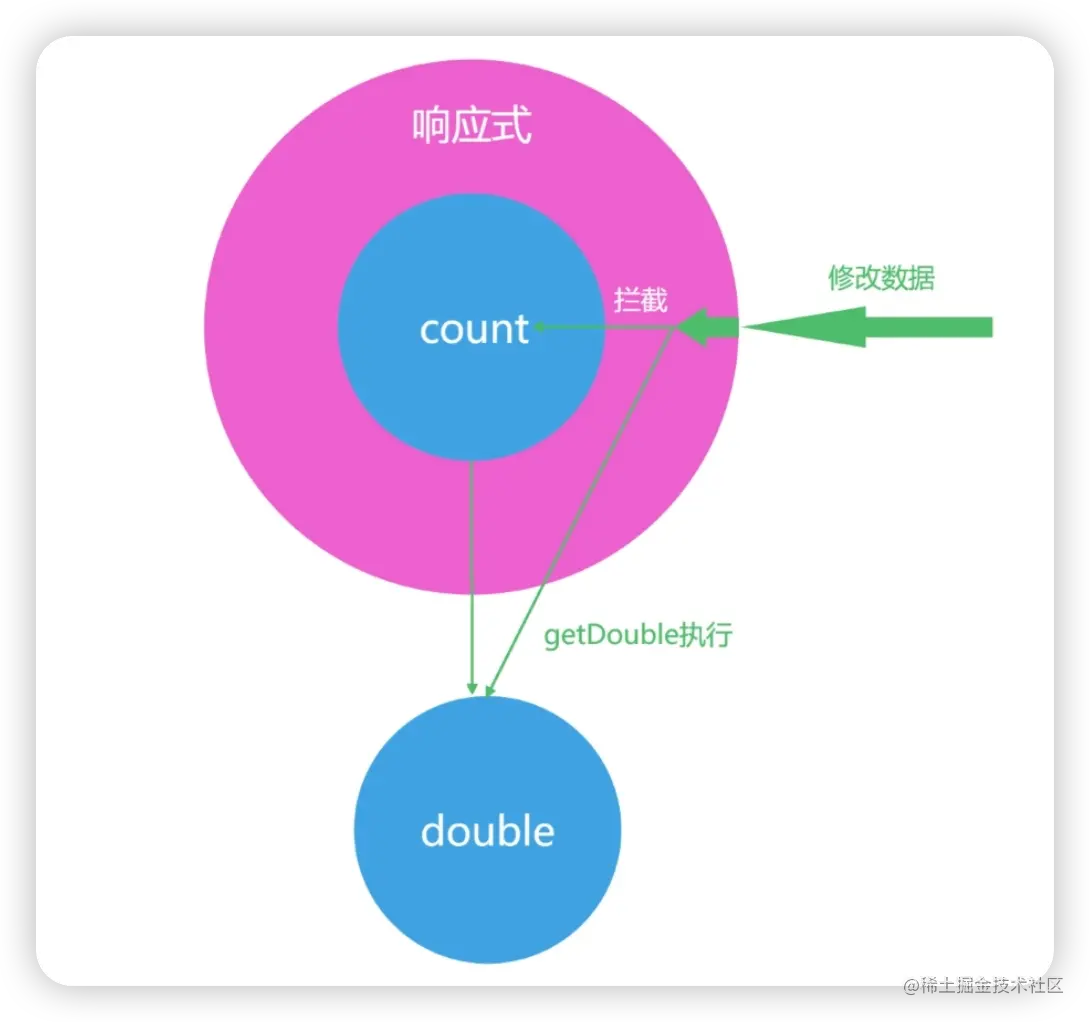
Responsiveness has always been the characteristic of Vue One of the functions; in contrast, variables in JavaScript do not have the concept of responsiveness; the first concept you are instilled when learning JavaScript is that the code is executed from top to bottom;
Let's look at the code below. After the code is executed, the two double results printed out are also 2; even if we modify the value of count in the code, the value of double will not change at all
let count = 1
let double = count * 2
count = 2
every time the value of count is modified.
For example, in the following code, we first encapsulate the logic of calculating double into a function, and then after modifying the count, execute it again, and you will get the latest double valuelet count = 1 // 计算过程封装成函数 let getDouble = n=>n*2 //箭头函数 let double = getDouble(count) count = 2 // 重新计算double ,这里我们不能自动执行对double的计算 double = getDouble(count)

Responsiveness principle
What is the principle of responsiveness? Three responsive solutions have been used in Vue, namely defineProperty, Proxy and value setter. Let’s first look at Vue 2’s defineProperty APIHere I will illustrate with an example. In the following code, we define Each object obj uses defineProperty to proxy the count attribute; in this way, we intercept the value attribute of the obj object, execute the get function when reading the count attribute, execute the set function when modifying the count attribute, and reset it inside the set function. Calculating doublelet getDouble = n=>n*2
let obj = {}
let count = 1
let double = getDouble(count)
Object.defineProperty(obj,'count',{
get(){
return count
},
set(val){
count = val
double = getDouble(val)
}
})
console.log(double) // 打印2
obj.count = 2
console.log(double) // 打印4 有种自动变化的感觉$delete a special function to delete data
delete obj.count
console.log(double) // doube还是4
let proxy = new Proxy(obj,{
    get : function (target,prop) {
        return target[prop]
    },
    set : function (target,prop,value) {
        target[prop] = value;
        if(prop==='count'){
            double = getDouble(value)
    }
},
deleteProperty(target,prop){
    delete target[prop]
    if(prop==='count'){
        double = NaN
    }
   }
})
console.log(obj.count,double)
proxy.count = 2
console.log(obj.count,double)
delete proxy.count
// 删除属性后,我们打印log时,输出的结果就会是 undefined NaN
console.log(obj.count,double)import {reactive,computed,watchEffect} from 'vue'
let obj = reactive({
count:1
})
let double = computed(()=>obj.count*2)
obj.count = 2
watchEffect(()=>{
console.log('数据被修改了',obj.count,double.value)
})有了 Proxy 后,响应式机制就比较完备了;但是在 Vue 3 中还有另一个响应式实现的逻辑,就是利用对象的 get 和 set 函数来进行监听,这种响应式的实现方式,只能拦截某一个属性的修改,这也是 Vue 3 中 ref 这个 API 的实现
在下面的代码中,我们拦截了 count 的 value 属性,并且拦截了 set 操作,也能实现类似的功能
let getDouble = n => n * 2
let _value = 1

double = getDouble(_value)
let count = {
    get value() {
        return _value
    },
    set value(val) {
        _value = val
        double = getDouble(_value)
    }
}

console.log(count.value,double)
count.value = 2
console.log(count.value,double)三种实现原理的对比表格如下,帮助你理解三种响应式的区别
| 实现原理 | defineProperty | Proxy | value setter |
|---|---|---|---|
| 实际场景 | Vue 2 响应式 | Vue 3 reactive | Vue 3 ref |
| 优势 | 兼容性 | 基于proxy实现真正的拦截 | 实现简单 |
| 劣势 | 数组和属性删除等拦截不了 | 兼容不了 IE11 | 只拦截了 value 属性 |
| 实际应用 | Vue 2 | Vue 3 复杂数据结构 | Vue 3 简单数据结构 |
定制响应式数据
简单入门响应式的原理后,接下来我们学习一下响应式数据在使用的时候的进阶方式;我们看下使用 <script setup></script> 重构之后的 todolist 的代码;这段代码使用 watchEffect,数据变化之后会把数据同步到 localStorage 之上,这样我们就实现了 todolist 和本地存储的同步
import { ref, watchEffect, computed } from "vue";
let title = ref("");
let todos = ref(JSON.parse(localStorage.getItem('todos')||'[]'));
watchEffect(()=>{
    localStorage.setItem('todos',JSON.stringify(todos.value))
})
function addTodo() {
    todos.value.push({
        title: title.value,
        done: false,
    });
    title.value = "";
}更进一步,我们可以直接抽离一个 useStorage 函数,在响应式的基础之上,把任意数据响应式的变化同步到本地存储;我们先看下面的这段代码,ref 从本地存储中获取数据,封装成响应式并且返回,watchEffect 中做本地存储的同步,useStorage 这个函数可以抽离成一个文件,放在工具函数文件夹中
function useStorage(name, value=[]){
    let data = ref(JSON.parse(localStorage.getItem(name)||'[]'))
    watchEffect(()=>{
        localStorage.setItem(name,JSON.stringify(data.value))
    })
    return data
}在项目中我们使用下面代码的写法,把 ref 变成 useStorage,这也是 Composition API 最大的优点,也就是可以任意拆分出独立的功能
let todos = useStorage('todos',[])
function addTodo() {
    ...code
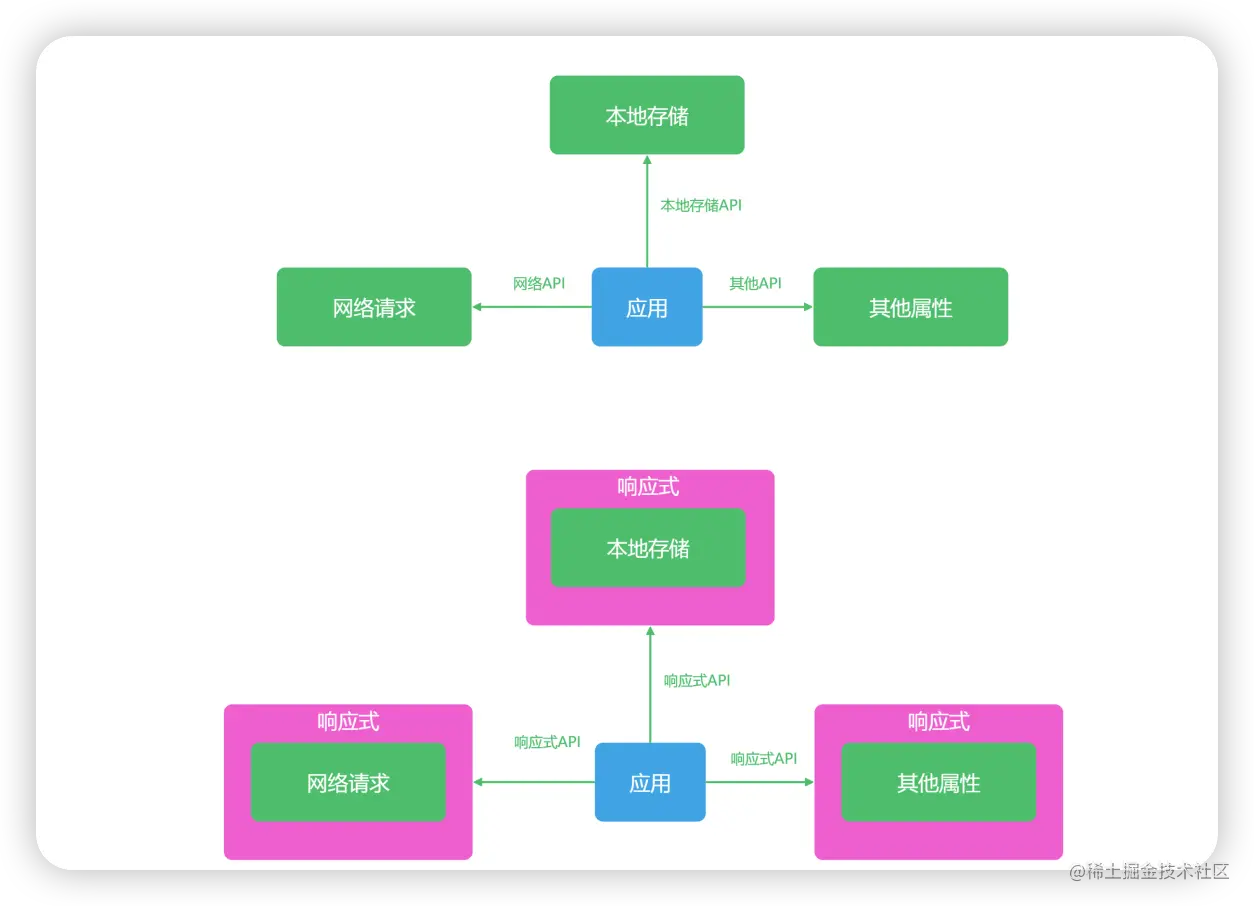
}现在,你应该已经学会了在 Vue 内部进阶地使用响应式机制,去封装独立的函数;在后续的实战应用中,我们也会经常对通用功能进行封装;如下图所示,我们可以把日常开发中用到的数据,无论是浏览器的本地存储,还是网络数据,都封装成响应式数据,统一使用响应式数据开发的模式;这样,我们开发项目的时候,只需要修改对应的数据就可以了

基于响应式的开发模式,我们还可以按照类似的原理,把我们需要修改的数据,都变成响应式;比如,我们可以在 loading 状态下,去修改浏览器的小图标 favicon;和本地存储类似,修改 favicon 时,我们需要找到 head 中有 icon 属性的标签
在下面的代码中,我们把对图标的对应修改的操作封装成了 useFavicon 函数,并且通过 ref 和 watch 的包裹,我们还把小图标变成了响应式数据
import {ref,watch} from 'vue'
export default function useFavicon( newIcon ) {
    const favicon = ref(newIcon)
    const updateIcon = (icon) => {
        document.head
        .querySelectorAll(`link[rel*="icon"]`)
        .forEach(el => el.href = `${icon}`)
    }
watch( favicon,
    (i) => {
        updateIcon(i)
    }
)
    return {favicon,reset}
}这样在组件中,我们就可以通过响应式的方式去修改和使用小图标,通过对 faivcon.value 的修改就可以随时更换网站小图标;下面的代码,就实现了在点击按钮之后,修改了网页的图标为 geek.png 的操作
<script>
import useFavicon from './utils/favicon'
let {favicon} = useFavicon()
function loading(){
favicon.value = '/geek.png'
}
</script>
<template>
<button>123</button>
</template>Vueuse 工具包
我们自己封装的 useStorage,算是把 localStorage 简单地变成了响应式对象,实现数据的更新和localStorage 的同步;同理,我们还可以封装更多的类似 useStorage 函数的其他 use 类型的函数,把实际开发中你用到的任何数据或者浏览器属性,都封装成响应式数据,这样就可以极大地提高我们的开发效率
Vue 社区中其实已经有一个类似的工具集合,也就是 VueUse,它把开发中常见的属性都封装成为响应式函数
VueUse 趁着这一波 Vue 3 的更新,跟上了响应式 API 的潮流;VueUse 的官方的介绍说这是一个 Composition API 的工具集合,适用于 Vue 2.x 或者 Vue 3.x,用起来和 React Hooks 还挺像的
在项目目录下打开命令行里,我们输入如下命令,来进行 VueUse 插件的安装:
npm install @vueuse/core
然后,我们就先来使用一下 VueUse;在下面这段代码中,我们使用 useFullscreen 来返回全屏的状态和切换全屏的函数;这样,我们就不需要考虑浏览器全屏的 API,而是直接使用 VueUse 响应式数据和函数就可以很轻松地在项目中实现全屏功能
<template>
<h1 id="click">click</h1>
</template>
<script>
import { useFullscreen } from '@vueuse/core'
const { isFullscreen, enter, exit, toggle } = useFullscreen()
</script>useFullscreen 的封装逻辑和 useStorage 类似,都是屏蔽了浏览器的操作,把所有我们需要用到的状态和数据都用响应式的方式统一管理,VueUse 中包含了很多我们常用的工具函数,我们可以把网络状态、异步请求的数据、动画和事件等功能,都看成是响应式的数据去管理
The above is the detailed content of An article provides an in-depth analysis of the responsive mechanism in Vue3. For more information, please follow other related articles on the PHP Chinese website!

Hot AI Tools

Undresser.AI Undress
AI-powered app for creating realistic nude photos

AI Clothes Remover
Online AI tool for removing clothes from photos.

Undress AI Tool
Undress images for free

Clothoff.io
AI clothes remover

AI Hentai Generator
Generate AI Hentai for free.

Hot Article

Hot Tools

Notepad++7.3.1
Easy-to-use and free code editor

SublimeText3 Chinese version
Chinese version, very easy to use

Zend Studio 13.0.1
Powerful PHP integrated development environment

Dreamweaver CS6
Visual web development tools

SublimeText3 Mac version
God-level code editing software (SublimeText3)

Hot Topics
 How to use echarts in vue
May 09, 2024 pm 04:24 PM
Using ECharts in Vue makes it easy to add data visualization capabilities to your application. Specific steps include: installing ECharts and Vue ECharts packages, introducing ECharts, creating chart components, configuring options, using chart components, making charts responsive to Vue data, adding interactive features, and using advanced usage.
 The role of export default in vue
May 09, 2024 pm 06:48 PM
Question: What is the role of export default in Vue? Detailed description: export default defines the default export of the component. When importing, components are automatically imported. Simplify the import process, improve clarity and prevent conflicts. Commonly used for exporting individual components, using both named and default exports, and registering global components.
 How to use map function in vue
May 09, 2024 pm 06:54 PM
The Vue.js map function is a built-in higher-order function that creates a new array where each element is the transformed result of each element in the original array. The syntax is map(callbackFn), where callbackFn receives each element in the array as the first argument, optionally the index as the second argument, and returns a value. The map function does not change the original array.
 The difference between event and $event in vue
May 08, 2024 pm 04:42 PM
In Vue.js, event is a native JavaScript event triggered by the browser, while $event is a Vue-specific abstract event object used in Vue components. It is generally more convenient to use $event because it is formatted and enhanced to support data binding. Use event when you need to access specific functionality of the native event object.
 The role of onmounted in vue
May 09, 2024 pm 02:51 PM
onMounted is a component mounting life cycle hook in Vue. Its function is to perform initialization operations after the component is mounted to the DOM, such as obtaining references to DOM elements, setting data, sending HTTP requests, registering event listeners, etc. It is only called once when the component is mounted. If you need to perform operations after the component is updated or before it is destroyed, you can use other lifecycle hooks.
 The difference between export and export default in vue
May 08, 2024 pm 05:27 PM
There are two ways to export modules in Vue.js: export and export default. export is used to export named entities and requires the use of curly braces; export default is used to export default entities and does not require curly braces. When importing, entities exported by export need to use their names, while entities exported by export default can be used implicitly. It is recommended to use export default for modules that need to be imported multiple times, and use export for modules that are only exported once.
 What are hooks in vue
May 09, 2024 pm 06:33 PM
Vue hooks are callback functions that perform actions on specific events or lifecycle stages. They include life cycle hooks (such as beforeCreate, mounted, beforeDestroy), event handling hooks (such as click, input, keydown) and custom hooks. Hooks enhance component control, respond to component life cycles, handle user interactions and improve component reusability. To use hooks, just define the hook function, execute the logic and return an optional value.
 What scenarios can event modifiers in vue be used for?
May 09, 2024 pm 02:33 PM
Vue.js event modifiers are used to add specific behaviors, including: preventing default behavior (.prevent) stopping event bubbling (.stop) one-time event (.once) capturing event (.capture) passive event listening (.passive) Adaptive modifier (.self)Key modifier (.key)


