css deformation has several properties
css transformation has 6 attributes: 1. transform, which applies 2D or 3D transformation to elements; 2. transform-origin, which allows users to change the position of the transformed element; 3. transform-style, which specifies to be nested How elements are displayed in 3D space; 4. perspective, stipulates the perspective effect of 3D elements; 5. perspective-origin, stipulates the bottom position of 3D elements; 6. backface-visibility.
The operating environment of this tutorial: Windows 7 system, CSS3&&HTML5 version, Dell G3 computer.
CSS3 transformations can move, scale, rotate, lengthen or stretch elements. The effect of a transformation is to make an element change its shape, size and position.
css transformation (transformation) property
| Property |
Description | CSS |
|---|---|---|
| transform | Apply a 2D or 3D transform to an element. | 3 |
| transform-origin | Allows you to change the position of the element being transformed. | 3 |
| transform-style | Specifies how nested elements are displayed in 3D space. | 3 |
| perspective | Specifies the perspective effect of 3D elements. | 3 |
| perspective-origin | Specifies the bottom position of the 3D element. | 3 |
| backface-visibility | Defines whether the element is visible when not facing the screen. | 3 |
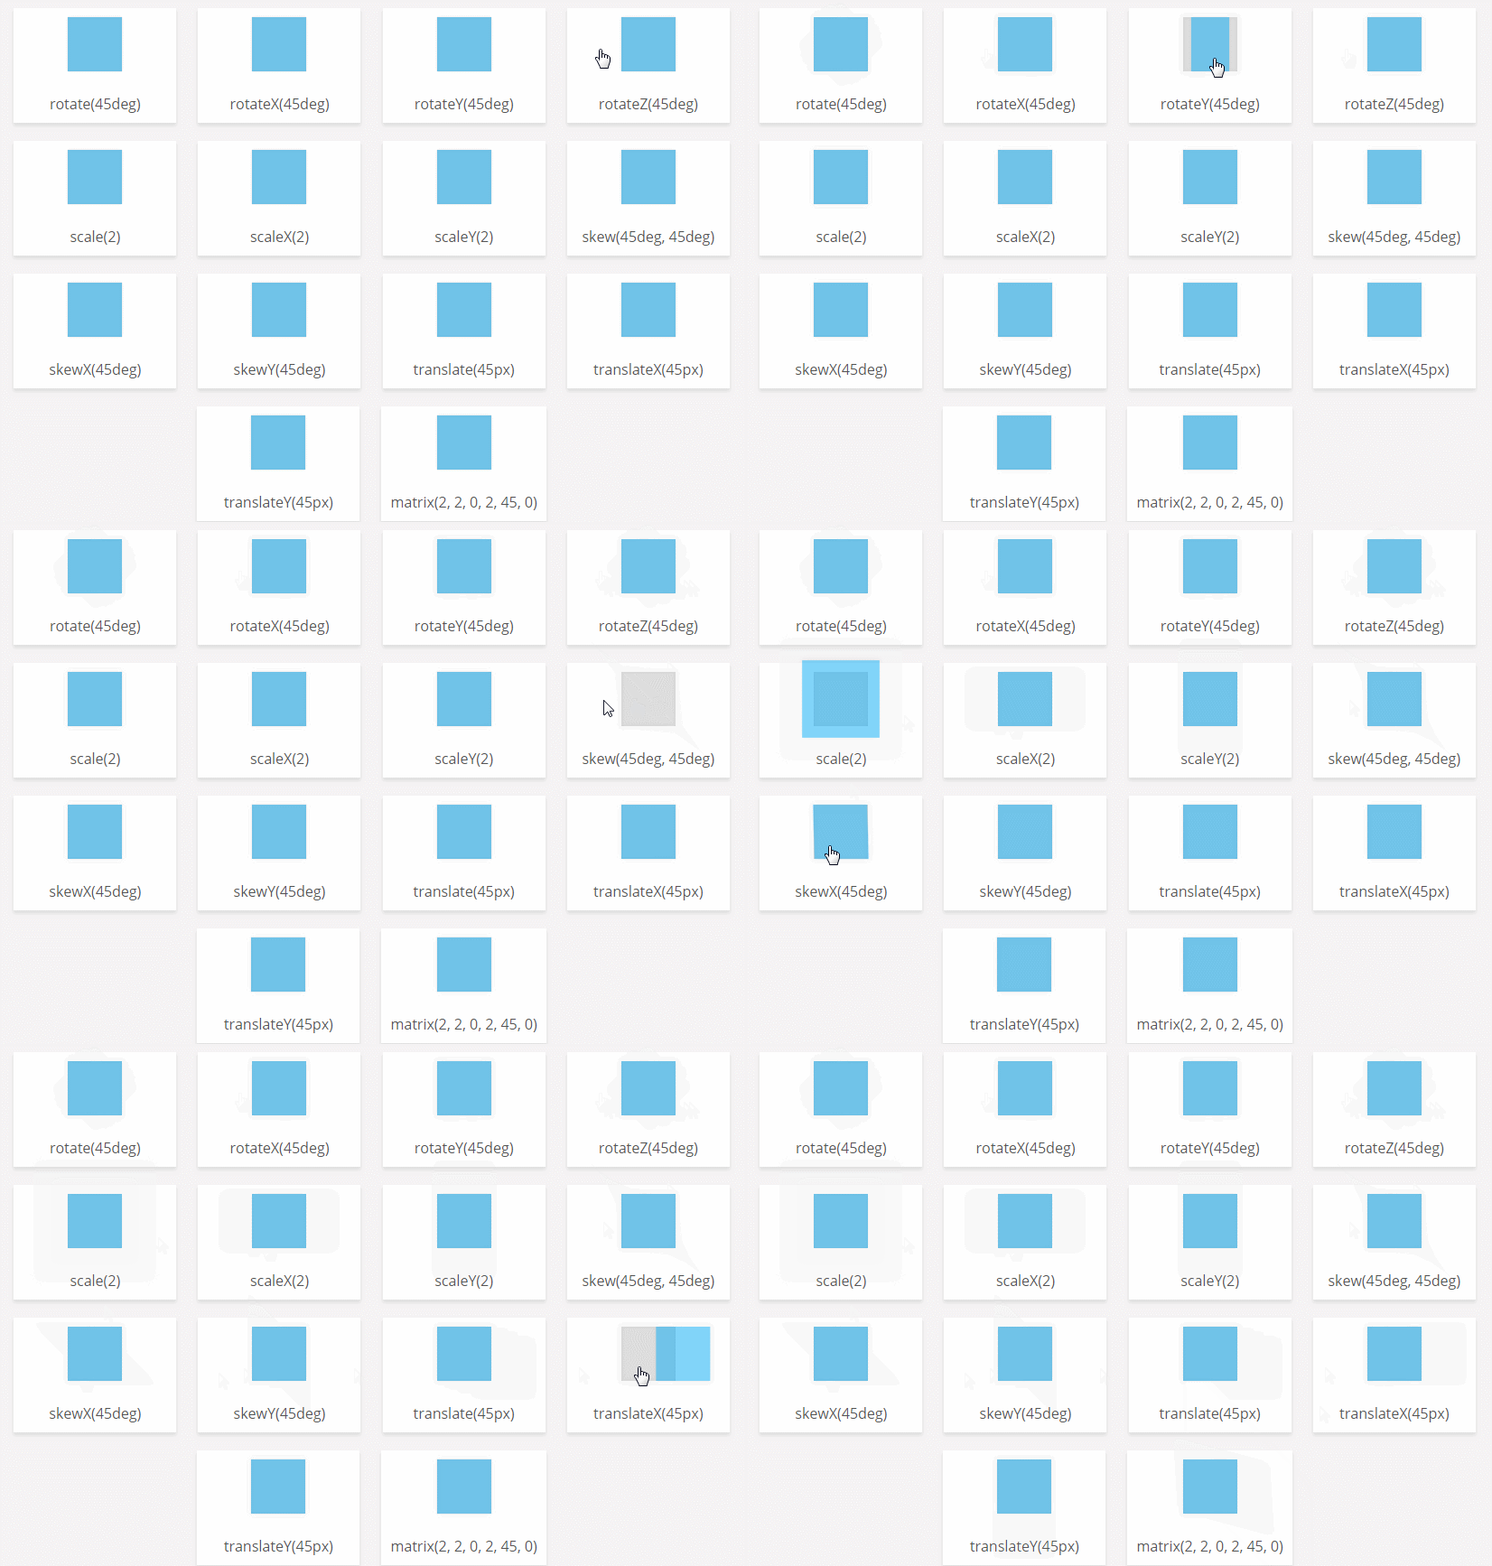
CSS3 transform attribute
Function: The transform attribute is applied to the element 2D or 3D conversion. This property allows us to rotate, scale, move or tilt the element.
Grammar:
transform: none|transform-functions;
Usage example
<!DOCTYPE html>
<html>
<head>
<style>
*, *:after, *:before {
box-sizing: border-box;
}
body {
background: #F5F3F4;
margin: 0;
padding: 10px;
font-family: 'Open Sans', sans-serif;
text-align: center;
}
h2, h4 {
font-weight: 400;
color: #4d4d4d;
}
.card {
display: inline-block;
margin: 10px;
background: #fff;
padding: 10px;
min-width: 180px;
box-shadow: 0 3px 5px #ddd;
color: #555;
}
.card .box {
width: 60px;
height: 60px;
margin: auto;
background: #ddd;
cursor: pointer;
box-shadow: 0 0 5px #ccc inset;
}
.card .box .fill {
width: 60px;
height: 60px;
position: relative;
background: #03A9F4;
opacity: .5;
box-shadow: 0 0 5px #ccc;
-webkit-transition: 0.3s;
transition: 0.3s;
}
.card p {
margin: 25px 0 0;
}
.rotate:hover .fill {
-webkit-transform: rotate(45deg);
transform: rotate(45deg);
}
.rotateX:hover .fill {
-webkit-transform: rotateX(45deg);
transform: rotateX(45deg);
}
.rotateY:hover .fill {
-webkit-transform: rotateY(45deg);
transform: rotateY(45deg);
}
.rotateZ:hover .fill {
-webkit-transform: rotate(45deg);
transform: rotate(45deg);
}
.scale:hover .fill {
-webkit-transform: scale(2, 2);
transform: scale(2, 2);
}
.scaleX:hover .fill {
-webkit-transform: scaleX(2);
transform: scaleX(2);
}
.scaleY:hover .fill {
-webkit-transform: scaleY(2);
transform: scaleY(2);
}
.skew:hover .fill {
-webkit-transform: skew(45deg, 45deg);
transform: skew(45deg, 45deg);
}
.skewX:hover .fill {
-webkit-transform: skewX(45deg);
transform: skewX(45deg);
}
.skewY:hover .fill {
-webkit-transform: skewY(45deg);
transform: skewY(45deg);
}
.translate:hover .fill {
-webkit-transform: translate(45px, 1em);
transform: translate(45px, 1em);
}
.translateX:hover .fill {
-webkit-transform: translateX(45px);
transform: translateX(45px);
}
.translateY:hover .fill {
-webkit-transform: translateY(45px);
transform: translateY(45px);
}
.matrix:hover .fill {
-webkit-transform: matrix(2, 2, 0, 2, 45, 0);
transform: matrix(2, 2, 0, 2, 45, 0);
}
</style>
</head>
<body>
<!-- Rotate-->
<div class="card">
<div class="box rotate">
<div class="fill"></div>
</div>
<p>rotate(45deg) </p>
</div>
<div class="card">
<div class="box rotateX">
<div class="fill"></div>
</div>
<p>rotateX(45deg)</p>
</div>
<div class="card">
<div class="box rotateY">
<div class="fill"></div>
</div>
<p>rotateY(45deg)</p>
</div>
<div class="card">
<div class="box rotateZ">
<div class="fill"></div>
</div>
<p>rotateZ(45deg) </p>
</div>
<!-- scale-->
<div class="card">
<div class="box scale">
<div class="fill"></div>
</div>
<p>scale(2)</p>
</div>
<div class="card">
<div class="box scaleX">
<div class="fill"></div>
</div>
<p>scaleX(2) </p>
</div>
<div class="card">
<div class="box scaleY">
<div class="fill"></div>
</div>
<p>scaleY(2) </p>
</div>
<!-- skew-->
<div class="card">
<div class="box skew">
<div class="fill"></div>
</div>
<p>skew(45deg, 45deg) </p>
</div>
<div class="card">
<div class="box skewX">
<div class="fill"></div>
</div>
<p>skewX(45deg)</p>
</div>
<div class="card">
<div class="box skewY">
<div class="fill"></div>
</div>
<p>skewY(45deg)</p>
</div>
<!-- translate-->
<div class="card">
<div class="box translate">
<div class="fill"></div>
</div>
<p>translate(45px) </p>
</div>
<div class="card">
<div class="box translateX">
<div class="fill"></div>
</div>
<p>translateX(45px)</p>
</div>
<div class="card">
<div class="box translateY">
<div class="fill"></div>
</div>
<p>translateY(45px)</p>
</div>
<div class="card">
<div class="box matrix">
<div class="fill"></div>
</div>
<p> matrix(2, 2, 0, 2, 45, 0)</p>
</div>
</body>
</html>Rendering:
CSS3 transform-origin attribute
Function: The transform-origin attribute allows you to change the position of the transformed element. 2D transform elements change the element's x and y axes. 3D transform elements can also change their Z-axis.
Syntax:
transform-origin: x-axis y-axis z-axis;
| Defines where on the X-axis the view is placed. Possible values: ● left ● center ● right
| |
| Defines where on the Y-axis the view is placed. Possible values: ● top ● center ● bottom ● length ● % | |
| Defines where on the Z axis the view is placed. Possible values: length |
| 值 | 描述 |
|---|---|
| number | 元素距离视图的距离,以像素计。 |
| none | 默认值。与 0 相同。不设置透视。 |
注释:perspective 属性只影响 3D 转换元素。
提示:请与 perspective-origin 属性一同使用该属性,这样您就能够改变 3D 元素的底部位置。
使用示例:
<!DOCTYPE html>
<html>
<head>
<meta charset="utf-8">
<style>
#div1
{
	position: relative;
	height: 150px;
	width: 150px;
	margin: 50px;
	padding:10px;
	border: 1px solid black;
	perspective:150px;
	-webkit-perspective:150px; /* Safari and Chrome */
}

#div2
{
	padding:50px;
	position: absolute;
	border: 1px solid black;
	background-color: red;
	transform: rotateX(45deg);
	-webkit-transform: rotateX(45deg); /* Safari and Chrome */
}
</style>
</head>

<body>

<div id="div1">
  <div id="div2">HELLO</div>
</div>

</body>
</html>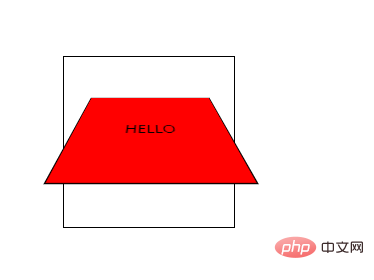
CSS3 perspective-origin属性
perspective-origin 属性定义 3D 元素所基于的 X 轴和 Y 轴。该属性允许您改变 3D 元素的底部位置。
定义时的perspective -Origin属性,它是一个元素的子元素,透视图,而不是元素本身。
perspective-origin: x-axis y-axis;
| 值 | 描述 |
|---|---|
| x-axis | 定义该视图在 x 轴上的位置。默认值:50%。 可能的值:
|
| y-axis | 定义该视图在 y 轴上的位置。默认值:50%。 可能的值:
|
使用示例:
<!DOCTYPE html>
<html>
<head>
<meta charset="utf-8">
<style>
#div1
{
	position: relative;
	height: 150px;
	width: 150px;
	margin: 50px;
	padding:10px;
	border: 1px solid black;
	perspective:150;
	perspective-origin: 10% 10%;
	-webkit-perspective:150; /* Safari and Chrome */
	-webkit-perspective-origin: 10% 10%; /* Safari and Chrome */
}

#div2
{
	padding:50px;
	position: absolute;
	border: 1px solid black;
	background-color: red;
	transform: rotateX(45deg);
	-webkit-transform: rotateX(45deg); /* Safari and Chrome */
}

</style>
</head>

<body>

<div id="div1">
  <div id="div2">HELLO</div>
</div>

</body>
</html>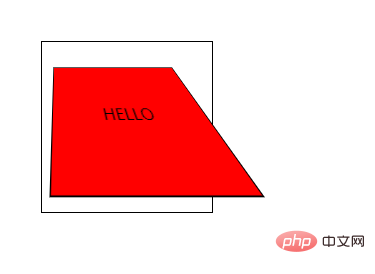
CSS3 backface-visibility属性
作用:backface-visibility 属性定义当元素不面向屏幕时是否可见。如果在旋转元素不希望看到其背面时,该属性很有用。
语法:
backface-visibility: visible|hidden;
visible:背面是可见的。
hidden:背面是不可见的。
注:只有 Internet Explorer 10+ 和 Firefox 支持 backface-visibility 属性;Opera 15+、Safari 和 Chrome 支持需使用-webkit-backface-visibility 属性替代。
使用示例
<!DOCTYPE html>
<html>
<head>
<meta charset="UTF-8">
<style>
div
{
position:relative;
height:60px;
width:60px;
border:1px solid #000;
background-color:yellow;
transform:rotateY(180deg);
-webkit-transform:rotateY(180deg); /* Chrome and Safari */
-moz-transform:rotateY(180deg); /* Firefox */
}
#div1
{
-webkit-backface-visibility:hidden;
-moz-backface-visibility:hidden;
-ms-backface-visibility:hidden;
}
#div2
{
-webkit-backface-visibility:visible;
-moz-backface-visibility:visible;
-ms-backface-visibility:visible;
}
</style>
</head>
<body>
<p>本例有两个 div 元素,均旋转 180 度,背向用户。</p>
<p>第一个 div 元素的 backface-visibility 属性设置为 "hidden",所以应该是不可见的。</p>
<div id="div1">DIV 1</div>
<p>第二个 div 元素的 backface-visibility 属性设置为 "visible",所以是可见的。</p>
<div id="div2">DIV 2</div>
<p><b>注释:</b>本例只在 Internet Explorer 10、Firefox、Chrome 以及 Safari 中有效。</p>
</body>
</html>效果图:
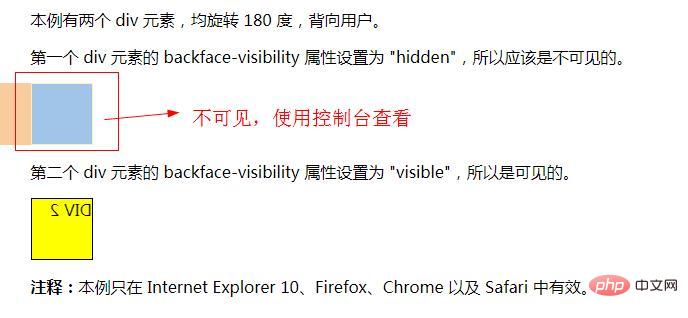
(学习视频分享:web前端)
The above is the detailed content of css deformation has several properties. For more information, please follow other related articles on the PHP Chinese website!

Hot AI Tools

Undresser.AI Undress
AI-powered app for creating realistic nude photos

AI Clothes Remover
Online AI tool for removing clothes from photos.

Undress AI Tool
Undress images for free

Clothoff.io
AI clothes remover

AI Hentai Generator
Generate AI Hentai for free.

Hot Article

Hot Tools

Notepad++7.3.1
Easy-to-use and free code editor

SublimeText3 Chinese version
Chinese version, very easy to use

Zend Studio 13.0.1
Powerful PHP integrated development environment

Dreamweaver CS6
Visual web development tools

SublimeText3 Mac version
God-level code editing software (SublimeText3)

Hot Topics
 How to achieve gap effect on the card and coupon layout with gradient background?
Apr 05, 2025 am 07:48 AM
Realize the gap effect of card coupon layout. When designing card coupon layout, you often encounter the need to add gaps on card coupons, especially when the background is gradient...
 Can Bootstrap directly implement horizontal waterfall flow layout?
Apr 05, 2025 am 07:15 AM
Using the Bootstrap framework to build horizontal waterfall flow layout Many developers hope to use the Bootstrap framework to quickly build web pages and achieve various complex layout effects...
 The style remains the same after PC page zooms: What are the possible solutions?
Apr 05, 2025 am 07:51 AM
The challenge of keeping the style of the page zoomed and the same after the page is zoomed in. Many developers will encounter a difficult problem when making PC pages: when the user zooms in or out of the browsing...
 iconfont icon displays abnormal intermittently? How to troubleshoot and solve coding problems
Apr 05, 2025 am 07:54 AM
iconfont...
 How to use the locally installed 'Jingnan Mai Round Body' on a web page and solve the display problem?
Apr 05, 2025 pm 02:06 PM
How to use locally installed font files on web pages In web development, users may want to use specific fonts installed on their computers to enhance the network...
 2K resolution rendering design of corporate websites: How can we perfectly adapt to the customer's display environment?
Apr 05, 2025 am 07:21 AM
Enterprise website rendering design: How to deal with the needs of 2K resolution. When designing a corporate website, customers often encounter special resolution requirements.
 How to create blocks of irregular shapes with CSS code only?
Apr 05, 2025 am 07:39 AM
Cleverly using CSS to implement irregular shape blocks This article will explain in detail how to use CSS to create irregular black shape blocks similar to those shown in the figure below: [There should be inserted here...
 What exactly is the merge of CSS vertical margins?
Apr 05, 2025 am 09:12 AM
In-depth understanding of CSS vertical margin merging In CSS style design, vertical margin merging is a common problem, which refers to adjacent block-level elements...


