

Detailed analysis of communication methods between Vue components

This article brings you relevant knowledge about vue, mainly introducing the communication methods between Vue components. Communication between Vue components has always been an important topic, although the officially launched Vuex state management solution It can solve the communication problem between components very well, but using Vuex inside the component library is often relatively heavy. Let’s take a look at it together. I hope it will be helpful to everyone.

[Related recommendations: javascript video tutorial, vue.js tutorial】
in the Vue component library During the development process, communication between Vue components has always been an important topic. Although the officially launched Vuex state management solution can very well solve the communication problem between components, using Vuex within the component library is often relatively heavy. This article The system lists several more practical communication methods between components that do not use Vuex for your reference.
Scenarios for communication between components
Before entering our topic today, let’s first summarize several scenarios for communication between Vue components. Generally, it can be divided into the following scenarios:
- Communication between parent and child components
- Communication between sibling components
- Between generational components Communication
Communication between parent and child components
Communication between parent and child components should be the simplest and most common type of Vue component communication , summarized in two parts: The parent component passes data to the child component through prop, and the child component passes data to the parent component through custom events.
The parent component passes data to the child component through prop
The data flow direction of the Vue component follows the principle of one-way data flow, All props form a One-way downward binding between their parent and child props: updates to the parent prop will flow downward to the child component, but not vice versa. This will prevent the child component from accidentally changing the state of the parent component, making the data flow of your application difficult to understand.
In addition, every time the parent component changes, all props in the child component will be refreshed to the latest values. This means you should not change props inside a child component. If you do this, Vue will issue a warning in the browser's console.
Parent component ComponentA:
<template>
<p>
<component-b title="welcome"></component-b>
</p>
</template>
<script>
import ComponentB from './ComponentB'
export default {
name: 'ComponentA',
components: {
ComponentB
}
}
</script>Child component ComponentB:
<template>
<p>
<p>{{title}}</p>
</p>
</template>
<script>
export default {
name: 'ComponentB',
props: {
title: {
type: String,
}
}
}
</script>The child component passes to the parent component through custom events Data
can be passed in the child component to generate an event to the parent component through $emit, and in the parent component through v-on/@ Monitor.
Sub-component ComponentA:
<template>
<p>
<component-b :title="title" @title-change="titleChange"></component-b>
</p>
</template>
<script>
import ComponentB from './ComponentB'
export default {
name: 'ComponentA',
components: {
ComponentB
},
data: {
title: 'Click me'
},
methods: {
titleChange(newTitle) {
this.title = newTitle
}
}
}
</script>Sub-component ComponentB:
<template>
<p>
<p @click="handleClick">{{title}}</p>
</p>
</template>
<script>
export default {
name: 'ComponentB',
props: {
title: {
type: String,
}
},
methods: {
handleClick() {
this.$emit('title-change', 'New title !')
}
}
}
</script>This example is very simple, inside the sub-component ComponentB Dispatch an event title-change through $emit, and listen to the titleChange event bound by @title-change in the parent component ComponentA , the data passed by ComponentB to ComponentA can be obtained in the parameters of the titleChange function.
Communication between sibling components
Status improvement
Students who have written React should be familiar with the concept of component State promotion, in React Divide components into two categories according to different responsibilities: Presentational Component and Container Component(Container Component).
The display component does not care about how the data used by the component is obtained, and how the component data should be modified. It only needs to know what the component UI looks like with this data. External components pass props to the data required by the presentational components and the callback functions that modify these data. The presentational components are just their users.
The responsibility of the container component is to obtain data and the processing logic of these data, and provide the data and logic to sub-components through props.
Therefore, referring to the concept of State promotion in React components, we provide a parent component on top of the two sibling components, which is equivalent to the container component and is responsible for processing data. The sibling components pass props Receiving parameters and callback functions is equivalent to displaying components to solve communication problems between sibling components.
ComponentA (sibling component A):
<template>
<p>
<p>{{title}}</p>
<p @click="changeTitle">click me</p>
</p>
</template>
<script>
export default {
name: 'ComponentA',
props: {
title: {
type: String
},
changeTitle: Function
}
}
</script>ComponentB (sibling component B):
<template>
<p>
<p>{{title}}</p>
<p @click="changeTitle">click me</p>
</p>
</template>
<script>
export default {
name: 'ComponentB',
props: {
title: {
type: String
},
changeTitle: Function
}
}
</script>ComponentC (Container component C):
<template>
<p>
<component-a :title="titleA" :change-title="titleAChange"></component-a>
<component-b :title="titleB" :change-title="titleBChange"></component-b>
</p>
</template>
<script>
import ComponentA from './ComponentA'
import ComponentB from './ComponentB'
export default {
name: 'ComponentC',
components: {
ComponentA,
ComponentB
},
data: {
titleA: 'this is title A',
titleB: 'this is title B'
},
methods: {
titleAChange() {
this.titleA = 'change title A'
},
titleBChange() {
this.titleB = 'change title B'
}
}
}
</script>As you can see, the above-mentioned "status promotion" method is relatively cumbersome, especially the communication between sibling components requires the help of parent components. After the components are complex, It is quite troublesome to deal with.
Communication between generation-separated components
Communication between generation-separated components can be achieved in the following ways:
$attrs/$listenersrovide/inject- 基于
$parent/$children实现的dispatch和broadcast
attrs/attrs/listeners
Vue 2.4.0 版本新增了 $attrs 和 $listeners 两个方法。先看下官方对 $attrs 的介绍:
包含了父作用域中不作为 prop 被识别 (且获取) 的 attribute 绑定(
class和style除外)。当一个组件没有声明任何 prop 时,这里会包含所有父作用域的绑定 (class和style除外),并且可以通过v-bind="$attrs"传入内部组件——在创建高级别的组件时非常有用。
看个例子:
组件A(ComponentA):
<template>
<component-a name="Lin" age="24" sex="male"></component-a>
</template>
<script>
import ComponentB from '@/components/ComponentB.vue'
export default {
name: 'App',
components: {
ComponentA
}
}
</script>组件B(ComponetB):
<template>
<p>
I am component B
<component-c v-bind="$attrs"></component-c>
</p>
</template>
<script>
import ComponentC from '@/components/ComponentC.vue'
export default {
name: 'ComponentB',
inheritAttrs: false,
components: {
ComponentC
}
}
</script>组件C(ComponetC):
<template>
<p>
I am component C
</p>
</template>
<script>
export default {
name: 'ComponentC',
props: {
name: {
type: String
}
},
mounted: function() {
console.log('$attrs', this.$attrs)
}
}
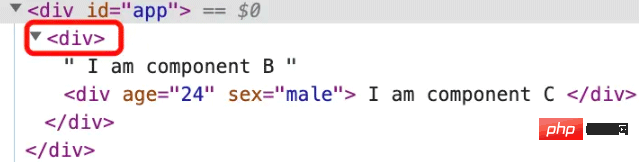
</script>这里有三个组件,祖先组件(ComponentA)、父组件(ComponentB)和子组件(ComponentC)。这三个组件构成了一个典型的子孙组件之间的关系。
ComponetA 给 ComponetB 传递了三个属性 name、age 和 sex,ComponentB 通过 v-bind="$attrs" 将这三个属性再透传给 ComponentC, 最后在 ComponentC 中打印 $attrs 的值为:
{age: '24', sex: 'male'}为什么我们一开始传递了三个属性,最后只打印了两个属性 age 和 sex 呢?因为在 ComponentC 的props 中声明了 name 属性,$attrs 会自动排除掉在 props 中声明的属性,并将其他属性以对象的形式输出。
说白了就是一句话,$attrs 可以获取父组件中绑定的非 Props 属性。
一般在使用的时候会同时和 inheritAttrs 属性配合使用。
如果你不希望组件的根元素继承 attribute,你可以在组件的选项中设置 inheritAttrs: false。
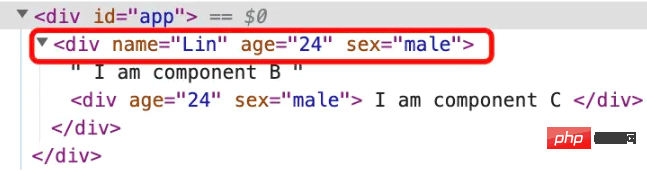
在 ComponentB 添加了 inheritAttrs=false 属性后,ComponentB 的dom结构中可以看到是不会继承父组件传递过来的属性:
如果不加上 inheritAttrs=false 属性,就会自动继承父组件传递过来的属性:
再看下 $listeners 的定义:
包含了父作用域中的 (不含
.native修饰器的)v-on事件监听器。它可以通过v-on="$listeners"传入内部组件——在创建更高层次的组件时非常有用。
$listeners也能把父组件中对子组件的事件监听全部拿到,这样我们就能用一个v-on把这些来自于父组件的事件监听传递到下一级组件。
继续改造 ComponentB 组件:
<template>
<p>
I am component B
<component-c v-bind="$attrs" v-on="$listeners"></component-c>
</p>
</template>
<script>
import ComponentC from '@/components/ComponentC.vue'
export default {
name: 'ComponentB',
inheritAttrs: false,
components: {
ComponentC
}
}
</script>这里利用 $attrs 和 $listeners 方法,可以将祖先组件(ComponentA) 中的属性和事件透传给孙组件(ComponentC),这样就可以实现隔代组件之间的通信。
provide/inject
provide/inject 是 Vue 2.2.0 版本后新增的方法。
这对选项需要一起使用,以允许一个祖先组件向其所有子孙后代注入一个依赖,不论组件层次有多深,并在其上下游关系成立的时间里始终生效。如果你熟悉 React,这与 React 的上下文特性很相似。
先看下简单的用法:
父级组件:
export default {
  provide: {
    name: 'Lin'
  }
}子组件:
export default {
  inject: ['name'],
  mounted () {
    console.log(this.name);  // Lin
  }
}上面的例子可以看到,父组件通过 privide 返回的对象里面的值,在子组件中通过 inject 注入之后可以直接访问到。
但是需要注意的是,provide 和 inject 绑定并不是可响应的,按照官方的说法,这是刻意为之的。
也就是说父组件 provide 里面的name属性值变化了,子组件中 this.name 获取到的值不变。
如果想让 provide 和 inject 变成可响应的,有以下两种方式:
- provide 祖先组件的实例,然后在子孙组件中注入依赖,这样就可以在子孙组件中直接修改祖先组件的实例的属性,不过这种方法有个缺点就是这个实例上挂载很多没有必要的东西比如props,methods
- 使用 Vue 2.6 提供的 Vue.observable 方法优化响应式 provide
看一下第一种场景:
祖先组件组件(ComponentA):
export default {
  name: 'ComponentA',
  provide() {
    return {
      app: this
    }
  },
  data() {
    return {
       appInfo: {
         title: ''
       }
    }
  },
  methods: {
    fetchAppInfo() {
      this.appInfo = { title: 'Welcome to Vue world'}
    }
  }
}我们把整个 ComponentA.vue 的实例 this 对外提供,命名为 app。接下来,任何组件只要通过 inject 注入 app 的话,都可以直接通过 this.app.xxx 来访问 ComponentA.vue 的 data、computed、methods 等内容。
子组件(ComponentB):
<template>
<p>
{{ title }}
<button @click="fetchInfo">获取App信息</button>
</p>
</template>
<script>
export default {
name: 'ComponentB',
inject: ['app'],
computed: {
title() {
return this.app.appInfo.title
}
},
methods: {
fetchInfo() {
this.app.fetchAppInfo()
}
}
}
</script>这样,任何子组件,只要通过 inject 注入 app 后,就可以直接访问祖先组件中的数据了,同时也可以调用祖先组件提供的方法修改祖先组件的数据并反应到子组件上。
当点击子组件(ComponentB)的获取App信息按钮,会调用 this.app.fetchAppInfo 方法,也就是访问祖先组件(ComponentA)实例上的 fetchAppInfo 方法,fetchAppInfo 会修改fetchAppInfo的值。同时子组件(ComponentB)中会监听 this.app.appInfo 的变化,并将变化后的title值显示在组件上。
再看一下第二种场景,通过 Vue.observable 方法来实现 provide 和 inject 绑定并可响应。
基于上面的示例,改造祖先组件(ComponentA):
import Vue from 'vue'

const state = Vue.observable({ title: '' });
export default {
  name: 'ComponentA',
  provide() {
    return {
      state
    }
  }
}使用 Vue.observable 定义一个可响应的对象 state,并在 provide 中返回这个对象。
改造子组件(ComponentB):
<template>
<p>
{{ title }}
<button @click="fetchInfo">获取App信息</button>
</p>
</template>
<script>
export default {
name: 'ComponentInject',
inject: ['state'],
computed: {
title() {
return this.state.title
}
},
methods: {
fetchInfo() {
this.state.title = 'Welcome to Vue world22'
}
}
}
</script>与之前的例子不同的是,这里我们直接修改了 this.state.title 的值,因为 state 被定义成了一个可响应的数据,所以 state.title 的值被修改后,视图上的 title 也会立即响应并更新,从这里看,其实很像 Vuex 的处理方式。
以上两种方式对比可以发现,第二种借助于 Vue.observable 方法实现 provide 和 inject 的可响应更加简单高效,推荐大家使用这种方式。
基于 $parent/$children 实现的 dispatch 和 broadcast
先了解下 dispatch 和 broadcast 两个概念:
- dispatch: 派发,指的是从一个组件内部向上传递一个事件,并在组件内部通过
$on进行监听 - broadcast: 广播,指的是从一个组件内部向下传递一个事件,并在组件内部通过
$on进行监听
在实现 dispatch 和 broadcast 方法之前,先来看一下具体的使用方法。有 ComponentA.vue 和 ComponentB.vue 两个组件,其中 ComponentB 是 ComponentA 的子组件,中间可能跨多级,在 ComponentA 中向 ComponentB 通信:
组件ComponentA:
<template>
<button @click="handleClick">派发事件</button>
</template>
<script>
import Emitter from '../mixins/emitter.js';
export default {
name: 'ComponentA',
mixins: [Emitter],
methods: {
handleClick () {
this.dispatch('ComponentB', 'on-message', 'Hello Vue.js')
}
}
}
</script>组件ComponentB:
export default {
  name: 'ComponentB',
  created () {
    this.$on('on-message', this.showMessage)
  },
  methods: {
    showMessage (text) {
      console.log(text)
    }
  }
}dispatch 的逻辑写在 emitter.js 中,使用的时候通过 mixins 混入到组件中,这样可以很好的将事件通信逻辑和组件进行解耦。
dispatch 的方法有三个传参,分别是:需要接受事件的组件的名字(全局唯一,用来精确查找组件)、事件名和事件传递的参数。
dispatch 的实现思路非常简单,通过 $parent 获取当前父组件对象,如果组件的name和接受事件的name一致(dispatch方法的第一个参数),在父组件上调用 $emit 发射一个事件,这样就会触发目标组件上 $on 定义的回调函数,如果当前组件的name和接受事件的name不一致,就递归地向上调用此逻辑。
dispath:
export default {
  methods: {
    dispatch(componentName, eventName, params) {
      let parent = this.$parent || this.$root;
      let name = parent.$options.name;
      while (parent && (!name || name !== componentName)) {
        parent = parent.$parent;
        if (parent) {
          name = parent.$options.name
        }
      }
      if (parent) {
        parent.$emit.apply(parent, [eventName].concat(params));
      }
    }
  }
}broadcast逻辑和dispatch的逻辑差不多,只是一个是通过 $parent 向上查找,一个是通过 $children 向下查找,
export default {
  methods: {
    broadcast(componentName, eventName, params) {
      this.$children.forEach(child => {
        const name = child.$options.name
        if (name === componentName) {
          child.$emit.apply(child, [eventName].concat(params))
        } else {
          broadcast.apply(child, [componentName, eventName].concat([params]))
        }
      })
    }
  }
}【相关推荐:javascript视频教程、vue.js教程】
The above is the detailed content of Detailed analysis of communication methods between Vue components. For more information, please follow other related articles on the PHP Chinese website!

Hot AI Tools

Undresser.AI Undress
AI-powered app for creating realistic nude photos

AI Clothes Remover
Online AI tool for removing clothes from photos.

Undress AI Tool
Undress images for free

Clothoff.io
AI clothes remover

AI Hentai Generator
Generate AI Hentai for free.

Hot Article
Hot Tools

Notepad++7.3.1
Easy-to-use and free code editor

SublimeText3 Chinese version
Chinese version, very easy to use

Zend Studio 13.0.1
Powerful PHP integrated development environment

Dreamweaver CS6
Visual web development tools

SublimeText3 Mac version
God-level code editing software (SublimeText3)
Hot Topics
 1376
1376
 52
52

 How to reference js file with vue.js
Apr 07, 2025 pm 11:27 PM
How to reference js file with vue.js
Apr 07, 2025 pm 11:27 PM
There are three ways to refer to JS files in Vue.js: directly specify the path using the <script> tag;; dynamic import using the mounted() lifecycle hook; and importing through the Vuex state management library.
 How to use watch in vue
Apr 07, 2025 pm 11:36 PM
How to use watch in vue
Apr 07, 2025 pm 11:36 PM
The watch option in Vue.js allows developers to listen for changes in specific data. When the data changes, watch triggers a callback function to perform update views or other tasks. Its configuration options include immediate, which specifies whether to execute a callback immediately, and deep, which specifies whether to recursively listen to changes to objects or arrays.
 How to use bootstrap in vue
Apr 07, 2025 pm 11:33 PM
How to use bootstrap in vue
Apr 07, 2025 pm 11:33 PM
Using Bootstrap in Vue.js is divided into five steps: Install Bootstrap. Import Bootstrap in main.js. Use the Bootstrap component directly in the template. Optional: Custom style. Optional: Use plug-ins.
 What does it mean to lazy load vue?
Apr 07, 2025 pm 11:54 PM
What does it mean to lazy load vue?
Apr 07, 2025 pm 11:54 PM
In Vue.js, lazy loading allows components or resources to be loaded dynamically as needed, reducing initial page loading time and improving performance. The specific implementation method includes using <keep-alive> and <component is> components. It should be noted that lazy loading can cause FOUC (splash screen) issues and should be used only for components that need lazy loading to avoid unnecessary performance overhead.
 Vue realizes marquee/text scrolling effect
Apr 07, 2025 pm 10:51 PM
Vue realizes marquee/text scrolling effect
Apr 07, 2025 pm 10:51 PM
Implement marquee/text scrolling effects in Vue, using CSS animations or third-party libraries. This article introduces how to use CSS animation: create scroll text and wrap text with <div>. Define CSS animations and set overflow: hidden, width, and animation. Define keyframes, set transform: translateX() at the beginning and end of the animation. Adjust animation properties such as duration, scroll speed, and direction.
 How to add functions to buttons for vue
Apr 08, 2025 am 08:51 AM
How to add functions to buttons for vue
Apr 08, 2025 am 08:51 AM
You can add a function to the Vue button by binding the button in the HTML template to a method. Define the method and write function logic in the Vue instance.
 How to query the version of vue
Apr 07, 2025 pm 11:24 PM
How to query the version of vue
Apr 07, 2025 pm 11:24 PM
You can query the Vue version by using Vue Devtools to view the Vue tab in the browser's console. Use npm to run the "npm list -g vue" command. Find the Vue item in the "dependencies" object of the package.json file. For Vue CLI projects, run the "vue --version" command. Check the version information in the <script> tag in the HTML file that refers to the Vue file.
 How to return to previous page by vue
Apr 07, 2025 pm 11:30 PM
How to return to previous page by vue
Apr 07, 2025 pm 11:30 PM
Vue.js has four methods to return to the previous page: $router.go(-1)$router.back() uses <router-link to="/" component window.history.back(), and the method selection depends on the scene.
