

Redis master-slave replication step-by-step explanation and use

This article brings you relevant knowledge about redis, which mainly introduces the relevant content about master-slave replication. Redis plays a huge role in our back-end services because of its high performance and ease of use. And the implementation of many important functions will rely on redis. Let’s take a look at it. I hope it will be helpful to everyone.

Recommended learning: Redis video tutorial
The master server (master) enables binary logs and selects a unique server-id to create a file with Users with replication permissions
enable relay logs from the slave server (slave), select a unique server-id to connect to the master server, and start replication
Main library ip: 192.168.235.130 port: 3306 Slave library ip: 192.168.235.139 Port: 3306
Main library configuration
(1) Set the server-id value and enable binlog parameters
[mysqld]
log_bin = mysql-bin
server_id = 130
Restart the database
(2) Create a synchronization account
create user 'rep1 '@'192.168.10.139' identified with mysql_native_password by 'Test@1234'#Set account password
grant replication slave on *.* to 'rep1'@'192.168.235.139';
grant replication slave on *. * to 'rep1'@'192.168.235.139';
show grants for 'rep1'@'192.168.235.139';
(3) Lock table setting read-only
Prepare for subsequent backups, please note that the production environment must apply for downtime in advance;
mysql> flush tables with read lock;
Tips: If no operation occurs beyond the set time, it will be automatically unlocked.
mysql> show variables like '%timeout%';
Test whether the database can be created after locking the table
4) Check the main library status Check the main library status, that is, the current log file name and binary log offset
mysql> show master status;
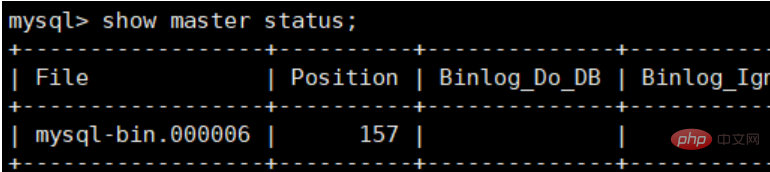
Remember file and position to facilitate subsequent slave connections.
(5) Back up database data
mysqldump -uroot -p -A -B |gzip > mysql_bak.$(date +%F).sql.gz
(6) Unlock
mysql> unlock tables;
(7) Upload the backup data of the main database to the slave database
scp /server/backup/mysql_bak.2022-09-22.sql.gz 192.168.235.139:/root/hh
Set up
(1) Set the server-id value and turn off the binlog parameter
#log_bin = /data/mysql/data/mysql-bin
server_id = 139
Restart the database
(2)Restore the backup data from the main database
cd /server/backup/
gzip -d mysql_bak.2022-09-22.sql.gz
mysql -uroot -p < mysql_bak.2022-09-22.sql
Check the restore:
mysql -uroot -p -e 'show databases;'
(3) Set the synchronization from the main library
mysql> change master to
    -> master_host='192.168.235.130',
    -> master_port=3306,
    -> master_user='rep1',
    -> master_password='Test@1234',
    -> master_log_file='mysql-bin.000006',
-> master_log_pos=157;(4) Start the synchronization switch from the slave library
mysql> start slave;
Check the status:
mysql> show slave status\G
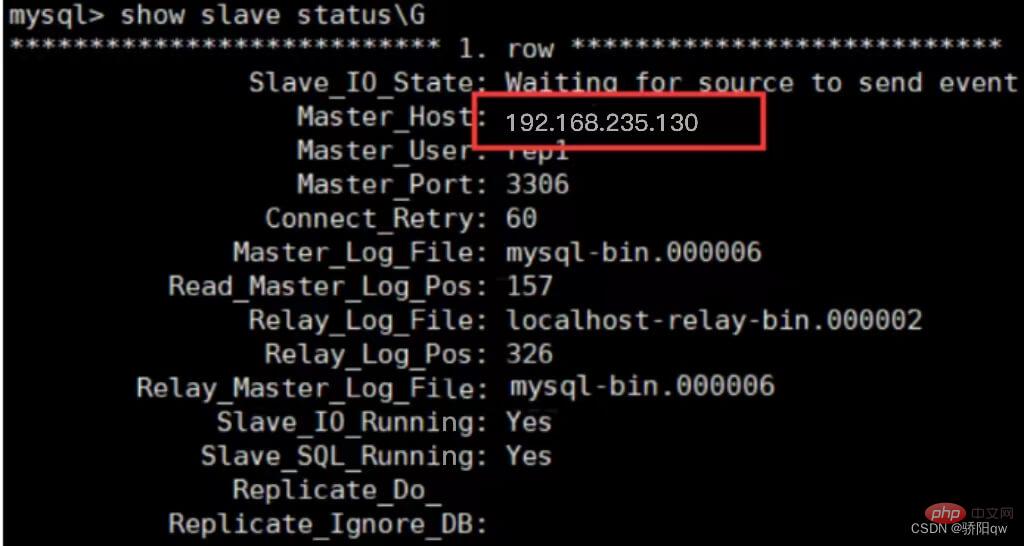
The primary and secondary replication functions are achieved.
Test below:
Execute on 192.168.235.130 (main):
create databses data; New database
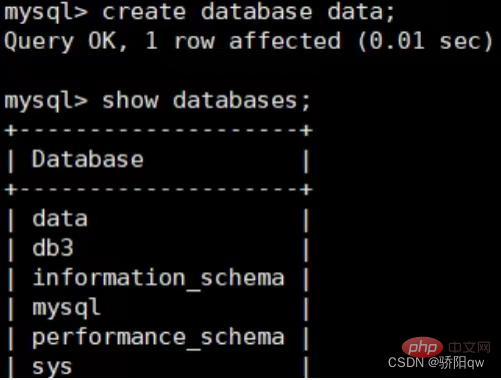
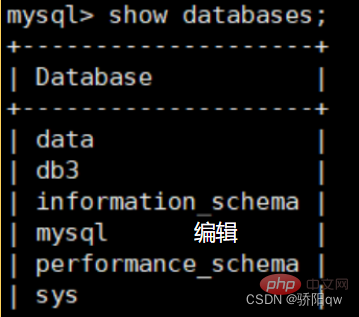
The data file is also built on the slave virtual machine, and the master-slave replication of Mysql is realized.
Recommended learning: Redis video tutorial
The above is the detailed content of Redis master-slave replication step-by-step explanation and use. For more information, please follow other related articles on the PHP Chinese website!

Hot AI Tools

Undresser.AI Undress
AI-powered app for creating realistic nude photos

AI Clothes Remover
Online AI tool for removing clothes from photos.

Undress AI Tool
Undress images for free

Clothoff.io
AI clothes remover

Video Face Swap
Swap faces in any video effortlessly with our completely free AI face swap tool!

Hot Article
Hot Tools

Notepad++7.3.1
Easy-to-use and free code editor

SublimeText3 Chinese version
Chinese version, very easy to use

Zend Studio 13.0.1
Powerful PHP integrated development environment

Dreamweaver CS6
Visual web development tools

SublimeText3 Mac version
God-level code editing software (SublimeText3)
Hot Topics
 1386
1386
 52
52

 How to build the redis cluster mode
Apr 10, 2025 pm 10:15 PM
How to build the redis cluster mode
Apr 10, 2025 pm 10:15 PM
Redis cluster mode deploys Redis instances to multiple servers through sharding, improving scalability and availability. The construction steps are as follows: Create odd Redis instances with different ports; Create 3 sentinel instances, monitor Redis instances and failover; configure sentinel configuration files, add monitoring Redis instance information and failover settings; configure Redis instance configuration files, enable cluster mode and specify the cluster information file path; create nodes.conf file, containing information of each Redis instance; start the cluster, execute the create command to create a cluster and specify the number of replicas; log in to the cluster to execute the CLUSTER INFO command to verify the cluster status; make
 How to clear redis data
Apr 10, 2025 pm 10:06 PM
How to clear redis data
Apr 10, 2025 pm 10:06 PM
How to clear Redis data: Use the FLUSHALL command to clear all key values. Use the FLUSHDB command to clear the key value of the currently selected database. Use SELECT to switch databases, and then use FLUSHDB to clear multiple databases. Use the DEL command to delete a specific key. Use the redis-cli tool to clear the data.
 How to use the redis command
Apr 10, 2025 pm 08:45 PM
How to use the redis command
Apr 10, 2025 pm 08:45 PM
Using the Redis directive requires the following steps: Open the Redis client. Enter the command (verb key value). Provides the required parameters (varies from instruction to instruction). Press Enter to execute the command. Redis returns a response indicating the result of the operation (usually OK or -ERR).
 How to read redis queue
Apr 10, 2025 pm 10:12 PM
How to read redis queue
Apr 10, 2025 pm 10:12 PM
To read a queue from Redis, you need to get the queue name, read the elements using the LPOP command, and process the empty queue. The specific steps are as follows: Get the queue name: name it with the prefix of "queue:" such as "queue:my-queue". Use the LPOP command: Eject the element from the head of the queue and return its value, such as LPOP queue:my-queue. Processing empty queues: If the queue is empty, LPOP returns nil, and you can check whether the queue exists before reading the element.
 How to use redis lock
Apr 10, 2025 pm 08:39 PM
How to use redis lock
Apr 10, 2025 pm 08:39 PM
Using Redis to lock operations requires obtaining the lock through the SETNX command, and then using the EXPIRE command to set the expiration time. The specific steps are: (1) Use the SETNX command to try to set a key-value pair; (2) Use the EXPIRE command to set the expiration time for the lock; (3) Use the DEL command to delete the lock when the lock is no longer needed.
 How to read the source code of redis
Apr 10, 2025 pm 08:27 PM
How to read the source code of redis
Apr 10, 2025 pm 08:27 PM
The best way to understand Redis source code is to go step by step: get familiar with the basics of Redis. Select a specific module or function as the starting point. Start with the entry point of the module or function and view the code line by line. View the code through the function call chain. Be familiar with the underlying data structures used by Redis. Identify the algorithm used by Redis.
 How to solve data loss with redis
Apr 10, 2025 pm 08:24 PM
How to solve data loss with redis
Apr 10, 2025 pm 08:24 PM
Redis data loss causes include memory failures, power outages, human errors, and hardware failures. The solutions are: 1. Store data to disk with RDB or AOF persistence; 2. Copy to multiple servers for high availability; 3. HA with Redis Sentinel or Redis Cluster; 4. Create snapshots to back up data; 5. Implement best practices such as persistence, replication, snapshots, monitoring, and security measures.
 How to use the redis command line
Apr 10, 2025 pm 10:18 PM
How to use the redis command line
Apr 10, 2025 pm 10:18 PM
Use the Redis command line tool (redis-cli) to manage and operate Redis through the following steps: Connect to the server, specify the address and port. Send commands to the server using the command name and parameters. Use the HELP command to view help information for a specific command. Use the QUIT command to exit the command line tool.
