A brief analysis of how node implements github third-party login
nodeHow to implement github third-party login? The following article will introduce to you how to implement third-party login to github using nodejs. I hope it will be helpful to you!

1. Detailed process

2. Detailed process
1. Register application
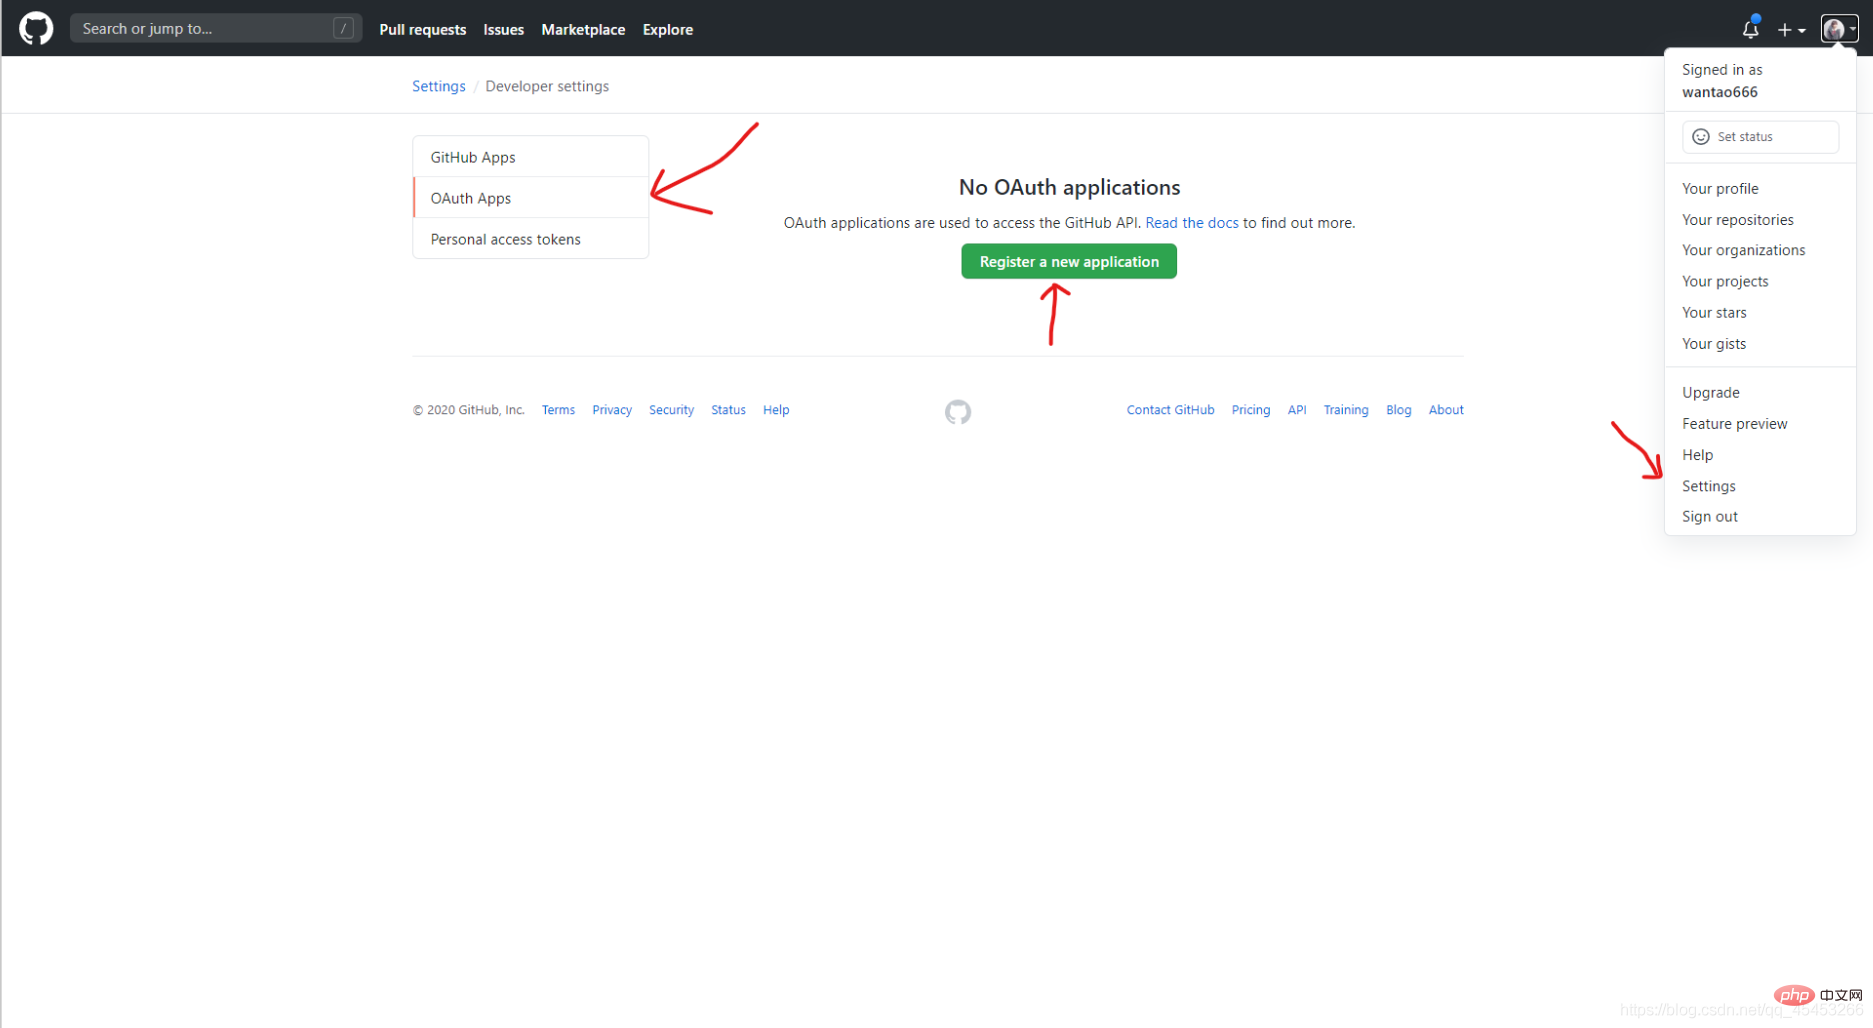
①Log in to github, Settings=>Developer settings=>OAuth Apps=>Register a new application


② Fill in the application information 
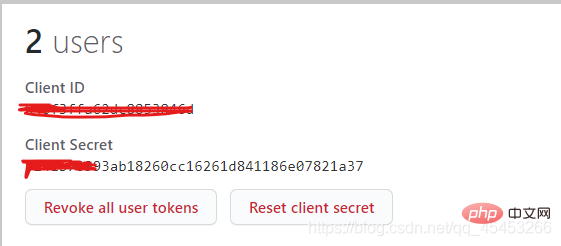
③ Registration is completed and get Client ID and Client Secret

[Related tutorial recommendations: nodejs video tutorial]
2. The front-end initiates a request to the github authorization page. If the authorization is successful, the code is redirected to the configured back-end callback URL
<a href="https://github.com/login/oauth/authorize?client_id={你自己的cilent_id}&redirect_uri=http://localhost:3001/github" class="iconfont ali-icon-github"></a>3. The back-end gets the code, requests github with the code, and gets to the token, and then put the token on the url and pass it to the front end
router.get('/github',controller.auth.githubLogin)
const axios = require('axios')
const querystring = require('querystring')

const config = {
    client_id: "你自己的client_id",
    client_secret: "你自己的client_secret"
}
class AuthController {
    async githubLogin(ctx) {
        const code = ctx.request.query.code
        const params = {
            client_id: config.client_id,
            client_secret: config.client_secret,
            code: code
        }
        let res = await axios.post('https://github.com/login/oauth/access_token', params)
        console.log(res)
        const token = querystring.parse(res.data).access_token
        ctx.cookies.set('token', token, {
            maxAge: ctx.config.jwt.expire * 1000,
        });
        res = { ...ctx.errCode.SUCCESS, data: { token } };
        ctx.redirect('http://172.25.78.33:8081/login/success?token='+token)
    }
}
module.exports = exports = new AuthController();4. The front end creates a temporary page, saves the token on the url, and jumps to the login success page
The temporary page will jump very quickly and is basically invisible.
<template>
  <h1 id="登录成功跳转首页">登录成功跳转首页</h1>
</template>

<script>
import {setLoginedUser} from "@/http/axios";
export default {
  mounted() {
    setLoginedUser("github", this.$route.query.token);
    this.$message({
      message: "登录成功",
      type: "success",
    });
    this.$router.push("/home");
  },
};
</script>

<style>
</style>3. Code link
https://github.com/wantao666/nodejs-github
For more node-related knowledge, please visit : nodejs tutorial!
The above is the detailed content of A brief analysis of how node implements github third-party login. For more information, please follow other related articles on the PHP Chinese website!

Hot AI Tools

Undresser.AI Undress
AI-powered app for creating realistic nude photos

AI Clothes Remover
Online AI tool for removing clothes from photos.

Undress AI Tool
Undress images for free

Clothoff.io
AI clothes remover

AI Hentai Generator
Generate AI Hentai for free.

Hot Article

Hot Tools

Notepad++7.3.1
Easy-to-use and free code editor

SublimeText3 Chinese version
Chinese version, very easy to use

Zend Studio 13.0.1
Powerful PHP integrated development environment

Dreamweaver CS6
Visual web development tools

SublimeText3 Mac version
God-level code editing software (SublimeText3)

Hot Topics
 1386
1386
 52
52
 How to delete node in nvm
Dec 29, 2022 am 10:07 AM
How to delete node with nvm: 1. Download "nvm-setup.zip" and install it on the C drive; 2. Configure environment variables and check the version number through the "nvm -v" command; 3. Use the "nvm install" command Install node; 4. Delete the installed node through the "nvm uninstall" command.
 How to use express to handle file upload in node project
Mar 28, 2023 pm 07:28 PM
How to handle file upload? The following article will introduce to you how to use express to handle file uploads in the node project. I hope it will be helpful to you!
 An in-depth analysis of Node's process management tool 'pm2”
Apr 03, 2023 pm 06:02 PM
This article will share with you Node's process management tool "pm2", and talk about why pm2 is needed, how to install and use pm2, I hope it will be helpful to everyone!
 Pi Node Teaching: What is a Pi Node? How to install and set up Pi Node?
Mar 05, 2025 pm 05:57 PM
Detailed explanation and installation guide for PiNetwork nodes This article will introduce the PiNetwork ecosystem in detail - Pi nodes, a key role in the PiNetwork ecosystem, and provide complete steps for installation and configuration. After the launch of the PiNetwork blockchain test network, Pi nodes have become an important part of many pioneers actively participating in the testing, preparing for the upcoming main network release. If you don’t know PiNetwork yet, please refer to what is Picoin? What is the price for listing? Pi usage, mining and security analysis. What is PiNetwork? The PiNetwork project started in 2019 and owns its exclusive cryptocurrency Pi Coin. The project aims to create a one that everyone can participate
 Let's talk about how to use pkg to package Node.js projects into executable files.
Dec 02, 2022 pm 09:06 PM
How to package nodejs executable file with pkg? The following article will introduce to you how to use pkg to package a Node project into an executable file. I hope it will be helpful to you!
 What to do if npm node gyp fails
Dec 29, 2022 pm 02:42 PM
npm node gyp fails because "node-gyp.js" does not match the version of "Node.js". The solution is: 1. Clear the node cache through "npm cache clean -f"; 2. Through "npm install -g n" Install the n module; 3. Install the "node v12.21.0" version through the "n v12.21.0" command.
 Token-based authentication with Angular and Node
Sep 01, 2023 pm 02:01 PM
Authentication is one of the most important parts of any web application. This tutorial discusses token-based authentication systems and how they differ from traditional login systems. By the end of this tutorial, you will see a fully working demo written in Angular and Node.js. Traditional Authentication Systems Before moving on to token-based authentication systems, let’s take a look at traditional authentication systems. The user provides their username and password in the login form and clicks Login. After making the request, authenticate the user on the backend by querying the database. If the request is valid, a session is created using the user information obtained from the database, and the session information is returned in the response header so that the session ID is stored in the browser. Provides access to applications subject to
 A brief analysis of how node implements ocr
Oct 31, 2022 pm 07:09 PM
How to implement OCR (optical character recognition)? The following article will introduce to you how to use node to implement OCR. I hope it will be helpful to you!


