
const weiboUrl = `https://api.weibo.com/oauth2/authorize?client_id=${weiboConfig.appKey}&response_type=code&redirect_uri=${weiboConfig.redirectUrl}`
A brief analysis of how node performs third-party login on Weibo

How to perform third-party login on Weibo? The following article will introduce to you how to use node to implement third-party login on Weibo. I hope it will be helpful to you!

You can access Weibo third-party login without registration, which provides a better user experience. Today we will use nodejs to implement Weibo third-party login (other languages are also available) ). [Related tutorial recommendations: nodejs video tutorial]
Achieve effect
Online example: http://www. lolmbbs.com/login
1. Click the Weibo login button to log in
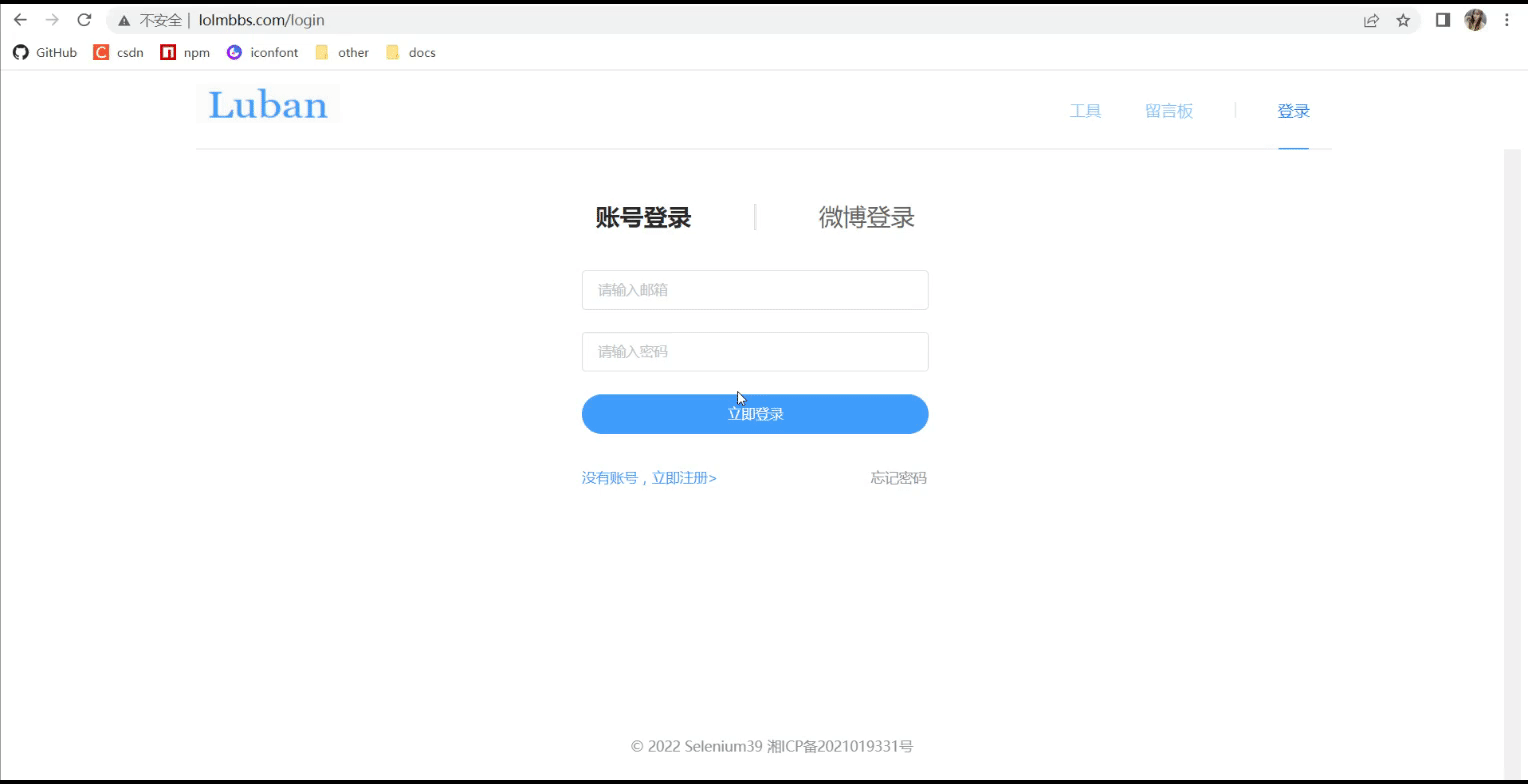
2. Scan the QR code to log in
Specific implementation
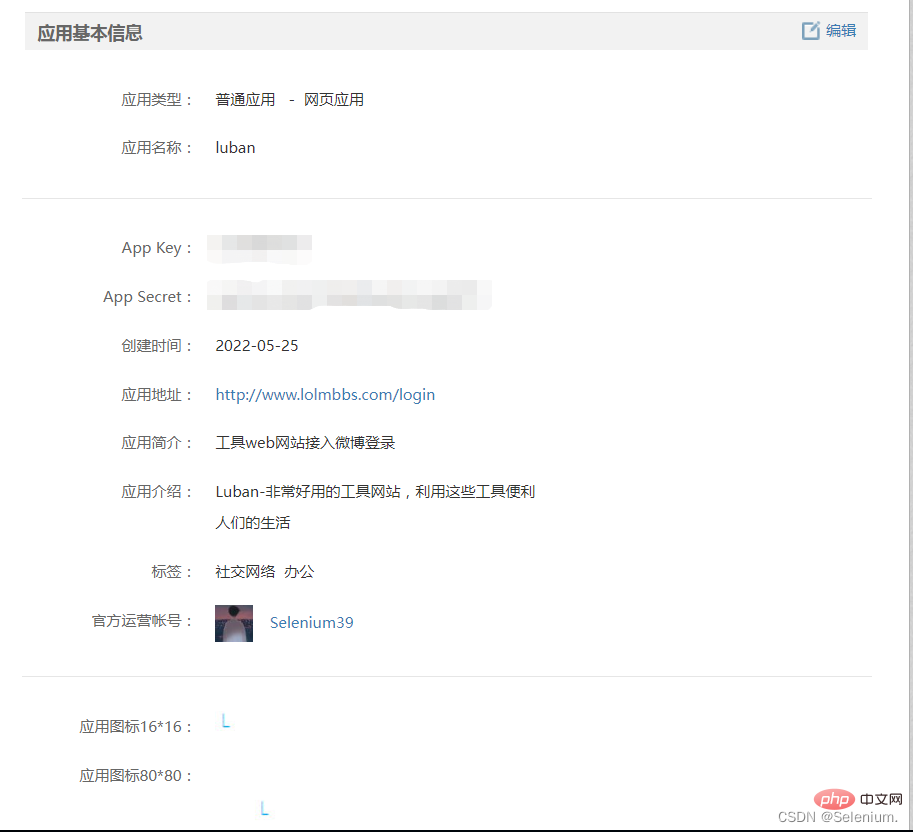
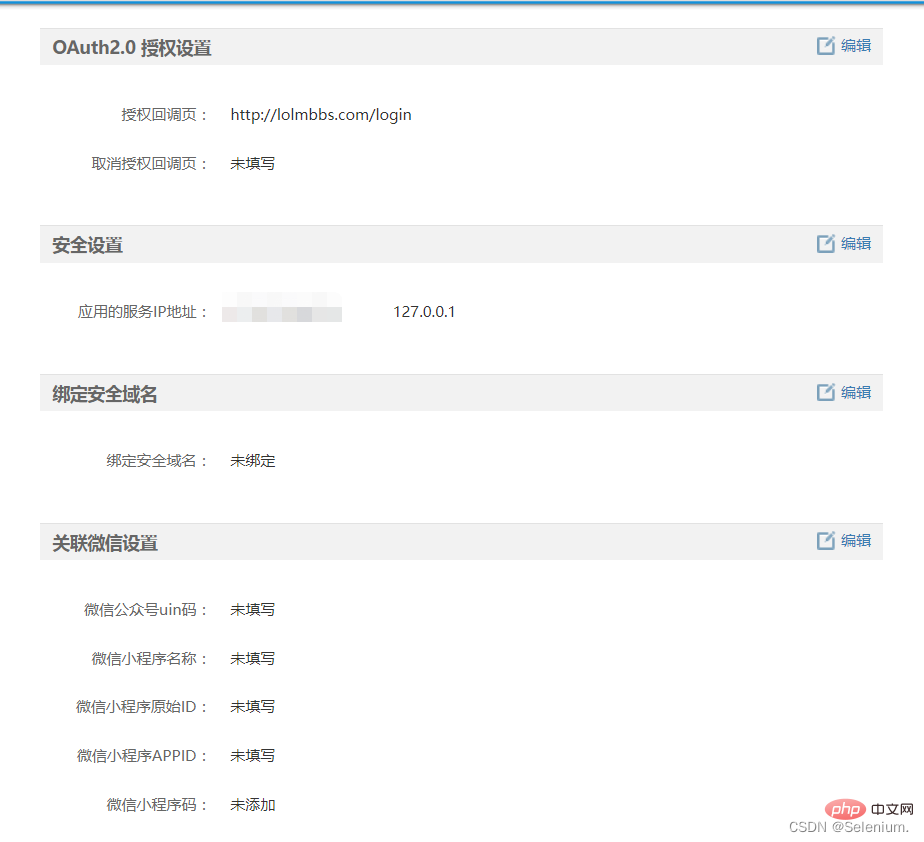
1. Apply for weibo website access
Log in to https://open.weibo.com/connect to apply for web website When accessing
for local development, write the application address: 127.0.0.1

##2. Click the button to log in to Weibo
uses OAuth2.0 authorization. For details, please refer to the document https://open.weibo.com/wiki/Connect/login1. Generate Weibo login authorization verification codeconst weiboUrl = `https://api.weibo.com/oauth2/authorize?client_id=${weiboConfig.appKey}&response_type=code&redirect_uri=${weiboConfig.redirectUrl}`Copy after login
appKey: The appKey given to you by weibo after successfully creating the applicationconst weiboUrl = `https://api.weibo.com/oauth2/authorize?client_id=${weiboConfig.appKey}&response_type=code&redirect_uri=${weiboConfig.redirectUrl}` redirectUrl: Your front-end page that will be redirected after successful user authorization. I What is written here is http://127.0.0.1:8080/login
created() {
    const { code } = this.$route.query;
    if (code) {
      loginCallback({ code }).then((res) => {
        this.$message({
          message: `${res.nickname} 欢迎您`,
          type: "success",
        });
        this.setUser(res);
        this.$router.push("/tool/qr");
      });
    }
} async loginCallback(ctx) {
let { code } = ctx.request.body
if (!code) {
return ctx.error(errCode.PARAMS_ERROR, '参数错误')
}
// 获取accessToken
const { access_token, uid } = await got.post('https://api.weibo.com/oauth2/access_token', {
form: {
client_id: weiboConfig.appKey,
client_secret: weiboConfig.appSecret,
grant_type: 'authorization_code',
redirect_uri: weiboConfig.redirectUrl,
code
}
}).json()
// 通过accessToken获取UserInfo
const { id, name: nickname, avatar_hd: avatar } = await got.get(`https://api.weibo.com/2/users/show.json?access_token=${access_token}&uid=${uid}`).json()
// 在自己的系统内创建User
let [user, isCreate] = await WeiboUser.upsert({ id, nickname, avatar })
// 生成登录Token,通过userType区分是微博登录用户还是系统账号登录用户
const token = await jwt.createToken({ ...user.toJSON(), userType: 'weiboUser' })
return ctx.success({ nickname, avatar, token })
}Copy after login
   async loginCallback(ctx) {
      let { code } = ctx.request.body
      if (!code) {
         return ctx.error(errCode.PARAMS_ERROR, '参数错误')
      }
      // 获取accessToken
      const { access_token, uid } = await got.post('https://api.weibo.com/oauth2/access_token', {
         form: {
            client_id: weiboConfig.appKey,
            client_secret: weiboConfig.appSecret,
            grant_type: 'authorization_code',
            redirect_uri: weiboConfig.redirectUrl,
            code
         }
      }).json()
      // 通过accessToken获取UserInfo
      const { id, name: nickname, avatar_hd: avatar } = await got.get(`https://api.weibo.com/2/users/show.json?access_token=${access_token}&uid=${uid}`).json()
      // 在自己的系统内创建User
      let [user, isCreate] = await WeiboUser.upsert({ id, nickname, avatar })
      // 生成登录Token,通过userType区分是微博登录用户还是系统账号登录用户
      const token = await jwt.createToken({ ...user.toJSON(), userType: 'weiboUser' })
      return ctx.success({ nickname, avatar, token })
}3. Weibo scan code Login
1. Generate Weibo scan code login QR code async getWeiboLoginQr(ctx) {
const qrApi = `https://api.weibo.com/oauth2/qrcode_authorize/generate?client_id=${weiboConfig.appKey}&redirect_uri=${weiboConfig.redirectUrl}&scope=&response_type=code&state=&__rnd=${Date.now()}`
const { url, vcode } = await got.get(qrApi).json()
return ctx.success({ weiboQrUrl: url, vcode })
}Copy after login
The returned url is the Weibo login QR code url, vcode is equivalent to this QR code Unique identifier, used to check whether the user has scanned the code2. The front end continuously polls to check whether the QR code is authorized by scanning the codeFront end: async getWeiboLoginQr(ctx) {
const qrApi = `https://api.weibo.com/oauth2/qrcode_authorize/generate?client_id=${weiboConfig.appKey}&redirect_uri=${weiboConfig.redirectUrl}&scope=&response_type=code&state=&__rnd=${Date.now()}`
const { url, vcode } = await got.get(qrApi).json()
return ctx.success({ weiboQrUrl: url, vcode })
} const id = setInterval(() => {
getWeiboLoginQrStatus({ vcode }).then((res) => {
const { status, url } = res;
if (status === "3") {
window.location = url;
clearInterval(id);
}
});
}, 3000); async getWeiboLoginQrStatus(ctx) {
const { vcode } = ctx.request.query
if (!vcode) {
return ctx.error(errCode.PARAMS_ERROR, '参数错误')
}
const queryQrApi = `https://api.weibo.com/oauth2/qrcode_authorize/query?vcode=${vcode}&__rnd=${Date.now()}`
const { status, url } = await got(queryQrApi).json()
return ctx.success({ status, url })
}nodejs tutorial!
The above is the detailed content of A brief analysis of how node performs third-party login on Weibo. For more information, please follow other related articles on the PHP Chinese website!

Hot AI Tools

Undresser.AI Undress
AI-powered app for creating realistic nude photos

AI Clothes Remover
Online AI tool for removing clothes from photos.

Undress AI Tool
Undress images for free

Clothoff.io
AI clothes remover

Video Face Swap
Swap faces in any video effortlessly with our completely free AI face swap tool!

Hot Article
Hot Tools

Notepad++7.3.1
Easy-to-use and free code editor

SublimeText3 Chinese version
Chinese version, very easy to use

Zend Studio 13.0.1
Powerful PHP integrated development environment

Dreamweaver CS6
Visual web development tools

SublimeText3 Mac version
God-level code editing software (SublimeText3)
Hot Topics
 1386
1386
 52
52

 Detailed graphic explanation of the memory and GC of the Node V8 engine
Mar 29, 2023 pm 06:02 PM
Detailed graphic explanation of the memory and GC of the Node V8 engine
Mar 29, 2023 pm 06:02 PM
This article will give you an in-depth understanding of the memory and garbage collector (GC) of the NodeJS V8 engine. I hope it will be helpful to you!
 An article about memory control in Node
Apr 26, 2023 pm 05:37 PM
An article about memory control in Node
Apr 26, 2023 pm 05:37 PM
The Node service built based on non-blocking and event-driven has the advantage of low memory consumption and is very suitable for handling massive network requests. Under the premise of massive requests, issues related to "memory control" need to be considered. 1. V8’s garbage collection mechanism and memory limitations Js is controlled by the garbage collection machine
 How to use express to handle file upload in node project
Mar 28, 2023 pm 07:28 PM
How to use express to handle file upload in node project
Mar 28, 2023 pm 07:28 PM
How to handle file upload? The following article will introduce to you how to use express to handle file uploads in the node project. I hope it will be helpful to you!
 Let's talk in depth about the File module in Node
Apr 24, 2023 pm 05:49 PM
Let's talk in depth about the File module in Node
Apr 24, 2023 pm 05:49 PM
The file module is an encapsulation of underlying file operations, such as file reading/writing/opening/closing/delete adding, etc. The biggest feature of the file module is that all methods provide two versions of **synchronous** and **asynchronous**, with Methods with the sync suffix are all synchronization methods, and those without are all heterogeneous methods.
 An in-depth analysis of Node's process management tool 'pm2”
Apr 03, 2023 pm 06:02 PM
An in-depth analysis of Node's process management tool 'pm2”
Apr 03, 2023 pm 06:02 PM
This article will share with you Node's process management tool "pm2", and talk about why pm2 is needed, how to install and use pm2, I hope it will be helpful to everyone!
 Pi Node Teaching: What is a Pi Node? How to install and set up Pi Node?
Mar 05, 2025 pm 05:57 PM
Pi Node Teaching: What is a Pi Node? How to install and set up Pi Node?
Mar 05, 2025 pm 05:57 PM
Detailed explanation and installation guide for PiNetwork nodes This article will introduce the PiNetwork ecosystem in detail - Pi nodes, a key role in the PiNetwork ecosystem, and provide complete steps for installation and configuration. After the launch of the PiNetwork blockchain test network, Pi nodes have become an important part of many pioneers actively participating in the testing, preparing for the upcoming main network release. If you don’t know PiNetwork yet, please refer to what is Picoin? What is the price for listing? Pi usage, mining and security analysis. What is PiNetwork? The PiNetwork project started in 2019 and owns its exclusive cryptocurrency Pi Coin. The project aims to create a one that everyone can participate
 Let's talk about the event loop in Node
Apr 11, 2023 pm 07:08 PM
Let's talk about the event loop in Node
Apr 11, 2023 pm 07:08 PM
The event loop is a fundamental part of Node.js and enables asynchronous programming by ensuring that the main thread is not blocked. Understanding the event loop is crucial to building efficient applications. The following article will give you an in-depth understanding of the event loop in Node. I hope it will be helpful to you!
 What should I do if node cannot use npm command?
Feb 08, 2023 am 10:09 AM
What should I do if node cannot use npm command?
Feb 08, 2023 am 10:09 AM
The reason why node cannot use the npm command is because the environment variables are not configured correctly. The solution is: 1. Open "System Properties"; 2. Find "Environment Variables" -> "System Variables", and then edit the environment variables; 3. Find the location of nodejs folder; 4. Click "OK".
