Understand the implementation principle of Java thread pool in one article
This article brings you relevant knowledge about java, which mainly introduces the relevant content about the implementation principle of thread pool, including why to use thread pool and related content about the use of thread pool , let’s take a look at it, I hope it will be helpful to everyone.

java video tutorial"
1. Why use thread poolThe use of thread pools is usually due to the following two reasons:
- Frequently creating and destroying threads consumes system resources, and using thread pools can reuse threads.
- Using a thread pool makes it easier to manage threads. The thread pool can dynamically manage the number of threads, have blocking queues, execute tasks periodically, and environment isolation, etc.
/**
 * @author 一灯架构
 * @apiNote 线程池示例
 **/
public class ThreadPoolDemo {

    public static void main(String[] args) {
        // 1. 创建线程池
        ThreadPoolExecutor threadPoolExecutor = new ThreadPoolExecutor(
                3,
                3,
                0L,
                TimeUnit.MILLISECONDS,
                new LinkedBlockingQueue(),
                Executors.defaultThreadFactory(),
                new ThreadPoolExecutor.AbortPolicy());

        // 2. 往线程池中提交3个任务
        for (int i = 0; i  {
                System.out.println(Thread.currentThread().getName() + " 关注公众号:一灯架构");
            });
        }

        // 3. 关闭线程池
        threadPoolExecutor.shutdown();
    }
}
Copy after login
Output results:
/**
* @author 一灯架构
* @apiNote 线程池示例
**/
public class ThreadPoolDemo {
public static void main(String[] args) {
// 1. 创建线程池
ThreadPoolExecutor threadPoolExecutor = new ThreadPoolExecutor(
3,
3,
0L,
TimeUnit.MILLISECONDS,
new LinkedBlockingQueue(),
Executors.defaultThreadFactory(),
new ThreadPoolExecutor.AbortPolicy());
// 2. 往线程池中提交3个任务
for (int i = 0; i {
System.out.println(Thread.currentThread().getName() + " 关注公众号:一灯架构");
});
}
// 3. 关闭线程池
threadPoolExecutor.shutdown();
}
}pool-1-thread-2 关注公众号:一灯架构 pool-1-thread-1 关注公众号:一灯架构 pool-1-thread-3 关注公众号:一灯架构
- Call the new ThreadPoolExecutor() constructor, specify the core parameters, and create a thread pool.
- Call the execute() method to submit the Runnable task
- After use, call the shutdown() method to close the thread pool.
The thread pool has seven core parameters:
| Parameter meaning | ||
|---|---|---|
| Number of core threads | ||
| Maximum number of threads | ||
| Thread survival time | ||
| Time unit | ||
| Blocking queue | ||
| Thread creation factory | ||
| Rejection strategy |
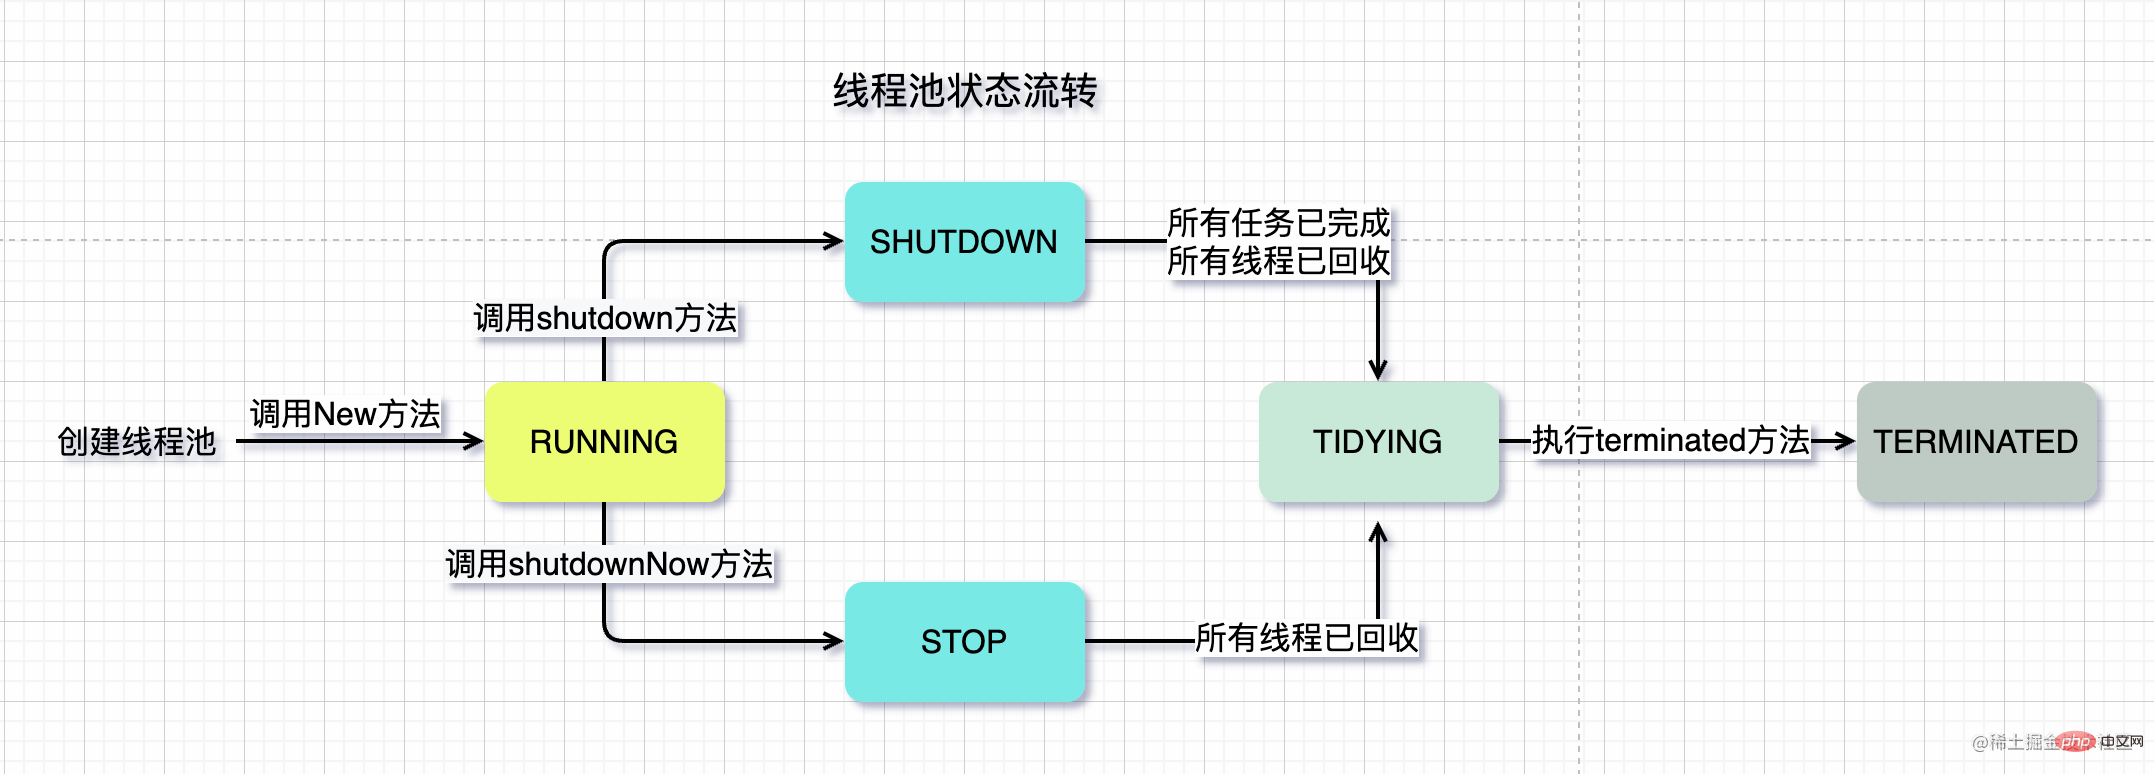
| 状态名称 | 状态含义 | 状态作用 |
|---|---|---|
| RUNNING | 运行中 | 线程池创建后默认状态,接收新任务,并处理阻塞队列中的任务。 |
| SHUTDOWN | 已关闭 | 调用shutdown方法后处于该状态,不再接收新任务,处理阻塞队列中任务。 |
| STOP | 已停止 | 调用shutdownNow方法后处于该状态,不再新任务,并中断所有线程,丢弃阻塞队列中所有任务。 |
| TIDYING | 处理中 | 所有任务已完成,所有工作线程都已回收,等待调用terminated方法。 |
| TERMINATED | 已终止 | 调用terminated方法后处于该状态,线程池的最终状态。 |

5.3 execute源码
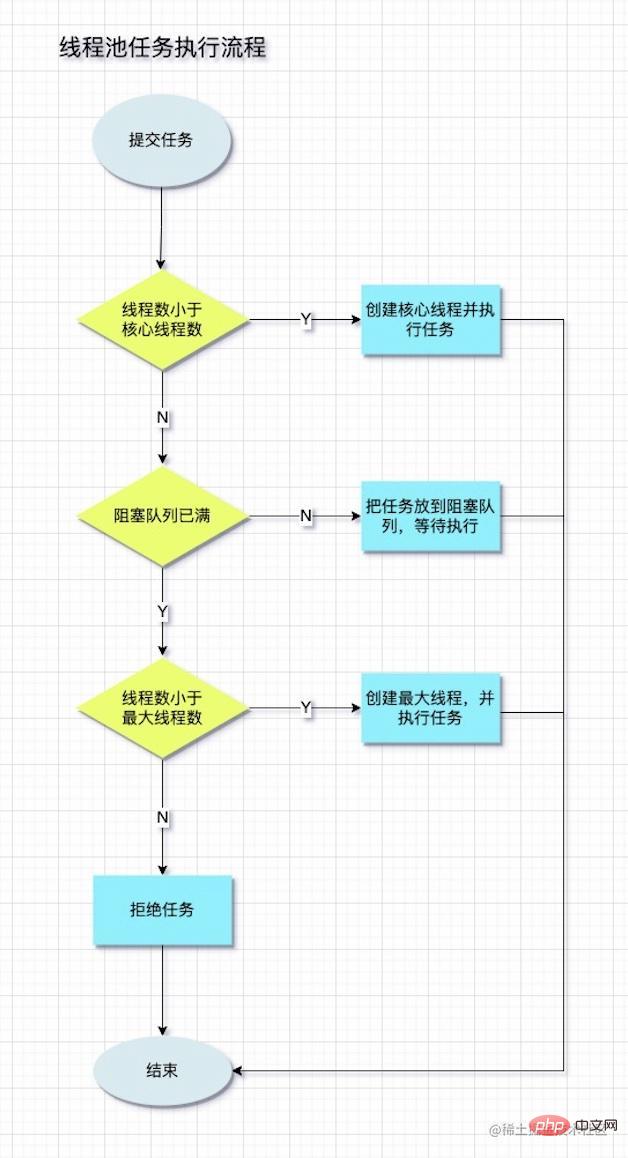
看一下往线程池中提交任务的源码,这是线程池的核心逻辑:
// 往线程池中提交任务
public void execute(Runnable command) {
    // 1. 判断提交的任务是否为null
    if (command == null)
        throw new NullPointerException();

    int c = ctl.get();
    // 2. 判断线程数是否小于核心线程数
    if (workerCountOf(c) <p>execute方法的逻辑也很简单,最终就是调用addWorker方法,把任务添加到worker集合中,再看一下addWorker方法的源码:</p><pre class="brush:php;toolbar:false">// 添加worker
private boolean addWorker(Runnable firstTask, boolean core) {
    retry:
    for (; ; ) {
        int c = ctl.get();
        int rs = runStateOf(c);
        // 1. 检查是否允许提交任务
        if (rs >= SHUTDOWN &&
                !(rs == SHUTDOWN &&
                        firstTask == null &&
                        !workQueue.isEmpty()))
            return false;
        // 2. 使用死循环保证添加线程成功
        for (; ; ) {
            int wc = workerCountOf(c);
            // 3. 校验线程数是否超过容量限制
            if (wc >= CAPACITY ||
                    wc >= (core ? corePoolSize : maximumPoolSize))
                return false;
            // 4. 使用CAS修改线程数
            if (compareAndIncrementWorkerCount(c))
                break retry;
            c = ctl.get();
            // 5. 如果线程池状态变了,则从头再来
            if (runStateOf(c) != rs)
                continue retry;
        }
    }
    boolean workerStarted = false;
    boolean workerAdded = false;
    Worker w = null;
    try {
        // 6. 把任务和新线程包装成一个worker
        w = new Worker(firstTask);
        final Thread t = w.thread;
        if (t != null) {
            // 7. 加锁,控制并发
            final ReentrantLock mainLock = this.mainLock;
            mainLock.lock();
            try {
                // 8. 再次校验线程池状态是否异常
                int rs = runStateOf(ctl.get());
                if (rs  largestPoolSize)
                        largestPoolSize = s;
                    workerAdded = true;
                }
            } finally {
                mainLock.unlock();
            }
            if (workerAdded) {
                // 12. 启动线程
                t.start();
                workerStarted = true;
            }
        }
    } finally {
        if (!workerStarted)
            addWorkerFailed(w);
    }
    return workerStarted;
}方法虽然很长,但是逻辑很清晰。就是把任务和线程包装成worker,添加到worker集合,并启动线程。
5.4 worker源码
再看一下worker类的结构:
private final class Worker
        extends AbstractQueuedSynchronizer
        implements Runnable {
    // 工作线程
    final Thread thread;
    // 任务
    Runnable firstTask;

    // 创建worker,并创建一个新线程(用来执行任务)
    Worker(Runnable firstTask) {
        setState(-1);
        this.firstTask = firstTask;
        this.thread = getThreadFactory().newThread(this);
    }
}5.5 runWorker源码
再看一下run方法的源码:
// 线程执行入口
public void run() {
    runWorker(this);
}

// 线程运行核心方法
final void runWorker(Worker w) {
    Thread wt = Thread.currentThread();
    Runnable task = w.firstTask;
    w.firstTask = null;
    w.unlock();
    boolean completedAbruptly = true;
    try {
        // 1. 如果当前worker中任务是null,就从阻塞队列中获取任务
        while (task != null || (task = getTask()) != null) {
            // 加锁,保证thread不被其他线程中断(除非线程池被中断)
            w.lock();
            // 2. 校验线程池状态,是否需要中断当前线程
            if ((runStateAtLeast(ctl.get(), STOP) ||
                    (Thread.interrupted() &&
                            runStateAtLeast(ctl.get(), STOP))) &&
                    !wt.isInterrupted())
                wt.interrupt();
            try {
                beforeExecute(wt, task);
                Throwable thrown = null;
                try {
                    // 3. 执行run方法
                    task.run();
                } catch (RuntimeException x) {
                    thrown = x;
                    throw x;
                } catch (Error x) {
                    thrown = x;
                    throw x;
                } catch (Throwable x) {
                    thrown = x;
                    throw new Error(x);
                } finally {
                    afterExecute(task, thrown);
                }
            } finally {
                task = null;
                w.completedTasks++;
                // 解锁
                w.unlock();
            }
        }
        completedAbruptly = false;
    } finally {
        // 4. 从worker集合删除当前worker
        processWorkerExit(w, completedAbruptly);
    }
}runWorker方法逻辑也很简单,就是不断从阻塞队列中拉取任务并执行。
再看一下从阻塞队列中拉取任务的逻辑:
// 从阻塞队列中拉取任务
private Runnable getTask() {
    boolean timedOut = false;
    for (; ; ) {
        int c = ctl.get();
        int rs = runStateOf(c);
        // 1. 如果线程池已经停了,或者阻塞队列是空,就回收当前线程
        if (rs >= SHUTDOWN && (rs >= STOP || workQueue.isEmpty())) {
            decrementWorkerCount();
            return null;
        }
        int wc = workerCountOf(c);
        // 2. 再次判断是否需要回收线程
        boolean timed = allowCoreThreadTimeOut || wc > corePoolSize;
        if ((wc > maximumPoolSize || (timed && timedOut))
                && (wc > 1 || workQueue.isEmpty())) {
            if (compareAndDecrementWorkerCount(c))
                return null;
            continue;
        }
        try {
            // 3. 从阻塞队列中拉取任务
            Runnable r = timed ?
                    workQueue.poll(keepAliveTime, TimeUnit.NANOSECONDS) :
                    workQueue.take();
            if (r != null)
                return r;
            timedOut = true;
        } catch (InterruptedException retry) {
            timedOut = false;
        }
    }
}推荐学习:《java视频教程》
The above is the detailed content of Understand the implementation principle of Java thread pool in one article. For more information, please follow other related articles on the PHP Chinese website!

Hot AI Tools

Undresser.AI Undress
AI-powered app for creating realistic nude photos

AI Clothes Remover
Online AI tool for removing clothes from photos.

Undress AI Tool
Undress images for free

Clothoff.io
AI clothes remover

AI Hentai Generator
Generate AI Hentai for free.

Hot Article

Hot Tools

Notepad++7.3.1
Easy-to-use and free code editor

SublimeText3 Chinese version
Chinese version, very easy to use

Zend Studio 13.0.1
Powerful PHP integrated development environment

Dreamweaver CS6
Visual web development tools

SublimeText3 Mac version
God-level code editing software (SublimeText3)

Hot Topics
 Square Root in Java
Aug 30, 2024 pm 04:26 PM
Guide to Square Root in Java. Here we discuss how Square Root works in Java with example and its code implementation respectively.
 Perfect Number in Java
Aug 30, 2024 pm 04:28 PM
Guide to Perfect Number in Java. Here we discuss the Definition, How to check Perfect number in Java?, examples with code implementation.
 Random Number Generator in Java
Aug 30, 2024 pm 04:27 PM
Guide to Random Number Generator in Java. Here we discuss Functions in Java with examples and two different Generators with ther examples.
 Armstrong Number in Java
Aug 30, 2024 pm 04:26 PM
Guide to the Armstrong Number in Java. Here we discuss an introduction to Armstrong's number in java along with some of the code.
 Weka in Java
Aug 30, 2024 pm 04:28 PM
Guide to Weka in Java. Here we discuss the Introduction, how to use weka java, the type of platform, and advantages with examples.
 Smith Number in Java
Aug 30, 2024 pm 04:28 PM
Guide to Smith Number in Java. Here we discuss the Definition, How to check smith number in Java? example with code implementation.
 Java Spring Interview Questions
Aug 30, 2024 pm 04:29 PM
In this article, we have kept the most asked Java Spring Interview Questions with their detailed answers. So that you can crack the interview.
 Break or return from Java 8 stream forEach?
Feb 07, 2025 pm 12:09 PM
Java 8 introduces the Stream API, providing a powerful and expressive way to process data collections. However, a common question when using Stream is: How to break or return from a forEach operation? Traditional loops allow for early interruption or return, but Stream's forEach method does not directly support this method. This article will explain the reasons and explore alternative methods for implementing premature termination in Stream processing systems. Further reading: Java Stream API improvements Understand Stream forEach The forEach method is a terminal operation that performs one operation on each element in the Stream. Its design intention is


