Sharing practical Word skills: showing you how to use Word to create test papers
In the previous article "Practical Word Skills Sharing: Sorting by Numbers, Strokes, Dates, and Pinyin", we learned about sorting by numbers, strokes, dates, and Pinyin. Today we will teach you how to make test papers in Word in five steps, come and take a look!

Test papers are answer sheets or question papers that each of us will come into contact with in our lives. As exam week approaches, if you are a student, you will be busy reviewing for exams in various subjects; if you are a teacher, you will be busy coming up with test questions and writing test papers. But how can you create test papers quickly? This is one of the skills that many teachers need to master.
Nowadays, with the development of technology, teachers no longer use traditional production methods to make test papers, but use computers and office software to quickly produce them, which can greatly save costs and time.
Normally, when teachers make test papers, the first step is to design the test paper "paper surface". That is, setting up test paper pages, adding page numbers, etc... Therefore, today I will introduce to you how to use Word to prepare test papers. I hope these skills can help teachers complete the work of writing test papers faster and more conveniently. Let’s take a look at how to use Word to prepare test papers.
##1. Page settings
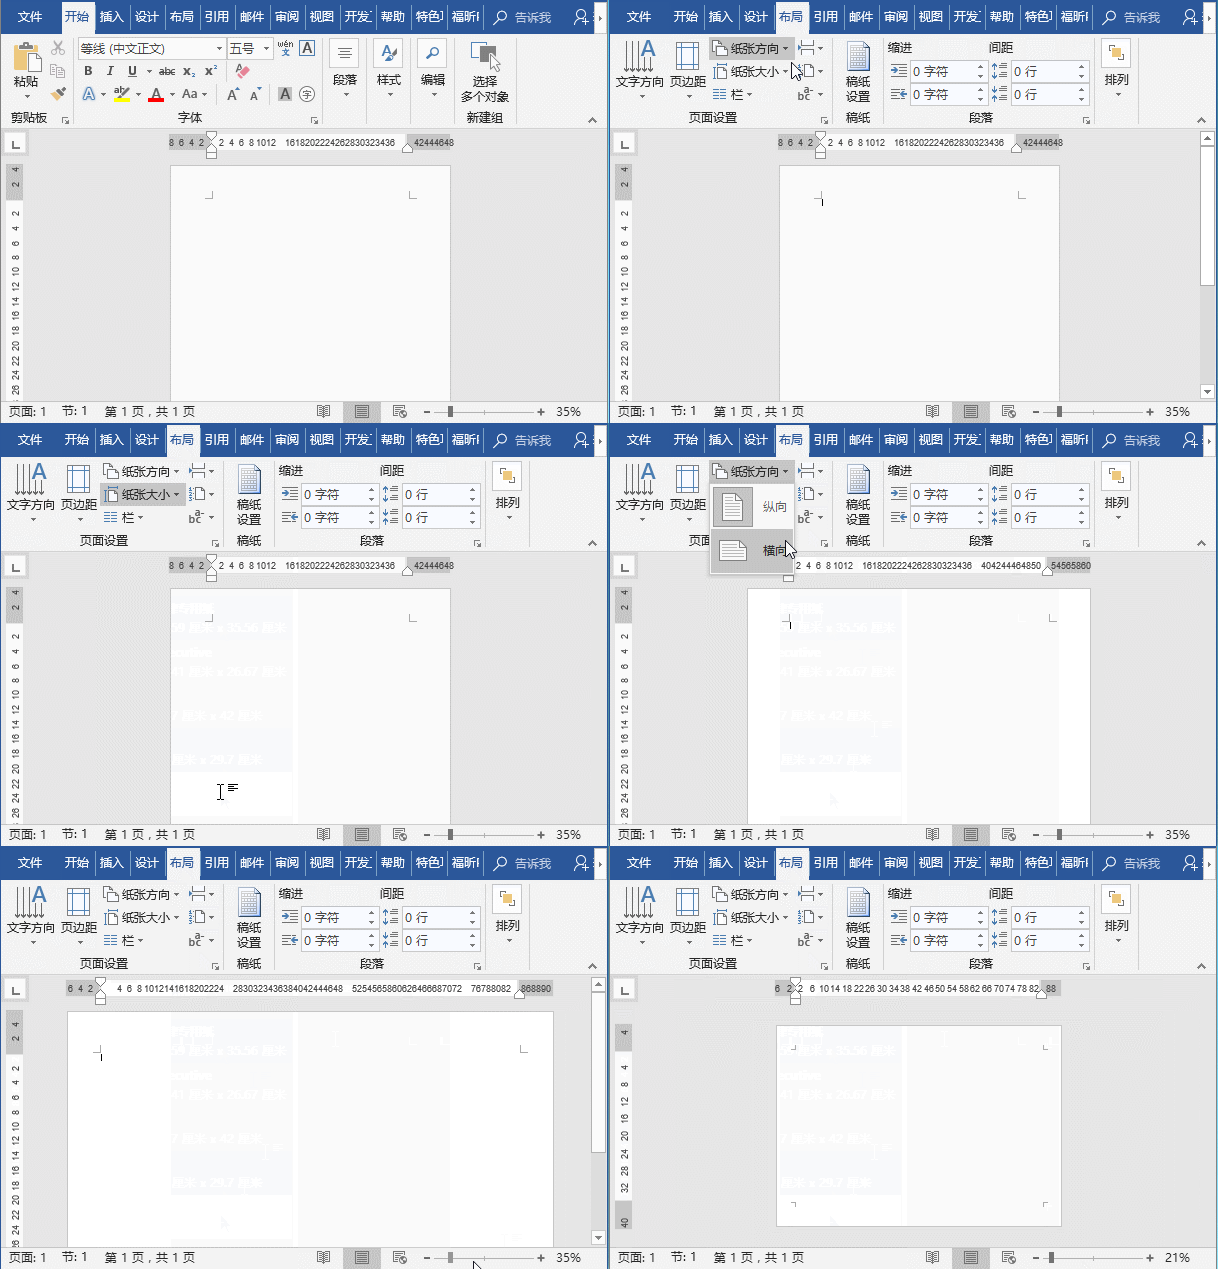
In the exam, the most common format of the test paper is to use B4 paper and be horizontal. Therefore, we first need to set up the page. The specific method is as follows: Click the [Layout]-[Page Layout]-[Paper Size] button and select "B4 (JIS)" in the pop-up drop-down list. Then click the [Paper Orientation] button and select "Landscape".
#2. Set page marginsThe setting of page margins is to facilitate the later addition of elements such as test paper sealing lines and page numbers. The method is as follows:
Click [Layout] -Button in the lower right corner of the [Page Layout] group to open the "Page Setup" dialog box. Select the "Margins" tab, set the top, bottom, left, and right page margins to 2, 2, 4, and 2 respectively, and click the "OK" button.
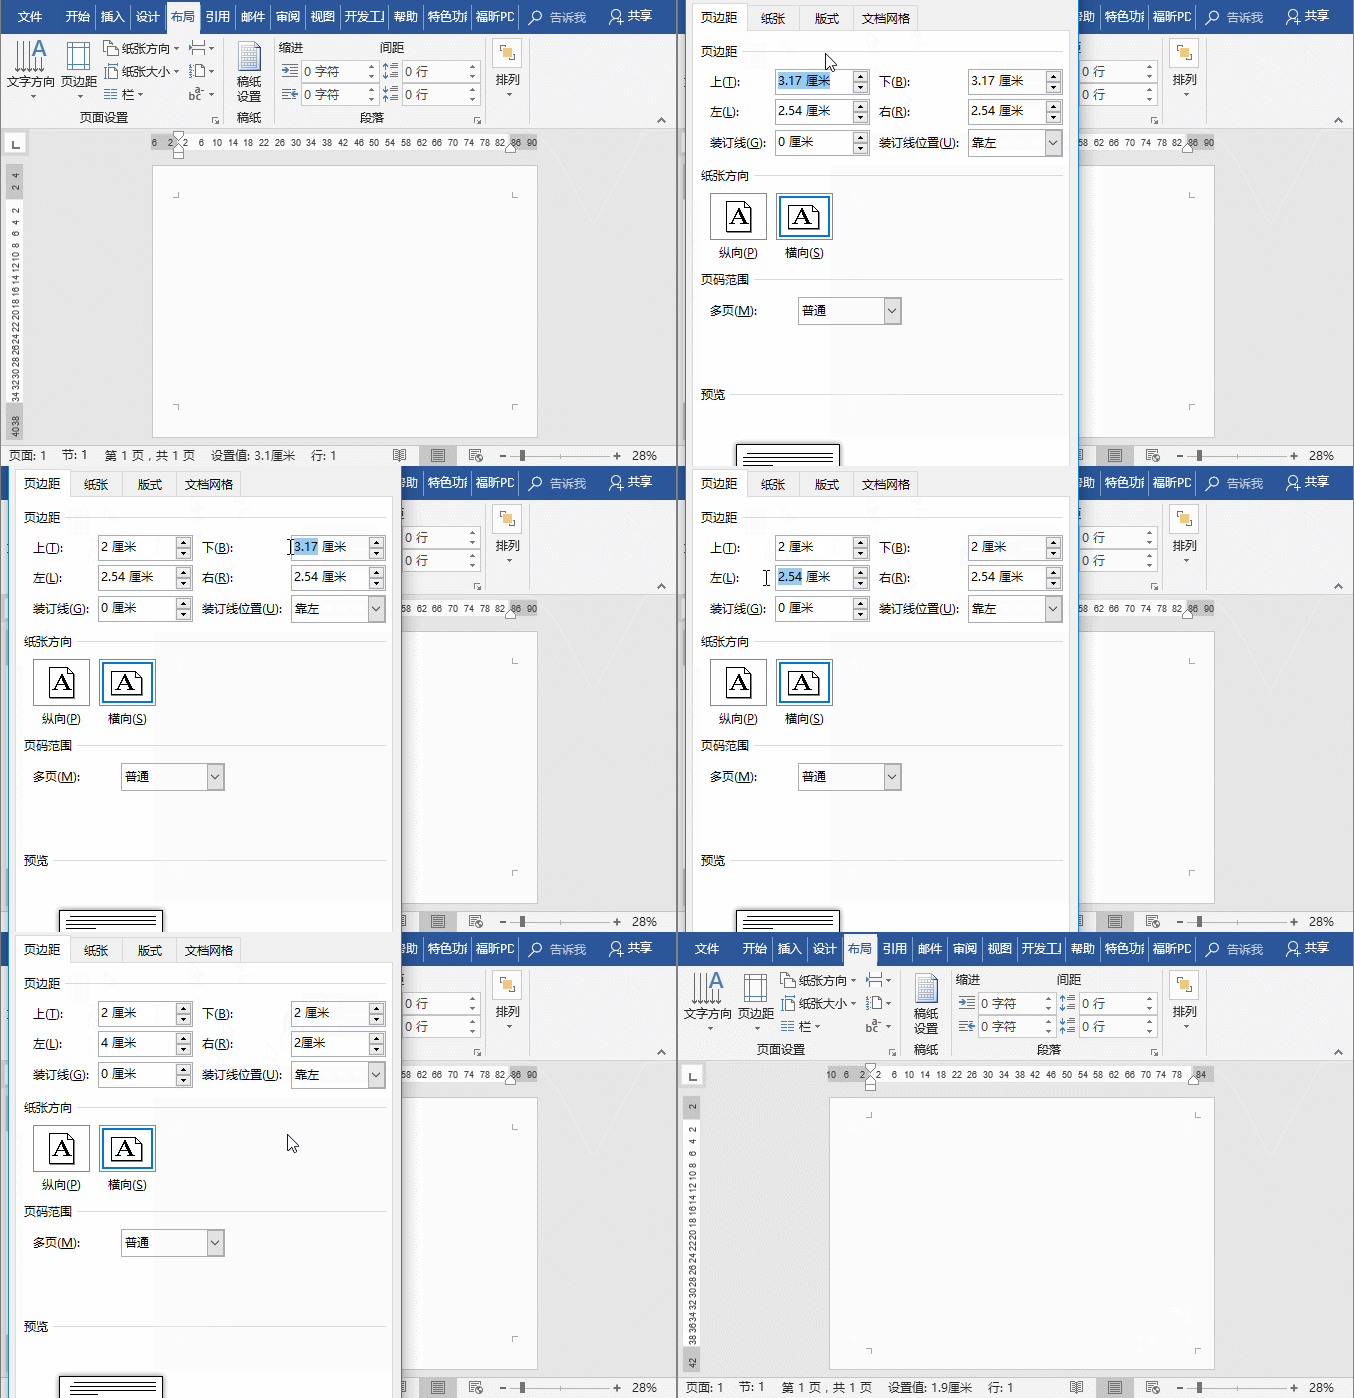
#Tips:The left margin here is obviously wider than the other margins, because a sealing line will be added to the left later.
3. Set up columns
The test paper is usually divided into two columns, each column The page number and total page number will be added below, so we need to divide the page into columns.
Open the "Page Setup" dialog box again, select the "Document Grid" tab, set the "Number of Columns" to "2" columns, and then click the "OK" button.
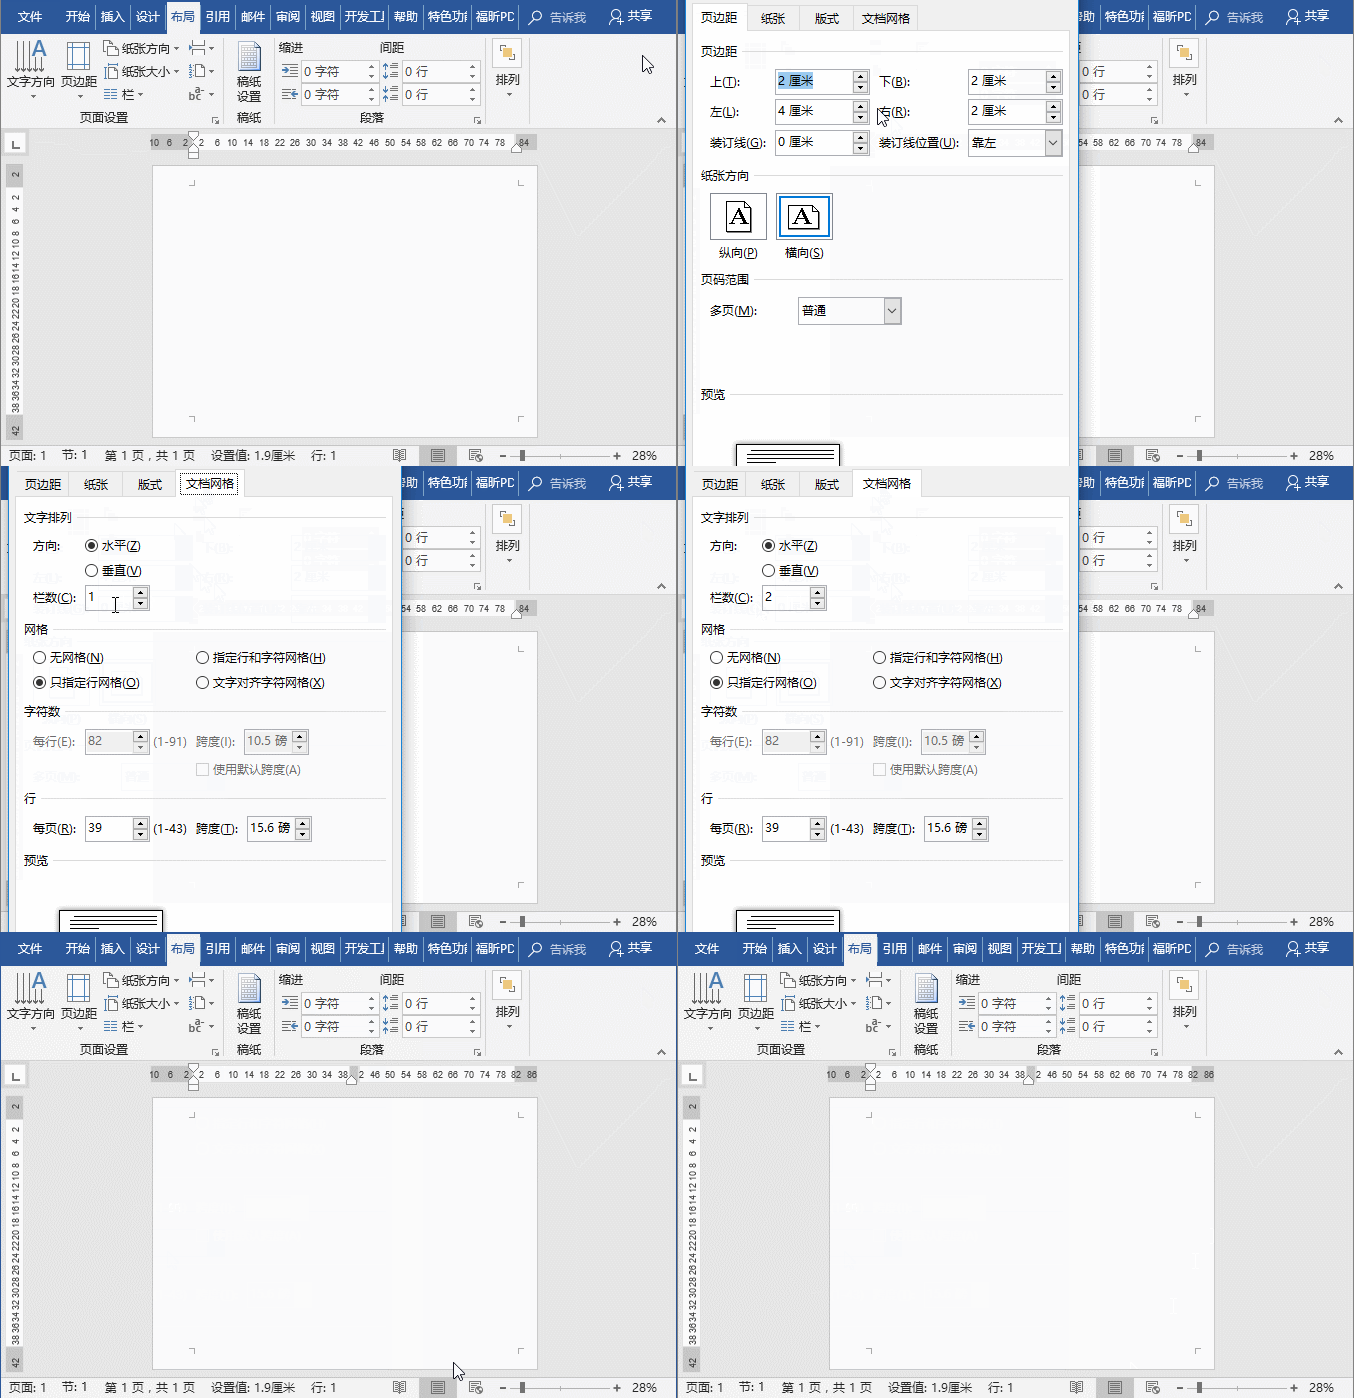
# After dividing into columns, the page No actual column changes were found. You can see the column effect after adding page numbers. At the same time, it should be noted that do not select "separator line" here, otherwise there will be a column line in the middle of the test paper.
##4. Add page numbers
(1) Click [Insert]-[Page Number]-[Bottom of Page]-[x/y] page number, and then enter the text "No. Pages/Total pages".
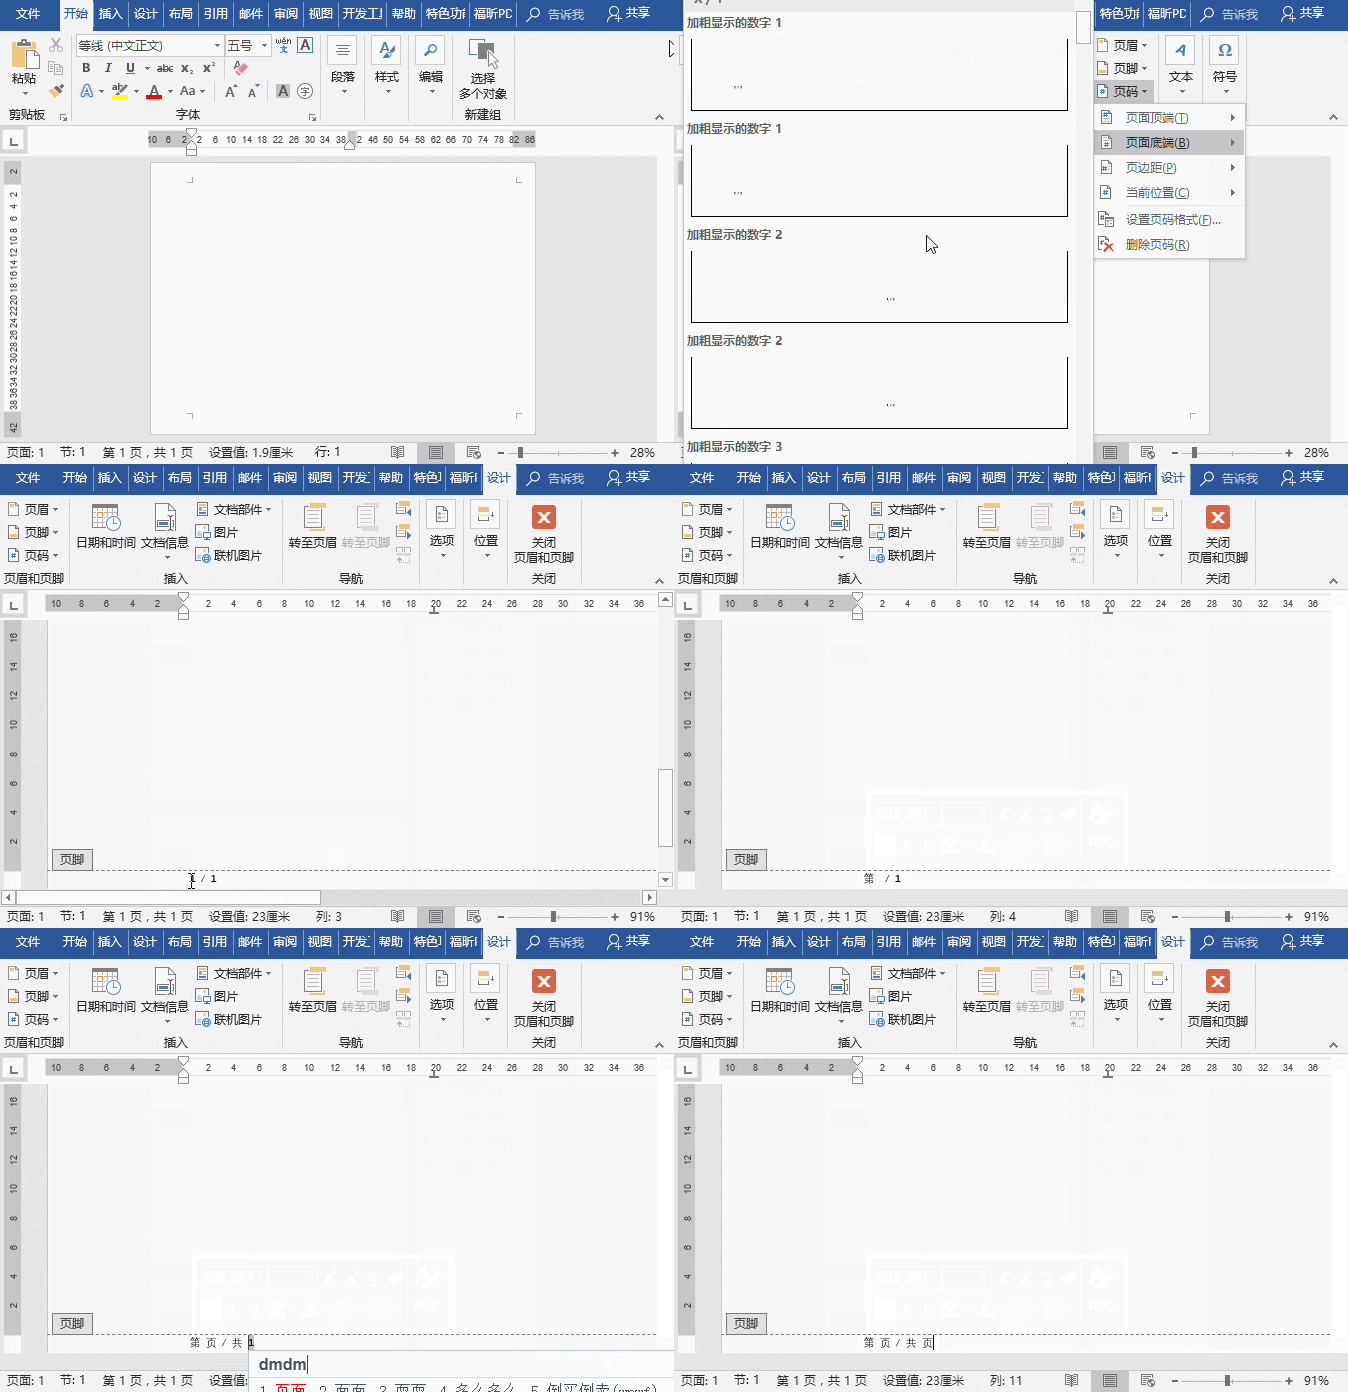
# #(2) Position the cursor between "page" and "page", press the [ctrl F9] key twice, then enter the code "{ = {page }*2-1}", then right-click and select "Update Domain" . (3) Position the mouse between "Total" and "Page", press ctrl F9 and enter the following code "{= {numpages }*2 }", then right-click and select "Update Domain" to view the page Set the effect.
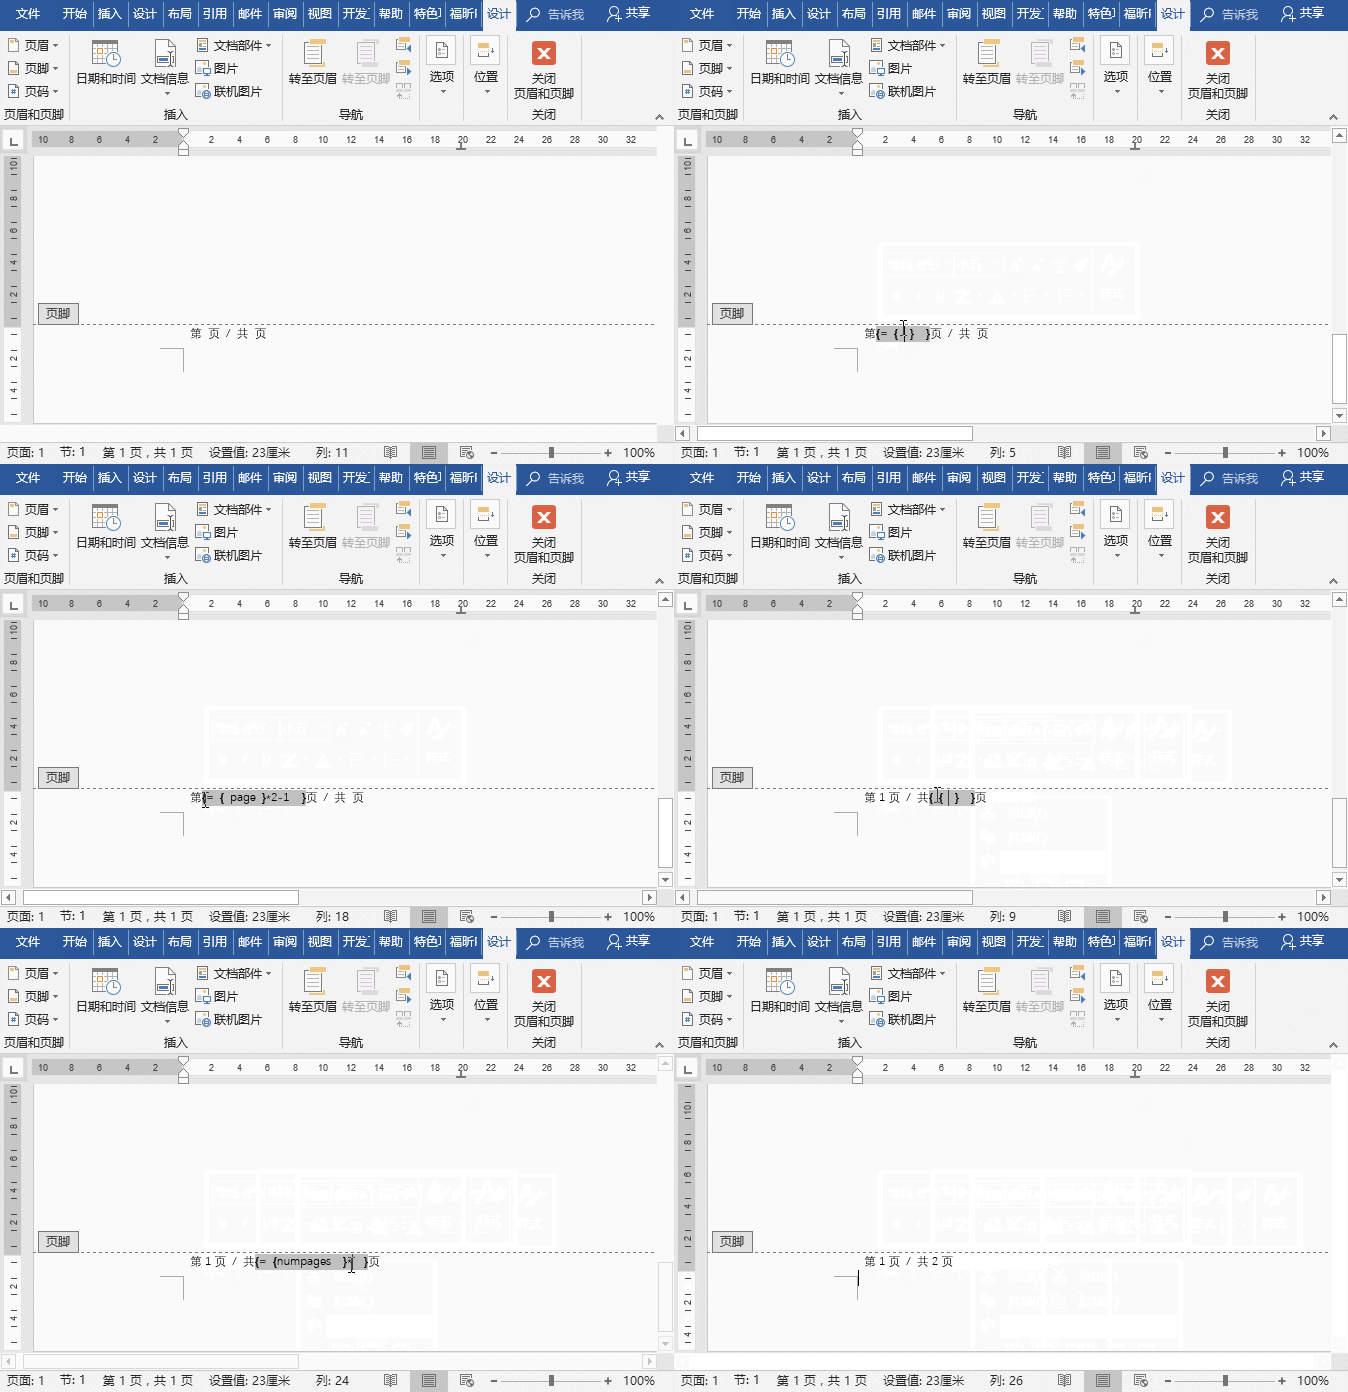
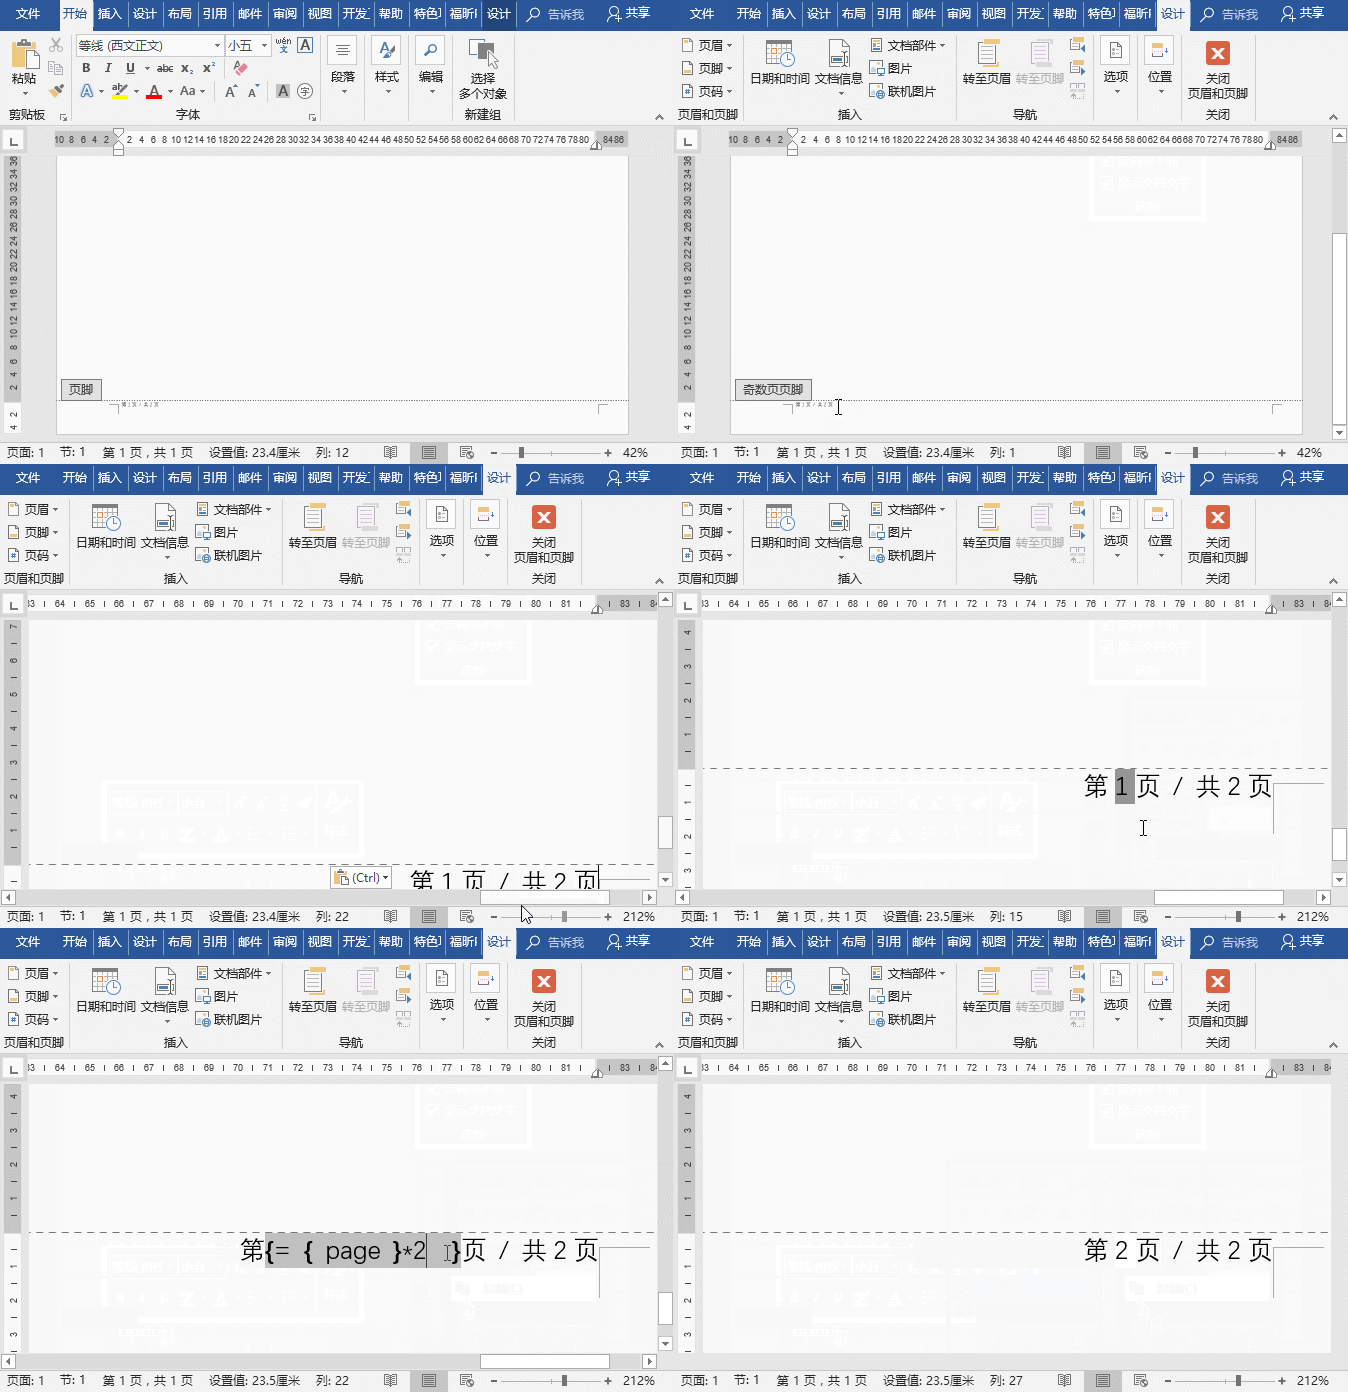
##(4 ) Click [Design] - [Options] group, check the "Odd and even pages are different" check box, then copy the page number on the left and paste it to the appropriate position on the right (second column). Select the current page number "1", right-click Select "Switch Field Code", change the field "*2-1" in the curly brackets to "*2", right-click again, select "Update Field", the current page number will appear. The total number of page numbers remains unchanged.
#5. Making sealing lines
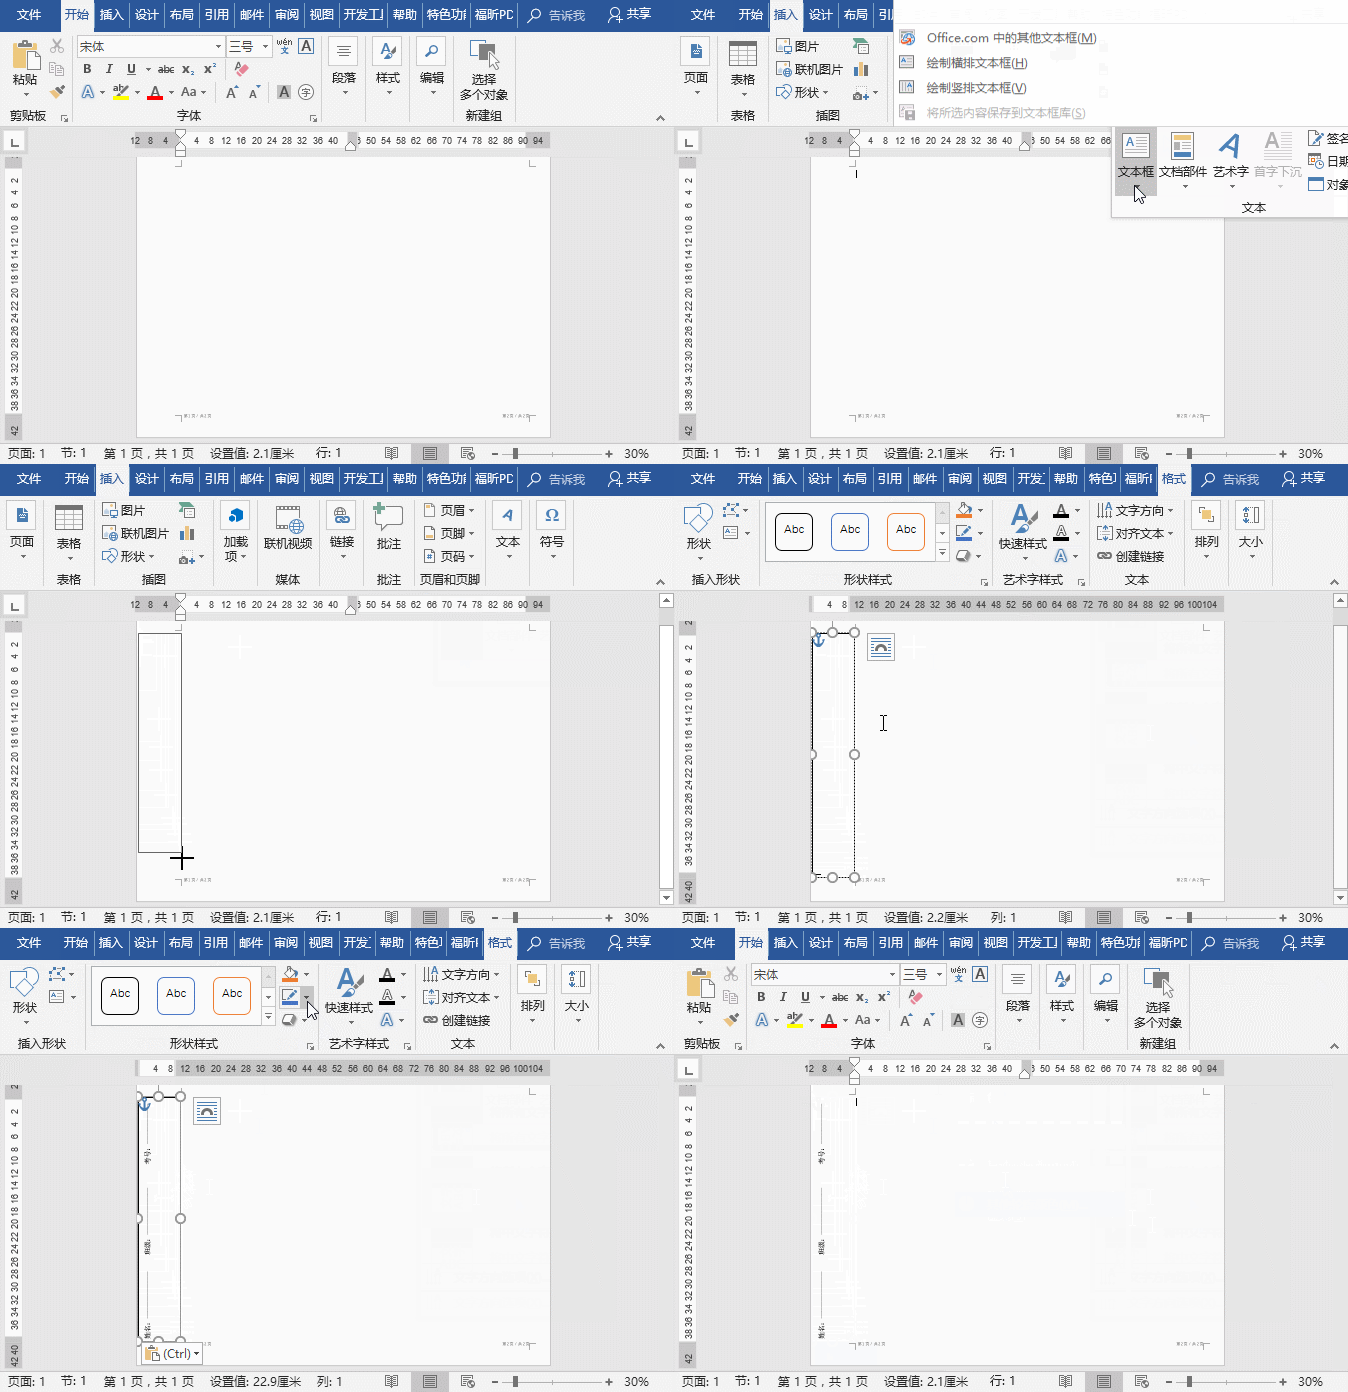
(1) Click [Insert]-[Text Box]-[Draw Vertical Text Box] command, draw and insert a vertical text box at the left margin. Click the [Format]-[Text Direction] button, select "Rotate all text 270°" in the pop-up list, and then select "Rotate all text 270°" in the text box Enter "name, class, exam number" and other contents into the box.
(2) Select the text box, click the [Format]-[Shape Outline] button, select the "No Outline" command in the pop-up menu, and cancel Text box border line.
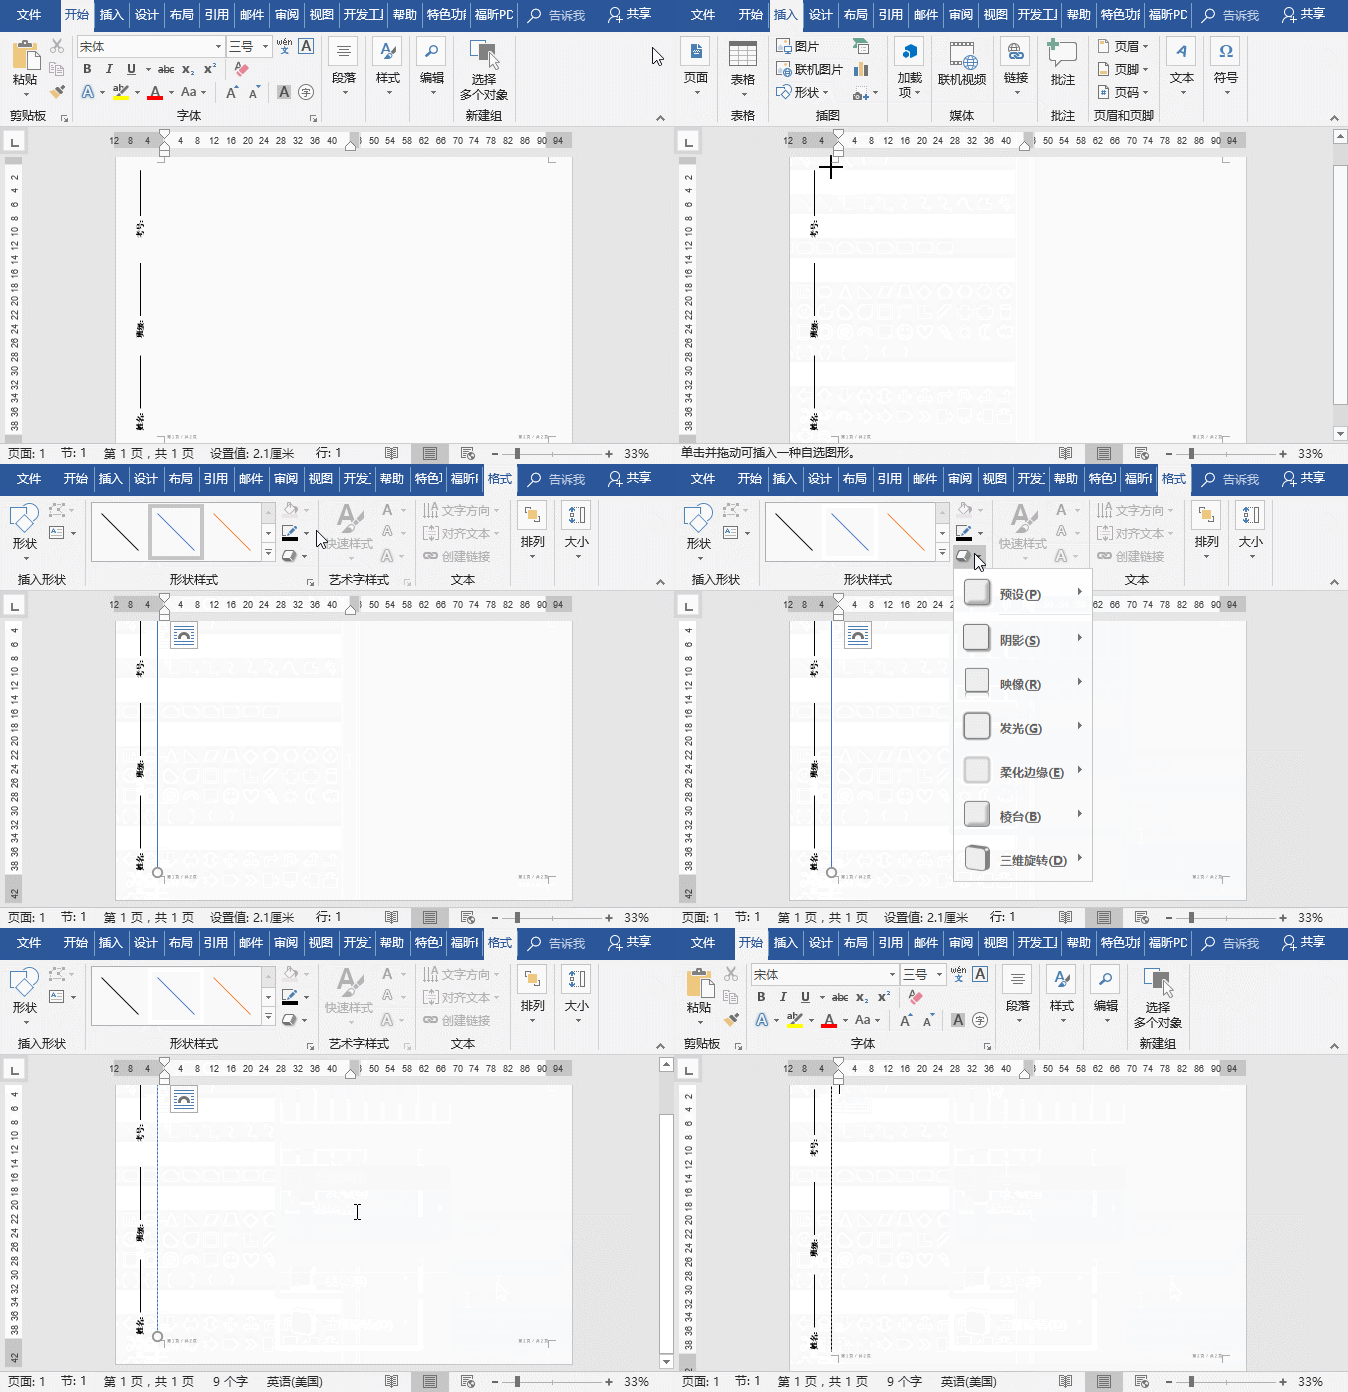
## (3) Then adjust the position of the text box. Click [Insert]-[Shape]-[Line], draw and insert a straight line on the right side. Click the [Format]-[Shape Outline] button and set the line thickness in the pop-up menu , line style and line color.
 ##The above is today’s All content, I hope you have also learned how to use Word to make test papers!
Recommended tutorial: "Word Tutorial"
The above is the detailed content of Sharing practical Word skills: showing you how to use Word to create test papers. For more information, please follow other related articles on the PHP Chinese website!

Hot AI Tools

Undresser.AI Undress
AI-powered app for creating realistic nude photos

AI Clothes Remover
Online AI tool for removing clothes from photos.

Undress AI Tool
Undress images for free

Clothoff.io
AI clothes remover

Video Face Swap
Swap faces in any video effortlessly with our completely free AI face swap tool!

Hot Article

Hot Tools

Notepad++7.3.1
Easy-to-use and free code editor

SublimeText3 Chinese version
Chinese version, very easy to use

Zend Studio 13.0.1
Powerful PHP integrated development environment

Dreamweaver CS6
Visual web development tools

SublimeText3 Mac version
God-level code editing software (SublimeText3)

Hot Topics
 1386
1386
 52
52
 How to cancel automatic word wrapping in word
Mar 19, 2024 pm 10:16 PM
When editing content in a word document, lines may automatically wrap. If no adjustment is made at this time, it will have a great impact on our editing and make people very headache. What is going on? In fact, it is a problem with the ruler. Below, I will introduce the solution to how to cancel automatic word wrapping in word. I hope it can help everyone! After opening a Word document and entering text, when you try to copy and paste, the text may jump to a new line. In this case, you need to adjust the settings to solve this problem. 2. To solve this problem, we must first know the cause of this problem. At this time we click View under the toolbar. 3. Then click the "Ruler" option below. 4. At this time we will find that a ruler appears above the document with several conical markers on it.
 Detailed explanation of how to display the ruler in Word and how to operate the ruler!
Mar 20, 2024 am 10:46 AM
When we use Word, in order to edit the content more beautifully, we often use rulers. You should know that the rulers in Word include horizontal rulers and vertical rulers, which are used to display and adjust the document's page margins, paragraph indents, tabs, etc. So, how do you display the ruler in Word? Next, I will teach you how to set the ruler display. Students in need should quickly collect it! The steps are as follows: 1. First, we need to bring up the word ruler. The default word document does not display the word ruler. We only need to click the [View] button in word. 2. Then, we find the option of [Ruler] and check it. In this way, we can adjust the word ruler! Yes or no
 How to add handwritten signature to word document
Mar 20, 2024 pm 08:56 PM
Word documents are widely used due to their powerful functions. Not only can various formats be inserted into Word, such as pictures and tables, etc., but now for the integrity and authenticity of the files, many files require a manual signature at the end of the document. It sounds like this How to solve complex problems? Today I will teach you how to add a handwritten signature to a word document. Use a scanner, camera or mobile phone to scan or photograph the handwritten signature, and then use PS or other image editing software to perform necessary cropping on the image. 2. Select "Insert - Picture - From File" in the Word document where you want to insert the handwritten signature, and select the cropped handwritten signature. 3. Double-click the handwritten signature picture (or right-click the picture and select "Set Picture Format"), and the "Set Picture Format" pops up.
 How to set page margins for Word
Mar 19, 2024 pm 10:00 PM
Among office software, Word is one of our most commonly used software. The text documents we produce are generally operated with Word. Some documents need to be submitted in paper version as required. Before printing, the layout must be set before it can be presented. produce better results. So the question is, how do you set page margins in Word? We have specific course explanations to help you solve your doubts. 1. Open or create a new word document and click the "Page Layout" menu on the menu bar. 2. Click the "Margins" button of the "Page Setup" option. 3. Select a commonly used page margin in the list. 4. If there are no suitable margins in the list, click "Custom Margins". 5. The "Page Setup" dialog box pops up, enter the "Margins" option respectively.
 How to draw a dotted line in word
Mar 19, 2024 pm 10:25 PM
Word is a software that we often use in our office. It has many functions that can facilitate our operations. For example, for a large article, we can use the search function inside to find out that a word in the full text is wrong, so we can directly replace it. Make changes one by one; when submitting the document to your superiors, you can beautify the document to make it look better, etc. Below, the editor will share with you the steps on how to draw a dotted line in Word. Let's learn together! 1. First, we open the word document on the computer, as shown in the figure below: 2. Then, enter a string of text in the document, as shown in the red circle in the figure below: 3. Next, press and hold [ctrl+A] Select all the text, as shown in the red circle in the figure below: 4. Click [Start] on the top of the menu bar
 Where is the shading setting in word?
Mar 20, 2024 am 08:16 AM
We often use word for office work, but do you know where the shading settings are in word? Today I will share with you the specific operation steps. Come and take a look, friends! 1. First, open the word document, select a paragraph of text paragraph information that needs to be added with shading, then click the [Start] button on the toolbar, find the paragraph area, and click the drop-down button on the right (as shown in the red circle in the figure below) ). 2. After clicking the drop-down box button, in the pop-up menu options, click the [Border and Shading] option (as shown in the red circle in the figure below). 3. In the pop-up [Border and Shading] dialog box, click the [Shading] option (as shown in the red circle in the figure below). 4. In the filled column, select a color
 Specific steps to delete down arrow in Word!
Mar 19, 2024 pm 08:50 PM
In daily office work, if you copy a piece of text from a website and paste it directly into Word, you will often see a [down arrow]. This [down arrow] can be deleted by selecting it, but if there are too many such symbols, So is there a quick way to delete all arrows? So today I will share with you the specific steps to delete the downward arrow in Word! First of all, the [Down Arrow] in Word actually represents [Manual Line Break]. We can replace all [Down Arrows] with [Paragraph Mark] symbols, as shown in the figure below. 2. Then, we select the [Find and Replace] option on the menu bar (as shown in the red circle in the figure below). 3. Then, click the [Replace] command, a pop-up box will pop up, click [Special Symbols]
 Do you know how to sum a Word table?
Mar 21, 2024 pm 01:10 PM
Sometimes, we often encounter counting problems in Word tables. Generally, when encountering such problems, most students will copy the Word table to Excel for calculation; some students will silently pick up the calculator. Calculate. Is there a quick way to calculate it? Of course there is, in fact the sum can also be calculated in Word. So, do you know how to do it? Today, let’s take a look together! Without further ado, friends in need should quickly collect it! Step details: 1. First, we open the Word software on the computer and open the document that needs to be processed. (As shown in the picture) 2. Next, we position the cursor on the cell where the summed value is located (as shown in the picture); then, we click [Menu Bar


