

A brief analysis of the http module and export sharing in Nodejs

This article talks about the basics of node, the understanding and cases of http module and module.exports export sharing, I hope it will be helpful to everyone!

1. http module
The http module is a module officially provided by Node.js for creating web servers. [Related tutorial recommendations: nodejs video tutorial]
Through the http.createServer() method provided by the http module, you can easily turn an ordinary computer into a web server , thereby providing web resource services to the outside world.
1. Create a web server
- Import the http module
- Create a web server instance
- Bind to the server instance request event, listen to the client's request
- Start the server
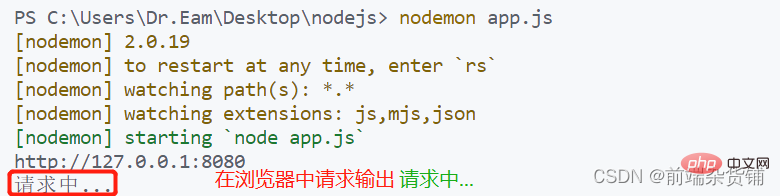
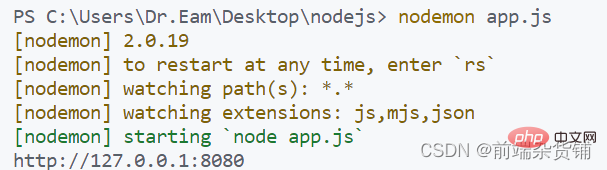
Example: Listen to the 8080 service
// 导入 http 模块
const http = require('http')
// 创建 web 服务器实例
const server = http.createServer()
// 为服务器实例绑定 request 事件 监听客户端的请求
server.on('request', function (req, res) {
    console.log('请求中...')
})
// 启动服务
server.listen(8080, function () {
    console.log('http://127.0.0.1:8080')
})
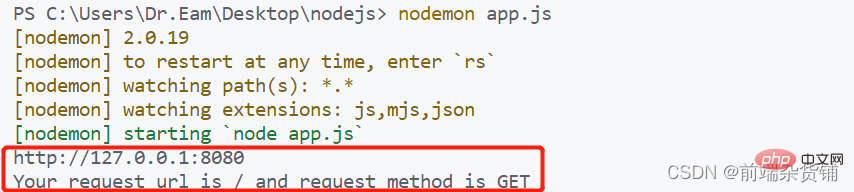
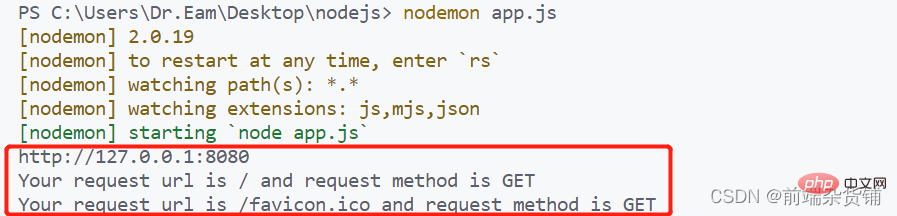
2. req request object
As long as the server receives the client's request, it will call the request event processing function bound to the server through server.on()
Example: In the event handling function, access data or attributes related to the client
// 导入 http 模块
const http = require('http')
// 创建 web 服务器实例
const server = http.createServer()
// req 是请求对象 包含了与客户端相关的数据和属性
server.on('request', (req) => {
    // req.url 客户端请求的 url 地址
    const url = req.url
    // req.method 是客户端请求的 method 类型
    const method = req.method
    const str = `Your request url is ${url} and request method is ${method}`
    console.log(str)
})
// 启动服务
server.listen(8080, function () {
    console.log('http://127.0.0.1:8080')
})
3. res response object
In the server's request event handling function, if you want to access server-related data or properties, you need to use response
Example: Request response
// 导入 http 模块
const http = require('http')
// 创建 web 服务器实例
const server = http.createServer()
// req 是请求对象 包含了与客户端相关的数据和属性
server.on('request', (req, res) => {
    // req.url 客户端请求的 url 地址
    const url = req.url
    // req.method 是客户端请求的 method 类型
    const method = req.method
    const str = `Your request url is ${url} and request method is ${method}`
    console.log(str)
    // 调用 res.end() 方法 向客户端响应一些内容
    res.end(str)
})
// 启动服务
server.listen(8080, function () {
    console.log('http://127.0.0.1:8080')
})

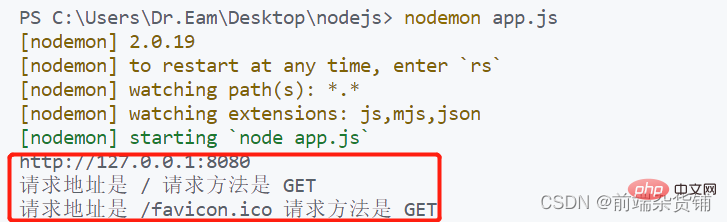
4. Solve the problem of Chinese garbled characters
When calling the res.end() method, report to the client When sending Chinese content, garbled characters will occur, and you need to manually set the encoding format of the content
Example: Solve Chinese garbled characters
// 导入 http 模块
const http = require('http')
// 创建 web 服务器实例
const server = http.createServer()
// req 是请求对象 包含了与客户端相关的数据和属性
server.on('request', (req, res) => {
    // req.url 客户端请求的 url 地址
    const url = req.url
    // req.method 是客户端请求的 method 类型
    const method = req.method
    const str = `请求地址是 ${url} 请求方法是 ${method}`
    console.log(str)
    // 设置 Content-Type 响应头 解决中文乱码问题
    res.setHeader('Content-Type', 'text/html; charset=utf-8')
    // 调用 res.end() 方法 向客户端响应一些内容
    res.end(str)
})
// 启动服务
server.listen(8080, function () {
    console.log('http://127.0.0.1:8080')
})

5. Respond to different html content according to different URLs
Example: The steps are as follows
- Get the requested url address
- Set the default response content to 404 Not found
- Determine whether the user requested / or /index.html home page
- Determine whether the user requested Whether to set the Content-Type response header for /about.html About page
- to prevent Chinese garbled characters
- Use res.end() to respond the content to the client
// 导入 http 模块
const http = require('http')
// 创建 web 服务器实例
const server = http.createServer()
// req 是请求对象 包含了与客户端相关的数据和属性
server.on('request', (req, res) => {
// req.url 客户端请求的 url 地址
const url = req.url
// 设置默认的内容为 404 Not Found
let content = '<h1 id="nbsp-Not-nbsp-Found">404 Not Found!</h1>'
// 用户请求页是首页
if(url === '/' || url === '/index.html') {
content = '<h1 id="首页">首页</h1>'
} else if (url === '/about.html') {
content = '<h1 id="关于页面">关于页面</h1>'
}
// 设置 Content-Type 响应头 防止中文乱码
res.setHeader('Content-Type', 'text/html; charset=utf-8')
// 调用 res.end() 方法 向客户端响应一些内容
res.end(content)
})
// 启动服务
server.listen(8080, function () {
console.log('http://127.0.0.1:8080')
})


## 2. Module classification in Node.js
1. Three major module categories
- Built-in modules: Officially provided by node.js, such as fs, path, http, etc.Custom module: Every .js file created by the user is a custom moduleThird-party module: A module developed by a third party, which must be downloaded before use
2. Module scope
Prevents the problem of global variable pollutionExample:index.js file
const username = '张三'

function say() {
    console.log(username);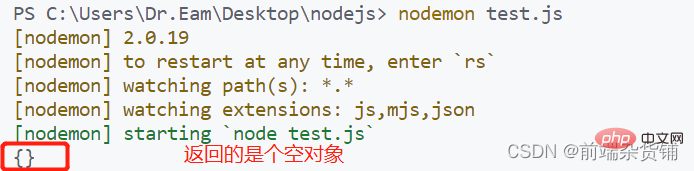
}test.js file
const custom = require('./index')

console.log(custom)
##3. module.exports object In a custom module, you can use the module.exports object to
share members within the modulefor external use. When the external require() method imports a custom module, what is obtained is the object pointed to by module.exports
Example:
index.js fileconst blog = '前端杂货铺'
// 向 module.exports 对象上挂载属性
module.exports.username = '李四'
// 向 module.exports 对象上挂载方法
module.exports.sayHello = function () {
console.log('Hello!')
}
module.exports.blog = blog
const m = require('./index')

console.log(m)
4、共享成员时的注意点
使用 require() 方法导入模块时,导入的结果,永远以 module.exports 指向的对象为准
示例:
index.js 文件
module.exports.username = '李四'

module.exports.sayHello = function () {
    console.log('Hello!')
}

// 让 module.exports 指向一个新对象
module.exports = {
    nickname: '张三',
    sayHi() {
        console.log('Hi!')
    }
}test.js 文件
const m = require('./index')

console.log(m)

5、exports 和 module.exports
默认情况下,exports 和 module.exports 指向同一个对象。
最终共享的结果,还是以 module.exports 指向的对象为准。
示例:
index1.js 文件
exports.username = '杂货铺'

module.exports = {
    name: '前端杂货铺',
    age: 21
}
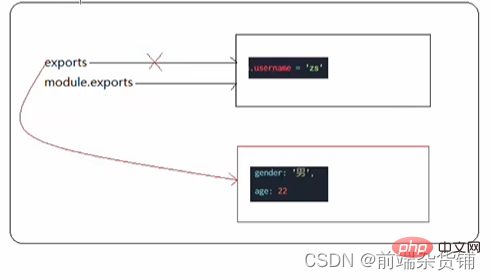
index2.js 文件
module.exports.username = 'zs'

exports = {
    gender: '男',
    age: 22
}
index3.js 文件
exports.username = '杂货铺'

module.exports.age = 21

index4.js 文件
exports = {
    gender: '男',
    age: 21
}

module.exports = exports

module.exports.username = 'zs'
对 index2.js 文件结果的解析如下:
对 index4.js 文件结果的解析如下: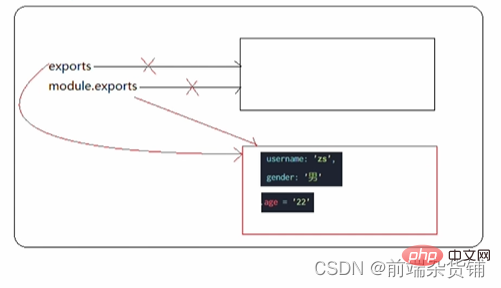
注意:为防止混乱,尽量不要在同一个模块中同时使用 exports 和 module.exports
更多node相关知识,请访问:nodejs 教程!
The above is the detailed content of A brief analysis of the http module and export sharing in Nodejs. For more information, please follow other related articles on the PHP Chinese website!

Hot AI Tools

Undresser.AI Undress
AI-powered app for creating realistic nude photos

AI Clothes Remover
Online AI tool for removing clothes from photos.

Undress AI Tool
Undress images for free

Clothoff.io
AI clothes remover

AI Hentai Generator
Generate AI Hentai for free.

Hot Article
Hot Tools

Notepad++7.3.1
Easy-to-use and free code editor

SublimeText3 Chinese version
Chinese version, very easy to use

Zend Studio 13.0.1
Powerful PHP integrated development environment

Dreamweaver CS6
Visual web development tools

SublimeText3 Mac version
God-level code editing software (SublimeText3)
Hot Topics
 1378
1378
 52
52

 Is nodejs a backend framework?
Apr 21, 2024 am 05:09 AM
Is nodejs a backend framework?
Apr 21, 2024 am 05:09 AM
Node.js can be used as a backend framework as it offers features such as high performance, scalability, cross-platform support, rich ecosystem, and ease of development.
 How to connect nodejs to mysql database
Apr 21, 2024 am 06:13 AM
How to connect nodejs to mysql database
Apr 21, 2024 am 06:13 AM
To connect to a MySQL database, you need to follow these steps: Install the mysql2 driver. Use mysql2.createConnection() to create a connection object that contains the host address, port, username, password, and database name. Use connection.query() to perform queries. Finally use connection.end() to end the connection.
 What is the difference between npm and npm.cmd files in the nodejs installation directory?
Apr 21, 2024 am 05:18 AM
What is the difference between npm and npm.cmd files in the nodejs installation directory?
Apr 21, 2024 am 05:18 AM
There are two npm-related files in the Node.js installation directory: npm and npm.cmd. The differences are as follows: different extensions: npm is an executable file, and npm.cmd is a command window shortcut. Windows users: npm.cmd can be used from the command prompt, npm can only be run from the command line. Compatibility: npm.cmd is specific to Windows systems, npm is available cross-platform. Usage recommendations: Windows users use npm.cmd, other operating systems use npm.
 What are the global variables in nodejs
Apr 21, 2024 am 04:54 AM
What are the global variables in nodejs
Apr 21, 2024 am 04:54 AM
The following global variables exist in Node.js: Global object: global Core module: process, console, require Runtime environment variables: __dirname, __filename, __line, __column Constants: undefined, null, NaN, Infinity, -Infinity
 Is there a big difference between nodejs and java?
Apr 21, 2024 am 06:12 AM
Is there a big difference between nodejs and java?
Apr 21, 2024 am 06:12 AM
The main differences between Node.js and Java are design and features: Event-driven vs. thread-driven: Node.js is event-driven and Java is thread-driven. Single-threaded vs. multi-threaded: Node.js uses a single-threaded event loop, and Java uses a multi-threaded architecture. Runtime environment: Node.js runs on the V8 JavaScript engine, while Java runs on the JVM. Syntax: Node.js uses JavaScript syntax, while Java uses Java syntax. Purpose: Node.js is suitable for I/O-intensive tasks, while Java is suitable for large enterprise applications.
 Pi Node Teaching: What is a Pi Node? How to install and set up Pi Node?
Mar 05, 2025 pm 05:57 PM
Pi Node Teaching: What is a Pi Node? How to install and set up Pi Node?
Mar 05, 2025 pm 05:57 PM
Detailed explanation and installation guide for PiNetwork nodes This article will introduce the PiNetwork ecosystem in detail - Pi nodes, a key role in the PiNetwork ecosystem, and provide complete steps for installation and configuration. After the launch of the PiNetwork blockchain test network, Pi nodes have become an important part of many pioneers actively participating in the testing, preparing for the upcoming main network release. If you don’t know PiNetwork yet, please refer to what is Picoin? What is the price for listing? Pi usage, mining and security analysis. What is PiNetwork? The PiNetwork project started in 2019 and owns its exclusive cryptocurrency Pi Coin. The project aims to create a one that everyone can participate
 Is nodejs a back-end development language?
Apr 21, 2024 am 05:09 AM
Is nodejs a back-end development language?
Apr 21, 2024 am 05:09 AM
Yes, Node.js is a backend development language. It is used for back-end development, including handling server-side business logic, managing database connections, and providing APIs.
 How to deploy nodejs project to server
Apr 21, 2024 am 04:40 AM
How to deploy nodejs project to server
Apr 21, 2024 am 04:40 AM
Server deployment steps for a Node.js project: Prepare the deployment environment: obtain server access, install Node.js, set up a Git repository. Build the application: Use npm run build to generate deployable code and dependencies. Upload code to the server: via Git or File Transfer Protocol. Install dependencies: SSH into the server and use npm install to install application dependencies. Start the application: Use a command such as node index.js to start the application, or use a process manager such as pm2. Configure a reverse proxy (optional): Use a reverse proxy such as Nginx or Apache to route traffic to your application
