

A practical introduction to Vue.js: How to loop over arrays and objects


In the previous section (Course Part 3) we learned how to use v-if and v -show Perform conditional rendering. In this section we will learn how to loop over arrays and objects, in addition to applying some of the concepts we learned previously.
v-for
v-for is one of the basic instructions of Vue. Once you learn how to use it, you can Add more features to the program.
Simply put, v-for is a for loop. If you still don’t know what a for loop is, a for loop is actually a piece of code. Each element in the code will be executed once, and these elements are usually an Array (Array) or Object(Object).
Today, we’re going to start from the beginning so that everything we do has a clear purpose. Below is the basic structure of our index.html file, which you can copy and paste into your editor.
<html>

<head>
  <title>Vue 101</title>
</head>

<body>
  <div id="app">

  </div>

  <script src="https://cdn.jsdelivr.net/npm/vue/dist/vue.js"></script>

  <script>
    const app = new Vue({
      el: '#app',
      data: {

      },
      methods: {

      }
    });
  </script>
</body>

</html>Let's create a simple array first so that we can use a loop to output the contents of the array. We will create a property in the data object called games. Of course, you can also choose a name you like???.
data: {
  games: [
    'Super Mario 64',
    'The Legend of Zelda Ocarina of Time',
    'Secret of Mana',
    'Super Metroid'
  ]
},Now that we have the array set up, let's create a simple <ul> tag to display it.
<div id="app">
  <ul>
    <li>Game title here</li>
  </ul>
</div>Looks great! Now we need to tell Vue that we want to output as many <li> as possible in <ul> by looping through the array Label.
In other languages, you may have been accustomed to looping the output like this<li> Tag:
<?php foreach ($game in $games): ?>
  <li><?php echo $game; ?></li>
<?php endforeach; ?>
Will need to loop the output<li> ; tags are wrapped in a loop.
But in Vue, we can declare the v-for directive on the label we want to loop. First make the following changes in your <li> tag, and then we will analyze it step by step.
<ul>
  <li v-for="game in games">{{ game }}</li>
</ul>Let us analyze it in detail:
- <li>
v-for The command is added directly to <li> tag instead of the <ul> tag we saw earlier. The reason for writing this is: "Create a <li> tag for each game in our games array.
Note that games is the attribute we added earlier in data, so we have to use this variable name.
game This variable (singular) is defined by ourselves. We can use item, game, title or anything else we think is appropriate. name. But you must understand that this game is the variable you want to use in the loop.
Finally, in our <li> In the tag, we want to output the contents of the game variable, so when we run the loop, the strings in the games array will be output to < ;li> tag.
Open our index.html file in your browser, you should see games The contents of the array are output to the screen.
Increase the difficulty
So far, so good, right? v-for It's actually a very simple concept, but this example is too boring. Let's make things a little more complicated and interesting by including some objects in our array and using v-if, How's that?
First, let's update our games properties with some more interesting data.
data: {
  games: [
    { name: 'Super Mario 64', console: 'Nintendo 64', rating: 4 },
    { name: 'The Legend of Zelda Ocarina of Time', console: 'Nintendo 64', rating: 5 },
    { name: 'Secret of Mana', console: 'Super Nintendo', rating: 4 },
    { name: 'Fallout 76', console: 'Multiple', rating: 1 },
    { name: 'Super Metroid', console: 'Super Nintendo', rating: 6 }
  ]
}, If you run our program now, it won't go wrong , but it will only output the objects in games in string format, which is not pretty. In fact, we have to completely delete our <ul> tag and use <div> tag to output our information. (Don’t worry, it will still look ugly if you use div?)
Replace the entire <div id="app"> ; Replace with the following content:
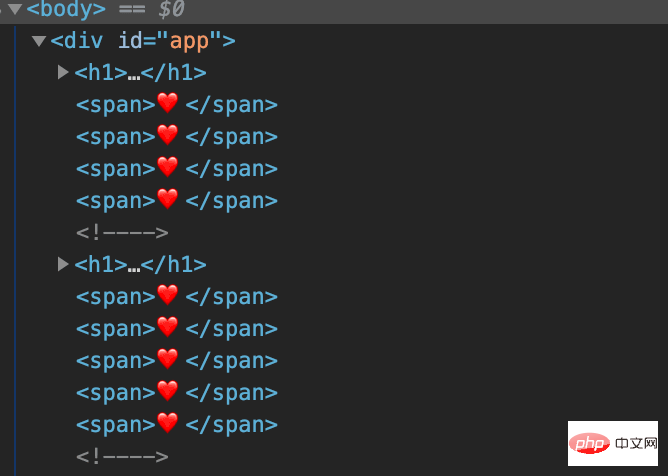
<div id="app">
  <div v-for="game in games">
    <h1>{{ game.name }} - <small>{{ game.console }}</small></h1>

    <span v-for="star in game.rating">❤️</span>

    <div v-if="game.rating > 5">Wow, this game must be <b>REALLY</b> good</div>
  </div>
</div>?. Are you scared to see a lot of the above? Don’t worry, you just need to know what it is, let us analyze it in detail:
- <li>
div v-for="game in games" Still the same, we need to loop the games array and convert the games array Each object within is stored in a game variable.
看看 <h1> 标签. 因为 game 是一个对象,而这个对象里又有自己的 name、console 和rating 属性。在 <h1> 里面,我们要输出 game 内的 game.name 和 game.console。正如你现在所看到的那样,v-for 并不像我们之前只输出 <li> 标签,实际上你可以根据你的需要输出不同的 HTML 标签。
嵌套的 v-for。在 span 标签里面,我们有一个嵌套的 v-for 循环(这完全是可以的),只是有点不同,在这里我们没有循环数组或对象。而是循环了一个数值(在本例中是 game.rating,循环将根据 game.rating 的值开始计数,然后输出对应数量的❤️。很简单吧?)
最后是 v-if。我们要在循环中输出一个 <div> 标签,只有当前 game.rating 的值大于 5 时,才会输出一个<div>标签。
来吧,在浏览器中继续运行我们的 index.html 文件。
每次循环时可不可以不使用 DIV ?
如果你发现写了一大堆 <div> 标签只是为了用 v-for 循环,那么可以使用 <template> </ template> 这个特殊的 HTML 标签帮助你解决这个问题。
现在将带有 v-for 指令的 <div> 标签改成 <template> 标签,然后打开你的开发者控制台,你会发现 <h1> 和 <span> 标签没有被任何东西包裹。
<template> 很特别,因为 Vue 会把它当作一个只用来封装的标签,当我们执行的时候,它不会被渲染到 HTML 中,所以你可以安全地用它来封装一堆其他元素,而不影响你整体的 HTML 结构。
:key 属性
最后一件事::key属性。我特意留到了最后来讲解。
当你用 v-for 循环时,Vue 不知道如何追踪每个元素,因为它不能将对象区别开来。这意味着 Vue 将重新渲染循环创建的整个部分。在我们的例子中,v-for 只是一个很小的部分,性能损失很小,但这些你应该牢记住。
现在,我们该如何使用它呢?
:key 接收字符串或数字来 “命名” 或 “追踪” 这个元素,所以我们需要给它一个唯一的标识符。对于我们的 games 来说,很简单,我们可以这样做:
<div v-for="game in games" :key="game.name">
我很确定,我们不会在这个列表中出现两次相同的 game 对象,所以这是相当安全的。如果你有来自数据库的数据,一个唯一的 id 在这里使用也很好。
如果你对 :key 的原理很好奇,你可以看看文档 Key的文档
既然你已经了解了这么多,我就再强调下文档的重要性。 Vue 的文档非常出色,文档团队在保持更新和清晰性方面做了很多努力并且通过代码示例把每个部分都解释的非常清楚。
最终代码
以防万一,这是最终的代码:
Vue 101 <div v-for="game in games" :key="game.name"> <h1>{{ game.name }} - {{ game.console }} ❤️Wow, this game must be REALLY good
小测验
请在 <span> 标签中添加一个 @click 事件,使它每次点击就会增加一个❤️。
提示: 你需要将正在循环的 game 对象传递给点击方法。
原文地址:https://dev.to/marinamosti/hands-on-vuejs-for-beginners-part-4-324l
译文地址:https://www.php.cn/link/5a13fe4ac11f3e35f4b9f0a99cf504c0
The above is the detailed content of A practical introduction to Vue.js: How to loop over arrays and objects. For more information, please follow other related articles on the PHP Chinese website!

Hot AI Tools

Undresser.AI Undress
AI-powered app for creating realistic nude photos

AI Clothes Remover
Online AI tool for removing clothes from photos.

Undress AI Tool
Undress images for free

Clothoff.io
AI clothes remover

AI Hentai Generator
Generate AI Hentai for free.

Hot Article
Hot Tools

Notepad++7.3.1
Easy-to-use and free code editor

SublimeText3 Chinese version
Chinese version, very easy to use

Zend Studio 13.0.1
Powerful PHP integrated development environment

Dreamweaver CS6
Visual web development tools

SublimeText3 Mac version
God-level code editing software (SublimeText3)
Hot Topics
 1378
1378
 52
52

 How to add functions to buttons for vue
Apr 08, 2025 am 08:51 AM
How to add functions to buttons for vue
Apr 08, 2025 am 08:51 AM
You can add a function to the Vue button by binding the button in the HTML template to a method. Define the method and write function logic in the Vue instance.
 How to use bootstrap in vue
Apr 07, 2025 pm 11:33 PM
How to use bootstrap in vue
Apr 07, 2025 pm 11:33 PM
Using Bootstrap in Vue.js is divided into five steps: Install Bootstrap. Import Bootstrap in main.js. Use the Bootstrap component directly in the template. Optional: Custom style. Optional: Use plug-ins.
 How to reference js file with vue.js
Apr 07, 2025 pm 11:27 PM
How to reference js file with vue.js
Apr 07, 2025 pm 11:27 PM
There are three ways to refer to JS files in Vue.js: directly specify the path using the <script> tag;; dynamic import using the mounted() lifecycle hook; and importing through the Vuex state management library.
 How to use watch in vue
Apr 07, 2025 pm 11:36 PM
How to use watch in vue
Apr 07, 2025 pm 11:36 PM
The watch option in Vue.js allows developers to listen for changes in specific data. When the data changes, watch triggers a callback function to perform update views or other tasks. Its configuration options include immediate, which specifies whether to execute a callback immediately, and deep, which specifies whether to recursively listen to changes to objects or arrays.
 How to return to previous page by vue
Apr 07, 2025 pm 11:30 PM
How to return to previous page by vue
Apr 07, 2025 pm 11:30 PM
Vue.js has four methods to return to the previous page: $router.go(-1)$router.back() uses <router-link to="/" component window.history.back(), and the method selection depends on the scene.
 Vue realizes marquee/text scrolling effect
Apr 07, 2025 pm 10:51 PM
Vue realizes marquee/text scrolling effect
Apr 07, 2025 pm 10:51 PM
Implement marquee/text scrolling effects in Vue, using CSS animations or third-party libraries. This article introduces how to use CSS animation: create scroll text and wrap text with <div>. Define CSS animations and set overflow: hidden, width, and animation. Define keyframes, set transform: translateX() at the beginning and end of the animation. Adjust animation properties such as duration, scroll speed, and direction.
 How to query the version of vue
Apr 07, 2025 pm 11:24 PM
How to query the version of vue
Apr 07, 2025 pm 11:24 PM
You can query the Vue version by using Vue Devtools to view the Vue tab in the browser's console. Use npm to run the "npm list -g vue" command. Find the Vue item in the "dependencies" object of the package.json file. For Vue CLI projects, run the "vue --version" command. Check the version information in the <script> tag in the HTML file that refers to the Vue file.
 What does vue multi-page development mean?
Apr 07, 2025 pm 11:57 PM
What does vue multi-page development mean?
Apr 07, 2025 pm 11:57 PM
Vue multi-page development is a way to build applications using the Vue.js framework, where the application is divided into separate pages: Code Maintenance: Splitting the application into multiple pages can make the code easier to manage and maintain. Modularity: Each page can be used as a separate module for easy reuse and replacement. Simple routing: Navigation between pages can be managed through simple routing configuration. SEO Optimization: Each page has its own URL, which helps SEO.
