Redis high availability architecture construction to principle analysis
This article brings you relevant knowledge about Redis, which mainly introduces the relevant content from high-availability architecture construction to principle analysis. Let’s take a look at it together. I hope it will be helpful to everyone. .

Recommended learning: Redis video tutorial
Due to the company’s recent system optimization, the large table was divided into tables some time ago. , now it’s time to do redis again. Regarding redis, one of the requirements is to migrate the redis service from Alibaba Cloud to the company's own server (due to the nature of the company). I just took this opportunity to review the high-availability cluster architecture of redis. There are three redis cluster modes, namely master-slave replication mode, sentinel mode and Cluster cluster mode. Generally, Sentinel and Cluster clusters are used more frequently. Let’s briefly understand these three modes.
Persistence mechanism
Before understanding the cluster architecture, we must first introduce the persistence mechanism of redis, because persistence will be involved in the subsequent cluster. Redis persistence is to store the data cached in the memory according to some rules to prevent data recovery or master-slave node data synchronization in the cluster architecture when the redis service goes down. There are two ways of redis persistence: RDB and AOF. After version 4.0, a new hybrid persistence mode was introduced.
RDB
RDB is the persistence mechanism enabled by redis by default. Its persistence method is based on the rules configured by the user"At least Y changes have occurred within X seconds" , generate a snapshot and save it to the dump.rdb binary file. By default, redis is configured with three configurations: at least one cache key change has occurred within 900 seconds, at least 10 cache key changes have occurred within 300 seconds, and at least 10,000 changes have occurred within 60 seconds.

In addition to redis automatic snapshot persistence data, there are two commands that can help us manually snapshot memory data. These two commands are saveandbgsave.

save: Perform data snapshots in a synchronous manner. When the amount of cached data is large, it will block the execution of other commands. low efficiency.
bgsave: Perform data snapshots in an asynchronous manner. The redis main thread forks out a child process to perform data snapshots, which will not block the execution of other commands. Higher efficiency. Since an asynchronous snapshot is used, it is possible that other commands may modify the data during the snapshot process. In order to avoid this problem, reids adopts the copy-on-write (Cpoy-On-Write) method. Because the process taking the snapshot at this time is forked by the main thread, it enjoys the resources of the main thread. When data changes occur during the snapshot process, , then the data will be copied and the copy data will be generated, and the child process will write the modified copy data to the dump.rdb file.
RDB snapshots are stored in binary, so data recovery will be faster, but there is a risk of data loss. If the snapshot rule is set so that at least 100 data changes occur within 60 seconds, then at 50 seconds, the redis service suddenly goes down for some reason, and all data within these 50 seconds will be lost.
AOF
AOF is another persistence method of Redis. Unlike RDB, AOF records every command that changes data and saves it to the appendonly.aof file on the disk. , when the redis service is restarted, the file will be loaded and the commands saved in the file will be executed again to achieve the effect of data recovery. By default, AOF is turned off and can be turned on by modifying the conf configuration file.
 # appendonly no  关闭AOF持久化
 appendonly yes   # 开启AOF持久化
 # The name of the append only file (default: "appendonly.aof")
 appendfilename "appendonly.aof" # 持久化文件名
AOF provides three ways to save commands to disk. By default, AOF uses appendfsync everysec for command persistence.
appendfsync always #每次有新的改写命令时,都会追加到磁盘的aof文件中。数据安全性最高,但效率最慢。
appendfsync everysec # 每一秒,都会将改写命令追加到磁盘中的aof文件中。如果发生宕机,也只会丢失1秒的数据。
appendfsync no #不会主动进行命令落盘,而是由操作系统决定什么时候写入到磁盘。数据安全性不高。
After opening AOF, you need to restart the redis service. When the relevant rewrite command is executed again, the operation command will be recorded in the aof file.


Compared with RDB, although AOF data security is higher, as the service continues to run, the files of aof will also It gets bigger and bigger, and the next time you restore data, the speed will get slower and slower. If both RDB and AOF are enabled, redis will give priority to AOF when restoring data. After all, AOF loses less data.
| AOF | ||||||||||||||||||||||||||||||||
|---|---|---|---|---|---|---|---|---|---|---|---|---|---|---|---|---|---|---|---|---|---|---|---|---|---|---|---|---|---|---|---|---|
| High | Low | |||||||||||||||||||||||||||||||
| Low | High | |||||||||||||||||||||||||||||||
| Low | High |
| IP | 主/从节点 | 端口 | 版本 |
|---|---|---|---|
| 192.168.36.128 | 主 | 6379 | 5.0.14 |
| 192.168.36.130 | 从 | 6379 | 5.0.14 |
| 192.168.36.131 | 从 | 6379 | 5.0.14 |
- 配置从节点36.130,36.131机器中reids.conf
修改redis.conf文件中的replicaof,配置主节点的ip和端口号,并且开启从节点只读。


- 启动主节点36.128机器中reids服务
./src/redis-server redis.conf
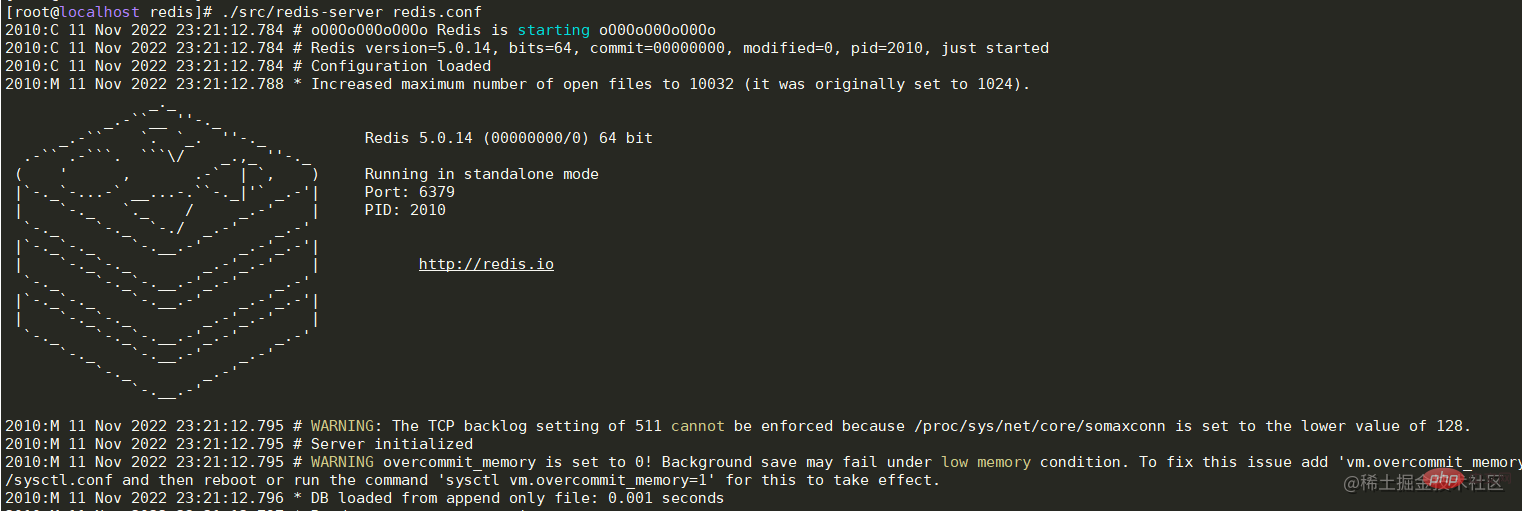 3. 依次启动从节点36.130,36.131机器中的redis服务
./src/redis-server redis.conf
启动成功后可以看到日志中显示已经与Master节点建立的连接。 如果出现与Master节点的连接被拒,那么先检查Master节点的服务器是否开启防火墙,如果开启,可以开放6379端口或者关闭防火墙。如果防火墙被关闭但连接仍然被拒,那么可以修改Master节点服务中的redis.conf文件。将bing 127.0.0.1修改为本机对外的网卡ip或者直接注释掉即可,然后重启服务器即可。

- 查看状态
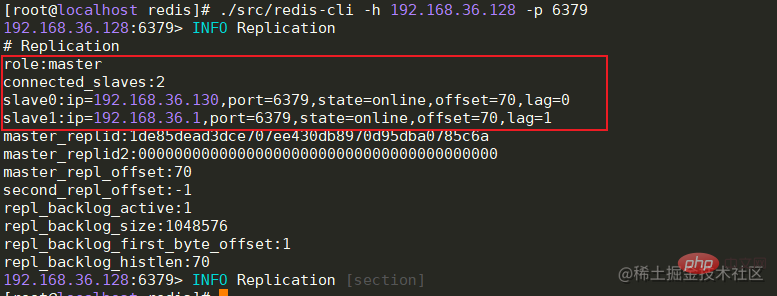
全部节点启动成功后,Master节点可以查看从节点的连接状态,offset偏移量等信息。
info replication # 主节点查看连接信息
数据同步流程
全量数据同步
 主从节点之间的数据同步是通过建立socket长连接来进行传输的。当Slave节点启动时,会与Master节点建立长连接,并且发送psync同步数据命令。当Master节点收到psync命令时,会执行pgsave进行rdb内存数据快照(这里的rdb快照与conf文件中是否开启rdb无关),如果在快照过程中有新的改写命令,那么Master节点会将这些命令保存到repl buffer缓冲区中。当快照结束后,会将rdb传输给Slave节点。Slave节点在接收到rdb后,如果存在旧数据,那么会将这些旧数据清除并加载rdb。加载完成后会接受master缓存在repl buffer中的新命令。在这些步骤全部执行完成后,主从节点已经算连接成功了,后续Master节点的命令会不断的发送到Slave节点。如果在高并发的情况下,可能会存在数据延迟的情况。
部分数据同步
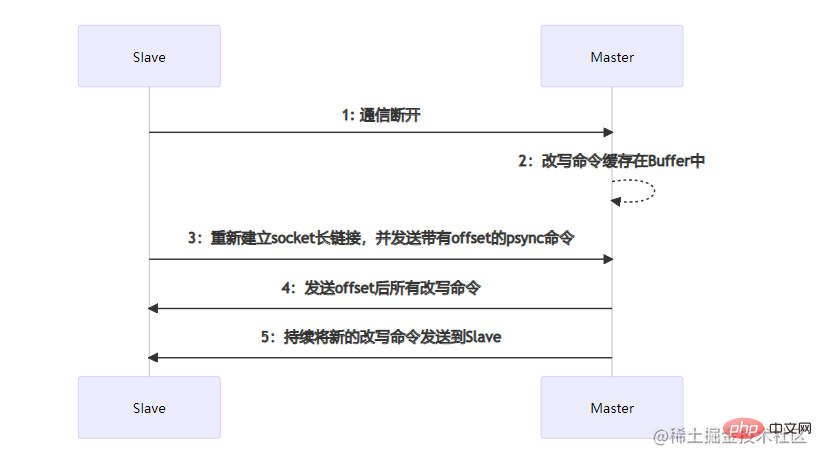
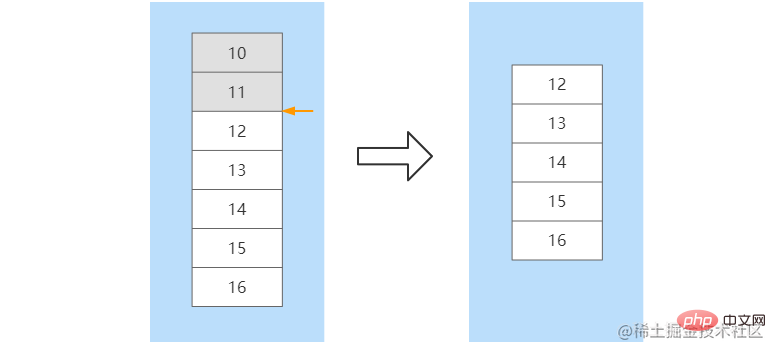
部分数据同步发生在Slave节点发生宕机,并且在短时间内进行了服务恢复。短时间内主从节点之间的数据差额不会太大,如果执行全量数据同步将会比较耗时。部分数据同步时,Slave会向Master节点建立socket长连接并发送带有一个offset偏移量的数据同步请求,这个offset可以理解数据同步的位置。Master节点在收到数据同步请求后,会根据offset结合buffer缓冲区内新的改写命令进行位置确定。如果确定了offset的位置,那么就会将这个位置往后的所有改写命令发送到Slave节点。如果没有确定offset的位置,那么会再次执行全量数据同步。比如,在Slave节点没有宕机之前命令已经同步到了offset=11这个位置,当该节点重启后,向Master节点发送该offset,Master根据offset在缓冲区中进行定位,在定位到11这个位置后,将该位置往后的所有命令发送给Slave。在数据同步完成后,后续Master节点的命令会不断的发送到该Slave节点
优缺点
-
优点
- 可以实现一主多从,读写分离,减轻Master节点读操作压力
- 是哨兵,集群架构的基础
-
缺点
- Does not have automatic master-slave switching function. When the Master node goes down, you need to manually switch the master node.
- It is easy to have data inconsistency. When the Master node goes down, if there is data that is not synchronized, It will cause data loss
Sentinel mode
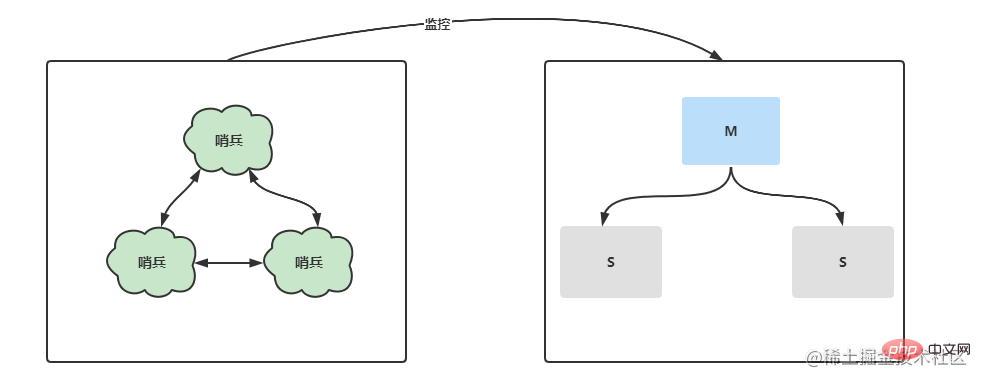
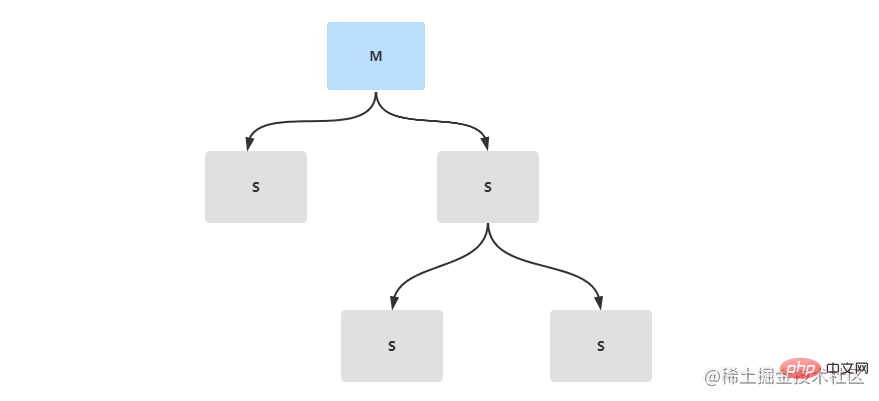
Sentinel mode further optimizes the master-slave replication and separates a separate sentinel process for monitoring the master-slave Regarding the server status in the architecture, once a downtime occurs, Sentinel will elect a new Master node within a short period of time and perform master-slave switching. Not only that, under a multi-sentinel node, each sentinel will monitor each other and monitor whether the sentinel node is down.
Environment Configuration
| IP | Master/Slave Node | Port | Sentinel Port | Version | ||||||||||||||||||||||||||||
|---|---|---|---|---|---|---|---|---|---|---|---|---|---|---|---|---|---|---|---|---|---|---|---|---|---|---|---|---|---|---|---|---|
| Master | 6379 | 26379 | 5.0.14 | |||||||||||||||||||||||||||||
| From | 6379 | 26379 | 5.0.14 | |||||||||||||||||||||||||||||
| from | 6379 | 26379 | 5.0.14 | ## |
| IP | Master/Slave Node | Port | Version |
|---|---|---|---|
| 192.168.36.128 | - | 6379 | 5.0.14 |
| - | 6380 | 5.0.14 | |
| - | 6379 | 5.0.14 | ##192.168.36.130 |
| 6380 | 5.0.14 | 192.168.36.131 | |
| 6379 | 5.0.14 | ##192.168. 36.131 | |
| 6380 | 5.0.14 |
为了看起来不是那么混乱,可以为cluster新建一个文件夹,并将redis的文件拷贝到cluster文件夹中,并修改文件夹名为redis-6379,reids-6380。 新建完成后,修改每个节点的redis.conf配置文件,找到cluster相关的配置位置,将cluster-enable更改为yes,表示开启集群模式。开启后,需要修改集群节点连接的超时时间cluster-node-timeout,节点配置文件名cluster-config-file等等,需要注意的是,同一台机器上面的服务节点记得更改端口号。
在每个节点都配置完成后,可以依次启动各节点。启动成功后,可以查看redis的进程信息,后面有明显的标识为[cluster]。
现在虽然每个节点的redis都已经正常启动了,但是每个节点之间并没有任何联系啊。所以这个时候还需要最后一步,将各节点建立关系。在任意一台机器上运行下面的命令-- cluster create ip:port,进行集群创建。命令执行成功后,可以看到槽位的分布情况和主从关系。 ./src/redis-cli --cluster create 192.168.36.128:6379 192.168.36.128:6380 192.168.36.130:6379 192.168.36.130:6380 192.168.36.131:6379 192.168.36.131:6380 --cluster-replicas 1复制代码 Copy after login
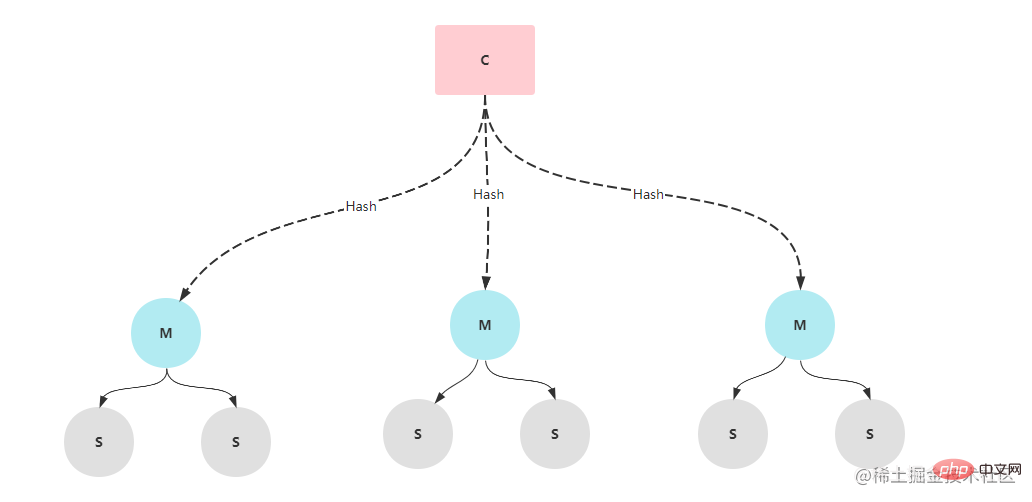
cluster成功启动后,可以在代码中简单的测试一下,这里的代码依旧采用哨兵模式中的测试代码,只是将sentinel相关的信息注释掉并加上cluster的节点信息即可。 spring: redis: cluster: nodes: 192.168.36.128:6379,192.168.36.128:6380,192.168.36.130:6379,192.168.36.130:6380,192.168.36.131:6379,192.168.36.131:6380# sentinel:# master: mymaster# nodes: 192.168.36.128:26379,192.168.36.130:26379,192.168.36.131:26379 timeout: 3000 lettuce: pool: max-active: 80 min-idle: 50 Copy after login 数据分片Cluster模式下由于存在多个Master节点,所以在存储数据时,需要确定将这个数据存储到哪台机器上。上面在启动集群成功后可以看到每台Master节点都有自己的一个槽位(Slots)范围,Master[0]的槽位范围是0 - 5460,Master[1]的槽位范围是5461 - 10922,Master[2]的槽位范围是10922 - 16383。redis在存储前会通过CRC16方法计算出key的hash值,并与16383进行位运算来确定最终的槽位值。所以,可以知道 选举机制cluster模式中的选举与哨兵中的不同。当某个从节点发现自己的主节点状态变为fail状态时,便尝试进行故障转移。由于挂掉的主节点可能会有多个从节点,从而存在多个从节点竞争成为新主节点 。其选举过程大概如下:
优缺点优点:
缺点:
Summaryreids is a very popular middleware today. It can be used as a cache to reduce the pressure on the DB and improve the performance of the system. It can also be used as a distributed lock to ensure concurrency security. It can also be used as an MQ message queue to reduce the coupling of the system. It supports stand-alone mode, master-slave replication, sentry and cluster mode. Each mode has its own advantages and disadvantages. In actual projects, you can choose according to your own business needs and degree of concurrency. Recommended learning: Redis video tutorial |
The above is the detailed content of Redis high availability architecture construction to principle analysis. For more information, please follow other related articles on the PHP Chinese website!

Hot AI Tools

Undresser.AI Undress
AI-powered app for creating realistic nude photos

AI Clothes Remover
Online AI tool for removing clothes from photos.

Undress AI Tool
Undress images for free

Clothoff.io
AI clothes remover

AI Hentai Generator
Generate AI Hentai for free.

Hot Article

Hot Tools

Notepad++7.3.1
Easy-to-use and free code editor

SublimeText3 Chinese version
Chinese version, very easy to use

Zend Studio 13.0.1
Powerful PHP integrated development environment

Dreamweaver CS6
Visual web development tools

SublimeText3 Mac version
God-level code editing software (SublimeText3)

Hot Topics
 1378
1378
 52
52
 How to build the redis cluster mode
Apr 10, 2025 pm 10:15 PM
Redis cluster mode deploys Redis instances to multiple servers through sharding, improving scalability and availability. The construction steps are as follows: Create odd Redis instances with different ports; Create 3 sentinel instances, monitor Redis instances and failover; configure sentinel configuration files, add monitoring Redis instance information and failover settings; configure Redis instance configuration files, enable cluster mode and specify the cluster information file path; create nodes.conf file, containing information of each Redis instance; start the cluster, execute the create command to create a cluster and specify the number of replicas; log in to the cluster to execute the CLUSTER INFO command to verify the cluster status; make
 How to use the redis command
Apr 10, 2025 pm 08:45 PM
Using the Redis directive requires the following steps: Open the Redis client. Enter the command (verb key value). Provides the required parameters (varies from instruction to instruction). Press Enter to execute the command. Redis returns a response indicating the result of the operation (usually OK or -ERR).
 How to use single threaded redis
Apr 10, 2025 pm 07:12 PM
Redis uses a single threaded architecture to provide high performance, simplicity, and consistency. It utilizes I/O multiplexing, event loops, non-blocking I/O, and shared memory to improve concurrency, but with limitations of concurrency limitations, single point of failure, and unsuitable for write-intensive workloads.
 How to read the source code of redis
Apr 10, 2025 pm 08:27 PM
The best way to understand Redis source code is to go step by step: get familiar with the basics of Redis. Select a specific module or function as the starting point. Start with the entry point of the module or function and view the code line by line. View the code through the function call chain. Be familiar with the underlying data structures used by Redis. Identify the algorithm used by Redis.
 How to clear redis data
Apr 10, 2025 pm 10:06 PM
How to clear Redis data: Use the FLUSHALL command to clear all key values. Use the FLUSHDB command to clear the key value of the currently selected database. Use SELECT to switch databases, and then use FLUSHDB to clear multiple databases. Use the DEL command to delete a specific key. Use the redis-cli tool to clear the data.
 How to view all keys in redis
Apr 10, 2025 pm 07:15 PM
To view all keys in Redis, there are three ways: use the KEYS command to return all keys that match the specified pattern; use the SCAN command to iterate over the keys and return a set of keys; use the INFO command to get the total number of keys.
 How to read redis queue
Apr 10, 2025 pm 10:12 PM
To read a queue from Redis, you need to get the queue name, read the elements using the LPOP command, and process the empty queue. The specific steps are as follows: Get the queue name: name it with the prefix of "queue:" such as "queue:my-queue". Use the LPOP command: Eject the element from the head of the queue and return its value, such as LPOP queue:my-queue. Processing empty queues: If the queue is empty, LPOP returns nil, and you can check whether the queue exists before reading the element.
 How to start the server with redis
Apr 10, 2025 pm 08:12 PM
The steps to start a Redis server include: Install Redis according to the operating system. Start the Redis service via redis-server (Linux/macOS) or redis-server.exe (Windows). Use the redis-cli ping (Linux/macOS) or redis-cli.exe ping (Windows) command to check the service status. Use a Redis client, such as redis-cli, Python, or Node.js, to access the server.


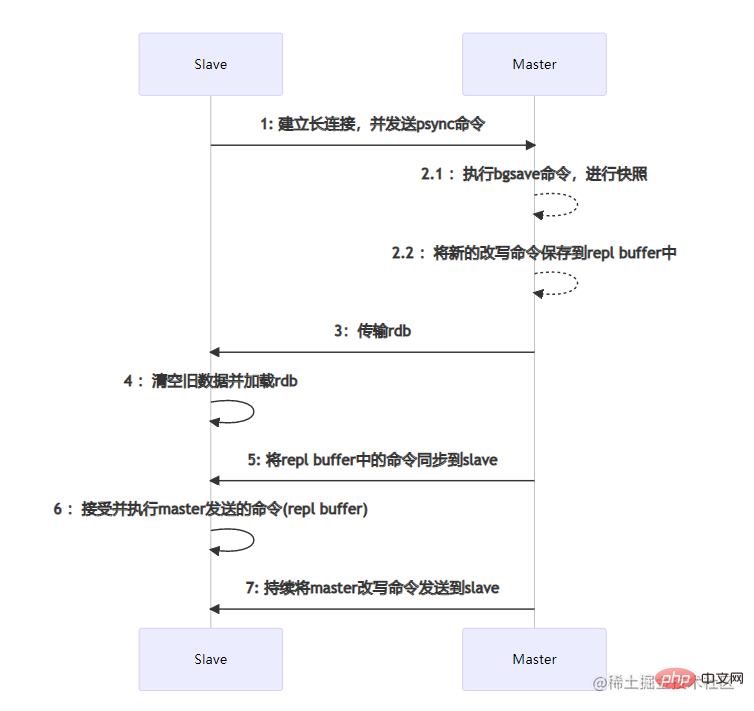 主从节点之间的数据同步是通过建立socket长连接来进行传输的。当Slave节点启动时,会与Master节点建立长连接,并且发送psync同步数据命令。当Master节点收到psync命令时,会执行pgsave进行rdb内存数据快照(这里的rdb快照与conf文件中是否开启rdb无关),如果在快照过程中有新的改写命令,那么Master节点会将这些命令保存到repl buffer缓冲区中。当快照结束后,会将rdb传输给Slave节点。Slave节点在接收到rdb后,如果存在旧数据,那么会将这些旧数据清除并加载rdb。加载完成后会接受master缓存在repl buffer中的新命令。在这些步骤全部执行完成后,主从节点已经算连接成功了,后续Master节点的命令会不断的发送到Slave节点。如果在高并发的情况下,可能会存在数据延迟的情况。

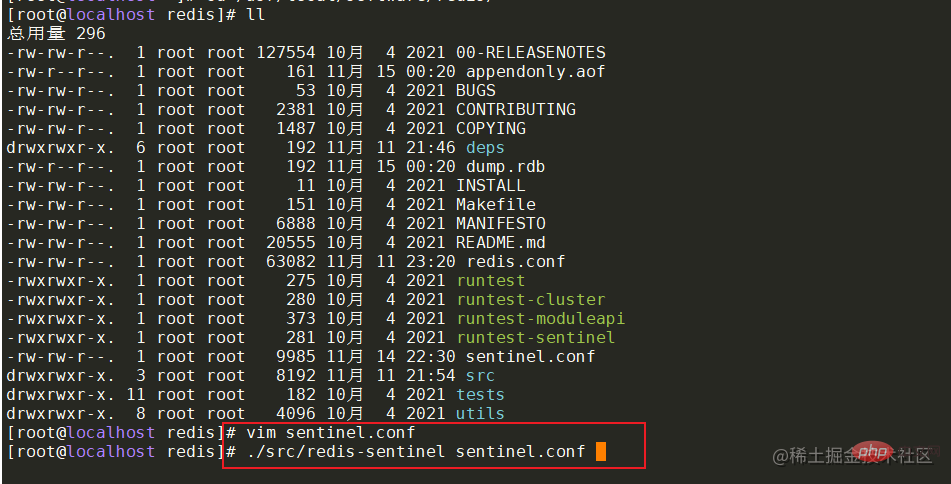
 搭建成功后,就来通过代码演示主节点宕机的情况下,哨兵是否会帮助系统自动进行主备切换。在springboot项目中引入对应的pom,并配置对应的redis哨兵信息。
