Word Tips Sharing: Tips on using the 'Quick Access Toolbar” (2)

In the process of using Word to typeset documents, there are always several functions that we often use. However, when using them, we have to switch tabs many times and enter the secondary menu bar. This function can only be found in .
Therefore, in the previous article tutorial, we introduced several basic knowledge of customizing the quick access toolbar, so that we can quickly call common functions, avoid troublesome operations, and implement Word Typesetting speed is 3 times faster than others!
Today, I will continue the previous tutorial and continue to introduce you to the related operating techniques of the quick access toolbar.
1. Command position adjustment
When adding function commands in the quick access toolbar, by default, the arrangement position of each function command They are all arranged in the order of adding them. If you want to arrange the most commonly used command buttons on the leftmost side of the toolbar, how to achieve it?
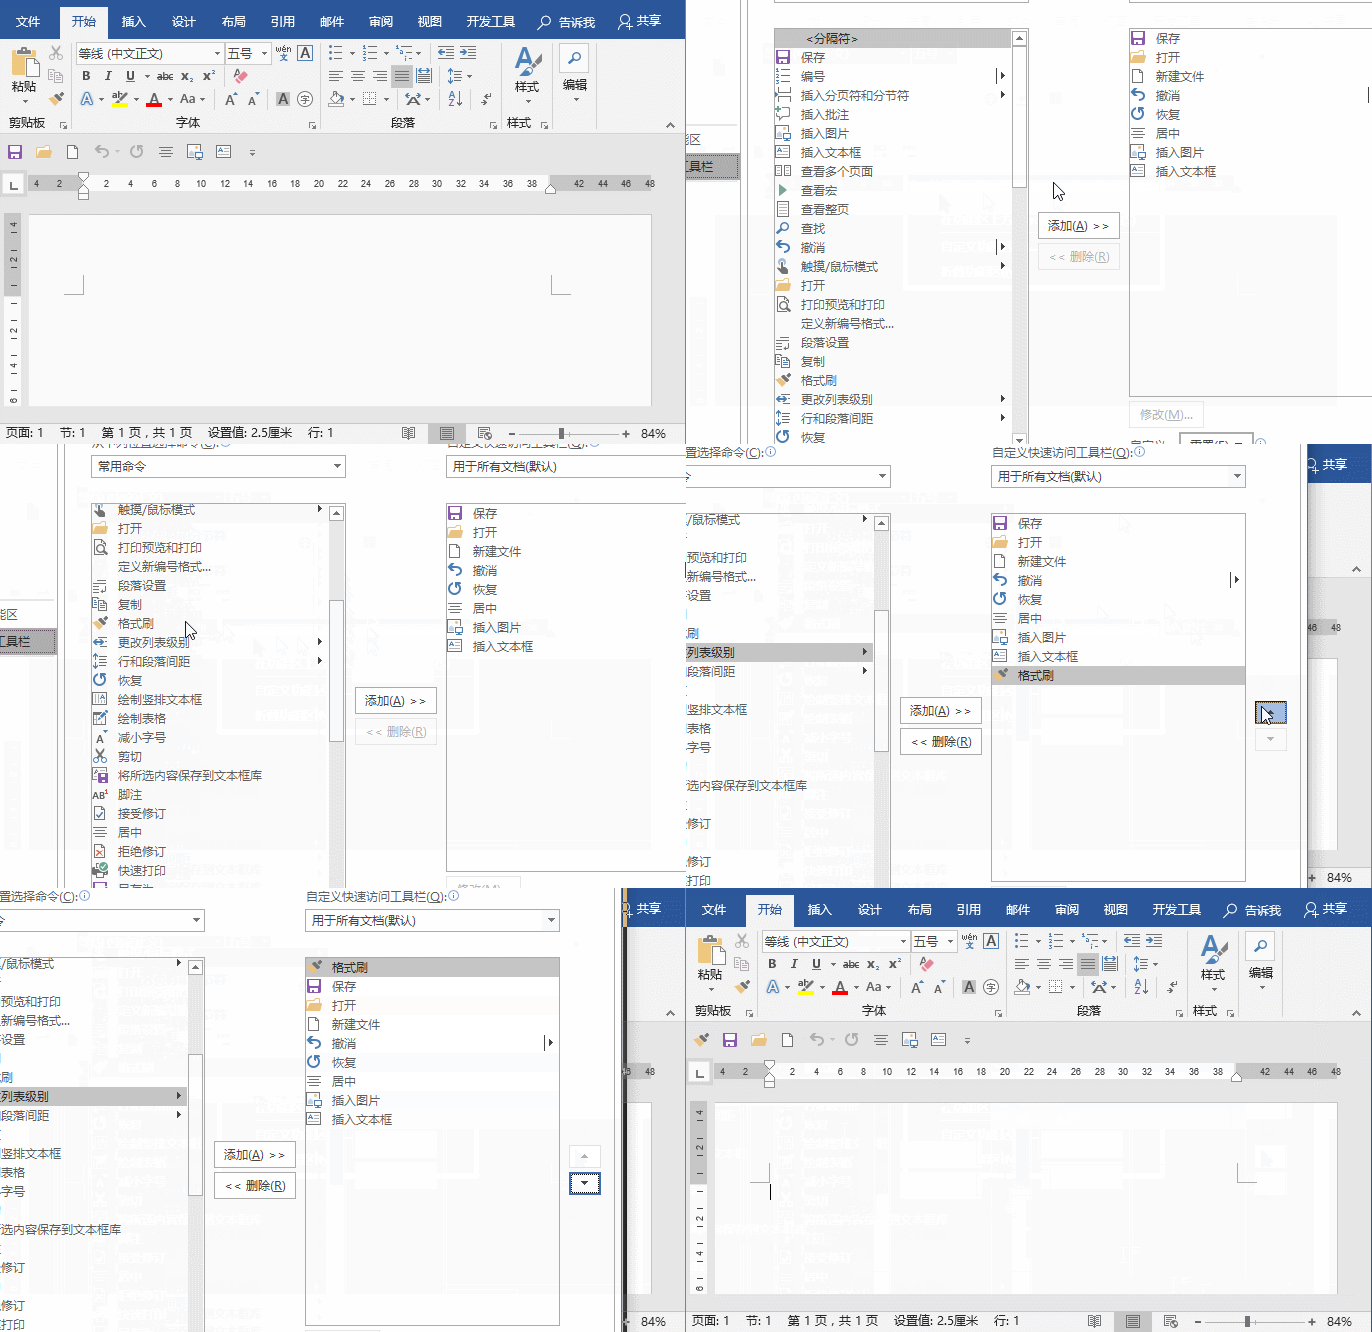
For example, add the "Format Painter" command to the Quick Access Toolbar and adjust it to the leftmost display of the toolbar.
(1) Move the mouse to any command button in the Ribbon or Quick Access Toolbar, then right-click the mouse and select the "Customize Quick Access Toolbar" command in the pop-up shortcut menu. Open the "Word Options" dialog box.
(2) Select the "Format Painter" command from the left list box, and then click the "Add" button. At this time, the command has been added to the right list box and is selected. Click continuously on the right Click the "Move Up" button, adjust the "Format Painter" command to the top, and click the [OK] button.
(3) Return to the work interface, and you can see that the "Format Painter" button is displayed on the leftmost side of the quick access toolbar.

2. Command grouping
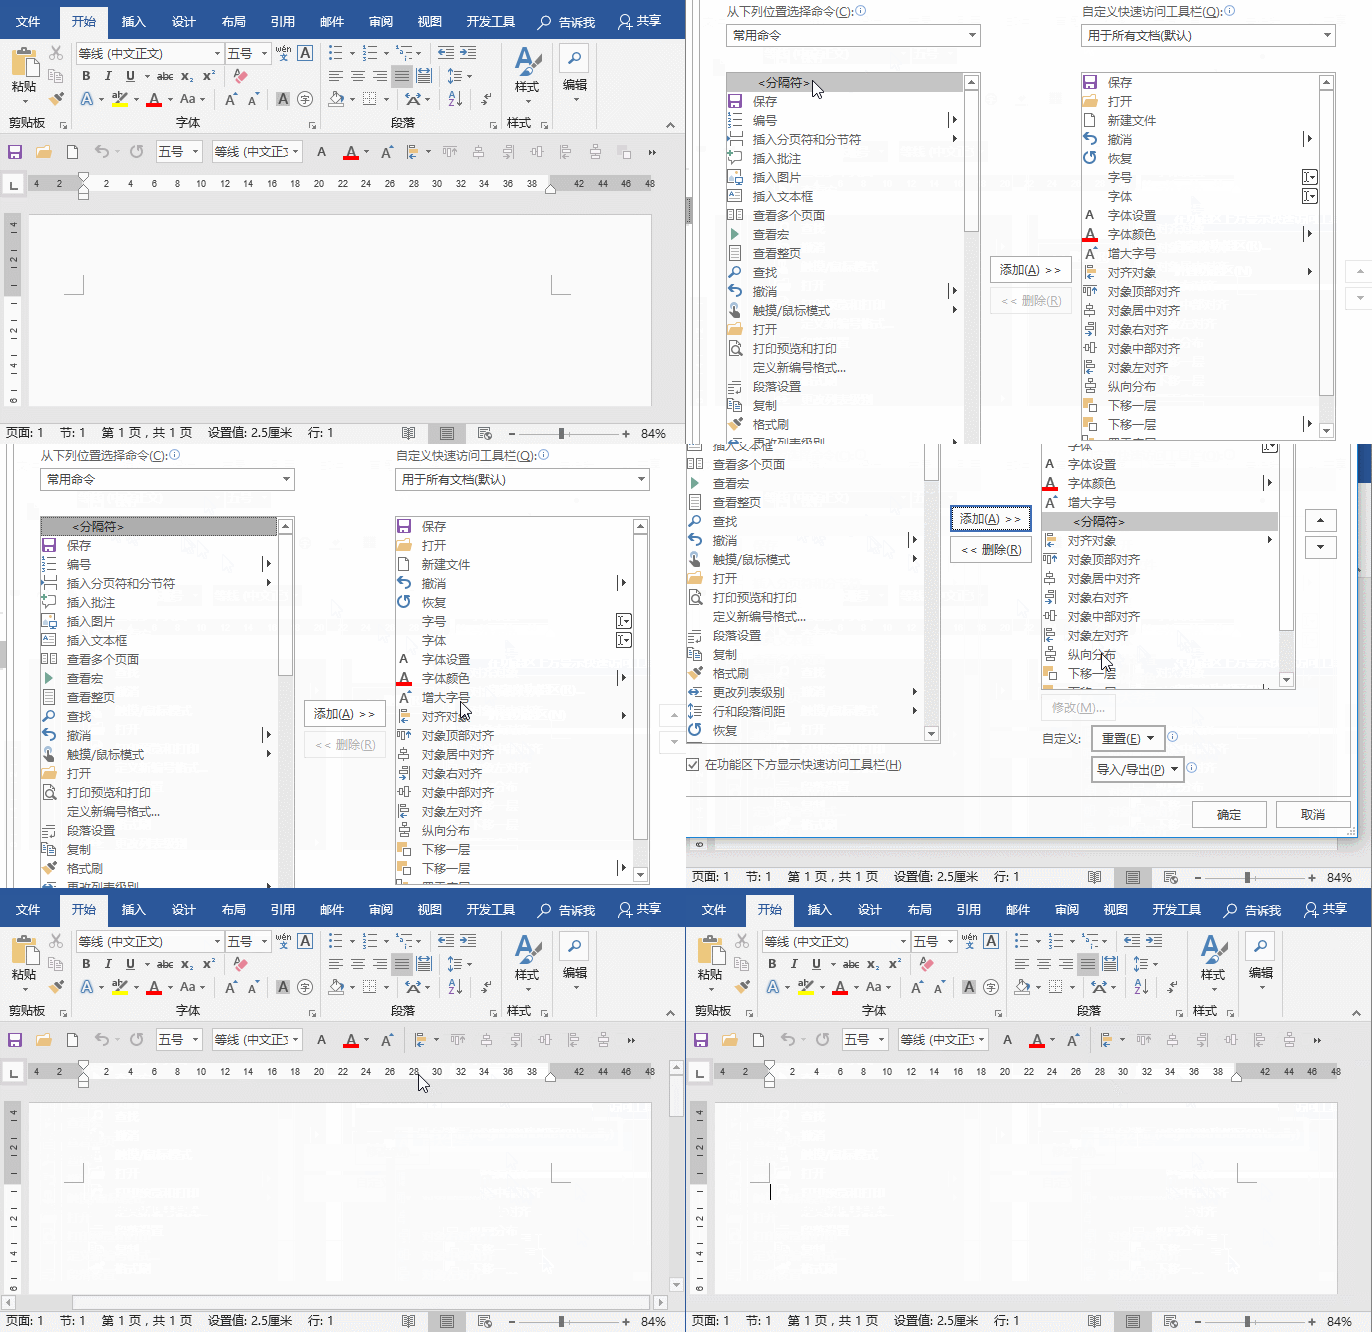
When adding too many commands to the quick access toolbar, In situations where it may be inconvenient to find, we can add separators to group different types of commands.
For example: Classify by alignment function, font editing, combination arrangement. Group commands with similar functions to reduce the time spent searching for commands.
(1) Open the "Word Options" dialog box, select the "Separator" command in the left list box, select the last command to be grouped in the right list box, and then click the " Click the "Add" button. A separator will be added below the command in the list box on the right. After the addition is completed, click the "OK" button.
(2) Return to the work interface and you can see that the commands in the quick access toolbar have been grouped with separators.

Effect:

##3. Import/Export Quick Access Toolbar
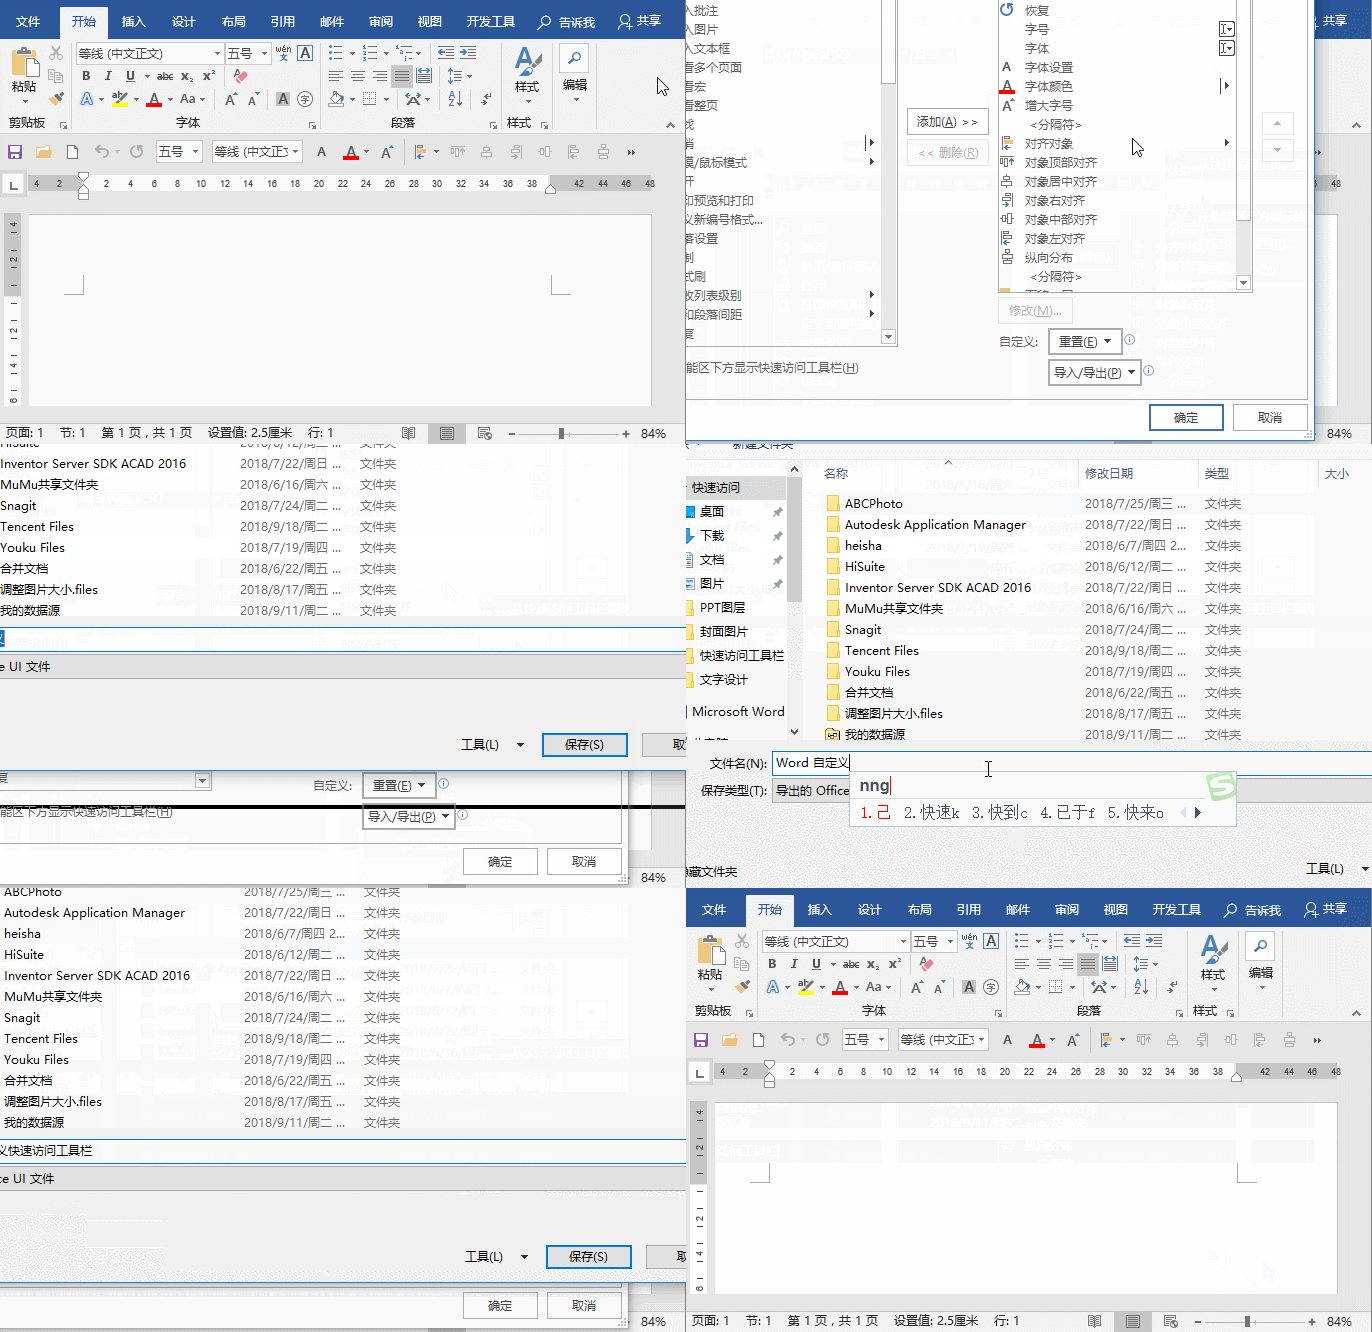
In order to improve operating efficiency, we have set up an exclusive quick access toolbar in Word on our computer. But if you use another computer one day, do you still have to spend time resetting these commands? Of course not! We can export and save the set quick access toolbar, then copy it to other computers and import it, and then we can use it directly, which is very convenient! (1) Right-click the Quick Access Toolbar that has been set up, select the "Customize Quick Access Toolbar" command in the pop-up menu, and open the "Word Options" dialog box. (2) Click the "Import/Export" button in the lower right corner and select the "Export All Customized Settings" command in the pop-up menu. (3) Open the "Save" dialog box, select the save location of the configuration file, then enter an easily identifiable file name, click the "Save" button to save it to the specified location.
Word Tutorial"
The above is the detailed content of Word Tips Sharing: Tips on using the 'Quick Access Toolbar” (2). For more information, please follow other related articles on the PHP Chinese website!

Hot AI Tools

Undresser.AI Undress
AI-powered app for creating realistic nude photos

AI Clothes Remover
Online AI tool for removing clothes from photos.

Undress AI Tool
Undress images for free

Clothoff.io
AI clothes remover

AI Hentai Generator
Generate AI Hentai for free.

Hot Article

Hot Tools

Notepad++7.3.1
Easy-to-use and free code editor

SublimeText3 Chinese version
Chinese version, very easy to use

Zend Studio 13.0.1
Powerful PHP integrated development environment

Dreamweaver CS6
Visual web development tools

SublimeText3 Mac version
God-level code editing software (SublimeText3)

Hot Topics
 1378
1378
 52
52
 How to cancel automatic word wrapping in word
Mar 19, 2024 pm 10:16 PM
When editing content in a word document, lines may automatically wrap. If no adjustment is made at this time, it will have a great impact on our editing and make people very headache. What is going on? In fact, it is a problem with the ruler. Below, I will introduce the solution to how to cancel automatic word wrapping in word. I hope it can help everyone! After opening a Word document and entering text, when you try to copy and paste, the text may jump to a new line. In this case, you need to adjust the settings to solve this problem. 2. To solve this problem, we must first know the cause of this problem. At this time we click View under the toolbar. 3. Then click the "Ruler" option below. 4. At this time we will find that a ruler appears above the document with several conical markers on it.
 Detailed explanation of how to display the ruler in Word and how to operate the ruler!
Mar 20, 2024 am 10:46 AM
When we use Word, in order to edit the content more beautifully, we often use rulers. You should know that the rulers in Word include horizontal rulers and vertical rulers, which are used to display and adjust the document's page margins, paragraph indents, tabs, etc. So, how do you display the ruler in Word? Next, I will teach you how to set the ruler display. Students in need should quickly collect it! The steps are as follows: 1. First, we need to bring up the word ruler. The default word document does not display the word ruler. We only need to click the [View] button in word. 2. Then, we find the option of [Ruler] and check it. In this way, we can adjust the word ruler! Yes or no
 How to add handwritten signature to word document
Mar 20, 2024 pm 08:56 PM
Word documents are widely used due to their powerful functions. Not only can various formats be inserted into Word, such as pictures and tables, etc., but now for the integrity and authenticity of the files, many files require a manual signature at the end of the document. It sounds like this How to solve complex problems? Today I will teach you how to add a handwritten signature to a word document. Use a scanner, camera or mobile phone to scan or photograph the handwritten signature, and then use PS or other image editing software to perform necessary cropping on the image. 2. Select "Insert - Picture - From File" in the Word document where you want to insert the handwritten signature, and select the cropped handwritten signature. 3. Double-click the handwritten signature picture (or right-click the picture and select "Set Picture Format"), and the "Set Picture Format" pops up.
 How to set page margins for Word
Mar 19, 2024 pm 10:00 PM
Among office software, Word is one of our most commonly used software. The text documents we produce are generally operated with Word. Some documents need to be submitted in paper version as required. Before printing, the layout must be set before it can be presented. produce better results. So the question is, how do you set page margins in Word? We have specific course explanations to help you solve your doubts. 1. Open or create a new word document and click the "Page Layout" menu on the menu bar. 2. Click the "Margins" button of the "Page Setup" option. 3. Select a commonly used page margin in the list. 4. If there are no suitable margins in the list, click "Custom Margins". 5. The "Page Setup" dialog box pops up, enter the "Margins" option respectively.
 How to draw a dotted line in word
Mar 19, 2024 pm 10:25 PM
Word is a software that we often use in our office. It has many functions that can facilitate our operations. For example, for a large article, we can use the search function inside to find out that a word in the full text is wrong, so we can directly replace it. Make changes one by one; when submitting the document to your superiors, you can beautify the document to make it look better, etc. Below, the editor will share with you the steps on how to draw a dotted line in Word. Let's learn together! 1. First, we open the word document on the computer, as shown in the figure below: 2. Then, enter a string of text in the document, as shown in the red circle in the figure below: 3. Next, press and hold [ctrl+A] Select all the text, as shown in the red circle in the figure below: 4. Click [Start] on the top of the menu bar
 Where is the shading setting in word?
Mar 20, 2024 am 08:16 AM
We often use word for office work, but do you know where the shading settings are in word? Today I will share with you the specific operation steps. Come and take a look, friends! 1. First, open the word document, select a paragraph of text paragraph information that needs to be added with shading, then click the [Start] button on the toolbar, find the paragraph area, and click the drop-down button on the right (as shown in the red circle in the figure below) ). 2. After clicking the drop-down box button, in the pop-up menu options, click the [Border and Shading] option (as shown in the red circle in the figure below). 3. In the pop-up [Border and Shading] dialog box, click the [Shading] option (as shown in the red circle in the figure below). 4. In the filled column, select a color
 Specific steps to delete down arrow in Word!
Mar 19, 2024 pm 08:50 PM
In daily office work, if you copy a piece of text from a website and paste it directly into Word, you will often see a [down arrow]. This [down arrow] can be deleted by selecting it, but if there are too many such symbols, So is there a quick way to delete all arrows? So today I will share with you the specific steps to delete the downward arrow in Word! First of all, the [Down Arrow] in Word actually represents [Manual Line Break]. We can replace all [Down Arrows] with [Paragraph Mark] symbols, as shown in the figure below. 2. Then, we select the [Find and Replace] option on the menu bar (as shown in the red circle in the figure below). 3. Then, click the [Replace] command, a pop-up box will pop up, click [Special Symbols]
 Do you know how to sum a Word table?
Mar 21, 2024 pm 01:10 PM
Sometimes, we often encounter counting problems in Word tables. Generally, when encountering such problems, most students will copy the Word table to Excel for calculation; some students will silently pick up the calculator. Calculate. Is there a quick way to calculate it? Of course there is, in fact the sum can also be calculated in Word. So, do you know how to do it? Today, let’s take a look together! Without further ado, friends in need should quickly collect it! Step details: 1. First, we open the Word software on the computer and open the document that needs to be processed. (As shown in the picture) 2. Next, we position the cursor on the cell where the summed value is located (as shown in the picture); then, we click [Menu Bar


