

Take you to master the formatting method in VSCode

How to format the program in VSCode? This article will guide you step by step to understand and master the formatting method in VSCode. I hope it will be helpful to you!

All languages in Visual Studio Code can be formatted using one of the automatic formatters, and the Python extension also supports linters. [Recommended learning: vscode tutorial, Programming video]
Organization and formatting
Linter and formatting program execution Different Tasks:
- A formatting will change how your code looks rather than how it works.
- alinters will warn you about your code's standards-compliant style, type compliance, safety, and a range of best practices.
Python extensions support a number of third-party linters, which often perform different jobs. For example, Bandit is a linter for security vulnerabilities, and Flake8 is a linter for style guide compliance.
The Python extension also comes with Language Server Tools, which perform analysis by loading interfaces (methods, functions, classes) from your code and the libraries you use.
At the time of writing this tutorial, the latest and greatest language server extension for Python on Visual Studio Code is Pylance.
Setting up Pylance
Pylance is an extension that works with Python in Visual Studio Code to provide deeper language support and Python Introspection of code. Pylance will provide autocompletion, automatic module imports, better code navigation, type checkingand more.
To get Pylance, go to the *Extensions* menu on the sidebar and search for Pylance( ms-python.vscode-pylance).
Note: Pylance is now bundled with the Python extension, so you may already have it installed.
After installing Pylance, you may need to change two default configuration settings in User Settings to take full advantage of the extension.
The first setting to change is the type checking mode, which you can use to specify the level of type checking analysis performed:
"python.analysis.typeCheckingMode": "basic"
By default, the type checking mode is set to "off".
Other options are "basic" or "strict". Use "basic" to run rules independent of type checking and rules for basic type checking. If mode is set to "strict", it will run all type checking rules with the highest error severity. Set this "basic" to strike a balance between strict and disabling.
Another default setting is python.analysis.diagnosticMode. By default, Pylance will only check the currently open file. Changing this setting to workspace will check all Python files in the workspace, giving you a list of errors and warnings in the Explorer view:

You should only set python.analysis.diagnosticMode to "workspace" if you have some RAM available, as it will consume more resources.
Pylance is most effective when it has information about the types used as parameters for methods and functions, as well as the return type.
For external libraries, Pylance will use typeshed to infer return types and parameter types. Pylance also provides type stubs and intelligence for some of the most popular data science libraries, such as pandas, Matplotlib, scikit-learn, and NumPy. If you are using Pandas, Pylance will provide you with information and examples of common functions and patterns:
For libraries that do not have type stubs on typeshed, Pylance will do its best to guess the types What is it. Otherwise, you can add your own type stubs.
Set Format and Lint on Save
格式化文档是将格式应用于 VS Code 中的任何文档的操作。对于Python扩展,这个动作执行"python.formatting.provider",其可设置为任何支持自动格式化的:"autopep8","black"或"yapf"。
在 中配置格式化程序后settings.json,您可以将格式化程序设置为在保存文件时自动运行。在 VS Code 配置中,您可以将编辑器设置配置为仅适用于某些文件类型,方法是将它们放在一个"[<file_type>]"组中:
...
"[python]": {
    "editor.formatOnSave": true,
},随着格式化程序的执行,您还可以按字母顺序组织导入语句,并通过将标准库模块、外部模块和包导入分成具有以下配置的组:
"[python]": {
    ...
    "editor.codeActionsOnSave": {"source.organizeImports": true},
},与格式化不同,linting 特定于 Python 扩展。要启用 linting,请通过Python: Select Linter在命令面板上运行来选择一个 linter 。您还可以在设置中启用一个或多个 linter。例如,要启用 Bandit 和 Pylint linters,请编辑您的settings.json:
...
"python.linting.enabled": true,
"python.linting.banditEnabled": true,
"python.linting.pylintEnabled": true,
要在保存文件时运行启用的 linter,请将以下设置添加到settings.json:
...
"python.linting.lintOnSave": true,
您可能会发现启用多个 linter 很有帮助。请记住,Pylance 已经提供了您可以从 pylint 获得的许多见解,因此您可能不需要同时启用 pylint和Pylance。相比之下,Flake8 提供了 Pylance 没有涵盖的风格反馈,因此您可以将这两者结合使用。
在 Visual Studio Code 中测试 Python 代码
Python 提供了大量工具来测试您的代码。VS Code 的 Python 扩展支持最流行的测试框架,unittest以及pytest.
配置测试集成
要启用对 Python 的测试支持,请Python: Configure Tests从命令面板运行该命令。VS Code 将提示您从受支持的测试框架之一中进行选择,并指定包含您的测试的文件夹。
此向导将配置选项添加到.vscode/settings.json:
"python.testing.pytestEnabled": true,
"python.testing.pytestArgs": [
    "tests"
],您可以python.testing.<framework>Args使用首选的测试框架进行编辑以添加任何其他命令行标志。上面的示例显示了 pytest 的配置选项。
如果您有更复杂的 pytest 设置,请将它们pytest.ini而不是 VS Code 设置放入。这样,您就可以使配置与任何自动化测试或CI/CD工具保持一致。
执行测试
为测试运行器配置测试框架和参数后,您可以通过Python: Run All Tests从命令面板运行命令来执行测试。这将使用配置的参数启动测试运行器,并将测试输出放入Python 测试日志输出面板:
测试发现完成后,每个测试用例都将有一个内联选项来执行或调试该用例:
失败的测试将被标记为有错误。您可以在Python 测试日志面板中以及通过将鼠标悬停在代码中失败的测试用例上来查看测试运行器的失败:
如果您经常运行测试,则可以使用testing explorer改善 VS Code 中的测试体验。
要启用测试面板,请右键单击侧栏并确保选中测试。测试面板显示了 Python 扩展发现的所有测试,并为您提供了许多功能:
您可以直观地表示测试套件分组以及哪些测试失败。您还可以使用菜单按钮运行和调试测试。
VS Code 的测试系统功能强大,但默认情况下禁用了许多功能以使其成为轻量级编辑器。除了测试之外,您可能还希望从 VS Code 内部定期运行其他任务。这就是任务系统的用武之地。
使用 Visual Studio Code 任务系统
Visual Studio Code 支持 Go、Rust 和 C++ 等编译语言,以及 Python 和 Ruby 等解释型语言。VS Code 有一个灵活的系统来执行用户定义的配置任务,比如构建和编译代码。
Python 代码通常不需要提前编译,因为 Python 解释器会为您做这件事。相反,您可以使用任务系统来预先配置您将在命令行中运行的任务,例如:
- 构建轮子或源代码分发
- 在 Django 等框架中运行任务
- 编译 Python C 扩展
VS Code 任务是可以使用命令面板按需运行的命令或可执行文件。有两个内置的默认任务:
在构建任务
该测试任务
请注意,您可以将任务用于可能通过命令行执行的任何内容。您不仅限于构建和测试活动。
使用任务编译轮子
如果您有一个setup.py文件来构建要在 PyPI 上分发的包,则可以使用任务系统自动构建源(Python)和二进制(编译的 Python)分发包。
任务在.vscode/tasks.json文件中定义。要试用它,请创建.vscode/tasks.json并复制此配置:
 1{
 2  "version": "2.0.0",
 3  "tasks": [
 4    {
 5      "type": "shell",
 6      "command": "${command:python.interpreterPath}",
 7      "args": ["setup.py", "bdist_wheel", "sdist"],
 8      "isBackground": true,
 9      "options": {"cwd": "${workspaceFolder}"},
10      "label": "Build Wheel",
11      "group": {
12        "kind": "build",
13        "isDefault": true
14      }
15    }
16  ]
17}在这个例子中有几件事情需要注意,所以你将逐行查看最重要的配置:
- **第 5 行:**任务类型是
shell,它指定这应该在您配置的 shell 下运行。 - **第 6 行:**命令是
${command:python.interpreterPath},它是此环境的 Python 解释器的内置变量。这包括任何激活的虚拟环境。 - **第 9 行:**该选项
"options": {"cwd": "${workspaceFolder}"}指定这应该在项目的根目录下运行。如果需要,您可以将其更改为子文件夹。 - **线11〜13:**将
"group"被设置为"build",而这个任务将成为默认的工作,因为你设置"isDefault"到true。这意味着此任务将作为默认构建任务运行。
要执行默认构建任务,您可以Tasks: Run Build Task从命令面板运行或使用内置键盘快捷键Cmd+F9或Ctrl+F9。在“*终端”*选项卡下,您可以找到构建命令的输出,该命令的输出名称为您指定的任何内容"label":
您不仅限于构建脚本。任务系统是 Django 和 Flask 管理命令的一个很好的解决方案。
使用 Django 任务
您是否正在使用 Django 应用程序,并且想要manage.py从命令行自动运行?您可以使用shell类型创建任务。这样,您可以manage.py使用要运行的 Django 子命令以及任何参数来执行:
{
  "version": "2.0.0",
  "tasks": [
    {
      "type": "shell",
      "command": "${command:python.interpreterPath}",
      "args": ["manage.py", "makemigrations"],
      "isBackground": true,
      "options": {"cwd": "${workspaceFolder}"},
      "label": "Make Migrations"
    }
  ]
}要运行此任务,请使用Tasks: Run Task命令面板中的命令并从列表中选择Make Migrations任务。
您可以复制此代码段并将其粘贴到您定期运行的任何 Django 命令中,例如collectstatic.
链接任务
如果您有多个应按顺序运行的任务或一个任务依赖于另一个任务,则可以在tasks.json.
扩展上的setup.py例子,如果你想先建立自己的包的源代码分发,你可以添加以下任务tasks.json:
...
{
  "type": "shell",
  "command": "${command:python.interpreterPath}",
  "args": ["setup.py", "sdist"],
  "isBackground": true,
  "options": {"cwd": "${workspaceFolder}"},
  "label": "Build Source",
}在默认构建任务中,您可以添加一个属性dependsOn以及需要首先运行的任务标签列表:
{
  "version": "2.0.0",
  "tasks": [
    {
      "type": "shell",
      "command": "${command:python.interpreterPath}",
      "args": ["setup.py", "bdist_wheel"],
      "isBackground": true,
      "options": {"cwd": "${workspaceFolder}"},
      "label": "Build Wheel",
      "group": {
        "kind": "build",
        "isDefault": true
      },
      "dependsOn": ["Build Source"]
    }
  ]
}下次运行此任务时,它将首先运行所有相关任务。
如果您有此任务所依赖的多个任务并且它们可以并行运行,请添加"dependsOrder": "parallel"到任务配置中。
使用任务运行 Tox
现在您将探索tox,这是一个旨在自动化和标准化 Python 测试的工具。Visual Studio Code 的 Python 扩展不附带 tox 集成。相反,您可以使用任务系统将 tox 设置为默认测试任务。
**提示:**如果你希望迅速与TOX开始,然后安装tox与pip并运行tox-quickstart命令:
$ python -m pip install tox
$ tox-quickstart
这将提示您完成创建tox 配置文件的步骤。
要使用您的 tox 配置自动运行 tox,请将以下任务添加到tasks.json:
{
  "type": "shell",
  "command": "tox",
  "args": [],
  "isBackground": false,
  "options": {"cwd": "${workspaceFolder}"},
  "label": "Run tox",
  "group": {
      "kind": "test",
      "isDefault": true
  }
}您可以使用Tasks: Run Test Task命令面板运行此任务,该任务将使用终端选项卡中的输出执行 tox :
如果您有几个任务并且需要经常运行它们,那么是时候探索一个很棒的扩展了,它在 UI 中添加了一些用于运行配置任务的快捷方式。
使用任务资源管理器扩展
该任务浏览器扩展(spmeesseman.vscode-taskexplorer)添加简单的用户界面控件运行您的预配置任务。安装后,任务资源管理器将成为资源管理器视图中的面板。它会扫描你的项目自动发现的任务npm,make,gulp,和许多其他的构建工具。你可以在vscode组下找到你的任务:
单击任何任务旁边的箭头以执行它,如果您更改了任务的配置,请单击顶部的刷新图标。
在 Visual Studio Code 中调试 Python 脚本
Visual Studio Code 的 Python 扩展捆绑了一个强大的调试器,支持本地和远程调试。
运行和调试简单 Python 脚本的最简单方法是转到运行 → 开始调试菜单并从选择中选择Python 文件。这将使用配置的 Python 解释器执行当前文件。
您可以通过单击行号左侧的装订线在代码中的任何位置设置断点。当代码执行时遇到断点时,代码将暂停并等待指令:
调试器添加了一个控件菜单:Continue、Step Over、Step Into、Step Out、Restart和Stop Execution:
在左侧面板上,您可以执行常见的调试操作,例如探索局部和全局变量以及 Python 的调用堆栈。您还可以设置手表,您将在下一节中了解更多信息。
设置手表
监视是在调试会话之间持续存在的表达式。当您停止执行并再次开始调试时,您将保留上次会话的所有监视。
您可以将变量添加到关注从面板变量通过右键单击一个变量,然后选择面板添加到关注。
您还可以通过单击*+图标将任何 Python 表达式添加到监视*列表。表达式可以包含:
- 小型 Python 表达式,例如
x == 3 - 函数调用,例如
var.upper() - 比较
每当遇到断点时,您都会实时获得每个表达式的当前结果。当您逐步调试会话时,VS Code 还将更新每个手表的值:
您可以使用左侧的箭头扩展字典和对象等复杂类型。
到目前为止,您已经看到了单个 Python 文件的调试器,但许多 Python 应用程序都是模块或需要特殊命令才能启动。
配置启动文件
VS Code 有一个用于启动配置文件的配置文件.vscode/launch.json. VS Code 的 Python 调试器可以启动任何启动配置并将调试器附加到它。
**注意:**要查看即将进行的配置的预期结果,您需要设置一个有效的FastAPI 项目,并在您使用的 Python 环境中安装异步Web 服务器uvicorn。
作为在 VS Code 中使用启动配置文件的示例,您将探索如何使用 ASGI 服务器uvicorn启动FastAPI应用程序。通常,您可能只使用命令行:
$ python -m uvicorn example_app.main:app
相反,您可以在以下位置设置等效的启动配置launch.json:
{
  "configurations": [
    {
      "name": "Python: FastAPI",
      "type": "python",
      "request": "launch",
      "module": "uvicorn",
      "cwd": "${workspaceFolder}",
      "args": [
          "example_app.main:app"
      ],
    }
  ]
}在这里,您将"type"配置设置为"python",它告诉 VS Code 使用 Python 调试器。您还设置"module"指定要运行的 Python 模块,在本例中为"uvicorn". 您可以在 下提供任意数量的参数"args"。如果您的应用程序需要环境变量,您也可以使用env参数设置这些变量。
添加此配置后,您应该会在“*运行和调试”*面板下找到准备启动的新启动配置:
当您按F5或从顶部菜单中选择Run → Start Debugging时,您配置为首次启动配置的任何内容都将运行。
如果 VS Code 没有自动为你选择正确的 Python 环境,那么你也可以在你的.vscode/launch.json文件中声明一个适当的 Python 解释器的显式路径作为一个选项:
 1{
 2  "configurations": [
 3    {
 4      "name": "Python: FastAPI",
 5      "type": "python",
 6      "python": "${workspaceFolder}/venv/bin/python",
 7      "request": "launch",
 8      "module": "uvicorn",
 9      "cwd": "${workspaceFolder}",
10      "args": [
11          "example_app.main:app"
12      ],
13    }
14  ]
15}您可以将 Python 解释器的路径添加为名称为 的新条目"python"。在此示例中,解释器位于venv您在工作区文件夹的根目录下创建的 Python 虚拟环境中。如果您想使用不同的 Python 解释器,您可以通过编辑第 6 行中显示的路径来定义它的路径以适合您的设置。
掌握远程开发
VS Code 支持三种远程开发配置文件:
容器
通过 SSH 的远程主机
适用于 Linux 的 Windows 子系统 (WSL)
所有三个选项都由远程开发扩展包 ( ms-vscode-remote.vscode-remote-extensionpack) 提供。您需要安装此扩展包才能在 VS Code 中显示远程调试功能。
使用容器进行远程开发
您需要在您的机器上安装 Docker 运行时才能对容器进行远程调试。如果您还没有安装 Docker,可以从Docker 网站下载它。
Docker 运行后,转到左侧导航菜单上的远程资源管理器选项卡。将Remote Explorer下拉菜单更改为Containers,您将看到一个带有面板的视图:
如果您有全新的 Docker 安装,则不会填充这些面板。
如果您已经安装并运行了 Docker 映像,则可能会填充三个面板:
**Containers:**一个导航面板,用于显示此工作区中的开发容器或一些快速启动步骤的链接
**容器的名称(如果正在运行):**正在运行的容器的属性和卷安装
**DevVolumes:**可以编辑和挂载以修改代码的开发卷列表
例如,如果您按照 VS Code 的容器教程 中概述的步骤安装了试用开发容器:Python,则您的 VS Code远程资源管理器选项卡将在前面提到的面板中显示正在运行的容器的名称:
使用这些面板可以快速管理您的项目所依赖的任何 Docker 容器。
通常,运行远程容器扩展的主要方式有以下三种:
附加到现有的运行容器以进行快速更改
创建
.devcontainer/devcontainer.json文件并将工作区作为远程容器打开运行
Remote-Containers: Reopen in Container命令并选择 Python 3 图像
.devcontainer/devcontainer.json与简单地打开容器相比,创建文件具有显着的优势:
- 开发容器支持GitHub 代码空间
- 开发容器支持本教程中显示的启动配置文件和任务配置
如果您计划在容器和 VS Code 中进行大量工作,那么花费额外的时间来创建开发容器将是值得的。
**注意:**您可以通过阅读官方 VS Code 文档来更详细地了解如何创建开发容器。
开始使用开发容器的一种快速方法是从当前工作区创建它:
Remote-Containers: Reopen in Container从命令面板运行命令。选择 Python 3,然后选择所需的 Python 版本。
接受默认的 Node.js 建议版本。
然后 VS Code 将移植您现有的工作区并.devcontainer/devcontainer.json基于DockerfilePython的泛型创建配置。
开发容器有两个必需的文件:
.devcontainer/devcontainer.json,它指定了所有 VS Code 要求,例如需要哪些扩展以及要使用哪些设置
Dockerfile, 指定哪些命令将构建环境
在默认设置中,Dockerfile位于.devcontainer/目录内。如果您的项目已经有一个Dockerfile,您可以通过更改.devcontainer/devcontainer.json.
您将使用里面的默认值.devcontainer/devcontainer.json来指定:
- 该路径的
Dockerfile - 容器的名称
- 要应用的 VS Code设置
- 任何需要安装的VS Code扩展
- 您要运行的任何创建后命令
python -m pip install <package>,例如,
如果您的应用程序需要来自 PyPI 的其他包,请更改.devcontainer/devcontainer.json并取消注释指定的行"postCreateCommand":
{
  ...
  // Use 'postCreateCommand' to run commands after the Container is created.
  "postCreateCommand": "python3 -m pip install -r requirements.txt",
}如果您正在开发提供网络服务的应用程序(如 Web 应用程序),您还可以添加端口转发选项。有关完整的选项列表,您可以查看devcontainer.json参考。
在对Dockerfile或 devcontainer 规范进行更改后,通过右键单击正在运行的容器并选择Rebuild Container从远程资源管理器重建容器:
通过这样做,您将使用对配置和Dockerfile.
除了用于远程调试的远程开发扩展包的扩展功能之外,还有一个用于 VS Code 的 Docker 扩展。您将在本教程结束时介绍此扩展并找到更多功能。
使用 SSH 进行远程开发
通过Remote-SSH: Open SSH Configuration File在命令面板中运行,您可以打开本地 SSH 配置文件。这是一个标准的SSH 配置文件,用于列出主机、端口和私钥的路径。该IdentityFile选项默认为~/.ssh/id_rsa,因此验证的最佳方式是私钥和公钥对。
这是两个主机的示例配置:
Host 192.168.86.30
  HostName 192.168.86.30
  User development
  IdentityFile ~/path/to/rsa

Host Test-Box
  HostName localhost
  User vagrant
  Port 2222
保存配置文件后,远程资源管理器选项卡将在SSH 目标下拉选项下列出这些 SSH 主机:
要连接到该服务器,请单击“新窗口中的连接到主机”,这是任何主机右侧的图标。这将打开一个带有远程主机的新 VS Code 窗口。
连接后,单击资源管理器视图下的打开文件夹。VS Code 将显示一个特殊的文件夹导航菜单,显示远程主机上的可用文件夹。导航到您的代码所在的文件夹,您可以在该目录下启动一个新的工作区:

在这个远程工作区中,您可以编辑和保存远程服务器上的任何文件。如果您需要运行任何其他命令,“*终端”*选项卡会自动设置为远程主机的 SSH 终端。
使用 WSL 进行远程开发
适用于 Linux 的 Windows 子系统或WSL是 Microsoft Windows 的一个组件,它使用户能够在其 Windows 操作系统上运行任意数量的 Linux 发行版,而无需单独的虚拟机管理程序。
VS Code 支持 WSL 作为远程目标,因此您可以在 WSL 下为 Windows 运行 VS Code 并为 Linux 开发。
在 VS Code 中使用 WSL 首先需要安装 WSL。安装 WSL 后,您需要至少有一个可用的发行版。
在最新版本的 Windows 10 上安装 WSL 的最简单方法是打开命令提示符并运行:
C:\> wsl --install
该--install命令执行以下操作:
- 启用可选的 WSL 和虚拟机平台组件
- 下载并安装最新的 Linux 内核
- 将 WSL 2 设置为默认值
- 下载并安装 Linux 发行版,可能需要重新启动机器
在计算机上成功设置 WSL 后,您还需要为 VS Code安装Remote - WSL ( ms-vscode-remote.remote-wsl)扩展。之后,您就可以在 Visual Studio Code 中使用 WSL。
如果您已经在 WSL 中有代码,请Remote-WSL: Open Folder in WSL从 VS Code 中的命令面板运行。在 Linux 子系统中为您的代码选择目标目录。
如果您的代码已在 Windows 中签出,请Remote-WSL: Reopen Folder in WSL从命令面板运行。
远程资源管理器将记住您配置的 WSL 目标,并让您从远程资源管理器视图中的WSL 目标下拉菜单中快速重新打开它们:
如果您想要一个可重现的环境,请考虑创建一个Dockerfile而不是直接在 WSL 主机上工作。
使用数据科学工具
VS Code 非常适合使用 Python 进行应用程序开发和 Web 开发。它还具有一组强大的扩展和工具,用于处理数据科学项目。
到目前为止,您主要介绍了 VS Code 的 Python 扩展。还有Jupyter Notebooks 扩展,它将 IPython 内核和笔记本编辑器集成到 VS Code 中。
安装 Jupyter Notebook 扩展
要在 VS Code 上开始使用 Jupyter Notebooks,您需要Jupyter 扩展 ( ms-toolsai.jupyter)。
注意: Jupyter Notebooks 支持现在与 Python 扩展捆绑在一起,所以如果您已经安装了它,请不要感到惊讶。
Jupyter Notebooks 支持pip作为包管理器,以及conda来自Anaconda 发行版。
Python 的数据科学库通常需要用 C 和 C++ 编写的编译模块。conda如果您使用大量第三方包,则应将其用作包管理器,因为 Anaconda 发行版已代表您解决了构建依赖项,从而更容易安装包。
在 VS Code 中开始使用 Jupyter Notebook
在本例中,您将打开一系列关于波变换的 Jupyter Notebooks 。下载 repo 的.zip/文件夹并解压缩,或者克隆 GitHub repo并使用 VS Code 打开它。进一步描述的步骤也适用于包含.ipynb笔记本文件的任何其他工作区。
**注意:**本节的其余部分使用conda包管理器。如果要使用本节中显示的命令,则需要安装 Anaconda。
在 VS Code 中,您可以使用任何现有conda环境。您可以conda从终端为 VS Code创建一个专门的环境,而不是将包安装到基本环境中:
$ conda create --name vscode python=3.8
创建conda名为的环境后vscode,您可以在其中安装一些常见的依赖项:
$ conda install -n vscode -y numpy scipy pandas matplotlib ipython ipykernel ipympl
安装依赖项后,Python: Select Interpreter从 VS Code 命令面板运行命令并搜索vscode以选择新conda环境:
此选择会将您的 VS Code 设置为使用您conda环境中的 Python 解释器,vscode.
**注意:**如果conda环境在列表中不可用,您可能需要通过Developer: Reload Window从命令面板运行命令来重新加载窗口。
选择后,在 VS Code 中打开笔记本并单击右侧的选择内核按钮或Notebook: Select Notebook Kernel从命令面板运行命令。键入vscode以选择conda安装了依赖项的新创建的环境:
选择新conda环境作为笔记本的内核将使您的笔记本能够访问您在该环境中安装的所有依赖项。这是执行代码单元所必需的。
选择内核后,您可以运行任何或所有单元格并查看 VS Code 中显示的操作输出:
笔记本执行后,Jupyter 扩展将在Jupyter: Variables视图中提供任何中间变量,例如列表、NumPy 数组和 Pandas DataFrames:
您可以通过单击笔记本顶部的“*变量”*按钮或运行Jupyter: Focus on Variables View命令来使该视图成为焦点。
对于更复杂的变量,选择图标以在数据查看器中打开数据。
使用数据查看器
Jupyter 扩展带有一个数据查看器,用于查看和过滤 2D 数组,例如列表、NumPyndarray和 Pandas DataFrames:
To access the data viewer, you can expand complex variables in the Variables view by clicking Show variables in data viewer . This option is represented by an icon that appears to the left of the row representing a complex variable:
The data viewer supports inline filtering and paging of large data sets. If you plot large datasets in Matplotlib, the Jupyter extension supports Matplotlib widgets instead of SVG rendering.
Using the Rainbow CSV extension
If you are using CSV or TSV to enter your data, there is an extension called Rainbow CSV ( mechatroner.rainbow -A useful extension for csv) that enables you to open and visualize CSV files in VS Code:
#Each column is colored, allowing you to quickly Find the missing comma. You can also align all columns by running the Rainbow CSV: Align CSV Columns command from the command palette.
**Note:** If you are looking for a sample CSV file to try out this extension, you can select a CSV file to download from the New Zealand Government's Official Statistics page.
The Rainbow CSV extension also comes with a Rainbow Query Language (RBQL) query tool that allows you to write RBQL queries on CSV data to create filtered datasets:

You can access the RBQL console by running Rainbow CSV: RBQL in the command panel. After executing the query, you will see the results in a new tab as a temporary CSV file that you can save and use for further data analysis work.
In this tutorial, you have installed several useful extensions for VS Code. There are many useful extensions available. In the last part of this tutorial, you'll learn about some additional extensions that you haven't covered so far and that you might want to try.
Add bonus extensions to Visual Studio Code
The VS Code marketplace has thousands of extensions. The selection of extensions covers anything from language support, themes, spell checking and even mini-games.
So far in this tutorial, you've introduced a number of extensions that make Python development in Visual Studio Code more powerful. The last four extensions are optional but can make your life easier.
Code Spell Checker
Code Spell Checker (streetsidesoftware.code-spell-checker) is a spell Checker for checking variable names, text within strings, and Python docstrings:

The Code Spell Checker extension will highlight any suspected spelling errors. You can correct spelling in the dictionary or add words to the user or workspace dictionary.
The workspace dictionary will be located in the workspace folder so you can check it into Git. User dictionaries remain constant across all your projects. If you have a lot of keywords and phrases that you use frequently, you can add them to the user dictionary.
Docker
The docker extension (ms-azuretools.vscode-docker) can be easily created , manage and debug containerized applications:

Docker extensions go beyond the Remote - Containers extension you introduced earlier. It provides you with a UI to manage images, networks, container registries, volumes, and containers.
Thunder Client
Thunder Client (rangav.vscode-thunder-client) is the HTTP client of VS Code Terminal and UI, designed to help test REST APIs. If you are developing and testing APIs in a framework such as Flask, FastAPI, or Django Rest Framework, you may already use tools such as Postman or curl to test your application.
In Thunder Client, you can create HTTP requests and send them to your API, manipulate headers, and set payloads of text, XML, and JSON:

Thunder Client is a great alternative to Postman or curl because you can use it directly in VS Code, so you can avoid switching between applications when testing and developing REST APIs.
VS Code Pets
VS Code Pets ( tonybaloney.vscode-pets) is an interesting extension that You can place one or more small pets in your VS Code window:

You can customize pets, customize their environments, and play games with them.
**NOTE:**As the author of this tutorial, I will say this is a great extension - but I may be biased because I created it.
This is just a snapshot of the expansion in the market. There are thousands of additional language support, UI improvements, and even Spotify integration yet to be discovered.
Conclusion
Visual Studio Code’s Python tools are evolving rapidly, and the team releases monthly updates containing bug fixes and new features. Be sure to install any new updates to keep your environment up to date and optimal.
In this tutorial, you've seen an overview of some of the more advanced features in Visual Studio Code, Python and Jupyter extensions, and some additional extensions.
You learned how to:
- Use smooth UI customization and keybindingsCustomization Your user interface
- Run and monitor Python tests by Integrating a test framework into Visual Studio Code
- Cleaned and formatted using Pylance and external linters Code
- Debugging via SSH and Docker****Local and remote environments
- LaunchingData science toolsto use Jupyter Notebooks
#You can use this knowledge to get yourself on track to becoming a VS Code power user.
Try using some of these extensions and test them out as you work on your next project. You may find that some VS Code features are more useful to you than others. Once you know a few customizations and extensions, you may find yourself looking for more in the VS Code documentation or even writing your own extensions!
For more knowledge about VSCode, please visit: vscode Basic Tutorial!
The above is the detailed content of Take you to master the formatting method in VSCode. For more information, please follow other related articles on the PHP Chinese website!

Hot AI Tools

Undresser.AI Undress
AI-powered app for creating realistic nude photos

AI Clothes Remover
Online AI tool for removing clothes from photos.

Undress AI Tool
Undress images for free

Clothoff.io
AI clothes remover

AI Hentai Generator
Generate AI Hentai for free.

Hot Article
Hot Tools

Notepad++7.3.1
Easy-to-use and free code editor

SublimeText3 Chinese version
Chinese version, very easy to use

Zend Studio 13.0.1
Powerful PHP integrated development environment

Dreamweaver CS6
Visual web development tools

SublimeText3 Mac version
God-level code editing software (SublimeText3)
Hot Topics


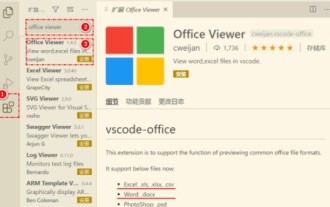 How to view word documents in vscode How to view word documents in vscode
May 09, 2024 am 09:37 AM
How to view word documents in vscode How to view word documents in vscode
May 09, 2024 am 09:37 AM
First, open the vscode software on the computer, click the [Extension] icon on the left, as shown in ① in the figure. Then, enter [officeviewer] in the search box of the extension interface, as shown in ② in the figure. Then, from the search Select [officeviewer] to install in the results, as shown in ③ in the figure. Finally, open the file, such as docx, pdf, etc., as shown below
 How to draw a flow chart with vscode_How to draw a flow chart with visual_studio code
Apr 23, 2024 pm 02:13 PM
How to draw a flow chart with vscode_How to draw a flow chart with visual_studio code
Apr 23, 2024 pm 02:13 PM
First, open visual studio code on the computer, click the four square buttons on the left, then enter draw.io in the search box to query the plug-in, click Install. After installation, create a new test.drawio file, then select the test.drawio file, enter the editing mode on the left There are various graphics on the side. You can draw the flow chart by selecting at will. After drawing, click File → Embed → svg and then select Embed. Copy the svg code. Paste the copied svg code into the html code. Open the html web page and you can see it. Click on the picture on the web page to jump to the flow chart. On this page, you can zoom in and out of the flow chart. Here, we choose to click on the pencil pattern in the lower right corner to jump to the web page.
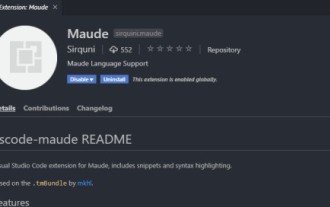 How to write Maude in Vscode_How to write Maude in Vscode
Apr 23, 2024 am 10:25 AM
How to write Maude in Vscode_How to write Maude in Vscode
Apr 23, 2024 am 10:25 AM
First, you can search for the Maude plug-in in the vscode plug-in manager. Then, create a new file with the extension maude to use maude's code snippets and syntax highlighting. Terminal -> New Terminal can open the vscode built-in terminal in the current folder to run the maude or full-maude program. In maude's official tutorial, there are also examples of http clients, which can be called and run as shown in the figure. If you want to associate files with the fm extension, open settings, search for fileassociations in user settings, and open settings.json. Just add an entry to the file association, that is, the entry from *.fm to maude. But full
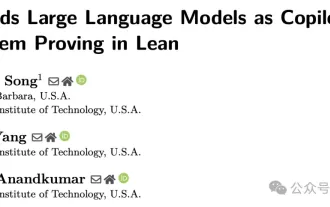 Caltech Chinese use AI to subvert mathematical proofs! Speed up 5 times shocked Tao Zhexuan, 80% of mathematical steps are fully automated
Apr 23, 2024 pm 03:01 PM
Caltech Chinese use AI to subvert mathematical proofs! Speed up 5 times shocked Tao Zhexuan, 80% of mathematical steps are fully automated
Apr 23, 2024 pm 03:01 PM
LeanCopilot, this formal mathematics tool that has been praised by many mathematicians such as Terence Tao, has evolved again? Just now, Caltech professor Anima Anandkumar announced that the team released an expanded version of the LeanCopilot paper and updated the code base. Image paper address: https://arxiv.org/pdf/2404.12534.pdf The latest experiments show that this Copilot tool can automate more than 80% of the mathematical proof steps! This record is 2.3 times better than the previous baseline aesop. And, as before, it's open source under the MIT license. In the picture, he is Song Peiyang, a Chinese boy. He is
 How to enable background updates in vscode How to enable background updates in vscode
May 09, 2024 am 09:52 AM
How to enable background updates in vscode How to enable background updates in vscode
May 09, 2024 am 09:52 AM
1. First, after opening the interface, click the file menu in the upper left corner. 2. Then, click the settings button in the preferences column. 3. Then, in the settings page that jumps, find the update section. 4. Finally, click the mouse to check and enable it. Download and install the new VSCode version button in the background on Windows and restart the program.
 How to add files to vscode workspace How to add files to vscode workspace
May 09, 2024 am 09:43 AM
How to add files to vscode workspace How to add files to vscode workspace
May 09, 2024 am 09:43 AM
1. First, open the vscode software, click the explorer icon, and find the workspace window 2. Then, click the file menu in the upper left corner and find the add folder to workspace option 3. Finally, find the folder location in the local disk , click the add button
 How to disable wsl configuration file in vscode How to disable wsl configuration file in vscode
May 09, 2024 am 10:30 AM
How to disable wsl configuration file in vscode How to disable wsl configuration file in vscode
May 09, 2024 am 10:30 AM
1. First, open the settings option in the settings menu. 2. Then, find the terminal column in the commonly used page. 3. Finally, uncheck the usewslprofiles button on the right side of the column.
 How to set animation smooth insertion in VScode VScode tutorial to set animation smooth insertion
May 09, 2024 am 09:49 AM
How to set animation smooth insertion in VScode VScode tutorial to set animation smooth insertion
May 09, 2024 am 09:49 AM
1. First, after opening the interface, click the workspace interface 2. Then, in the open editing panel, click the File menu 3. Then, click the Settings button under the Preferences column 4. Finally, click the mouse to check the CursorSmoothCaretAnimation button and save Just set it
