An in-depth analysis of the MongoDB storage engine (with schematic diagram)
This article will introduce you to the relevant knowledge about mongodb and introduce the storage engine in MongoDB. I hope it will be helpful to you!
A brief review
Last time we talked about the mongodb cluster, which is divided into master-slave cluster and sharded cluster. For the shards in the sharded cluster, here is what is needed Pay attention to the following points, let’s review them together:
- For hot data
certain shard keys (shards A shard key is an index field or composite index field that exists in each document in the collection) will cause all read or write requests to operate on a single data block or shard, which will result in a single sharded server If the load is too heavy, the self-increasing shard key will easily cause writing problems [Recommendation: MongoDB video tutorial]
- For indivisible data blocks
For coarse-grained sharding keys, may result in many documents using the same sharding key
In this case, these documents cannot be split into multiple data blocks, this will limit mongodb's ability to evenly distribute data
- Forquery obstacles
Sharding keys and queries There is no correlation, which will cause poor query performance
For the above points, we must be aware of them. If we encounter similar problems in actual work, we can try to learn to deal with them
Today we will take a brief look at What is the storage engine of mongodb
Storage engine
When it comes to the storage engine of mongodb, we need to know that it is in mongodb 3.0 At that time, the concept of pluggable storage engine was introduced
Now there are mainly these engines:
- WiredTiger storage engine
- inMemory Storage Engine
When the storage engine first came out, the default was to use the MMAPV1 storage engine.
MMAPV1 engine, we can probably know it by looking at the name. He uses mmap to do it, and uses the principle of linux memory mapping
The MMAPV1 engine is not used now because the WiredTiger storage engine is better, for example, compare WiredTiger has the following advantages:
- WiredTiger Better performance in read and write operations
WiredTiger can better utilize the processing capabilities of multi-core systems
-
WiredTiger The lock granularity is smaller
The MMAPV1 engine uses table-level locks. When there are concurrent operations on a single table, the throughput will be affected. Limitations
WiredTiger uses document-level locks, which improves concurrency and throughput
- WiredTiger Better compression
WiredTiger uses prefix compression, which saves memory space consumption compared to MMAPV1
And WiredTiger also provides a compression algorithm, which can greatly reduce the impact on the hard disk. Resource consumption
Writing principle of WiredTiger engine

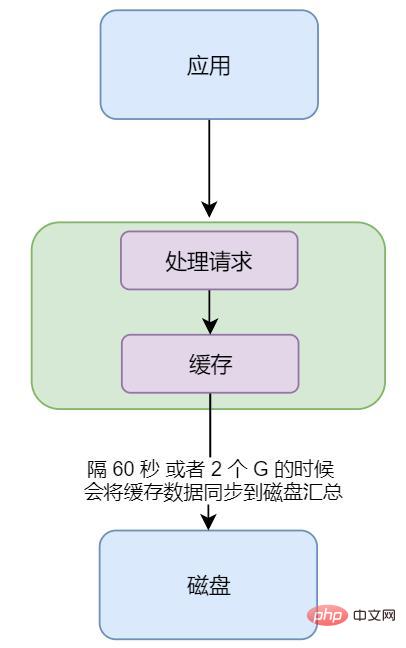
We can see from the above figure that WiredTiger The principle of writing to disk is also very simple The
- application request comes to mongodb, mongodb handles it, and stores the result in the cache
- When the cache reaches 2 G , or when the 60 s timer expires, the data in the cache will be flushed to the disk.
Careful xdm will know, then if it is exactly 59 seconds now, more than 1 G, the data in the cache has not yet been synchronized to the disk, and mongodb hangs up abnormally. Then won't mongodb lose data?
We can all think with our fingers, How could the designer of mongodb allow this situation to exist, then there must be a solution, as follows

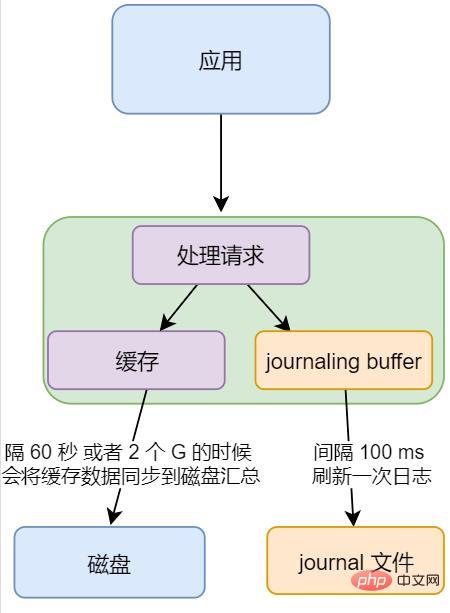
As shown in the picture above, there is an extra journaling buffer and journal file
- journaling buffer
Buffer that stores mongodb addition, deletion and modification instructions
- journal file
Similar to the transaction log in a relational database
The purpose of introducing Journaling is:
Journaling can enable the mongodb database to quickly recover after an unexpected failure
Journaling log function
Journaling's The logging function looks a bit like the aof persistence in redis. It can only be said that it is similar
In mongodb 2.4, the Journaling logging function is enabled by default , when we start the mongod instance, the service will check whether the data needs to be restored
So there will be no mongodb data loss mentioned above
In addition, we need to know here that journaling’s logging function will write logs when mongodb needs to perform write operations, that is, when adding, deleting, or modifying, which will affect performance
But mongodb will not record the read operation in the cache , so it will not be recorded in the journaling log, so the read operation will have no impact
That’s it for today. What I have learned, if there is any deviation, please correct me
The above is the detailed content of An in-depth analysis of the MongoDB storage engine (with schematic diagram). For more information, please follow other related articles on the PHP Chinese website!

Hot AI Tools

Undresser.AI Undress
AI-powered app for creating realistic nude photos

AI Clothes Remover
Online AI tool for removing clothes from photos.

Undress AI Tool
Undress images for free

Clothoff.io
AI clothes remover

Video Face Swap
Swap faces in any video effortlessly with our completely free AI face swap tool!

Hot Article

Hot Tools

Notepad++7.3.1
Easy-to-use and free code editor

SublimeText3 Chinese version
Chinese version, very easy to use

Zend Studio 13.0.1
Powerful PHP integrated development environment

Dreamweaver CS6
Visual web development tools

SublimeText3 Mac version
God-level code editing software (SublimeText3)

Hot Topics
 1393
1393
 52
52
 1205
1205
 24
24
 What is the use of net4.0
May 10, 2024 am 01:09 AM
.NET 4.0 is used to create a variety of applications and it provides application developers with rich features including: object-oriented programming, flexibility, powerful architecture, cloud computing integration, performance optimization, extensive libraries, security, Scalability, data access, and mobile development support.
 Integration of Java functions and databases in serverless architecture
Apr 28, 2024 am 08:57 AM
In a serverless architecture, Java functions can be integrated with the database to access and manipulate data in the database. Key steps include: creating Java functions, configuring environment variables, deploying functions, and testing functions. By following these steps, developers can build complex applications that seamlessly access data stored in databases.
 How to configure MongoDB automatic expansion on Debian
Apr 02, 2025 am 07:36 AM
This article introduces how to configure MongoDB on Debian system to achieve automatic expansion. The main steps include setting up the MongoDB replica set and disk space monitoring. 1. MongoDB installation First, make sure that MongoDB is installed on the Debian system. Install using the following command: sudoaptupdatesudoaptinstall-ymongodb-org 2. Configuring MongoDB replica set MongoDB replica set ensures high availability and data redundancy, which is the basis for achieving automatic capacity expansion. Start MongoDB service: sudosystemctlstartmongodsudosys
 How to ensure high availability of MongoDB on Debian
Apr 02, 2025 am 07:21 AM
This article describes how to build a highly available MongoDB database on a Debian system. We will explore multiple ways to ensure data security and services continue to operate. Key strategy: ReplicaSet: ReplicaSet: Use replicasets to achieve data redundancy and automatic failover. When a master node fails, the replica set will automatically elect a new master node to ensure the continuous availability of the service. Data backup and recovery: Regularly use the mongodump command to backup the database and formulate effective recovery strategies to deal with the risk of data loss. Monitoring and Alarms: Deploy monitoring tools (such as Prometheus, Grafana) to monitor the running status of MongoDB in real time, and
 Navicat's method to view MongoDB database password
Apr 08, 2025 pm 09:39 PM
It is impossible to view MongoDB password directly through Navicat because it is stored as hash values. How to retrieve lost passwords: 1. Reset passwords; 2. Check configuration files (may contain hash values); 3. Check codes (may hardcode passwords).
 Major update of Pi Coin: Pi Bank is coming!
Mar 03, 2025 pm 06:18 PM
PiNetwork is about to launch PiBank, a revolutionary mobile banking platform! PiNetwork today released a major update on Elmahrosa (Face) PIMISRBank, referred to as PiBank, which perfectly integrates traditional banking services with PiNetwork cryptocurrency functions to realize the atomic exchange of fiat currencies and cryptocurrencies (supports the swap between fiat currencies such as the US dollar, euro, and Indonesian rupiah with cryptocurrencies such as PiCoin, USDT, and USDC). What is the charm of PiBank? Let's find out! PiBank's main functions: One-stop management of bank accounts and cryptocurrency assets. Support real-time transactions and adopt biospecies
 What is the CentOS MongoDB backup strategy?
Apr 14, 2025 pm 04:51 PM
Detailed explanation of MongoDB efficient backup strategy under CentOS system This article will introduce in detail the various strategies for implementing MongoDB backup on CentOS system to ensure data security and business continuity. We will cover manual backups, timed backups, automated script backups, and backup methods in Docker container environments, and provide best practices for backup file management. Manual backup: Use the mongodump command to perform manual full backup, for example: mongodump-hlocalhost:27017-u username-p password-d database name-o/backup directory This command will export the data and metadata of the specified database to the specified backup directory.
 How to encrypt data in Debian MongoDB
Apr 12, 2025 pm 08:03 PM
Encrypting MongoDB database on a Debian system requires following the following steps: Step 1: Install MongoDB First, make sure your Debian system has MongoDB installed. If not, please refer to the official MongoDB document for installation: https://docs.mongodb.com/manual/tutorial/install-mongodb-on-debian/Step 2: Generate the encryption key file Create a file containing the encryption key and set the correct permissions: ddif=/dev/urandomof=/etc/mongodb-keyfilebs=512


