Let's talk about how to implement single sign-on (SSO) based on Node
What is single sign-on? What is the principle? How to achieve it? The following article will take you through single sign-on and talk about the method of using Node to implement single sign-on SSO. I hope it will be helpful to you!

[Related tutorial recommendations: nodejs video tutorial, programming teaching]
What is Single sign-on
As the company's business increases, different systems will inevitably be generated. It will be very inconvenient if each system requires a separate login.
Therefore, a solution such as single sign-on was born. The full name of single sign-on is Single Sign On, or SSO for short. It means that if you log in to one system in multiple system application groups, you can be authorized in all other systems. No need to log in again.
For example, Xiao Ming logged into Taobao today. If he has not logged in, he will be asked to enter authentication information (user name, password, etc.). After logging in, when he visits Tmall's page, he can access it directly without logging in.
Single sign-on principle

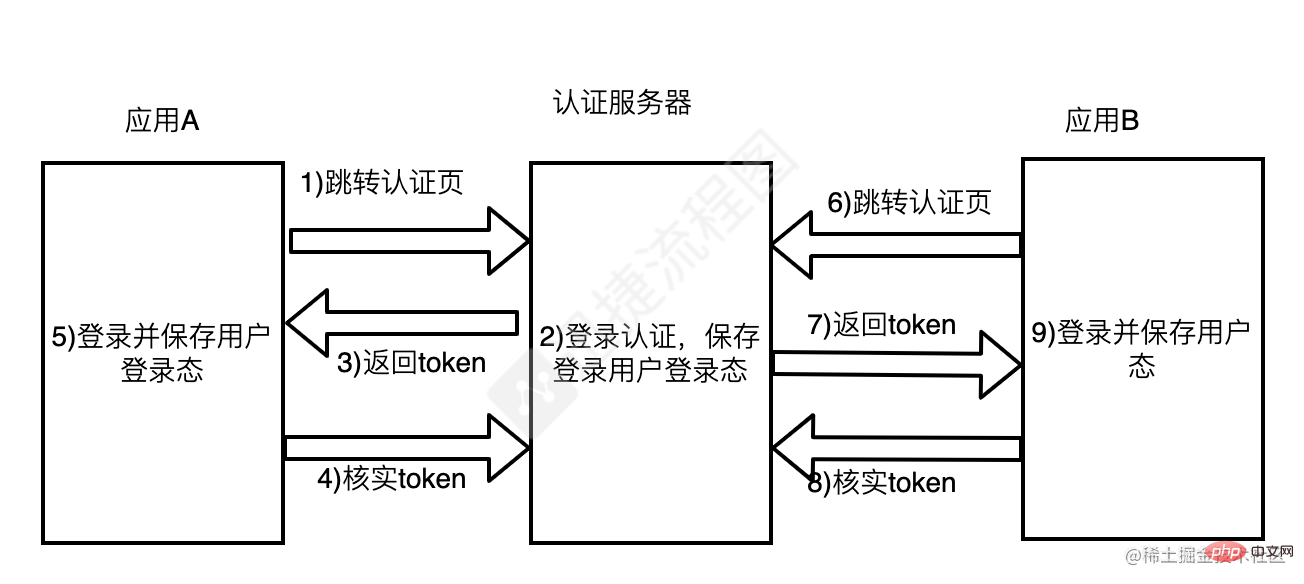
SSO requires an independent authentication center. Only the independent authentication center can accept users. For security information such as name and password, other systems do not provide login entrances and only accept indirect authorization from the certification center. The whole process can be simply described with the above picture:
When the user logs in to access application A, application A finds that the user is not logged in, jumps to the SSO authentication center, and uses its own address as The parameters are convenient for callback
The SSO certification center finds that the user has not logged in and guides the user to the login page; the user fills in the user name and password to submit the login application; the SSO certification center verifies the user information and creates the user Rain the session of the SSO authentication center (the information will be saved in the cookie at this time), and at the same time create the authorization token token
sso authentication center jumps to the original request address with the token (Application A)
Application A gets the token and goes to the SSO certification center to verify whether it is valid. If it returns a valid registration application A
Application A creates Conversation with the user, displaying resources and maintaining user login status
When the user accesses application B, it is found that the user is not logged in (the SSO authentication server and application A and application B are not in the same domain , unable to provide login status), jump to the SSO certification center, and bring your address and cookie information from the previous session with the SSO certification center
The SSO certification center finds that the user has logged in , jump back to the application B address, and attach the token token
-
The same application B gets the token and goes to the SSO certification center to verify whether it is valid. If it returns a valid registered application B
Application B creates a session with the user, displays resources and maintains the user's login status
NodeJS Demo
Three different services
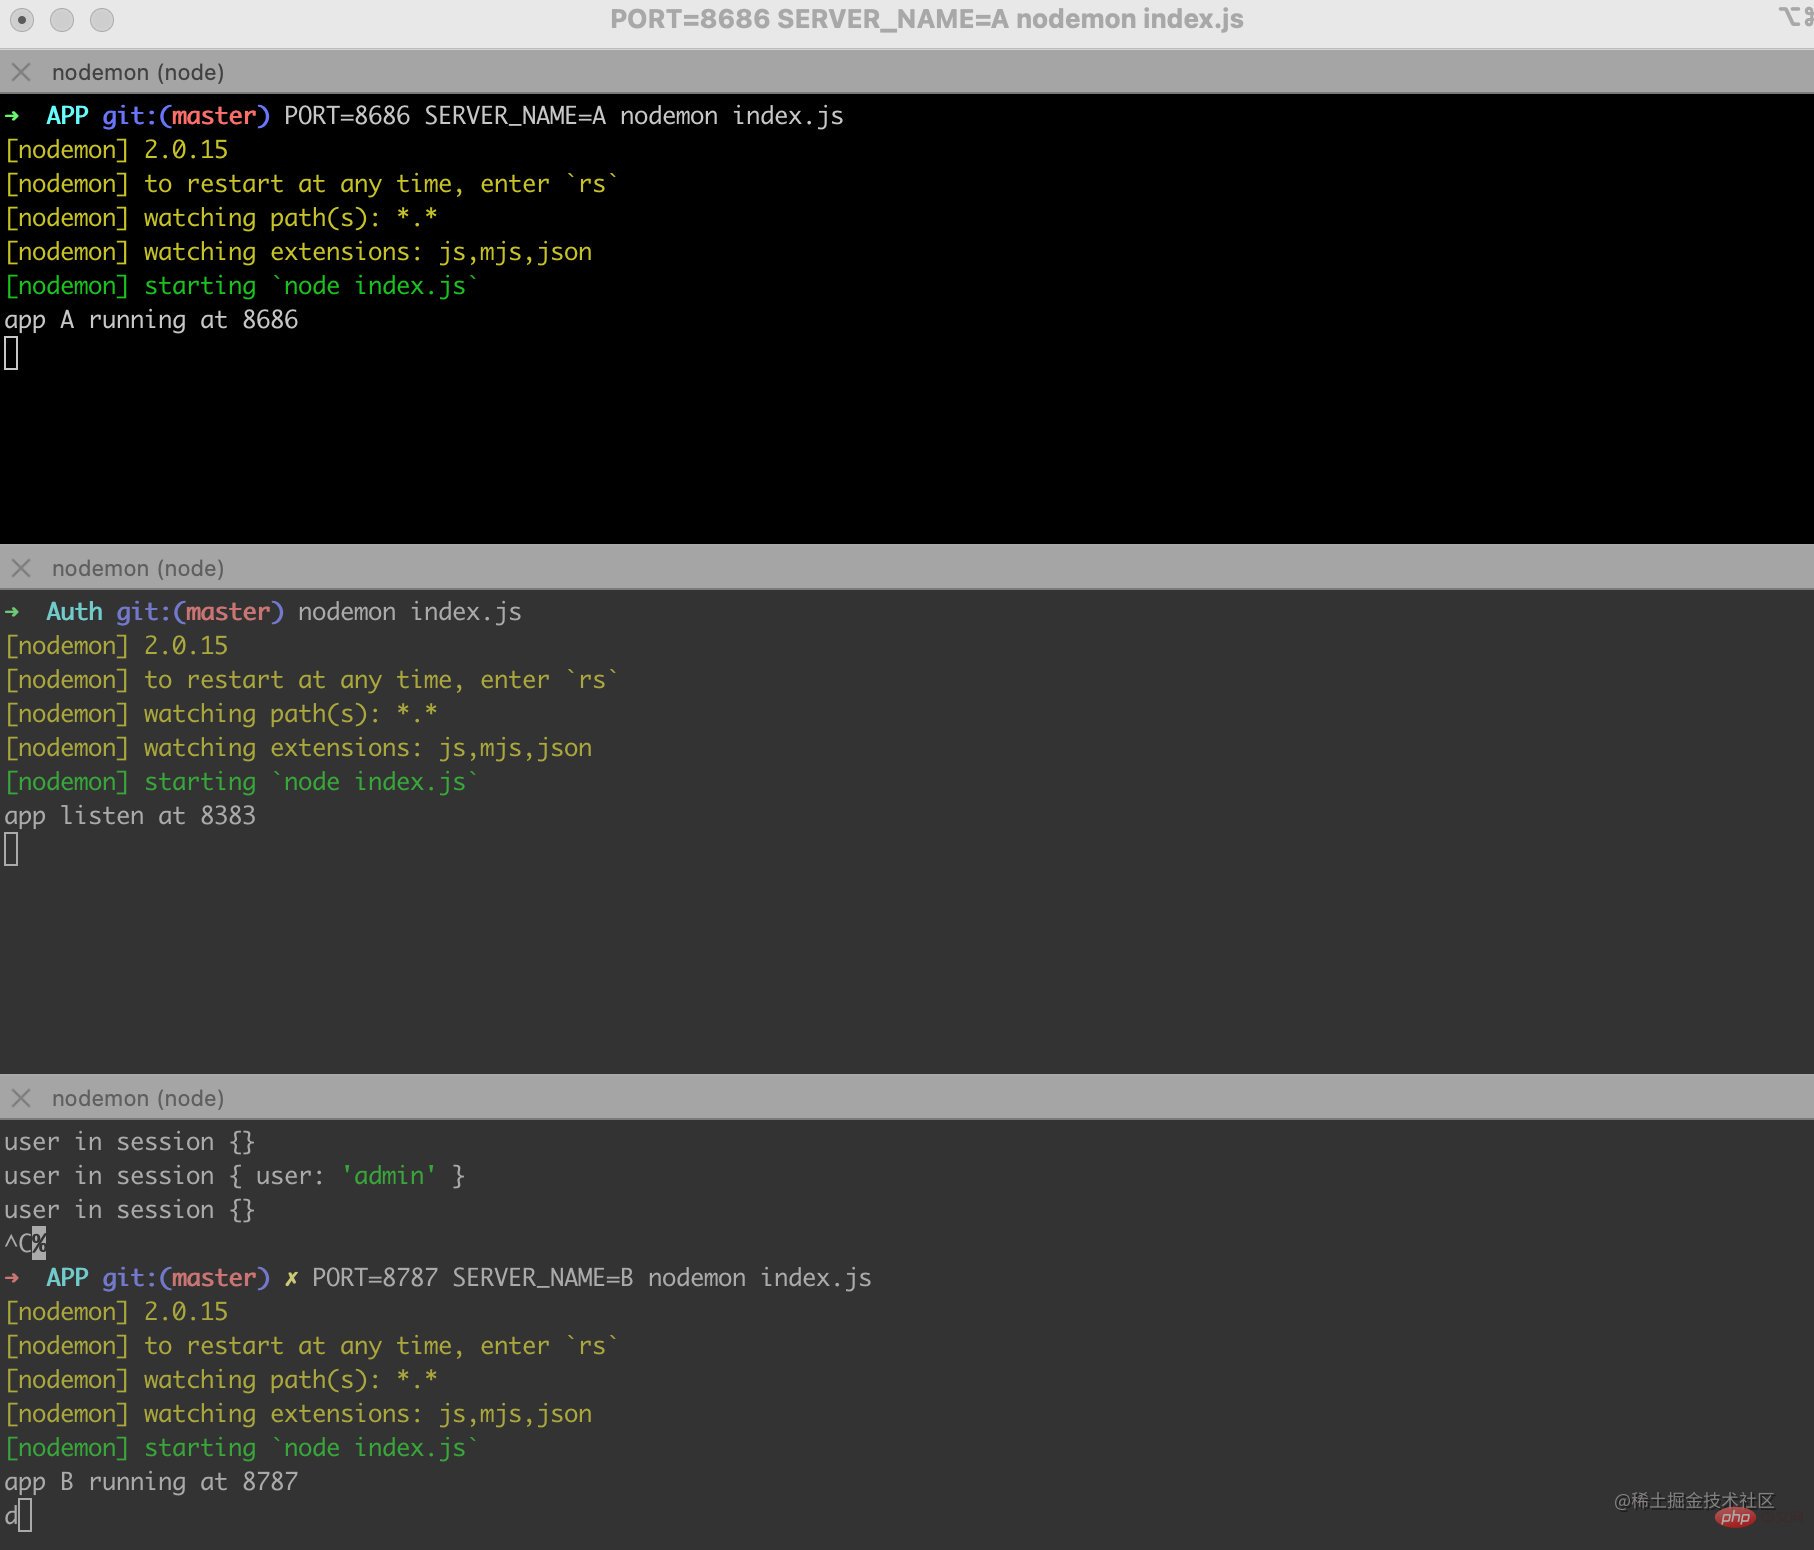
Here we need to start three services to simulate application A, SSO authentication server and application B

The service with port number 8383 here is the SSO authentication server, and the rest: 8686 and :8787 represent application A and application B respectively.
In fact, the codes of Application A and Application B are almost the same. As shown in the figure above, we can set different ports and application names by passing parameters.
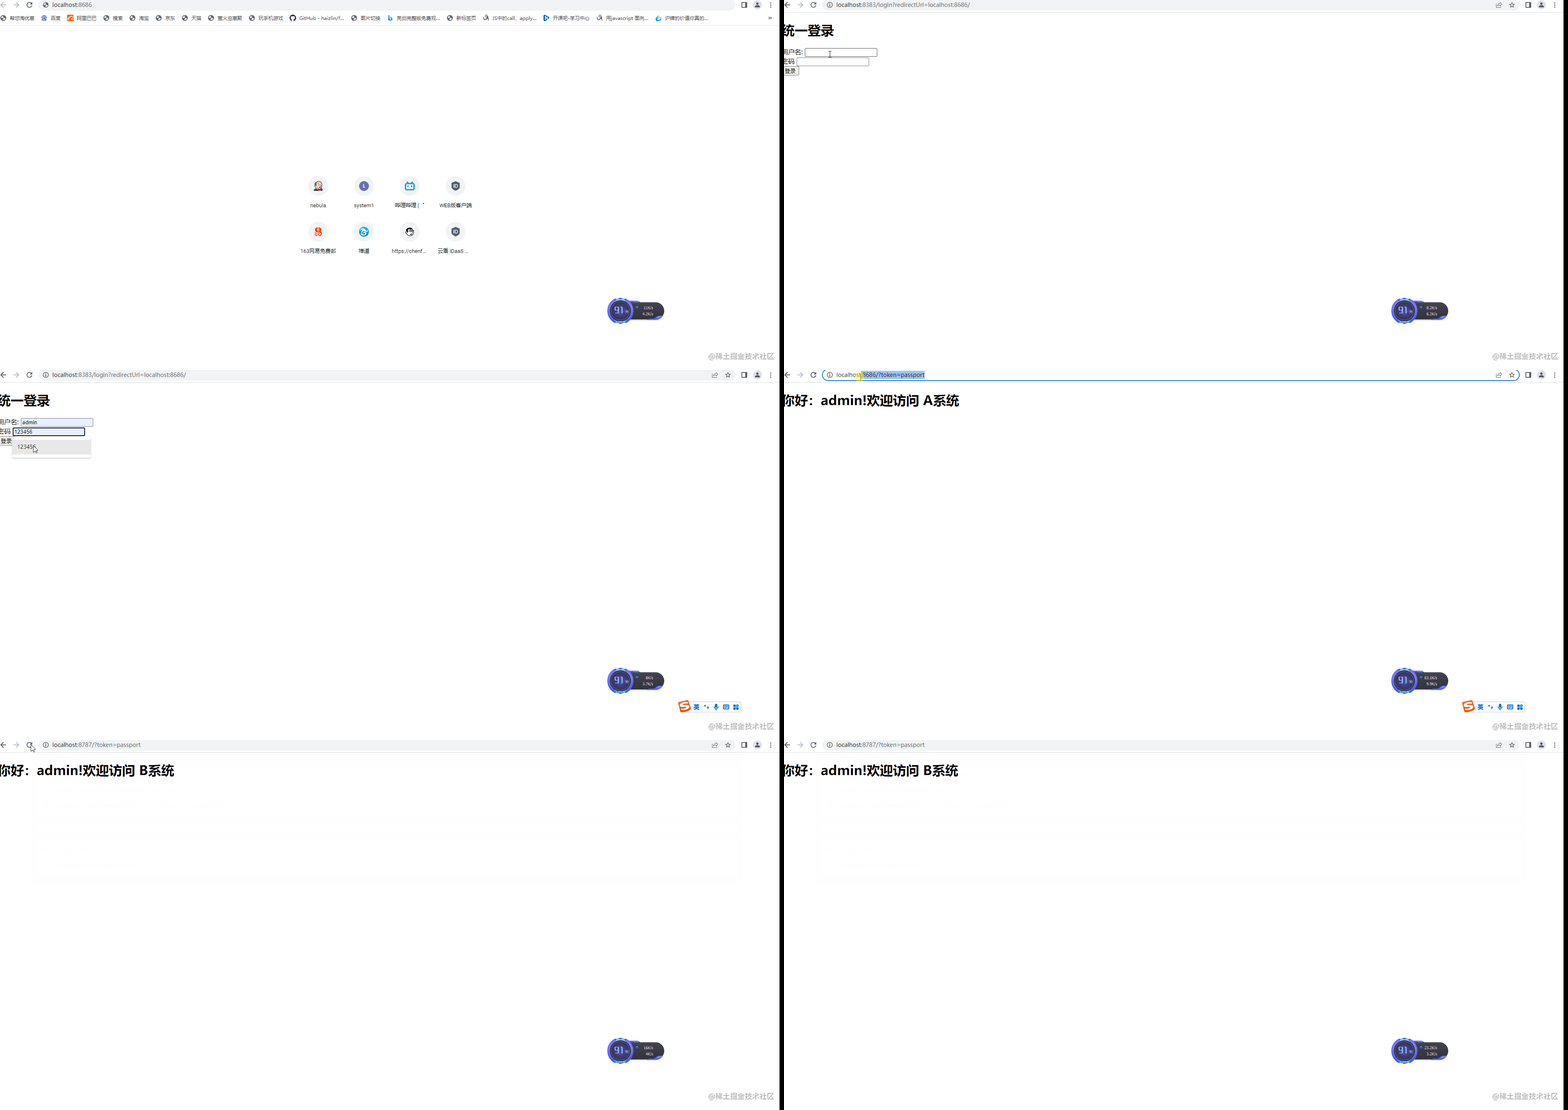
Let’s take a look at the effect first

Jump to the login page for the first visit
Application A determines the login status and jumps to the SSO authentication server
Application A
const Koa=require('koa');
const Router=require('koa-router')
const views=require('koa-views')
const static=require('koa-static')
const path=require('path');
const app=new Koa();
const router=new Router();
const session=require('koa-session')
const koa2Req=require('koa2-request');

//模版引擎相关配置
app.use(views(path.join(__dirname,'./views')),{
    extension:'ejs'
  })
app.keys=['key']

const keyMap={
  '8686':'koa:sess8686',
  '8787':'koa:sess8787'
}
const CONFIG={
    key:keyMap[process.env.PORT] || 'koa:sess',
    maxAge:1000*60*60*24,
    httpOnly:true
}
app.use(session(CONFIG,app))

const system=process.env.SERVER_NAME
router.get("/",async (ctx)=>{
    //通过 session来判断 应用A的登录状态
    let user=ctx.session.user
    if(user){
     //...
    }
    else //1、当用户登录访问应用A时,应用A发现用户未登录(应为服务器没有保存对应的session)
    {
      let token=ctx.query.token
      //第一次登录url上也不会有令牌
      if(!token)
      {
      //1、跳转到SSO认证服务器
       ctx.redirect(`http://localhost:8383/login?redirectUrl=${ctx.host+ctx.originalUrl}`)
      }
      else
      {
        //...
      }
    }
})
app.use(router.routes())


const port=process.env.PORT||8888

app.listen(port,()=>{
    console.log(`app ${system} running at ${port}`)

})The authentication server determines the login status and renders the login page
Authentication Server SSO
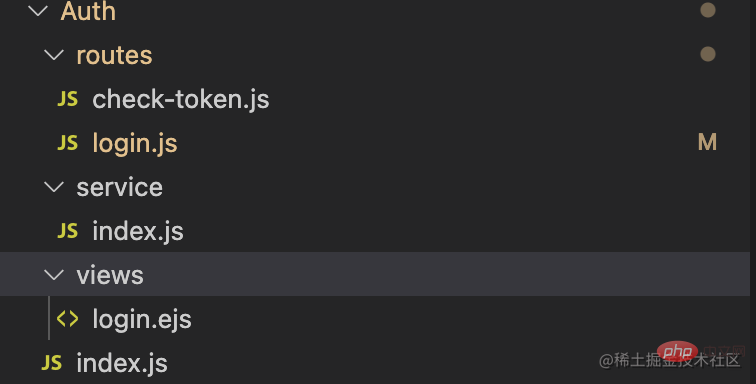
The directory structure of the authentication server is as follows It mainly handles two functions, one is the login logic, and the other is the subsequent verification of the validity of the token. There are routing login.js and check-token.js respectively to handle

Auth /index.js
const Koa=require('koa');
const Router=require('koa-router')
const views=require('koa-views')
const path=require('path');
const app=new Koa();
const router=new Router();
const login=require("./routes/login")
const checkToken=require('./routes/check-token')
const bodyparser=require('koa-bodyparser')

app.use(views(path.join(__dirname,'./views')),{
    extension:'ejs'
  })
app.use(bodyparser())
//处理登录相关的逻辑
router.use('/login',login.routes())
//处理令牌验证的逻辑
router.use('/check_token',checkToken.routes())
app.use(router.routes())

app.listen(8383,()=>{
    console.log(`app listen at 8383`)
})Just now we jumped from application A tohttp://localhost:8383/login?redirectUrl=localhost:8686 to see the logic in login
Auth /routes/login.js
const service = require("../service");
const router=require("koa-router")()


router.get('/',async (ctx)=>{
  const cookies=ctx.cookies;
  const token=cookies.get('token');
  //从cookie中判断应用A的登录态
  if(token && service.isTokenVailid(token)){
    //。。。如果有登录过
  }else{
    //2、SSO认证中心发现用户没有登录过,于是渲染登录页面登录页面;
    await ctx.render('login.ejs',{
        extension:'ejs'
     })
  }
})

//。。。
module.exports=routerLogin page
Auth/views/login.ejs
<html>
<head>
<meta charset="UTF-8">
<meta http-equiv="X-UA-Compatible" content="IE=edge">
<meta name="viewport" content="width=device-width, initial-scale=1.0">
<title>统一登录</title>
</head>
<body>
<h1>统一登录</h1>
<form method="post">
<div>用户名: <input type="text" name="name"/></div>
<div>密码 <input type="text" name="password" /></div>
<div><input type="submit" value='登录'></div>
</form>
</body>
</html>Verify user information and create token
Auth/routes/login.js
router.post('/',async (ctx)=>{
//2、用户填写用户名密码提交登录申请;
const body=ctx.request.body;
const {name,password}=body;
//2、SSO认证中心校验用户信息,
if(name==="admin" && password==="123456"){
//2、创建用户雨SSO认证中心的会话(这时会把信息保存到cookie中),同时创建授权令牌token
const token="passport";
await ctx.cookies.set('token',token,{
maxAge:1000*60*60*24*30,
httpOnly:true
})
if(ctx.query.redirectUrl){
//3、sso认证中心带着令牌跳转到最初的请求地址(应用A)
ctx.redirect(`${ctx.protocol}://${ctx.query.redirectUrl}?token=${token}`)
//回跳地址是 http://localhost:8686/?token=passport
}else{
ctx.body="<h1>登录成功!</h1>"
}
}else{
ctx.response.body={
error:1,
msg:'用户名或密码错误'
}
}
})Carries the token from the authentication server to jump back to application A
Token verification returns resources
Application A
app.use(views(path.join(__dirname,'./views')),{
    extension:'ejs'
  })

//...

const system=process.env.SERVER_NAME
router.get("/",async (ctx)=>{
    let user=ctx.session.user
    if(user){
      //...
    }
    else
    //这时应用A依旧没有登录态 但url上有了令牌 http://localhost:8686/?token=passport
   {
      let token=ctx.query.token
      if(!token)
      {
        //...跳转去SSO登录页面
      }
      else
      //跳回应用A时走这里的逻辑
      {
        //ajax请求 4. 应用A拿到令牌去SSO认证中心认证是否有效,如果返回有效注册应用A
        const url=`://localhost:8383/check_token?token=${token}&t=${new Date().getTime()}`
        let data = await koa2Req(ctx.protocol + url);
        if(data && data.body){
            try {
                const body=JSON.parse(data.body)
                const {error,userId}=body;
                // console.log(error,userId) 0,admin
                if(error==0){
                    if(!userId){
                        ctx.redirect(`http://localhost:8383/login?redirectUrl=${ctx.host+ctx.originalUrl}`)
                        return
                    }
                    //验证通过后注册session,渲染页面
                    //5. 应用A创建与用户之间的会话,展示资源并维持用户登录态
                    ctx.session.user=userId;
                    await ctx.render('index.ejs',{
                        user:userId,
                        system
                    })
                }else{
                    ctx.redirect(`http://localhost:8383/login?redirectUrl=${ctx.host+ctx.originalUrl}`)
                }
            } catch (error) {console.log(error)}


        }
      }
    }
})
app.use(router.routes())

const port=process.env.PORT||8888

app.listen(port,()=>{
    console.log(`app ${system} running at ${port}`)

})The corresponding logic for processing verification tokens in SSO
Auth/routes/check-token
const router=require("koa-router")()
const service=require("../service")

router.get('/',async (ctx)=>{
  const token=ctx.query.token;
  const result={
      error:1
  }
  //当token 是 password时
  if(service.isTokenVailid(token)){
    result.error=0;
    result.userId='admin'
  }
  ctx.body=result


})


module.exports=routerAuth/service/index.js
module.exports={
    isTokenVailid: function(token){
      if(token && token==='passport'){
          return true
      }
      return false
    }
}Now the user can access application A normally, and the user’s login information is available on the SSO server and application A server.
访问应用B
带cookie跳转至SSO认证服务器
应用B
//...

router.get("/",async (ctx)=>{
    let user=ctx.session.user
    if(user){
      //...
    }else{
      let token=ctx.query.token
      //...
      if(!token)
      {
      //同样既没有session也没有令牌,跳转到SSO认证服务器
      //6、当用户访问应用B时,发现用户未登录(SSO认证服务器与应用A应用B不是同一个域,不能提供登录态),跳转到SSO认证中心,并将自己的地址和之前和SSO认证中心会话的cookie信息带入
          ctx.redirect(`http://localhost:8383/login?redirectUrl=${ctx.host+ctx.originalUrl}`)
      }
      else
      {
        //。。。验证令牌的部分
      }
    }
})
app.use(router.routes())

const port=process.env.PORT||8888

app.listen(port,()=>{
    console.log(`app ${system} running at ${port}`)

})从认证服务器携带令牌跳转回应用B
SSO认证服务器 ,再次登录时携带了cookie,因此不会再请求登录页面 Auth/routes/login
//...
router.get('/',async (ctx)=>{
  const cookies=ctx.cookies;
  const token=cookies.get('token');
  //7. SSO认证中心发现用户已登录,跳转回应用B地址,并附上令牌token
  if(token && service.isTokenVailid(token)){
    const redirectUrl=ctx.query.redirectUrl;
    if(redirectUrl){
       //带着令牌跳转回应用B
        ctx.redirect(`${ctx.protocol}://${redirectUrl}?token=${token}`)
    }else{
        ctx.body="<h1>登录成功!</h1>"
    }
  }else{
    //...渲染登录页面
  }
})
//..令牌校验 返回资源
这里的逻辑和5,6两步一样,因为token容易伪造,所以要检验真伪。 应用B
app.use(views(path.join(__dirname,'./views')),{
    extension:'ejs'
  })

//...

const system=process.env.SERVER_NAME
router.get("/",async (ctx)=>{
    let user=ctx.session.user
    if(user){
      //...
    }
    else
    //这时应用B依旧没有登录态 但url上有了令牌 http://localhost:8787/?token=passport
   {
      let token=ctx.query.token
      if(!token)
      {
        //...跳转去SSO登录页面
      }
      else
      //跳回应用B时走这里的逻辑
      {
        //ajax请求 8. 同样的应用B拿到令牌去SSO认证中心认证是否有效,如果返回有效注册应用B
        const url=`://localhost:8383/check_token?token=${token}&t=${new Date().getTime()}`
        let data = await koa2Req(ctx.protocol + url);
        if(data && data.body){
            try {
                const body=JSON.parse(data.body)
                const {error,userId}=body;
                // console.log(error,userId) 0,admin
                if(error==0){
                    if(!userId){
                        ctx.redirect(`http://localhost:8383/login?redirectUrl=${ctx.host+ctx.originalUrl}`)
                        return
                    }
                    //验证通过后注册session,渲染页面
                    //9. 应用B创建与用户之间的会话,展示资源并维持用户登录态
                    ctx.session.user=userId;
                    await ctx.render('index.ejs',{
                        user:userId,
                        system
                    })
                }else{
                    ctx.redirect(`http://localhost:8383/login?redirectUrl=${ctx.host+ctx.originalUrl}`)
                }
            } catch (error) {console.log(error)}


        }
      }
    }
})
app.use(router.routes())

const port=process.env.PORT||8888

app.listen(port,()=>{
    console.log(`app ${system} running at ${port}`)

})至此单点登录的大部分逻辑都已经完成,之后再session有效期内再访问页面,就不需要再登录,直接返回资源
router.get("/",async (ctx)=>{
//如果session中有用户信息,说明已经登录过,直接返回请求资源
    let user=ctx.session.user
    if(user){
        await ctx.render('index.ejs',{
              user,
              system
        })
    }
    //...
})原文地址:https://juejin.cn/post/7088343138905325582
作者:YoYo君
更多node相关知识,请访问:nodejs 教程!
The above is the detailed content of Let's talk about how to implement single sign-on (SSO) based on Node. For more information, please follow other related articles on the PHP Chinese website!

Hot AI Tools

Undresser.AI Undress
AI-powered app for creating realistic nude photos

AI Clothes Remover
Online AI tool for removing clothes from photos.

Undress AI Tool
Undress images for free

Clothoff.io
AI clothes remover

AI Hentai Generator
Generate AI Hentai for free.

Hot Article

Hot Tools

Notepad++7.3.1
Easy-to-use and free code editor

SublimeText3 Chinese version
Chinese version, very easy to use

Zend Studio 13.0.1
Powerful PHP integrated development environment

Dreamweaver CS6
Visual web development tools

SublimeText3 Mac version
God-level code editing software (SublimeText3)

Hot Topics
 How to delete node in nvm
Dec 29, 2022 am 10:07 AM
How to delete node with nvm: 1. Download "nvm-setup.zip" and install it on the C drive; 2. Configure environment variables and check the version number through the "nvm -v" command; 3. Use the "nvm install" command Install node; 4. Delete the installed node through the "nvm uninstall" command.
 How to use express to handle file upload in node project
Mar 28, 2023 pm 07:28 PM
How to handle file upload? The following article will introduce to you how to use express to handle file uploads in the node project. I hope it will be helpful to you!
 An in-depth analysis of Node's process management tool 'pm2”
Apr 03, 2023 pm 06:02 PM
This article will share with you Node's process management tool "pm2", and talk about why pm2 is needed, how to install and use pm2, I hope it will be helpful to everyone!
 Pi Node Teaching: What is a Pi Node? How to install and set up Pi Node?
Mar 05, 2025 pm 05:57 PM
Detailed explanation and installation guide for PiNetwork nodes This article will introduce the PiNetwork ecosystem in detail - Pi nodes, a key role in the PiNetwork ecosystem, and provide complete steps for installation and configuration. After the launch of the PiNetwork blockchain test network, Pi nodes have become an important part of many pioneers actively participating in the testing, preparing for the upcoming main network release. If you don’t know PiNetwork yet, please refer to what is Picoin? What is the price for listing? Pi usage, mining and security analysis. What is PiNetwork? The PiNetwork project started in 2019 and owns its exclusive cryptocurrency Pi Coin. The project aims to create a one that everyone can participate
 How to use PHP to implement efficient and stable SSO single sign-on
Oct 15, 2023 pm 02:49 PM
How to use PHP to achieve efficient and stable SSO single sign-on Introduction: With the popularity of Internet applications, users are faced with a large number of registration and login processes. In order to improve user experience and reduce user registration and login intervals, many websites and applications have begun to adopt single sign-on (Single Sign-On, referred to as SSO) technology. This article will introduce how to use PHP to implement efficient and stable SSO single sign-on and provide specific code examples. 1. SSO single sign-on principle SSO single sign-on is an identity authentication solution
 Let's talk about how to use pkg to package Node.js projects into executable files.
Dec 02, 2022 pm 09:06 PM
How to package nodejs executable file with pkg? The following article will introduce to you how to use pkg to package a Node project into an executable file. I hope it will be helpful to you!
 Token-based authentication with Angular and Node
Sep 01, 2023 pm 02:01 PM
Authentication is one of the most important parts of any web application. This tutorial discusses token-based authentication systems and how they differ from traditional login systems. By the end of this tutorial, you will see a fully working demo written in Angular and Node.js. Traditional Authentication Systems Before moving on to token-based authentication systems, let’s take a look at traditional authentication systems. The user provides their username and password in the login form and clicks Login. After making the request, authenticate the user on the backend by querying the database. If the request is valid, a session is created using the user information obtained from the database, and the session information is returned in the response header so that the session ID is stored in the browser. Provides access to applications subject to
 What to do if node server.js reports an error
Dec 29, 2022 pm 04:19 PM
The node server.js error is because the path is incorrect. The solution is: 1. Enter the cmd window; 2. Switch to "server.js" under the project path; 3. Re-execute the "node server.js" command to solve the error problem. .


