
 Web Front-end
Front-end Q&A
Tool sharing: realizing automated management of front-end buried points
Web Front-end
Front-end Q&A
Tool sharing: realizing automated management of front-end buried points
Tool sharing: realizing automated management of front-end buried points


Buried points have always been an important part of the H5 project, and buried point data is an important basis for later business improvement and technical optimization. [Recommended learning: web front-end, programming teaching]
In daily work, students from product or business often ask, "This project now has What are the buried points?", "Where is this buried point used?" Questions like this are basically asking and checking the code once, which is very inefficient.

This may have something to do with the nature of the buried point itself. Buried points are relatively independent functions. As iterations proceed, it is difficult for developers to remember the purpose of buried points. For the purpose of self-test and verification, developers also have to sort out the hidden data in the project. Therefore, combined with the current scenario, a tool can be implemented: by scanning the code, analyzing the code related to buried points, processing it, and converting it into specific data for subsequent use in other management platforms.
Implementation ideas
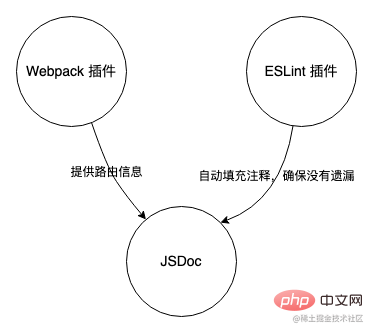
This tool can be roughly divided into three parts, JSDoc Extraction of buried points, routing dependency analysis and ESLint plugin.
- JSDoc is a tool for generating API documentation based on annotation information in JavaScript. Combined with this feature of JSDoc, this tracking tool uses JSDoc as the core part to output the tracking data in the code.
- The Webpack plug-in serves as an auxiliary to provide routing information for JSDoc.
- The ESLint plug-in is used as a final check to ensure that the buried code in the file has corresponding JSDoc comments.
Customized JSDoc tag embedding point
We know that JSDoc can output a document based on comments in the code . First, we customize a JSDoc tag to mark it as a hidden comment, so that the interference of other comments can be filtered out during subsequent processing. Combining the code used in the specific project, a flow chart like this can be drawn:
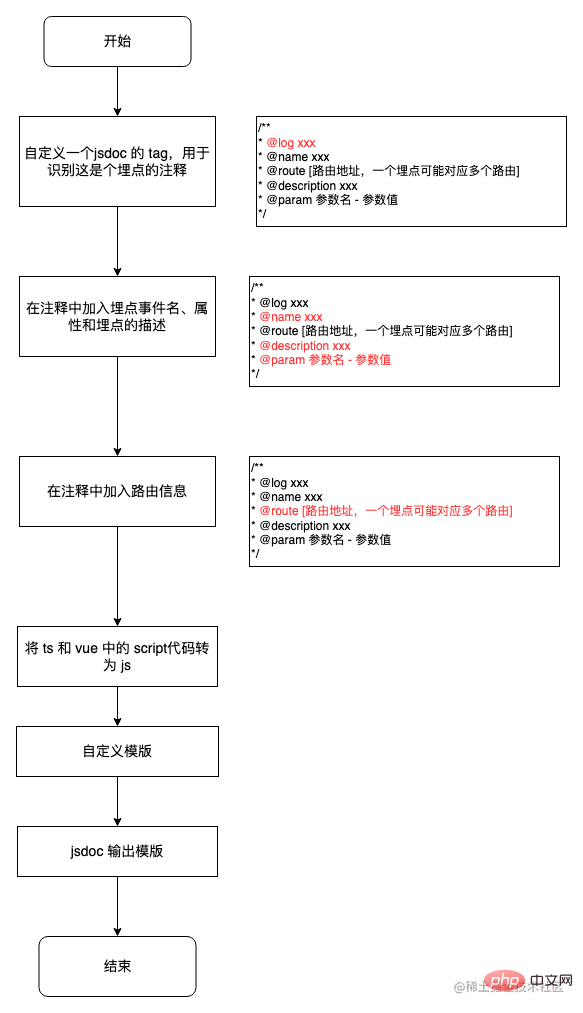
The following is the specific code implementation process.
Write a JSDoc plug-in and customize a tag:
// jsdoc.plugin.js
// 自定义一个 @log,含有 @log 才是埋点的注释
exports.defineTags = function (dictionary) {
  dictionary.defineTag('log', {
    canHaveName: true,
    onTagged: function (doclet, tag) {
      doclet.meta.log = tag.text;
    },
  });
};Parse .ts and .vue files.
// jsdoc.plugin.js
exports.handlers = {
  beforeParse: function (e) {
    // 对文件预处理
    if (/.vue/.test(e.filename)) {
      // 解析 vue 文件
      const component = compiler.parseComponent(e.source);
      // 获取 vue 文件的 script 代码
      const ast = parse.parse(component.script.content, {
        // ...
      });
    }

    if (/.ts/.test(e.filename)) {
      // ts 转 js
    }
  },
};Customized JSDoc template.
// publish.js
exports.publish = function (taffyData, opts, tutorials) {
  // ...
  data().each(function (doclet) {
    // 有 log 这个 tag 的才是埋点注释
    if (doclet.meta && doclet.meta.log) {
      doclet.tags?.forEach((item) => {
        // 获取对应的路由地址
      });

      // 拿到埋点数据
      logData.push({});
    }
  });

  // 输出 md 文档
  fs.writeFileSync(outpath, mdContent, 'utf8');
};At this point, all hidden points in the code can be completely output. At this time, let’s take a look at the current capabilities of this tool:
- Automatically extract buried point information and generate buried point documents: ✅
- Automatically add custom tags to buried point comments (@log ): ❌
- Automatically add reported buried point information to hidden point comments: ❌
- Automatically add routing information to buried point comments: ❌
- Automatically add buried point comments to hidden point comments Buried point description information: ❌
- Automatically prompt uncommented buried point code: ❌
Through the above combing, we can see:
- Required Manually add comments to each buried point
- You need to manually check the route corresponding to each buried point
- What if you forget to add comments to the buried point?
The original intention of making this tool is to save some repetitive and tedious work. If it adds some other workload in order to automatically input a document from the code, it will be a bit more than worth the gain. Through the analysis of these problems, the following solutions can be derived:
- Need to manually add comments to each hidden point-> Automatically fill in the code-> ESLint fix function/VSCode plug-in
- You need to manually check the route corresponding to each hidden point-> Automatically find the route corresponding to the component-> Webpack dependency analysis
- What if you forget to comment the hidden point? -> There will be a prompt if you forget to write a comment -> ESLint plug-in
At this point, the solution to the problem has become clear. Next, let’s take a look at the implementation process of the webpack plug-in and the ESLint plug-in.
Routing dependency analysis
webpack itself comes with Dependency analysis, and you can easily get the parent-child relationship between components.
compiler.hooks.normalModuleFactory.tap('routeAnalysePlugin', (nmf) => {
  nmf.hooks.afterResolve.tapAsync('routeAnalysePlugin', (result, callback) => {
    const { resourceResolveData } = result;
    // 子组件
    const path = resourceResolveData.path;

    // 父组件
    const fatherPath = resourceResolveData.context.issuer;

    // 只获取 vue 文件的依赖关系
    if (/.vue/.test(path) && /.vue/.test(fatherPath)) {
      // 将组件间的父子关系存到变量中
    }
  });
});Put the dependencies between components into the data format we want
[
  {
    "path": "src/views/register-v2/index.vue",
    "deps": [
      {
        "path": "src/components/landing-banner/index.vue",
        "deps": []
      }
    ]
  }
  // ...
]组件之间的依赖关系有了,接下来就是找到组件和路由的对应关系,这里我们用 AST 来解析路由文件,获取路由和组件的对应关系。
// 遍历路由文件
for (let i = 0; i < this.routePaths.length; i++) {
// ...
traverse(ast, {
enter(path) {
// 找出组件和路由的对应关系
path.node.properties.forEach((item) => {
// 组件
if (item.key.name === 'component') {
}
// 路由地址
if (item.key.name === 'path') {
}
});
},
});
}同样地,把组件与路由的映射关系拼成合适的数据格式。
{
  "src/views/register-v3/index.vue": "/register"
  // ...
}再将路由的映射关系和组件间的依赖关系整合到一起,得出每个组件与路由的对应关系。
{
  "src/components/landing-banner/index.vue": [
    "/register_v2",
    "/register"
    //...
  ]
  // ...
}因为使用 AST 遍历的方式来解析路由文件,目前支持的解析的路由文件写法有以下四种,基本上满足了当前的场景:
const page1 = (resolve) => {
  require.ensure(
    [],
    () => {
      resolve(require('page1.vue'));
    },
    'page1',
  );
};

const page2 = () =>
  import(
    /* webpackChunkName: "page2" */
    'page2.vue'
  );

export default [
  { path: '/page1', component: page1 },
  { path: '/page2', component: page2 },
  {
    path: '/page3',
    component: (resolve) => {
      require.ensure(
        [],
        () => {
          resolve(require('page3.vue'));
        },
        'page3',
      );
    },
  },

  {
    path: '/page4',
    component: () =>
      import(
        /* webpackChunkName: "page4" */
        'page4.vue'
      ),
  },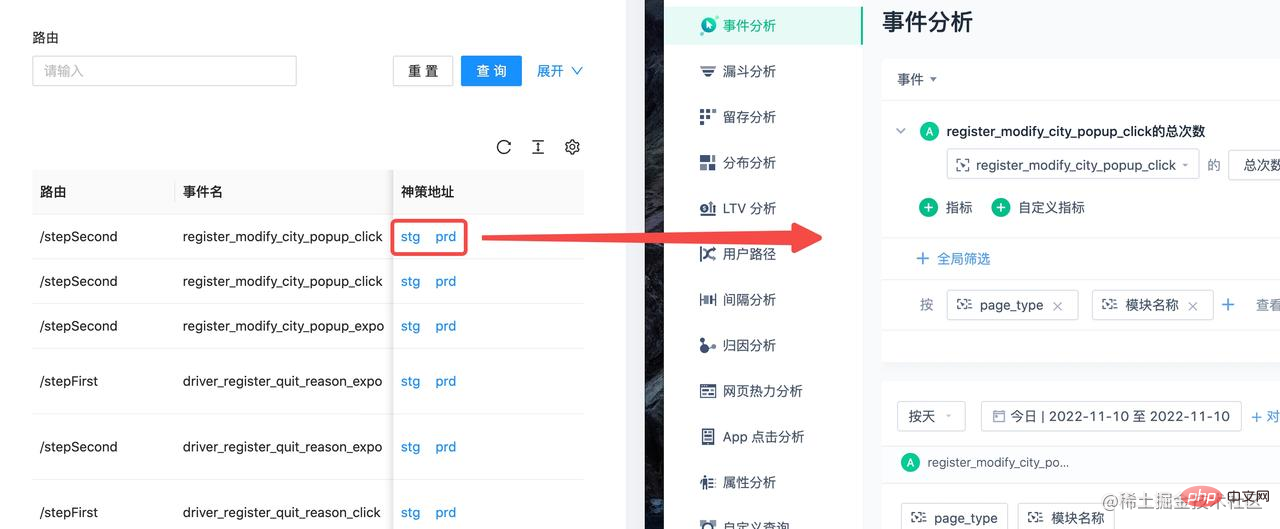
];再得到了上面的对应关系之后,可以把埋点数据放到传到埋点管理平台上,从而实现一键查询:
编写 ESLint 插件
先来看看代码中埋点上报的三种方式:
// 神策 sdk
sensors.track('xxx', {});

// 挂载到 Vue 实例中
this.$sa.track('xxx', {});

// 装饰器
@SensorTrack('xxx', {})观察上面三种方式,可以知道埋点上报是通过 track 函数和 SensorTrack 函数,所以我们的 ESLint 插件对这两个函数进行校验。
function create(context) {
  // 调用 track 函数的对象
  const checkList = ['sensor', 'sensors', '$sa', 'sa'];

  return {
    Literal: function (node) {
      // ...
      // 调用埋点函数而缺少注释时
      if (
        isNoComment &&
        ((isTrack && isSensor) || (is$Track && isThisExpression))
      ) {
        context.report({
          node,
          messageId: 'missingComment',
          fix: function (fixer) {
            // 自动修复
          },
        });
      }

      // 使用修饰器但没有注释时
      if (
        callee.name === 'SensorTrack' &&
        sourceCode.getCommentsBefore(node).length === 0
      ) {
        context.report({
          node,
          messageId: 'missingComment',
          fix: function (fixer) {
            // 自动修复
          },
        });
      }
    },
  };
}看下完成后的效果:
效果对比
我们再来对比下优化前后的区别:
| 优化前 | 优化后 | |
|---|---|---|
| 自动提取埋点信息,生成埋点文档 | ✅ | ✅ |
| 自动给埋点注释添加自定义 tag(@log) | ❌ | ✅ |
| 自动给埋点注释添加上报的埋点信息 | ❌ | ✅ |
| 自动给埋点注释添加路由信息 | ❌ | ✅ |
| 自动给埋点注释添加埋点描述信息 | ❌ | ❌ |
| 自动提示没有注释的埋点代码 | ❌ | ✅ |
优化之后除了整个流程基本都由工具自动完成,剩下一个埋点描述信息。因为埋点的描述信息只是为了让我们更好地理解这个埋点,本身并不在上报的代码中,所以工具没有办法自动生成,但是我们可以直接在产品提供的埋点文档中拷贝过来完成这一步。
总结
在项目中接入这个工具之后,可以快速地知道项目的埋点有哪些以及各个埋点所在的页面,也方便我们对埋点的梳理,同时利用导出的埋点数据开发后台应用,有效地提升了开发者效率。
这个工具的实现是在 JSDoc、webpack 和 ESLint 插件的加持下水到渠成的,说是水到渠成是因为一开始的想法只是做到第一步,先有个一键查询功能和能够输出一份文档用着先。但是第一版出来后发现要手动去处理这些埋点注释还是比较繁琐,恰巧平常开发中常见的 webpack 插件和 ESLint 插件可以很好地解决这些问题,于是便有路由依赖分析和 ESLint 插件。像是《牧羊少年奇幻之旅》中所说的,“如果你下定决心要做一件事情,整个宇宙都会合力帮助你。”
The above is the detailed content of Tool sharing: realizing automated management of front-end buried points. For more information, please follow other related articles on the PHP Chinese website!

Hot AI Tools

Undresser.AI Undress
AI-powered app for creating realistic nude photos

AI Clothes Remover
Online AI tool for removing clothes from photos.

Undress AI Tool
Undress images for free

Clothoff.io
AI clothes remover

AI Hentai Generator
Generate AI Hentai for free.

Hot Article
Hot Tools

Notepad++7.3.1
Easy-to-use and free code editor

SublimeText3 Chinese version
Chinese version, very easy to use

Zend Studio 13.0.1
Powerful PHP integrated development environment

Dreamweaver CS6
Visual web development tools

SublimeText3 Mac version
God-level code editing software (SublimeText3)
Hot Topics
 1375
1375
 52
52

 PHP and Vue: a perfect pairing of front-end development tools
Mar 16, 2024 pm 12:09 PM
PHP and Vue: a perfect pairing of front-end development tools
Mar 16, 2024 pm 12:09 PM
PHP and Vue: a perfect pairing of front-end development tools. In today's era of rapid development of the Internet, front-end development has become increasingly important. As users have higher and higher requirements for the experience of websites and applications, front-end developers need to use more efficient and flexible tools to create responsive and interactive interfaces. As two important technologies in the field of front-end development, PHP and Vue.js can be regarded as perfect tools when paired together. This article will explore the combination of PHP and Vue, as well as detailed code examples to help readers better understand and apply these two
 Questions frequently asked by front-end interviewers
Mar 19, 2024 pm 02:24 PM
Questions frequently asked by front-end interviewers
Mar 19, 2024 pm 02:24 PM
In front-end development interviews, common questions cover a wide range of topics, including HTML/CSS basics, JavaScript basics, frameworks and libraries, project experience, algorithms and data structures, performance optimization, cross-domain requests, front-end engineering, design patterns, and new technologies and trends. . Interviewer questions are designed to assess the candidate's technical skills, project experience, and understanding of industry trends. Therefore, candidates should be fully prepared in these areas to demonstrate their abilities and expertise.
 What are the benefits of web standards
Sep 20, 2023 pm 03:34 PM
What are the benefits of web standards
Sep 20, 2023 pm 03:34 PM
The benefits of web standards include providing better cross-platform compatibility, accessibility, performance, search engine rankings, development and maintenance costs, user experience, and code maintainability and reusability. Detailed description: 1. Cross-platform compatibility ensures that the website can display and run correctly on different operating systems, browsers and devices; 2. Improving accessibility ensures that the website is accessible to all users; 3. , Speed up website loading speed, users can access and browse the website faster, provide better user experience; 4. Improve search engine rankings, etc.
 Is Django front-end or back-end? check it out!
Jan 19, 2024 am 08:37 AM
Is Django front-end or back-end? check it out!
Jan 19, 2024 am 08:37 AM
Django is a web application framework written in Python that emphasizes rapid development and clean methods. Although Django is a web framework, to answer the question whether Django is a front-end or a back-end, you need to have a deep understanding of the concepts of front-end and back-end. The front end refers to the interface that users directly interact with, and the back end refers to server-side programs. They interact with data through the HTTP protocol. When the front-end and back-end are separated, the front-end and back-end programs can be developed independently to implement business logic and interactive effects respectively, and data exchange.
 What are the default ports for web standards?
Sep 20, 2023 pm 04:05 PM
What are the default ports for web standards?
Sep 20, 2023 pm 04:05 PM
The default ports of the web standard are: 1. HTTP, the default port number is 80; 2. HTTPS, the default port number is 443; 3. FTP, the default port number is 21; 4. SSH, the default port number is 22; 5. Telnet , the default port number is 23; 6. SMTP, the default port number is 25; 7. POP3, the default port number is 110; 8. IMAP, the default port number is 143; 9. DNS, the default port number is 53; 10. RDP , the default port number is 3389 and so on.
 C# development experience sharing: front-end and back-end collaborative development skills
Nov 23, 2023 am 10:13 AM
C# development experience sharing: front-end and back-end collaborative development skills
Nov 23, 2023 am 10:13 AM
As a C# developer, our development work usually includes front-end and back-end development. As technology develops and the complexity of projects increases, the collaborative development of front-end and back-end has become more and more important and complex. This article will share some front-end and back-end collaborative development techniques to help C# developers complete development work more efficiently. After determining the interface specifications, collaborative development of the front-end and back-end is inseparable from the interaction of API interfaces. To ensure the smooth progress of front-end and back-end collaborative development, the most important thing is to define good interface specifications. Interface specification involves the name of the interface
 Exploring Go language front-end technology: a new vision for front-end development
Mar 28, 2024 pm 01:06 PM
Exploring Go language front-end technology: a new vision for front-end development
Mar 28, 2024 pm 01:06 PM
As a fast and efficient programming language, Go language is widely popular in the field of back-end development. However, few people associate Go language with front-end development. In fact, using Go language for front-end development can not only improve efficiency, but also bring new horizons to developers. This article will explore the possibility of using the Go language for front-end development and provide specific code examples to help readers better understand this area. In traditional front-end development, JavaScript, HTML, and CSS are often used to build user interfaces
 How to implement instant messaging on the front end
Oct 09, 2023 pm 02:47 PM
How to implement instant messaging on the front end
Oct 09, 2023 pm 02:47 PM
Methods for implementing instant messaging include WebSocket, Long Polling, Server-Sent Events, WebRTC, etc. Detailed introduction: 1. WebSocket, which can establish a persistent connection between the client and the server to achieve real-time two-way communication. The front end can use the WebSocket API to create a WebSocket connection and achieve instant messaging by sending and receiving messages; 2. Long Polling, a technology that simulates real-time communication, etc.
