 Web Front-end
 Front-end Q&A
 What should I do if there is no syntax highlighting when writing vue in vscode?
What should I do if there is no syntax highlighting when writing vue in vscode?
Solution: 1. Open vscode and click on the extension function; 2. Search and install the Vetur plug-in in the opened window; 3. In the top menu, click "File" - "Preferences" - " Settings"-"User"-"Text Editor", find and edit the "setting.json" file; 4. Find "files.associations" in the configuration file, add the corresponding code in it, and save the file; 5. Restart vscode. Can.

The operating environment of this tutorial: windows7 system, vue3&&Visual Studio Code version 1.74.0, DELL G3 computer.
vscode sets vue syntax highlighting
1. Install the Vetur plug-in in the editor
1.1. Open the vs code editor, and then click on the extended function on the left, as shown below

1.2. Enter in the extended function window Vetur, select Install from the searched plug-in, as shown below
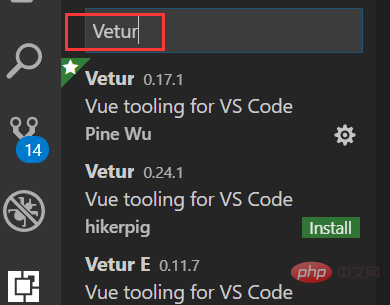
1.3. After successful installation, as shown below Picture:
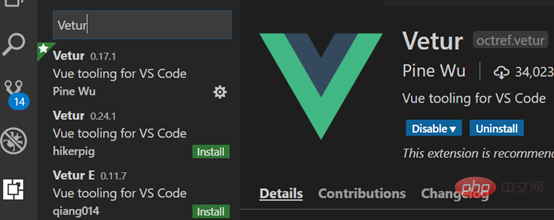
##2. Configure relevant information in the editor
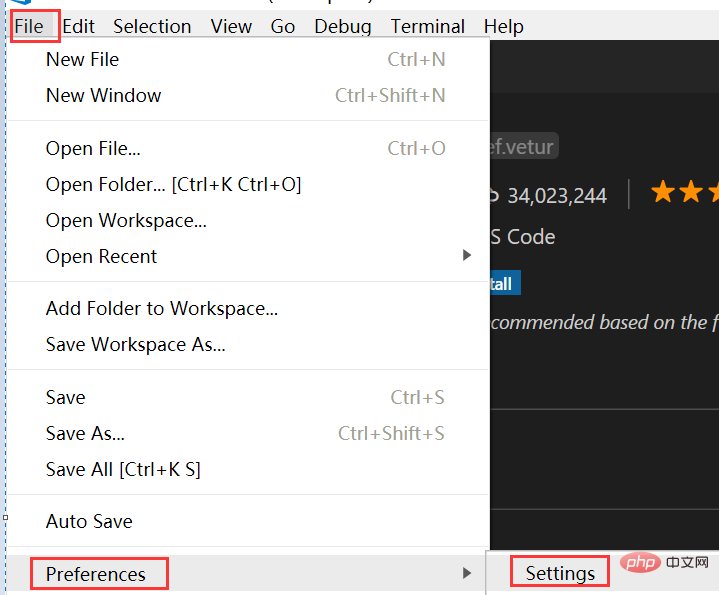
2.1. Open VScode editor, top menu:[File]->Preferences->Settings
English version:File-> Preferences-> Settings
user -> Text editor , drop down to find and edit in setting.json
English version: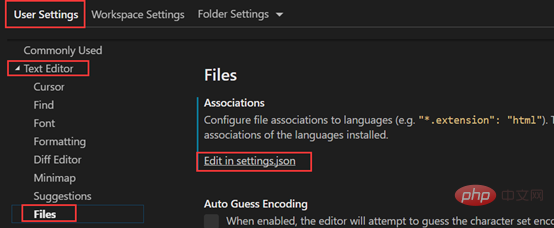


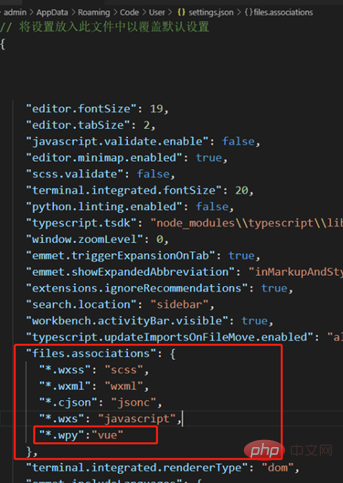
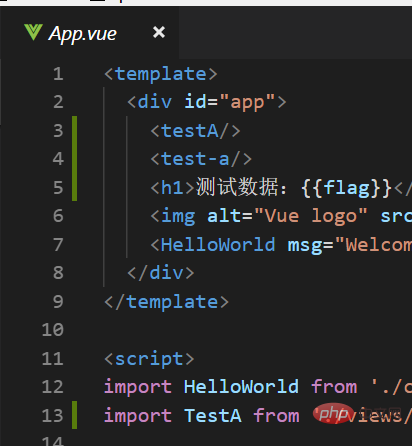
vuejs video tutorial, web front-end development]
The above is the detailed content of What should I do if there is no syntax highlighting when writing vue in vscode?. For more information, please follow other related articles on the PHP Chinese website!

Hot AI Tools

Undresser.AI Undress
AI-powered app for creating realistic nude photos

AI Clothes Remover
Online AI tool for removing clothes from photos.

Undress AI Tool
Undress images for free

Clothoff.io
AI clothes remover

AI Hentai Generator
Generate AI Hentai for free.

Hot Article

Hot Tools

Notepad++7.3.1
Easy-to-use and free code editor

SublimeText3 Chinese version
Chinese version, very easy to use

Zend Studio 13.0.1
Powerful PHP integrated development environment

Dreamweaver CS6
Visual web development tools

SublimeText3 Mac version
God-level code editing software (SublimeText3)

Hot Topics
 How to use echarts in vue
May 09, 2024 pm 04:24 PM
Using ECharts in Vue makes it easy to add data visualization capabilities to your application. Specific steps include: installing ECharts and Vue ECharts packages, introducing ECharts, creating chart components, configuring options, using chart components, making charts responsive to Vue data, adding interactive features, and using advanced usage.
 How to close the project folder in vscode_How to close the project folder in vscode
May 09, 2024 pm 02:13 PM
1. After opening the interface, click the mouse to select an item that needs to be deleted. 2. Find the close folder option in the file menu in the upper left corner. 3. Finally, find the specific location of the file in the document and right-click to delete it.
 The role of export default in vue
May 09, 2024 pm 06:48 PM
Question: What is the role of export default in Vue? Detailed description: export default defines the default export of the component. When importing, components are automatically imported. Simplify the import process, improve clarity and prevent conflicts. Commonly used for exporting individual components, using both named and default exports, and registering global components.
 How to use map function in vue
May 09, 2024 pm 06:54 PM
The Vue.js map function is a built-in higher-order function that creates a new array where each element is the transformed result of each element in the original array. The syntax is map(callbackFn), where callbackFn receives each element in the array as the first argument, optionally the index as the second argument, and returns a value. The map function does not change the original array.
 How to set the vertical scroll sensitivity value in Vscode. How to set the vertical scroll sensitivity value.
May 09, 2024 pm 02:40 PM
1. First, after opening the Vscode interface, click the Settings option in the Git menu 2. Then, click the Advanced button in the text editor column 3. Finally, scroll down the page with the mouse and find the vertical scroll sensitivity option in the scroll sensitivity section , just modify the parameters
 How To Set Up Visual Studio Code (VS Code) for PHP Development
Dec 20, 2024 am 11:31 AM
Visual Studio Code, also known as VS Code, is a free source code editor — or integrated development environment (IDE) — available for all major operating systems. With a large collection of extensions for many programming languages, VS Code can be c
 How to set search conditions in vscode vscode search condition setting tutorial
May 09, 2024 pm 01:28 PM
1. After opening the interface, click the search icon on the left. 2. Enter the keyword content you need to search in the dialog box. 3. Press the Enter key to display all matching items. 4. Select a directory to search. 5. Right-click the mouse and select the FindinFolder button 6. You can limit the search scope to this directory. After pressing Enter again to query, we can see that the items being searched have been greatly reduced.
 The role of onmounted in vue
May 09, 2024 pm 02:51 PM
onMounted is a component mounting life cycle hook in Vue. Its function is to perform initialization operations after the component is mounted to the DOM, such as obtaining references to DOM elements, setting data, sending HTTP requests, registering event listeners, etc. It is only called once when the component is mounted. If you need to perform operations after the component is updated or before it is destroyed, you can use other lifecycle hooks.


