

Detailed explanation of how to manipulate DOM elements in angular

How to correctly manipulate DOM elements in Angular? The following article will introduce to you how to operate DOM elements in angular. I hope it will be helpful to you!

To obtain DOM elements in angular, you can use
javascript's native API, or introduce jQuery throughjquery objectOperation DOM, but angular has provided us with the corresponding API (ElementRef) to obtain DOM elements, so there is no need to use the native API or jQuery. [Related tutorial recommendations: "angular tutorial"]
ElementRef Get the DOM element
1. Create TestComponentComponent, the template is as follows: test.component.html
<div>
	<p>你好</p>
</div>
<div>
    <span>世界</span>
</div>
<h1 id="标题">标题</h1>
<pass-badge id="component" textColor="red">组件</pass-badge>2. Write the test.component.ts file
import { Component, OnInit } from '@angular/core';
// 1、导入 ElementRef 类
import { ElementRef} from '@angular/core';
import { PassBadge } from './compoment/pass-badge/pass-badge.component'

@Component({
  selector: 'app-test',
  templateUrl: './test.component.html',
  styleUrls: ['./test.component.css'],
  declarations: [ PassBadge ]
})
export class TestComponent implements OnInit {
	// 2、将 ElementRef 类注入 test 组件中
    constructor(private el:ElementRef) {}

    ngOnInit() {
    	// 3、获取 DOM 元素
        console.log(this.el.nativeElement)
        console.log(this.el.nativeElement.querySelector('#component'))
    }
}us Let’s see what this.el.nativeElement is
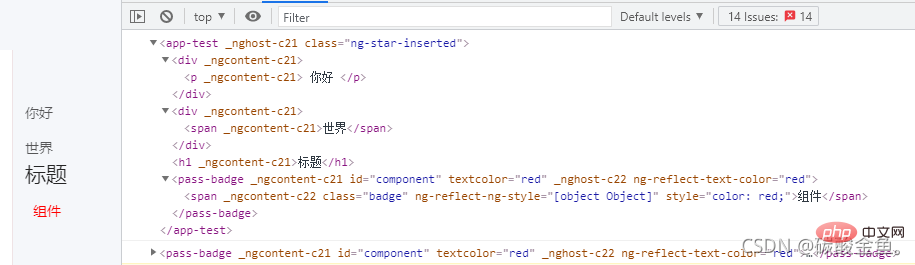
So you can pass this.el.nativeElement.querySelector('#component' ) to operate the corresponding DOM element. For example, you can change the text color
this.el.nativeElement.querySelector('#component').style.color = 'lightblue'
Template variable to get the DOM element
You can get the component through
ViewChild, and the same isContentChild,ViewChildrenandContentChildren
1. Modify the TestComponent component and add template variables to the corresponding elements. , as follows
<div>
    <p>你好</p>
</div>
<!-- 1、给元素加入模板变量 div -->
<div #div>
    <span>世界</span>
</div>
<h1 id="标题">标题</h1>
<!-- 给组件加入模板变量 component -->
<pass-badge #component textColor="red">组件</pass-badge>2. Modify test.component.ts as follows:
import { Component, OnInit } from '@angular/core';
import { ElementRef} from '@angular/core';
// 2、引入ViewChild
import { ViewChild } from '@angular/core'

@Component({
  selector: 'app-test',
  templateUrl: './test.component.html',
  styleUrls: ['./test.component.css']
})
export class TestComponent implements OnInit {
    constructor(private el:ElementRef) {}
    // 3、获取元素
    @ViewChild('component') dom: any;
    @ViewChild('div') div: any;
    ngOnInit() {
        console.log(this.dom)	// PassBadgeComponent
        this.dom.fn()   // 调用 passbadge 组件的 fn 方法
        console.log(this.div)	// ElementRef
        this.div.nativeElement.style.color = 'lightblue'	// 文字颜色修改为淡蓝色
    }
}The final result is as follows
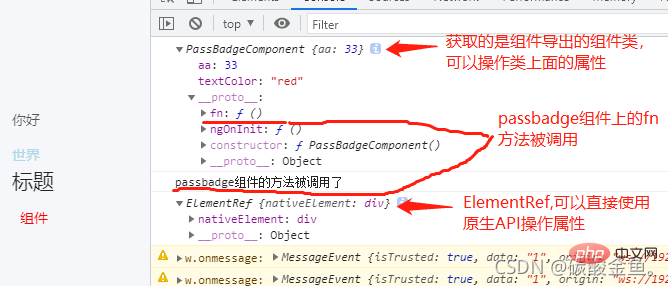
We can know from the results that when using the
ViewChildtemplate variable to obtain the component element, what is obtained is the component class exported by the component (the above example isPassBadgeComponent). At this time Only properties contained in the component can be manipulated.When using the
ViewChildtemplate variable to obtain the html element, the class obtained is theElementReftype. At this time, you can passthis.div.nativeElement. querySelector('span')and other native APIs to operate elements
For more programming-related knowledge, please visit:Programming Tutorial! !
The above is the detailed content of Detailed explanation of how to manipulate DOM elements in angular. For more information, please follow other related articles on the PHP Chinese website!

Hot AI Tools

Undresser.AI Undress
AI-powered app for creating realistic nude photos

AI Clothes Remover
Online AI tool for removing clothes from photos.

Undress AI Tool
Undress images for free

Clothoff.io
AI clothes remover

Video Face Swap
Swap faces in any video effortlessly with our completely free AI face swap tool!

Hot Article
Hot Tools

Notepad++7.3.1
Easy-to-use and free code editor

SublimeText3 Chinese version
Chinese version, very easy to use

Zend Studio 13.0.1
Powerful PHP integrated development environment

Dreamweaver CS6
Visual web development tools

SublimeText3 Mac version
God-level code editing software (SublimeText3)
Hot Topics
 1389
1389
 52
52

 How to implement an online speech recognition system using WebSocket and JavaScript
Dec 17, 2023 pm 02:54 PM
How to implement an online speech recognition system using WebSocket and JavaScript
Dec 17, 2023 pm 02:54 PM
How to use WebSocket and JavaScript to implement an online speech recognition system Introduction: With the continuous development of technology, speech recognition technology has become an important part of the field of artificial intelligence. The online speech recognition system based on WebSocket and JavaScript has the characteristics of low latency, real-time and cross-platform, and has become a widely used solution. This article will introduce how to use WebSocket and JavaScript to implement an online speech recognition system.
 How to install Angular on Ubuntu 24.04
Mar 23, 2024 pm 12:20 PM
How to install Angular on Ubuntu 24.04
Mar 23, 2024 pm 12:20 PM
Angular.js is a freely accessible JavaScript platform for creating dynamic applications. It allows you to express various aspects of your application quickly and clearly by extending the syntax of HTML as a template language. Angular.js provides a range of tools to help you write, update and test your code. Additionally, it provides many features such as routing and form management. This guide will discuss how to install Angular on Ubuntu24. First, you need to install Node.js. Node.js is a JavaScript running environment based on the ChromeV8 engine that allows you to run JavaScript code on the server side. To be in Ub
 WebSocket and JavaScript: key technologies for implementing real-time monitoring systems
Dec 17, 2023 pm 05:30 PM
WebSocket and JavaScript: key technologies for implementing real-time monitoring systems
Dec 17, 2023 pm 05:30 PM
WebSocket and JavaScript: Key technologies for realizing real-time monitoring systems Introduction: With the rapid development of Internet technology, real-time monitoring systems have been widely used in various fields. One of the key technologies to achieve real-time monitoring is the combination of WebSocket and JavaScript. This article will introduce the application of WebSocket and JavaScript in real-time monitoring systems, give code examples, and explain their implementation principles in detail. 1. WebSocket technology
 How to use JavaScript and WebSocket to implement a real-time online ordering system
Dec 17, 2023 pm 12:09 PM
How to use JavaScript and WebSocket to implement a real-time online ordering system
Dec 17, 2023 pm 12:09 PM
Introduction to how to use JavaScript and WebSocket to implement a real-time online ordering system: With the popularity of the Internet and the advancement of technology, more and more restaurants have begun to provide online ordering services. In order to implement a real-time online ordering system, we can use JavaScript and WebSocket technology. WebSocket is a full-duplex communication protocol based on the TCP protocol, which can realize real-time two-way communication between the client and the server. In the real-time online ordering system, when the user selects dishes and places an order
 How to implement an online reservation system using WebSocket and JavaScript
Dec 17, 2023 am 09:39 AM
How to implement an online reservation system using WebSocket and JavaScript
Dec 17, 2023 am 09:39 AM
How to use WebSocket and JavaScript to implement an online reservation system. In today's digital era, more and more businesses and services need to provide online reservation functions. It is crucial to implement an efficient and real-time online reservation system. This article will introduce how to use WebSocket and JavaScript to implement an online reservation system, and provide specific code examples. 1. What is WebSocket? WebSocket is a full-duplex method on a single TCP connection.
 Angular components and their display properties: understanding non-block default values
Mar 15, 2024 pm 04:51 PM
Angular components and their display properties: understanding non-block default values
Mar 15, 2024 pm 04:51 PM
The default display behavior for components in the Angular framework is not for block-level elements. This design choice promotes encapsulation of component styles and encourages developers to consciously define how each component is displayed. By explicitly setting the CSS property display, the display of Angular components can be fully controlled to achieve the desired layout and responsiveness.
 JavaScript and WebSocket: Building an efficient real-time weather forecasting system
Dec 17, 2023 pm 05:13 PM
JavaScript and WebSocket: Building an efficient real-time weather forecasting system
Dec 17, 2023 pm 05:13 PM
JavaScript and WebSocket: Building an efficient real-time weather forecast system Introduction: Today, the accuracy of weather forecasts is of great significance to daily life and decision-making. As technology develops, we can provide more accurate and reliable weather forecasts by obtaining weather data in real time. In this article, we will learn how to use JavaScript and WebSocket technology to build an efficient real-time weather forecast system. This article will demonstrate the implementation process through specific code examples. We
 Simple JavaScript Tutorial: How to Get HTTP Status Code
Jan 05, 2024 pm 06:08 PM
Simple JavaScript Tutorial: How to Get HTTP Status Code
Jan 05, 2024 pm 06:08 PM
JavaScript tutorial: How to get HTTP status code, specific code examples are required. Preface: In web development, data interaction with the server is often involved. When communicating with the server, we often need to obtain the returned HTTP status code to determine whether the operation is successful, and perform corresponding processing based on different status codes. This article will teach you how to use JavaScript to obtain HTTP status codes and provide some practical code examples. Using XMLHttpRequest
