

What does vue conditional rendering include?

Vue conditional rendering instructions include v-if, v-else, v-else-if, and v-show. The v-if directive is used to conditionally render a piece of content. This content will only be rendered when the expression of the directive returns a true value; v-else can add an "else block" to v-if, v-else -if can add an "else if block" to v-if. v-show determines whether to display an element or component based on a condition, relying on the control display attribute.

The operating environment of this tutorial: windows7 system, vue3 version, DELL G3 computer.
Conditional rendering
- #In some cases, we need to decide whether certain elements or components should be rendered based on the current conditions. At this time we need to make conditional judgments.
- Vue provides the following instructions for conditional judgment:
- v-if
- v-else
- v-else-if
v-show
Let’s learn about them.
v-if、v-else、v-else-if
- ##v-if、v-else、v-else-if Used to render a certain piece of content based on conditions:
- These contents will only be rendered when the condition is true;
- These three instructions are consistent with JavaScript The conditional statements if, else, else if are similar; the v-if instruction is used to conditionally render a piece of content. This piece of content will only be rendered when the expression of the instruction returns a true value. v-else can add an "else block" to v-if. v-else-if provides the "else if block" corresponding to v-if. It can be reused many times in a row.

- ##v-if rendering principle:
-
v -if is lazy;
- When the condition is false, the judged content will not be rendered at all or will be destroyed;
- When the condition is true, it will Really render the content in the conditional block;
template element
- But what if we want to switch multiple elements?
- At this time we render the div, but we do not want elements like div to be rendered;
- At this time, we can choose to use template;
The template element can be used as an invisible wrapping element and used on v-if, but in the end the template will not be rendered: -
- is somewhat similar to that in a mini program block
Let’s learn about the three instructions v-if, v-else, and v-else-if through examples.
v-if
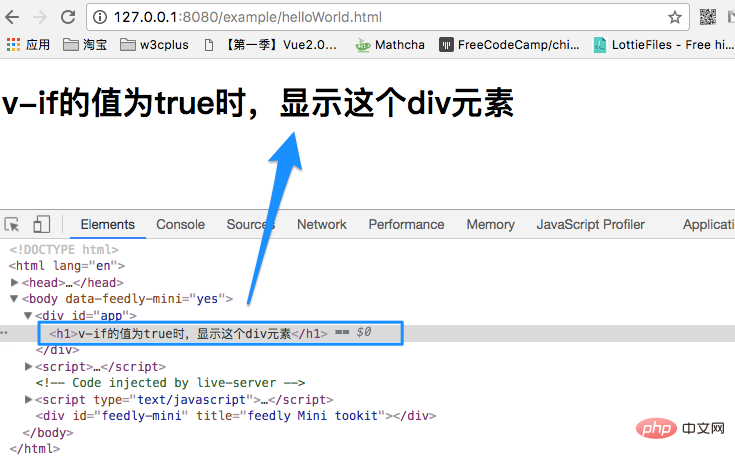
v-ifJudge the DOM based on the value of the expression generate elements. For example: <div class="code" style="position:relative; padding:0px; margin:0px;"><pre class="brush:php;toolbar:false"><!-- template -->
<div>
<h1 id="v-if的值为true时-显示这个div元素">v-if的值为true时,显示这个div元素</h1>
</div>
// JavaScript
var app = new Vue({
el: '#app',
data: {
}
})</pre><div class="contentsignin">Copy after login</div></div>At this time, the
element is inserted into the div#app element and rendered:
 In Vue, if you need to determine whether an element is rendered, add the
directive to the element and set its value to true or false. For example, in the above example, we set true and the element is rendered. If you change the true value above to false, the <h1></h1> element will not be rendered. In addition to directly setting
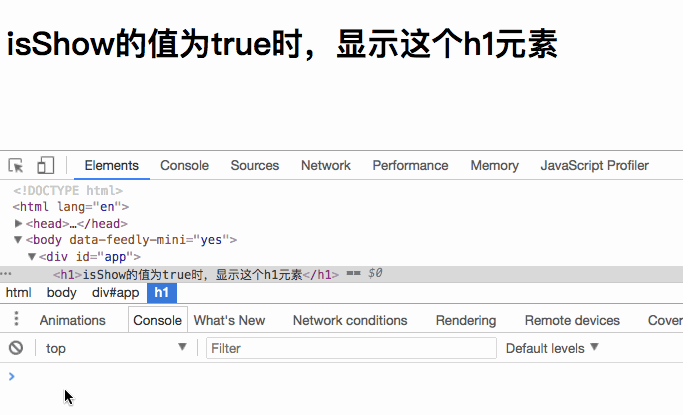
or false to v-if, you can also make judgments through expressions. For example: <div class="code" style="position:relative; padding:0px; margin:0px;"><pre class="brush:php;toolbar:false"><!-- template -->
<div>
<h1>
v-if的值为true时,显示这个div元素
</h1>
</div>
// JavaScript
var app = new Vue({
el: '#app',
data: { isShow: true }
})</pre><div class="contentsignin">Copy after login</div></div>In the above example, the value of
is declared to be true, and then in the h1 element, pass v-if directive bindingisShow. In fact, it is similar to v-if="true". The h1 element also renders normally:
 When you set
to false , the h1 element will not be rendered.
What we see above is rendering one element. If we want to render multiple elements, should we directly nest multiple elements inside? Let’s verify our thoughts:
<!-- template -->
<div>
    <div>
        <h1 id="我是标题">我是标题</h1>
        <p>我是段落</p>
    </div>
</div>
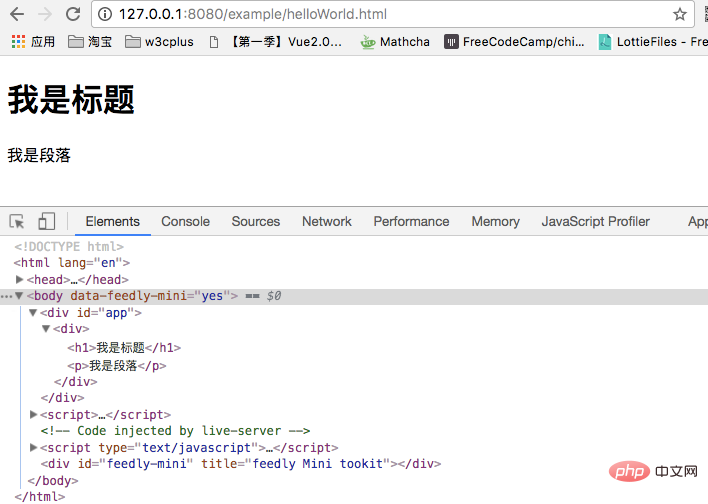 is just as we imagined. But in Vue, when we switch multiple elements, we generally don’t use it this way. Instead, we use the
element as a packaging element, and use v-if on it. The final rendering result will not contain the <template></template> element. As shown below: <div class="code" style="position:relative; padding:0px; margin:0px;"><pre class="brush:php;toolbar:false"><template>
<h1 id="标题">标题</h1>
<p>段落 1</p>
<p>段落 2</p>
</template></pre><div class="contentsignin">Copy after login</div></div>
v-else
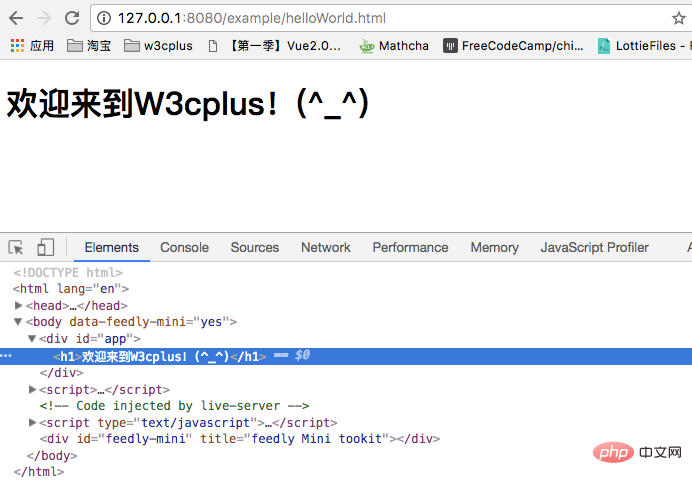
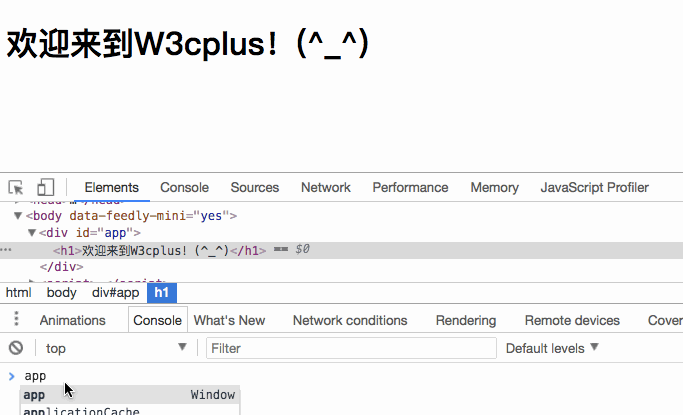
v-else和JavaScript中的else类似,但其要和v-if配合使用。比如我们做登录,如果登录了显示一个欢迎语,反则提示用户去登录。那么我们可以设置一个isLogined表达式,比如:
<!-- Template -->
<div>
    <h1 id="欢迎来到W-cplus">欢迎来到W3cplus!(^_^)</h1>
    <h1 id="请先登录-再来">请先登录,再来!(^_^)</h1>
</div>

// JavaScript
var app = new Vue({
    el: '#app',
    data: {
        isLogined: true
    }
})如你所想,你在浏览器能看到下图的效果:
把isLogined的值换成false,那么渲染出来的内容就变了:
在实际项目中,当我们一个组件在两种状态渲染的效果不一样的时候,这个时候使用v-if和v-else配合<template></template>就很好实现了。比如中奖和未中奖:
<template>
    <figure>
        <figcaption>恭喜你中了5元红包</figcaption>
        <img  src="/static/imghw/default1.png" data-src="xxx" class="lazy" alt="What does vue conditional rendering include?" >
    </figure>
</template>

<template>
    <figure>
        <figcaption>亲,就差那么一点点</figcaption>
        <img  src="/static/imghw/default1.png" data-src="xxx" class="lazy" alt="What does vue conditional rendering include?" >
    </figure>
</template>
v-else-if
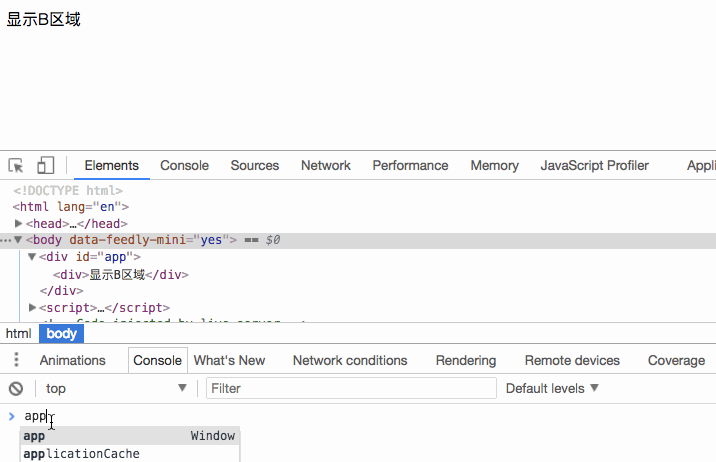
v-else-if和JavaScript中的else if类似,需要和v-if配合在一起使用。当有几个条件同时在的时候,根据运算结果决定显示与否。如下面的代码,根据type的值决定显示哪一个区块。比如,我们的例子,设定的type的值B,那么就会显示区块B:
<!-- template -->
<div>
    <div>显示A区域</div>
    <div>显示B区域</div>
    <div>显示C区域</div>
</div>

// JavaScript
var app = new Vue({
    el: '#app',
    data: {
        type: "B"
    }
})如果修改type的值,将显示的区域会不一样:
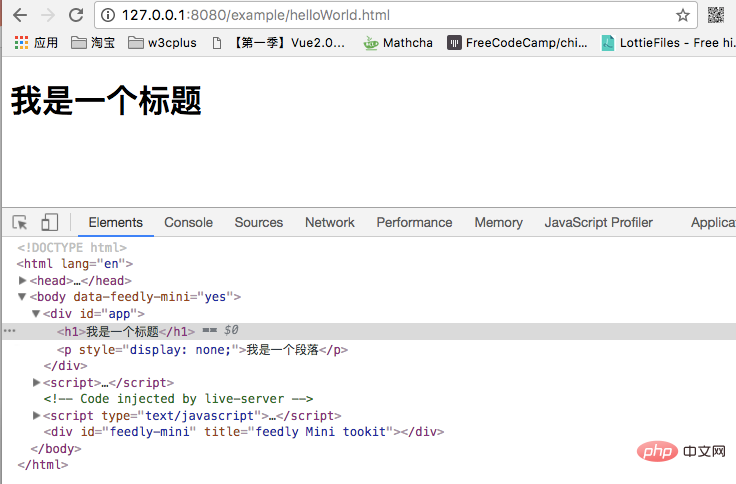
v-show
- v-show和v-if的用法看起来是一致的,也是根据一个条件决定是否显示元素或者组件:

v-show和v-if功能有点相似,其中v-if依赖于控制DOM节点,而v-show是依赖于控制DOM节点的display属性。当v-show传入的值为true时,对应DOM元素的display的值为block之类的,反之为false时,display的值为none。也就是用户看不到元素的显示,但其DOM元素还是存在的。
<!-- Template -->
<div>
    <h1 id="我是一个标题">我是一个标题</h1>
    <p>我是一个段落</p>
</div>

// JavaScript
var app = new Vue({
    el: '#app',
    data: {
        isShow: false
    }
})在浏览器看到的效果将是这样的:
注意,
v-show不支持<template></template>语法,也不支持v-else。
v-show和v-if的区别
- 首先,在用法上的区别:
- v-show是不支持template;
- v-show不可以和v-else一起使用;
- 其次,本质的区别:
- v-show元素无论是否需要显示到浏览器上,它的DOM实际都是有存在的,只是通过CSS的display属性来进行切换;
- v-if当条件为false时,其对应的原生压根不会被渲染到DOM中;
- 开发中如何进行选择呢?
- 如果我们的原生需要在显示和隐藏之间频繁的切换,那么使用v-show;
- 如果不会频繁的发生切换,那么使用v-if;
The above is the detailed content of What does vue conditional rendering include?. For more information, please follow other related articles on the PHP Chinese website!

Hot AI Tools

Undresser.AI Undress
AI-powered app for creating realistic nude photos

AI Clothes Remover
Online AI tool for removing clothes from photos.

Undress AI Tool
Undress images for free

Clothoff.io
AI clothes remover

Video Face Swap
Swap faces in any video effortlessly with our completely free AI face swap tool!

Hot Article
Hot Tools

Notepad++7.3.1
Easy-to-use and free code editor

SublimeText3 Chinese version
Chinese version, very easy to use

Zend Studio 13.0.1
Powerful PHP integrated development environment

Dreamweaver CS6
Visual web development tools

SublimeText3 Mac version
God-level code editing software (SublimeText3)
Hot Topics
 1386
1386
 52
52

 How to use bootstrap in vue
Apr 07, 2025 pm 11:33 PM
How to use bootstrap in vue
Apr 07, 2025 pm 11:33 PM
Using Bootstrap in Vue.js is divided into five steps: Install Bootstrap. Import Bootstrap in main.js. Use the Bootstrap component directly in the template. Optional: Custom style. Optional: Use plug-ins.
 How to add functions to buttons for vue
Apr 08, 2025 am 08:51 AM
How to add functions to buttons for vue
Apr 08, 2025 am 08:51 AM
You can add a function to the Vue button by binding the button in the HTML template to a method. Define the method and write function logic in the Vue instance.
 How to reference js file with vue.js
Apr 07, 2025 pm 11:27 PM
How to reference js file with vue.js
Apr 07, 2025 pm 11:27 PM
There are three ways to refer to JS files in Vue.js: directly specify the path using the <script> tag;; dynamic import using the mounted() lifecycle hook; and importing through the Vuex state management library.
 How to use watch in vue
Apr 07, 2025 pm 11:36 PM
How to use watch in vue
Apr 07, 2025 pm 11:36 PM
The watch option in Vue.js allows developers to listen for changes in specific data. When the data changes, watch triggers a callback function to perform update views or other tasks. Its configuration options include immediate, which specifies whether to execute a callback immediately, and deep, which specifies whether to recursively listen to changes to objects or arrays.
 What does vue multi-page development mean?
Apr 07, 2025 pm 11:57 PM
What does vue multi-page development mean?
Apr 07, 2025 pm 11:57 PM
Vue multi-page development is a way to build applications using the Vue.js framework, where the application is divided into separate pages: Code Maintenance: Splitting the application into multiple pages can make the code easier to manage and maintain. Modularity: Each page can be used as a separate module for easy reuse and replacement. Simple routing: Navigation between pages can be managed through simple routing configuration. SEO Optimization: Each page has its own URL, which helps SEO.
 How to return to previous page by vue
Apr 07, 2025 pm 11:30 PM
How to return to previous page by vue
Apr 07, 2025 pm 11:30 PM
Vue.js has four methods to return to the previous page: $router.go(-1)$router.back() uses <router-link to="/" component window.history.back(), and the method selection depends on the scene.
 How to query the version of vue
Apr 07, 2025 pm 11:24 PM
How to query the version of vue
Apr 07, 2025 pm 11:24 PM
You can query the Vue version by using Vue Devtools to view the Vue tab in the browser's console. Use npm to run the "npm list -g vue" command. Find the Vue item in the "dependencies" object of the package.json file. For Vue CLI projects, run the "vue --version" command. Check the version information in the <script> tag in the HTML file that refers to the Vue file.
 How to use function intercept vue
Apr 08, 2025 am 06:51 AM
How to use function intercept vue
Apr 08, 2025 am 06:51 AM
Function interception in Vue is a technique used to limit the number of times a function is called within a specified time period and prevent performance problems. The implementation method is: import the lodash library: import { debounce } from 'lodash'; Use the debounce function to create an intercept function: const debouncedFunction = debounce(() => { / Logical / }, 500); Call the intercept function, and the control function is called at most once in 500 milliseconds.
