Table of Contents
Picture panning
Picture zoom
Station labeling
Home Web Front-end Front-end Q&A How to implement scaling in react

How to implement scaling in react

Dec 28, 2022 am 10:13 AM
react

React's method of scaling: 1. Listen to the onWheel event; 2. Set the attribute deltaY of the event object event, "deltaY0" when scrolling down; 3. Modify the scaling ratio each time you scroll, and change the transform style to scale accordingly.

How to implement scaling in react

The operating environment of this tutorial: Windows 10 system, react version 18.0.0, Dell G3 computer.

How to achieve scaling in react?

react image scaling and panning (position, transform implementation)

Many web pages will attach some pictures to supplement the description of the copy, for example, when talking about the address , a map will be attached next to it, and the address will be marked on the map. If the attached picture is too small and it is difficult to see the specific information of the address clearly, some product managers will design a function for panning, zooming in and out of the picture. This article will implement the above functions one by one.

Without further ado, let me show you the renderings first:

How to implement scaling in react

Main three functional points:

  • Picture panning
  • Picture zoom
  • Station label

Picture panning

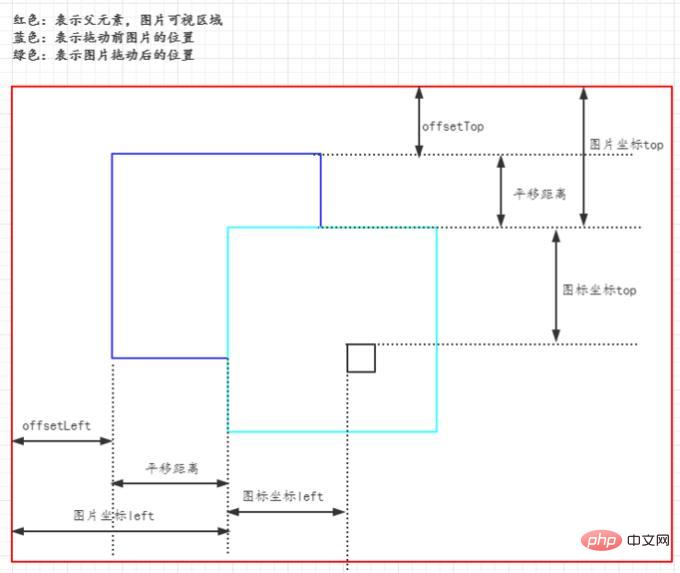
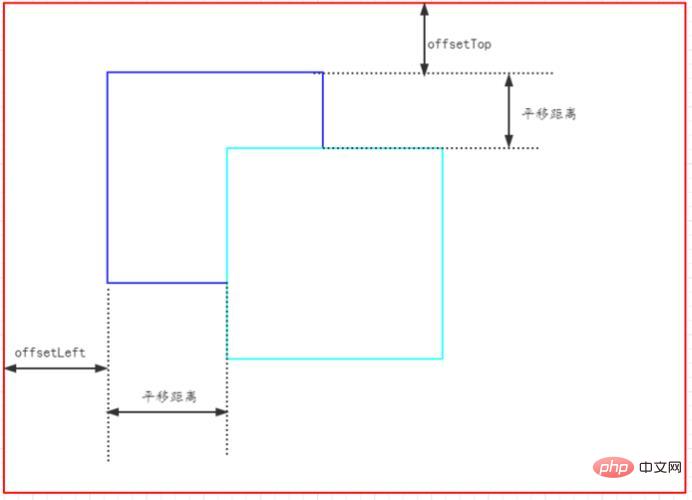
Picture panning can be implemented by monitoring these three events: onMouseDown, onMouseMove, onMouseUp .
onMouseDownThe event records the coordinate position of each mouse press;
onMouseMoveThe event calculates the distance of each translation, which is added to the distance of the picture from the parent before dragging The distance of the element is equal to the distance of the dragged image relative to the parent element; when the
onMouseUp event is triggered, log out or prevent the onMouseDown and onMouseMove events from being executed to prevent the mouse from moving in The picture will pan.

These three events need to prevent the browser's default behavior, otherwise the image will be automatically opened when moving.
How to implement scaling in react

1

2

3

4

5

6

7

8

9

10

11

12

13

14

15

16

17

18

19

20

21

22

23

24

25

26

const WIDTH = 1200;const HEIGHT = 900;const DynamicStyle= () => {   

  const imgRef = React.createRef<HTMLImageElement>(); 

  /** 图片样式 */  const [imgStyle, setImgStyle] = useState<React.CSSProperties>({});  /** 记录鼠标是否按下 */  const [mouseDowmFlag, setMouseDowmFlag] = useState(false);  /** 记录鼠标按下的坐标 */  const [mouseDowmPos, setMouseDowmPos] = useState<{x: number, y: number}>({x: 0, y: 0})  /** 鼠标可视区域时,重置鼠标按下的布尔值为false */  useEffect(() => {    document.onmouseover = () => {      if (mouseDowmFlag) {        setMouseDowmFlag(false);

      }

    };    return () => {      document.onmouseover = null;

    };

  }, [mouseDowmFlag])  /** 平移 */  const handleMouseDown = (event: React.MouseEvent<HTMLImageElement>) => {    const { clientX, clientY } = event;

    event.stopPropagation();

    event.preventDefault(); // 阻止浏览器默认行为,拖动会打开图片    setMouseDowmFlag(true); // 控制只有在鼠标按下后才会执行mousemove    setMouseDowmPos({      x: clientX,      y: clientY,

    });

  };  const handleMouseMove = (event: React.MouseEvent<HTMLImageElement>) => {

    event.stopPropagation();

    event.preventDefault();    const { clientX, clientY } = event;    const diffX = clientX - mouseDowmPos.x;    const diffY = clientY - mouseDowmPos.y;    if (!mouseDowmFlag || (diffX === 0 && diffY === 0)) return;    const { offsetLeft, offsetTop } = imgRef.current as HTMLImageElement;    const offsetX = parseInt(`${diffX + offsetLeft}`, 10);    const offsetY = parseInt(`${diffY + offsetTop}`, 10);    setMouseDowmPos({      x: clientX,      y: clientY,

    });    setImgStyle({

      ...imgStyle,      left: offsetX,      top: offsetY,

    });

  };  const handleMouseUp = (event: React.MouseEvent<HTMLImageElement>) => {

    event.stopPropagation();

    event.preventDefault();    setMouseDowmFlag(false);

  };  return (    <div className={styles.imgArea}>      <img src="/static/imghw/default1.png"  data-src="https://img.php.cn/upload/image/987/470/885/1672193291310298.jpg"  class="lazy" 

        src={mapImg}

        alt=&#39;part&#39;        ref={imgRef}        height={HEIGHT}

        style={imgStyle}        onMouseDown={handleMouseDown}        onMouseMove={handleMouseMove}        onMouseUp={handleMouseUp}

      >      </img>    </div>

  )

}

Copy after login

Picture zoom

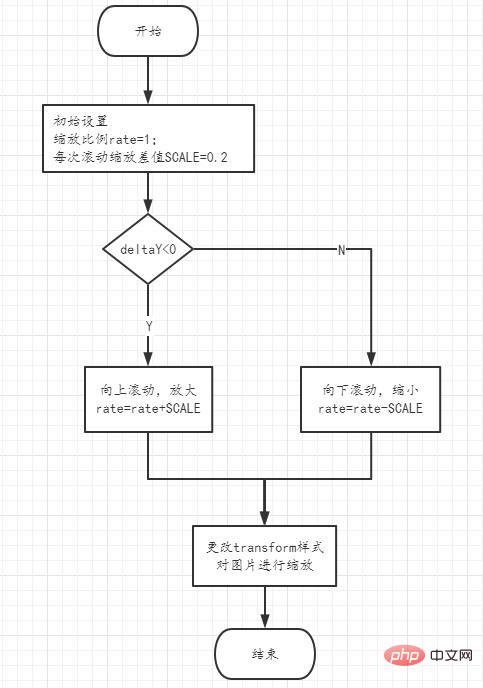
Picture zoom can listen to the onWheel event. The event object event has an attribute that records the scrolling of the wheel. deltaY, when scrolling up deltaY<0, when scrolling down deltaY>0. Each scroll modifies its scaling ratio, and at the same time changes the transform style to scale proportionally.
How to implement scaling in react

1

2

3

4

5

6

7

8

9

10

11

12

13

14

15

16

17

18

19

20

21

22

23

24

25

26

27

28

29

30

31

32

33

const WIDTH = 1200;const HEIGHT = 900;const SCALE = 0.2;const DynamicStyle= () => {  const imgRef = React.createRef<HTMLImageElement>();  /** 初始化缩放比例,默认为1 */  const [rate, setRate] = useState(1);  /** 图片样式 */  const [imgStyle, setImgStyle] = useState<React.CSSProperties>({});  /** 记录鼠标是否按下 */  const [mouseDowmFlag, setMouseDowmFlag] = useState(false);  /** 记录鼠标按下的坐标 */  const [mouseDowmPos, setMouseDowmPos] = useState<{x: number, y: number}>({x: 0, y: 0})  /** 图片现在大小 */  const [initial, setInitial] = useState<{width: number, height: number}>({width: WIDTH, height: HEIGHT});  useEffect(() => {    const { naturalWidth, naturalHeight, width, height } = imgRef.current as HTMLImageElement;    setInitial({ width, height });    // eslint-disable-next-line react-hooks/exhaustive-deps

  }, [])  // console.log(natural, initial)  useEffect(() => {    document.onmouseover = () => {      if (mouseDowmFlag) {        setMouseDowmFlag(false);

      }

    };    return () => {      document.onmouseover = null;

    };

  }, [mouseDowmFlag])  /** 缩放 */  const handleWheelImage = (event: React.WheelEvent<HTMLImageElement>) => {    // 向上为负,向下为正    const bigger = event.deltaY > 0 ? -1 : 1;    // transform偏移量    const transformX = -initial.width / 2;    const transformY = -initial.height / 2;    if (bigger > 0 && rate < 2) {      const enlargeRate = rate + SCALE;      setImgStyle({

        ...imgStyle,        transform: `matrix(${enlargeRate}, 0, 0, ${enlargeRate}, ${transformX}, ${transformY})`, // 默认以图片中心为原点进行缩放

      });      setRate(enlargeRate);

    } else if (bigger < 0 && rate > 1) {      const shrinkRate = rate - SCALE;      setImgStyle({

        ...imgStyle,        transform: `matrix(${shrinkRate}, 0, 0, ${shrinkRate}, ${transformX}, ${transformY})`,

      });      setRate(shrinkRate);

    }

  /** 平移 */  const handleMouseDown = (event: React.MouseEvent<HTMLImageElement>) => {    const { clientX, clientY } = event;

    event.stopPropagation();

    event.preventDefault(); // 阻止浏览器默认行为,拖动会打开图片    setMouseDowmFlag(true); // 控制只有在鼠标按下后才会执行mousemove    setMouseDowmPos({      x: clientX,      y: clientY,

    });

  };  const handleMouseMove = (event: React.MouseEvent<HTMLImageElement>) => {

    event.stopPropagation();

    event.preventDefault();    const { clientX, clientY } = event;    const diffX = clientX - mouseDowmPos.x;    const diffY = clientY - mouseDowmPos.y;    if (!mouseDowmFlag || (diffX === 0 && diffY === 0)) return;    const { offsetLeft, offsetTop } = imgRef.current as HTMLImageElement;    const offsetX = parseInt(`${diffX + offsetLeft}`, 10);    const offsetY = parseInt(`${diffY + offsetTop}`, 10);    setMouseDowmPos({      x: clientX,      y: clientY,

    });    setImgStyle({

      ...imgStyle,      left: offsetX,      top: offsetY,

    });

  };  const handleMouseUp = (event: React.MouseEvent<HTMLImageElement>) => {

    event.stopPropagation();

    event.preventDefault();    setMouseDowmFlag(false);

  };  return (    <div className={styles.imgArea}>      <img src="/static/imghw/default1.png"  data-src="https://img.php.cn/upload/image/524/801/658/1672193298348581.jpg"  class="lazy" 

        src={mapImg}

        alt=&#39;part&#39;

        height={HEIGHT}

        style={imgStyle}        ref={imgRef}        onWheel={handleWheelImage}        onMouseDown={handleMouseDown}        onMouseMove={handleMouseMove}        onMouseUp={handleMouseUp}

      >      </img>    </div>

  )

}

Copy after login

1

2

3

4

.imgArea {  position: relative;  width: 1200px;  height: 900px;  margin: auto;  border: 1px solid #da2727;  overflow: hidden;

  & > img {    position: absolute;    left: 50%;    top: 50%;    transform: translate(-50%, -50%);    cursor: move;

  }

}

Copy after login

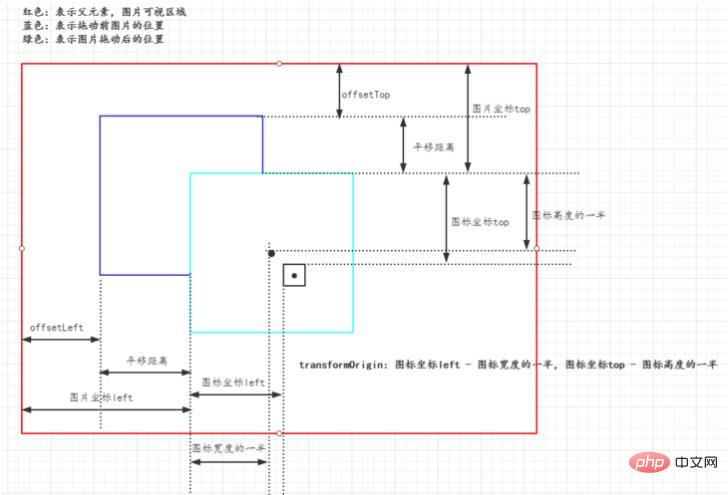
If transformOrigin is not set, the default is to scale relative to the center of the picture, but initially in order to center the picture horizontally and vertically within the visible area , used transform: translate(-50%, -50%);, so in order to scale relative to the center point of the picture, you need to set the 5th and 6th parameter correction of matrix transformOrigintransform: matrix(${shrinkRate}, 0, 0, ${shrinkRate}, ${transformX}, ${transformY})

Station labeling

First, define a constant to represent the coordinates of the icon. This coordinate is relative to the upper left corner of the original image.

1

const imgInfo = {  lableLeft: "1900",  lableTop: "2000",}

Copy after login

Here, explain the concept of the original picture:
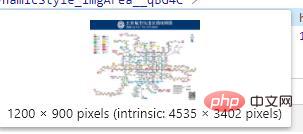
How to implement scaling in react

Just check out a picture element on the Internet, such as the one above. 1200 x 900 is the image size specified on the page, but the image also has a real size of 4535 x 3402.

Before calculating the initial coordinates of the icon without translation and scaling, you need to calculate the scaling ratio of the image (not the rate above):

1

2

/** 图片原始大小,默认设置为1是防止计算图片原始大小与初始大小比例出现无穷大 */const [natural, setNatural] = useState<{width: number, height: number}>({width: 1, height: 1});/** 图片现在大小 */const [initial, setInitial] = useState<{width: number, height: number}>({width: WIDTH, height: HEIGHT});useEffect(() => {    const { naturalWidth, naturalHeight, width, height } = imgRef.current as HTMLImageElement;    setNatural({ width: naturalWidth, height: naturalHeight });    setInitial({ width, height });    // eslint-disable-next-line react-hooks/exhaustive-deps}, []) 

// 初始图片缩放比例(图片有原始的图片大小)const imgScaleRateX = initial.width / natural.width;const imgScaleRateY = initial.height / natural.height;

Copy after login

The initial coordinates of the icon are It can be calculated:

1

const labelLeft = parseInt(`${imgInfo.lableLeft}`, 10) * imgScaleRateX;const labelTop = parseInt(`${imgInfo.lableTop}`, 10) * imgScaleRateY;

Copy after login

When the picture is translated, the icon also needs to be translated. This is the coordinate calculation:

1

2

// 图标相对父元素坐标 = 图标位置坐标 + 图片坐标const labelLeft = parseInt(`${imgInfo.lableLeft}`, 10) * imgScaleRateX + Number(imgStyle.left || WIDTH / 2);

const labelTop = parseInt(`${imgInfo.lableTop}`, 10) * imgScaleRateY + Number(imgStyle.top || HEIGHT / 2);

Copy after login

How to implement scaling in react

When the picture is zoomed, the icon Need to scale along with the image. If transformOrigin is not set for the icon, it will be scaled relative to the center of the icon by default. In order to ensure that the icon scales with the image, the scaling reference origin of the image and the icon must be the same, and the transformOrigin of the icon should be set to the distance relative to the origin of the image.

1

2

3

4

const labelTransformOrigin = () => {    return `${initial.width / 2 - Number(imgInfo.lableLeft) * imgScaleRateX}px ${

        initial.height / 2 - Number(imgInfo.lableTop) * imgScaleRateY

    }px`;

}

Copy after login

How to implement scaling in react

Overall code example:

1

2

3

4

5

6

7

8

9

10

11

12

13

14

15

16

17

18

19

20

21

22

23

24

25

26

27

28

29

30

31

32

33

34

35

36

37

38

39

40

41

42

43

44

45

46

47

48

49

50

51

52

53

54

55

56

57

58

59

60

61

62

63

64

65

66

67

68

69

70

71

72

73

74

75

76

77

78

79

80

81

82

83

84

85

86

87

88

89

90

91

92

93

94

95

96

97

98

99

100

101

102

103

104

105

106

107

108

109

110

111

112

113

114

115

116

117

118

119

120

121

122

123

124

125

126

127

128

129

130

131

132

133

134

135

136

137

138

139

140

141

142

143

144

145

146

147

148

149

150

151

const imgInfo = {

  lableLeft: "1900",

  lableTop: "2000",

}


const WIDTH = 1200;

const HEIGHT = 900;

const SCALE = 0.2;


const DynamicStyle= () => {


  const imgRef = React.createRef<HTMLImageElement>();

  /** 初始化缩放比例,默认为1 */

  const [rate, setRate] = useState(1);

  /** 图片样式 */

  const [imgStyle, setImgStyle] = useState<React.CSSProperties>({});

  /** 记录鼠标是否按下 */

  const [mouseDowmFlag, setMouseDowmFlag] = useState(false);

  /** 记录鼠标按下的坐标 */

  const [mouseDowmPos, setMouseDowmPos] = useState<{x: number, y: number}>({x: 0, y: 0})

  /** 图片原始大小,默认设置为1是防止计算图片原始大小与初始大小比例出现无穷大 */

  const [natural, setNatural] = useState<{width: number, height: number}>({width: 1, height: 1});

  /** 图片现在大小 */

  const [initial, setInitial] = useState<{width: number, height: number}>({width: WIDTH, height: HEIGHT});


  useEffect(() => {

    const { naturalWidth, naturalHeight, width, height } = imgRef.current as HTMLImageElement;

    setNatural({ width: naturalWidth, height: naturalHeight });

    setInitial({ width, height });

    // eslint-disable-next-line react-hooks/exhaustive-deps

  }, [])


  useEffect(() => {

    document.onmouseover = () => {

      if (mouseDowmFlag) {

        setMouseDowmFlag(false);

      }

    };

    return () => {

      document.onmouseover = null;

    };

  }, [mouseDowmFlag])


  /** 缩放 */

  const handleWheelImage = (event: React.WheelEvent<HTMLImageElement>) => {

    // 向上为负,向下为正

    const bigger = event.deltaY > 0 ? -1 : 1;

    // transform偏移量

    const transformX = -initial.width / 2;

    const transformY = -initial.height / 2;

    if (bigger > 0 && rate < 2) {

      const enlargeRate = rate + SCALE;

      setImgStyle({

        ...imgStyle,

        transform: `matrix(${enlargeRate}, 0, 0, ${enlargeRate}, ${transformX}, ${transformY})`, // 默认以图片中心为原点进行缩放

      });

      setRate(enlargeRate);

    } else if (bigger < 0 && rate > 1) {

      const shrinkRate = rate - SCALE;

      setImgStyle({

        ...imgStyle,

        transform: `matrix(${shrinkRate}, 0, 0, ${shrinkRate}, ${transformX}, ${transformY})`,

      });

      setRate(shrinkRate);

    }

  }


  /** 平移 */

  const handleMouseDown = (event: React.MouseEvent<HTMLImageElement>) => {

    const { clientX, clientY } = event;

    event.stopPropagation();

    event.preventDefault(); // 阻止浏览器默认行为,拖动会打开图片

    setMouseDowmFlag(true); // 控制只有在鼠标按下后才会执行mousemove

    setMouseDowmPos({

      x: clientX,

      y: clientY,

    });

  };


  const handleMouseMove = (event: React.MouseEvent<HTMLImageElement>) => {

    event.stopPropagation();

    event.preventDefault();

    const { clientX, clientY } = event;

    const diffX = clientX - mouseDowmPos.x;

    const diffY = clientY - mouseDowmPos.y;

    if (!mouseDowmFlag || (diffX === 0 && diffY === 0)) return;

    const { offsetLeft, offsetTop } = imgRef.current as HTMLImageElement;

    const offsetX = parseInt(`${diffX + offsetLeft}`, 10);

    const offsetY = parseInt(`${diffY + offsetTop}`, 10);


    setMouseDowmPos({

      x: clientX,

      y: clientY,

    });

    setImgStyle({

      ...imgStyle,

      left: offsetX,

      top: offsetY,

    });

  };


  const handleMouseUp = (event: React.MouseEvent<HTMLImageElement>) => {

    event.stopPropagation();

    event.preventDefault();

    setMouseDowmFlag(false);

  };


  // 初始图片缩放比例(图片有原始的图片大小)

  const imgScaleRateX = initial.width / natural.width;

  const imgScaleRateY = initial.height / natural.height;


  const labelTransformOrigin = () => {

    return `${initial.width / 2 - Number(imgInfo.lableLeft) * imgScaleRateX}px ${

      initial.height / 2 - Number(imgInfo.lableTop) * imgScaleRateY

    }px`;

  }


  /** 图标位置计算 */

  const labelStyle = (): React.CSSProperties => {

    const transformX = -initial.width / 2;

    const transformY = -initial.height / 2;

    // 图标相对父元素坐标 = 图标初始位置坐标 + 平移量

    const labelLeft = parseInt(`${imgInfo.lableLeft}`, 10) * imgScaleRateX + Number(imgStyle.left || WIDTH / 2);

    const labelTop = parseInt(`${imgInfo.lableTop}`, 10) * imgScaleRateY + Number(imgStyle.top || HEIGHT / 2);

    return {

      left: labelLeft,

      top: labelTop,

      transformOrigin: labelTransformOrigin(),

      transform: `matrix(${rate}, 0, 0, ${rate}, ${transformX}, ${transformY})`,

    }

  }


  return (

    <div className={styles.imgArea}>

      <img

        src={mapImg}

        alt=&#39;part&#39;

        height={HEIGHT}

        style={imgStyle}

        ref={imgRef}

        onWheel={handleWheelImage}

        onMouseDown={handleMouseDown}

        onMouseMove={handleMouseMove}

        onMouseUp={handleMouseUp}

      >

      </img>

      <span className={styles.label} style={labelStyle()}></span>

    </div>

  )

}

Copy after login

Recommended learning: "react video tutorial"

The above is the detailed content of How to implement scaling in react. For more information, please follow other related articles on the PHP Chinese website!

Statement of this Website
The content of this article is voluntarily contributed by netizens, and the copyright belongs to the original author. This site does not assume corresponding legal responsibility. If you find any content suspected of plagiarism or infringement, please contact admin@php.cn

Hot AI Tools

Undresser.AI Undress

Undresser.AI Undress

AI-powered app for creating realistic nude photos

AI Clothes Remover

AI Clothes Remover

Online AI tool for removing clothes from photos.

Undress AI Tool

Undress AI Tool

Undress images for free

Clothoff.io

Clothoff.io

AI clothes remover

Video Face Swap

Video Face Swap

Swap faces in any video effortlessly with our completely free AI face swap tool!

Hot Tools

Notepad++7.3.1

Notepad++7.3.1

Easy-to-use and free code editor

SublimeText3 Chinese version

SublimeText3 Chinese version

Chinese version, very easy to use

Zend Studio 13.0.1

Zend Studio 13.0.1

Powerful PHP integrated development environment

Dreamweaver CS6

Dreamweaver CS6

Visual web development tools

SublimeText3 Mac version

SublimeText3 Mac version

God-level code editing software (SublimeText3)

How to build a real-time chat app with React and WebSocket How to build a real-time chat app with React and WebSocket Sep 26, 2023 pm 07:46 PM

How to build a real-time chat application using React and WebSocket Introduction: With the rapid development of the Internet, real-time communication has attracted more and more attention. Live chat apps have become an integral part of modern social and work life. This article will introduce how to build a simple real-time chat application using React and WebSocket, and provide specific code examples. 1. Technical preparation Before starting to build a real-time chat application, we need to prepare the following technologies and tools: React: one for building

Guide to React front-end and back-end separation: How to achieve decoupling and independent deployment of front-end and back-end Guide to React front-end and back-end separation: How to achieve decoupling and independent deployment of front-end and back-end Sep 28, 2023 am 10:48 AM

React front-end and back-end separation guide: How to achieve front-end and back-end decoupling and independent deployment, specific code examples are required In today's web development environment, front-end and back-end separation has become a trend. By separating front-end and back-end code, development work can be made more flexible, efficient, and facilitate team collaboration. This article will introduce how to use React to achieve front-end and back-end separation, thereby achieving the goals of decoupling and independent deployment. First, we need to understand what front-end and back-end separation is. In the traditional web development model, the front-end and back-end are coupled

How to build simple and easy-to-use web applications with React and Flask How to build simple and easy-to-use web applications with React and Flask Sep 27, 2023 am 11:09 AM

How to use React and Flask to build simple and easy-to-use web applications Introduction: With the development of the Internet, the needs of web applications are becoming more and more diverse and complex. In order to meet user requirements for ease of use and performance, it is becoming increasingly important to use modern technology stacks to build network applications. React and Flask are two very popular frameworks for front-end and back-end development, and they work well together to build simple and easy-to-use web applications. This article will detail how to leverage React and Flask

How to build a reliable messaging app with React and RabbitMQ How to build a reliable messaging app with React and RabbitMQ Sep 28, 2023 pm 08:24 PM

How to build a reliable messaging application with React and RabbitMQ Introduction: Modern applications need to support reliable messaging to achieve features such as real-time updates and data synchronization. React is a popular JavaScript library for building user interfaces, while RabbitMQ is a reliable messaging middleware. This article will introduce how to combine React and RabbitMQ to build a reliable messaging application, and provide specific code examples. RabbitMQ overview:

React code debugging guide: How to quickly locate and solve front-end bugs React code debugging guide: How to quickly locate and solve front-end bugs Sep 26, 2023 pm 02:25 PM

React code debugging guide: How to quickly locate and resolve front-end bugs Introduction: When developing React applications, you often encounter a variety of bugs that may crash the application or cause incorrect behavior. Therefore, mastering debugging skills is an essential ability for every React developer. This article will introduce some practical techniques for locating and solving front-end bugs, and provide specific code examples to help readers quickly locate and solve bugs in React applications. 1. Selection of debugging tools: In Re

React Router User Guide: How to implement front-end routing control React Router User Guide: How to implement front-end routing control Sep 29, 2023 pm 05:45 PM

ReactRouter User Guide: How to Implement Front-End Routing Control With the popularity of single-page applications, front-end routing has become an important part that cannot be ignored. As the most popular routing library in the React ecosystem, ReactRouter provides rich functions and easy-to-use APIs, making the implementation of front-end routing very simple and flexible. This article will introduce how to use ReactRouter and provide some specific code examples. To install ReactRouter first, we need

How to build a fast data analysis application using React and Google BigQuery How to build a fast data analysis application using React and Google BigQuery Sep 26, 2023 pm 06:12 PM

How to use React and Google BigQuery to build fast data analysis applications Introduction: In today's era of information explosion, data analysis has become an indispensable link in various industries. Among them, building fast and efficient data analysis applications has become the goal pursued by many companies and individuals. This article will introduce how to use React and Google BigQuery to build a fast data analysis application, and provide detailed code examples. 1. Overview React is a tool for building

How to package and deploy front-end applications using React and Docker How to package and deploy front-end applications using React and Docker Sep 26, 2023 pm 03:14 PM

How to use React and Docker to package and deploy front-end applications. Packaging and deployment of front-end applications is a very important part of project development. With the rapid development of modern front-end frameworks, React has become the first choice for many front-end developers. As a containerization solution, Docker can greatly simplify the application deployment process. This article will introduce how to use React and Docker to package and deploy front-end applications, and provide specific code examples. 1. Preparation Before starting, we need to install

See all articles