
 PHP Framework
Laravel
An article explaining in detail how to quickly create a simple event flow in Laravel
PHP Framework
Laravel
An article explaining in detail how to quickly create a simple event flow in Laravel
An article explaining in detail how to quickly create a simple event flow in Laravel

This article brings you relevant knowledge about Laravel event flow. It mainly introduces what event flow is and how to create a simple event flow in Laravel. Interested friends should take a look. I hope everyone has to help.
Introduction
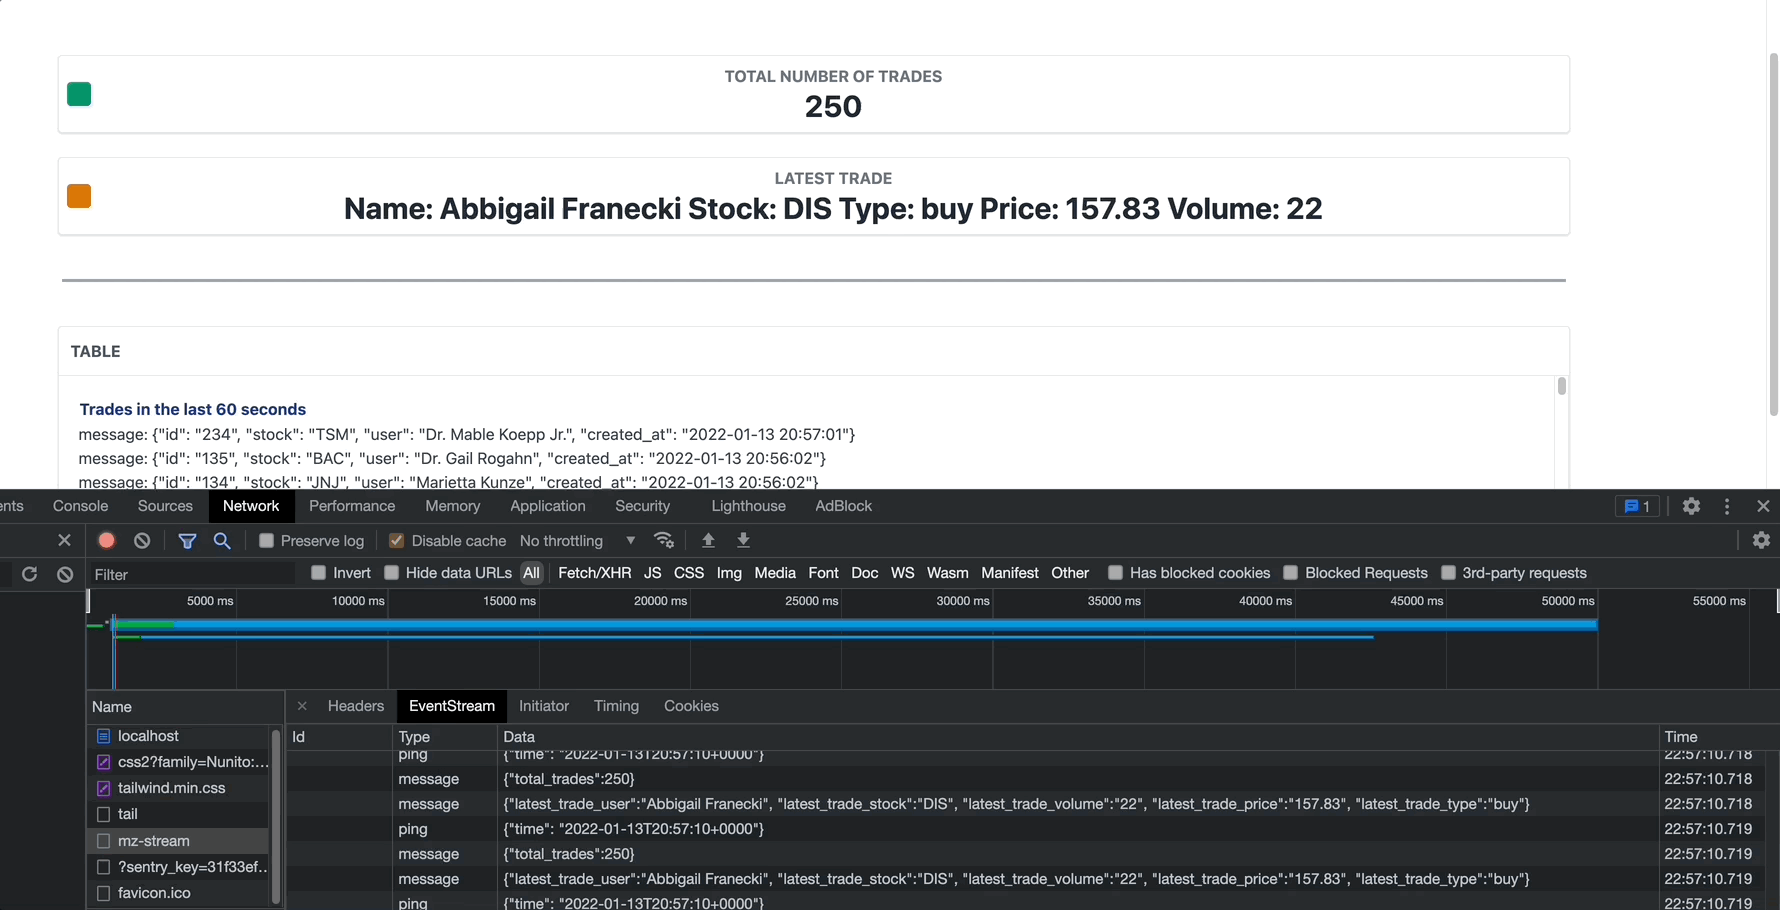
Event streaming provides you with a way to send events to the client without reloading the page. This is useful for updating the user interface when live changes are made to the database.
Unlike traditional long polling using AJAX requests, in which multiple requests are sent to the server and a new connection is established each time, the event stream is sent to the client in real time in a single request .

In this article, I will show you how to create a simple event stream in Laravel.
Prerequisites
Before you begin, you need to have Laravel installed on your machine.
I will be using the DigitalOcean Ubuntu Droplet in this demo. If you'd like, you can use my affiliate code to get free $100 DigitalOcean credits to launch your own server!
If you haven't already, you can follow the steps in this tutorial:
Or you can install it using this awesome script:
Create a Controller
Let's start by creating a controller that handles the event stream.
Use the following command:
php artisan make:controller EventStreamController
This will create a new controller in the App\Http\Controllers directory.
Adding Event Streaming Methods
Once we have created our controller, we need to add the stream method to it. This method will be used to send a stream of events.
Open the EventStreamController.php file and add the following code:
<?php namespace App\Http\Controllers;use Carbon\Carbon;use App\Models\Trade;class StreamsController extends Controller{
    /**
     * 事件流代码
     *
     * @return \Illuminate\Http\Response
     */
    public function stream(){
        return response()->stream(function () {
            while (true) {
                echo "event: ping\n";
                $curDate = date(DATE_ISO8601);
                echo 'data: {"time": "' . $curDate . '"}';
                echo "\n\n";

                $trades = Trade::latest()->get();
                echo 'data: {"total_trades":' . $trades->count() . '}' . "\n\n";

                $latestTrades = Trade::with('user', 'stock')->latest()->first();
                if ($latestTrades) {
                    echo 'data: {"latest_trade_user":"' . $latestTrades->user->name . '", "latest_trade_stock":"' . $latestTrades->stock->symbol . '", "latest_trade_volume":"' . $latestTrades->volume . '", "latest_trade_price":"' . $latestTrades->stock->price . '", "latest_trade_type":"' . $latestTrades->type . '"}' . "\n\n";
                }

                ob_flush();
                flush();

                // 如果客户端中止连接,则中断循环(关闭页面)
                if (connection_aborted()) {break;}
                usleep(50000); // 50ms
            }
        }, 200, [
            'Cache-Control' => 'no-cache',
            'Content-Type' => 'text/event-stream',
        ]);
}}The main things to note here are:
- We use
response()->stream()method to create an event stream. - Then we have an infinite loop that sends a stream of events every 50ms.
- If the client aborts the connection, we use
ob_flush()andflush()to send the event stream. - We use
sleep()to wait 50ms before sending the next event. - We use
connection_aborted()to break the loop if the client aborts the connection. - We use the
Carbon\Carbonclass to get the current date. - We use the
App\Models\Trademodel to get the latest transactions. This is for demonstration only, you can use any model you want. - Set the
Content-Typeheader totext/event-streamto tell the browser that the response is an event stream.
Enable output buffering
In order for the above code to work properly, we need to enable output buffering in your PHP.ini file. This is done by adding the following line to the php.ini file:
output_buffering = On
It may be necessary to reload the PHP-FPM service after making this change. Or if you are using Apache, you can restart Apache.
Add route
When requesting the /stream route, we want to call the ``stream` method.
The route will be added to the routes/web.php file as follows:
use App\Http\Controllers\StreamsController;Route::get('/stream', [StreamsController::class, 'stream']);Using the event flow from the frontend
You can use Front-end frameworks such as Vue.js are used to handle event streams. But for this demo, I'm going to use pure Javascript.
The JavaScript snippet added to the blade template looks like this:
const eventSource = new EventSource('/stream');eventSource.onmessage = function(event) {
    const data = JSON.parse(event.data);
    if (data.time) {
        document.getElementById('time').innerHTML = data.time;
    }
    const newElement = document.createElement("li");
    const eventList = document.getElementById("list");

    newElement.textContent = "message: " + event.data;
eventList.appendChild(newElement);}To see this in action, you can try the following demo! [Related recommendations: laravel video tutorial]
Demo project
If you want to understand how event streaming works, you can check out the demo project I created:
Laravel EventStream: Live Stock Trading Dashboard using Laravel and Materialize
Demo project not only shows the event stream but also has a simple front-end dashboard and uses Materialize As a streaming database.
SSE vs WebSockets
Event streaming is great and easy to use, but it also has some advantages and disadvantages compared to other streaming protocols like WebSockets.
For example, SSE is one-way, which means that once the connection is established, the server can only send data to the client, and the client cannot send data back to the server.
Unlike long polling, with WebSockets you have only one connection to the server, similar to SSE (Server Sent Events). The connection is duplex, which means you can send and receive data from the server.
If you want to learn more about the differences between SSE and WebSockets, check out this great video by Martin Chaov: Links
Conclusion
Related For more information on event streaming, check out this documentation from Mozilla here:
There, You'll find a more in-depth explanation of event streaming and how it works.
For more information about Materialize, watch this video here: Link
Hope you enjoyed this tutorial!
Original address: https://devdojo.com/bobbyiliev/how-to-cr...
Translated address: https: //www.php.cn/link/09d45b92ec72b3c16ac64bbe4b97f539
The above is the detailed content of An article explaining in detail how to quickly create a simple event flow in Laravel. For more information, please follow other related articles on the PHP Chinese website!

Hot AI Tools

Undresser.AI Undress
AI-powered app for creating realistic nude photos

AI Clothes Remover
Online AI tool for removing clothes from photos.

Undress AI Tool
Undress images for free

Clothoff.io
AI clothes remover

Video Face Swap
Swap faces in any video effortlessly with our completely free AI face swap tool!

Hot Article
Hot Tools

Notepad++7.3.1
Easy-to-use and free code editor

SublimeText3 Chinese version
Chinese version, very easy to use

Zend Studio 13.0.1
Powerful PHP integrated development environment

Dreamweaver CS6
Visual web development tools

SublimeText3 Mac version
God-level code editing software (SublimeText3)
Hot Topics
 1389
1389
 52
52

 How to get the return code when email sending fails in Laravel?
Apr 01, 2025 pm 02:45 PM
How to get the return code when email sending fails in Laravel?
Apr 01, 2025 pm 02:45 PM
Method for obtaining the return code when Laravel email sending fails. When using Laravel to develop applications, you often encounter situations where you need to send verification codes. And in reality...
 Laravel schedule task is not executed: What should I do if the task is not running after schedule: run command?
Mar 31, 2025 pm 11:24 PM
Laravel schedule task is not executed: What should I do if the task is not running after schedule: run command?
Mar 31, 2025 pm 11:24 PM
Laravel schedule task run unresponsive troubleshooting When using Laravel's schedule task scheduling, many developers will encounter this problem: schedule:run...
 In Laravel, how to deal with the situation where verification codes are failed to be sent by email?
Mar 31, 2025 pm 11:48 PM
In Laravel, how to deal with the situation where verification codes are failed to be sent by email?
Mar 31, 2025 pm 11:48 PM
The method of handling Laravel's email failure to send verification code is to use Laravel...
 How to implement the custom table function of clicking to add data in dcat admin?
Apr 01, 2025 am 07:09 AM
How to implement the custom table function of clicking to add data in dcat admin?
Apr 01, 2025 am 07:09 AM
How to implement the table function of custom click to add data in dcatadmin (laravel-admin) When using dcat...
 Laravel - Dump Server
Aug 27, 2024 am 10:51 AM
Laravel - Dump Server
Aug 27, 2024 am 10:51 AM
Laravel - Dump Server - Laravel dump server comes with the version of Laravel 5.7. The previous versions do not include any dump server. Dump server will be a development dependency in laravel/laravel composer file.
 Laravel Redis connection sharing: Why does the select method affect other connections?
Apr 01, 2025 am 07:45 AM
Laravel Redis connection sharing: Why does the select method affect other connections?
Apr 01, 2025 am 07:45 AM
The impact of sharing of Redis connections in Laravel framework and select methods When using Laravel framework and Redis, developers may encounter a problem: through configuration...
 Laravel multi-tenant extension stancl/tenancy: How to customize the host address of a tenant database connection?
Apr 01, 2025 am 09:09 AM
Laravel multi-tenant extension stancl/tenancy: How to customize the host address of a tenant database connection?
Apr 01, 2025 am 09:09 AM
Custom tenant database connection in Laravel multi-tenant extension package stancl/tenancy When building multi-tenant applications using Laravel multi-tenant extension package stancl/tenancy,...
 Laravel - Action URL
Aug 27, 2024 am 10:51 AM
Laravel - Action URL
Aug 27, 2024 am 10:51 AM
Laravel - Action URL - Laravel 5.7 introduces a new feature called “callable action URL”. This feature is similar to the one in Laravel 5.6 which accepts string in action method. The main purpose of the new syntax introduced Laravel 5.7 is to directl
