

How to implement react native routing jump: 1. Use the "yarn add react-navigation" command to install "react-navigation"; 2. Use the "yarn add react-native-gesture-handler" command to install " react-native-gesture-handler" component; 3. Set the initial route and then export it as a class component.

The operating environment of this tutorial: Windows 10 system, React Native version 0.67, Dell G3 computer.
How to implement react native routing jump?
React Native-Route Jump
After setting up the RN development environment, jumps between multiple pages must be implemented.
1. At this time, you need to install react-navigation (the previous Navigator and ex-Navigation have been abandoned), use the yarn add react-navigation command to install.
2.react-navigation depends on the react-native-gesture-handler component, so it also needs to be installed using the yarn add react-native-gesture-handler command.
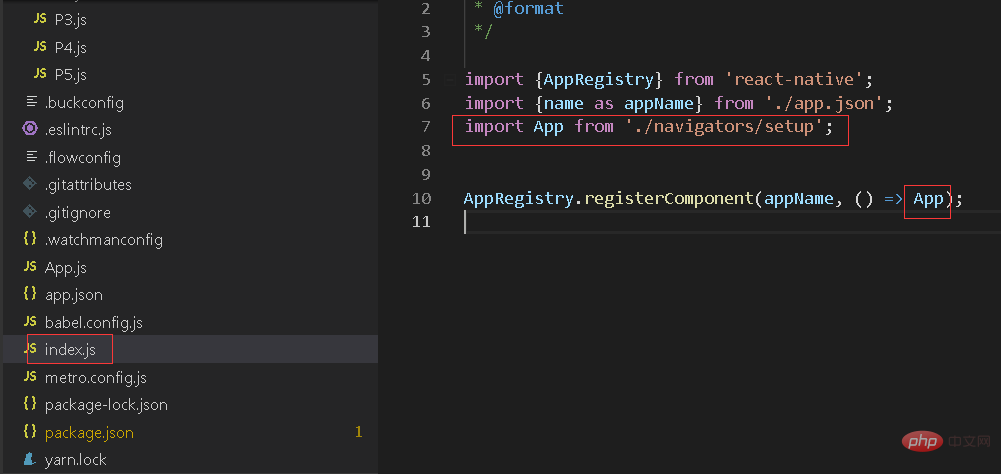
3. After the two components are successfully installed, register an App component in index.js (entry file, which may be index.android.js or index.ios.js) and quote Since setup.js.
4. Import createStackNavigator, createAppContainer two functions and two pages in setup.js.
import { createStackNavigator, createAppContainer } from "react-navigation";
import { Login } from "./js/pages/login";
import { ScanDevice } from "./js/pages/scanDevice";5. Use createStackNavigator to encapsulate the routing and title configuration of the two pages, and set the initial routing.
const AppNavigator = createStackNavigator({
    Login: {
        screen:Login,
        navigationOptions: {
            title: '冷链物流助手',
            headerTitleStyle:{
                textAlign: 'center',
                flex:1,
            }
        }
    },
    ScanDevice: {
        screen:ScanDevice,
        navigationOptions: {
            title: '扫描设备',
            headerTitleStyle:{
                textAlign: 'center',
                marginLeft:-25,
                flex:1,
            }
        }
    },
},{
    initialRouteName: 'Login'
});
6. Encapsulate the configured AppNavigator with another function createAppContainer, and then export it as a class component.
const AppContainer = createAppContainer(AppNavigator);
export default class App extends React.Component {
    render() {
        return <AppContainer />;
    }
}
7. Run react-native run-android. If there is an error, please query Google to solve it step by step. If a Task :react-native-gesture-handler:compileDebugJavaWithJavac FAILED error occurs, please follow https://www.php.cn/link/be47acb6bb8806ab820fd1081686a767 to solve it.
Recommended learning: "react video tutorial"
The above is the detailed content of How to implement react native routing jump. For more information, please follow other related articles on the PHP Chinese website!


![[Web front-end] Node.js quick start](https://img.php.cn/upload/course/000/000/067/662b5d34ba7c0227.png)


