
 Web Front-end
Vue.js
Detailed explanation of the two major responsive tools of Vue3: ref and reactive
Web Front-end
Vue.js
Detailed explanation of the two major responsive tools of Vue3: ref and reactive
Detailed explanation of the two major responsive tools of Vue3: ref and reactive

Compared with the data responsiveness implemented by Vue2's defineProperty, Vue3 has a clearer division of labor in processing data responses. The data is packaged through the two functions of ref and reactive exposed to developers in the combined API, thereby realizing data response. formula, so what’s the difference between them? Let’s learn together with examples!

ref: Defines the responsive of basic data types and reference data types. In other words, ref(value), this value type can be a basic data type or a reference data type, but when used in js, it must be used in the format of property.value, and can be called directly in the template data.
<template>
<div>
<div><button @click="changeValue">修改</button></div>
<div>
<p>当前strRef:{{ strRef }}</p>
<p>当前objRef:姓名:{{ objRef.name }} 爱好:{{ objRef.hobboy }}</p>
<p>当前arrRef:{{ arrRef }}</p>
</div>
</div>
</template>
<script>
import { defineComponent, ref, shallowRef } from 'vue'
export default defineComponent({
setup () {
const strRef = ref('sapper');// 基本数据类型
const arrRef = ref([1, 3, 2]);// 数组类型
const objRef = ref({ // 对象类型
name: 'sapper',
hobboy: ['吉他', '原神']
})
const changeValue = () => {
strRef.value = '工兵';
arrRef.value[1] = 4;
objRef.value.hobboy[1] = '滑冰';
}
return {strRef,objRef,arrRef,changeValue}
}
})
</script>reactive:Define the reactive type of reference type data, which does not support basic data types. If you need to write basic data types, you can only put them in objects, or That is to say, reactive(value), this value type must be a reference type. [Related recommendations: vuejs video tutorial, web front-end development]
<template>
<div>
<div><button @click="changeValue">修改</button></div>
<div>
<div>当前objReactive:
<br/>
姓名:{{ objReactive.name }}<br/>
爱好:{{ objReactive.hobboy }}
</div>
<div>当前arrReactive:{{ arrReactive }}</div>
</div>
</div>
</template>
<script>
import { defineComponent, reactive } from 'vue'
export default defineComponent({
setup () {
const arrReactive = reactive([1, 3, 2]);// 数组类型
const objReactive = reactive({ // 对象类型
name: 'sapper',
hobboy: ['吉他', '原神']
})
const changeValue = () => {
arrReactive[1] = 4;
objReactive.name = '工兵';
objReactive.hobboy[1] = '滑冰';
}
return {objReactive,arrReactive,changeValue}
}
})
</script> From the above two examples we can see that no matter what type of data, ref needs to be .value to call the data defined by ref. For reference data types, we can see that the code is not beautiful, so generally it is recommended to use reactive to define for reference type data; For basic data types, you can use ref or reactive to define . Now that we all understand the difference between the use of ref and reactive here, let's continue to explore the differences in their response principles?
Revealing ref
From the above example, we first print and look at the ref internal encapsulation structure of the basic data type (strRef) and reference data type (arrRef, ObjRef) what does it look like? As shown in the following three pictures


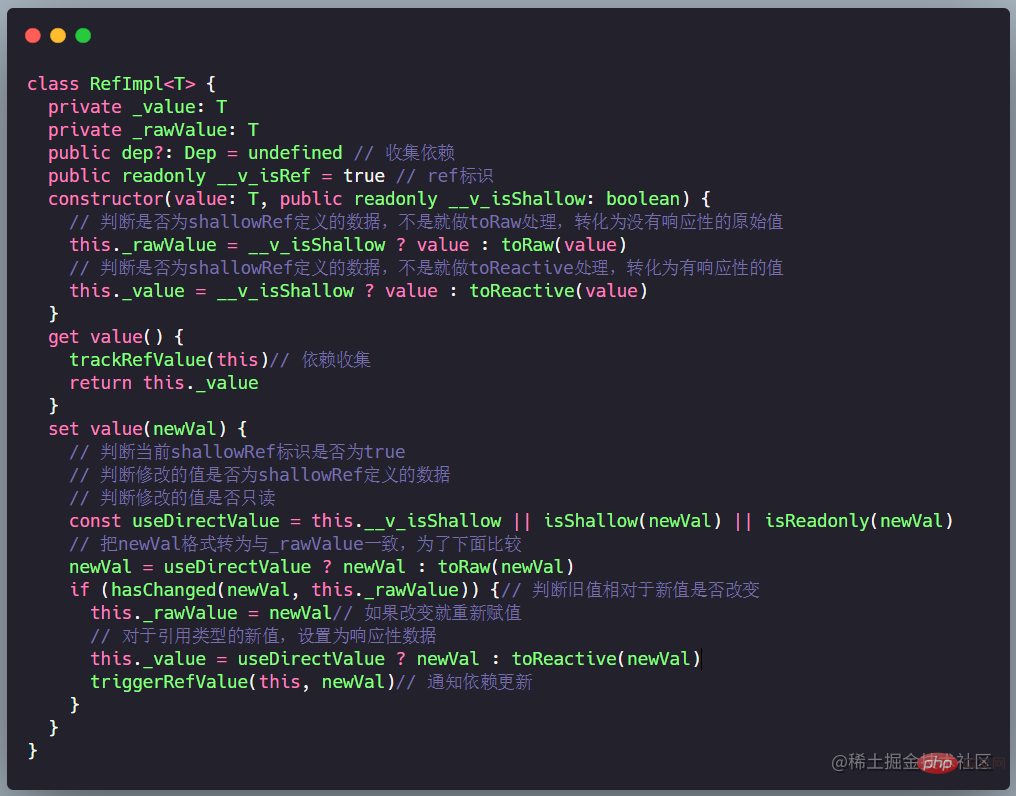
 As can be seen from the above pictures, no matter what type of data it is, for ref encapsulated data They are all a RefImpl object, the abbreviation of
 reference implement, which means reference implementation. Each RefImpl object has 6 attributes:
dep: It is a Set type data, used to store the dependencies collected by the current ref value.
_ v _ isRef: Mark bit, as long as it is defined by ref, it will mark the current data as a Ref, that is, its value is marked as true.
_ v _ isShallow: Determine whether it is the data defined by shallowRef.
Different from ref, when shallowRef is used to create responsiveness for a reference type, deep attributes are modified and there is no responsiveness. Fired only for references to .value.
const state = shallowRef({ count: 1 })
// 不会触发更改
state.value.count = 2
// 会触发更改
state.value = { count: 2 }
Copy after login_ rawValue: used to
save the original valuecorresponding to the current ref value, if the passed parameter isObject, which isused to save the original valuebefore conversion, otherwise _ value is the same as _ rawValue._ value: used to
save the current value of ref, if the passed parameter is anobject, it isUsed to save the value converted by the reactive function, otherwise _ value is the same as _ rawValue. From the above example, we can find that for reference type data, its value is a proxy object, which is actually the reactive object after encapsulating the data (discussed later). Let's first look at the picture below and find that _ rawValue is the original value without responsive processing. Then we look at _ value which is a proxy object that has been processed with reactive response._ rawValue and _ value are to distinguish whether reference type data should be processed responsively.

value: Saves the current value.
Now that we know what attributes ref encapsulates for data, let’s start exploring how the source code assigns values to the above six attributes:
-
ref function: Vue3 exposes the ref function to developers. In fact, it encapsulates a createRef function.
export function ref(value?: unknown) {
  return createRef(value, false)
}
Copy after login createRef function: There are two parameters, one is the data to
be processed for response, and the other isto determine whether the data is Datadefined for shallowRef. What it mainly does is to determine whether the current rawValue (data that has not yet been processed for response) is ref type data and create a RefImpl instance object.function createRef(rawValue: unknown, shallow: boolean) { if (isRef(rawValue)) { return rawValue } return new RefImpl(rawValue, shallow) }Copy after loginRefImpl类:创建RefImpl类给_ rawValue和_ value属性赋值,判断当前定义的ref数据是否为shallowRef定义的数据,然后获取响应性值时对数据依赖进行收集并返回_ value,修改响应式值时修改并通知依赖更新。
ref定义的数据为什么需要带.value调用数据? 就是
因为RefImpl类暴露给实例对象的get、set方法是value,所以在调用的时候,需要带上。
其实,RefImpl实例关键就在于trackRefValue(this)和triggerRefValue(this, newVal)的两个函数的处理,我们大概也知道它们就是依赖收集、依赖更新。这里就不一一探讨。
揭秘Reactive
上面也说了reactive封装数据的用法,它只支持传入引用类型数据(数组、对象),如果需要在reactive中使用基础类型只能放在对象中。既然这样我们来探讨一下reactive函数究竟做了什么?
const arrReactive = reactive([1, 3, 2]);// 数组类型
const objReactive = reactive({  // 对象类型
  name: 'sapper',
  hobboy: ['吉他', '原神']
})
const changeValue = () => {
  arrReactive[1] = 4;
  objReactive.name = '工兵';
  objReactive.hobboy[1] = '滑冰';
  console.log('arrReactive',arrReactive);
  console.log('objReactive',objReactive);
}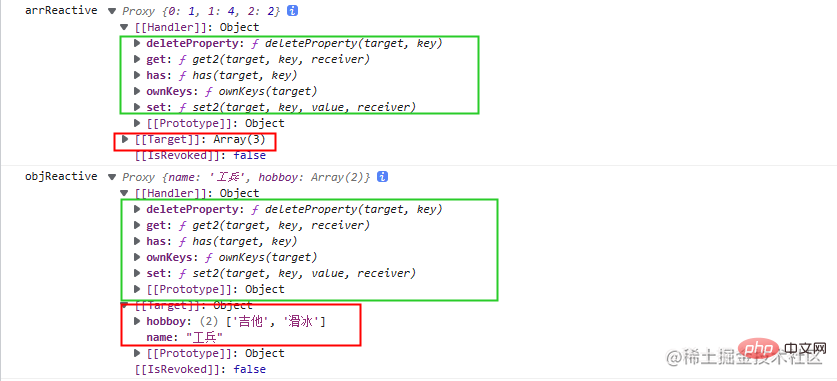 从上图可以看出,使用reactive封装的数据返回的都是一个proxy对象,proxy就是代理,如把一个对象代理到另一个对象,好比如房子所有者,代理房子给二手房东销售,二手房东就可以拥有房子销售权利。从上图我们可以看到Proxy对象有三个属性:
[[Handler]]: 创建Proxy对象传入的第二个参数,是对当前需要代理的目标target进行一些相关配置处理。
[[Target]]:需要代理的目标target,也就是被代理的目标。
[[IsRevoked]]:表示是否可撤销,生成可撤销的proxy对象用Proxy.revocable()方法。 那么Proxy对象可以做什么?我们看看下面例子:
const houseOwner = {home:'房源',price:1200,type:'一房一厅'};
const proxyOwner = new Proxy(houseOwner,{
  get:function (target,key){
    console.log(`${key}属性被访问!`)
    return target[key];
  },
  set:function(target,key,value){
    if(target[key]===value){
      return;
    }
    target[key] = value;
    return target[key];
  },
})
console.log(proxyOwner);
proxyOwner.price = 1300;// 对被代理对象的修改
proxyOwner.remark = '采光点好!';
console.log(proxyOwner.price);// price属性被访问
Copy after login
从这个例子,可以看出Proxy对象的第二个参数给代理目标带上相关属性:set方法、get方法,再回到reactive封装的数据中,数据的Handler属性给数据带上了五个属性:deleteProperty、get、set、has、ownKeys。这五个属性怎么来的?我们一起探讨一下Vue3的源码实现:
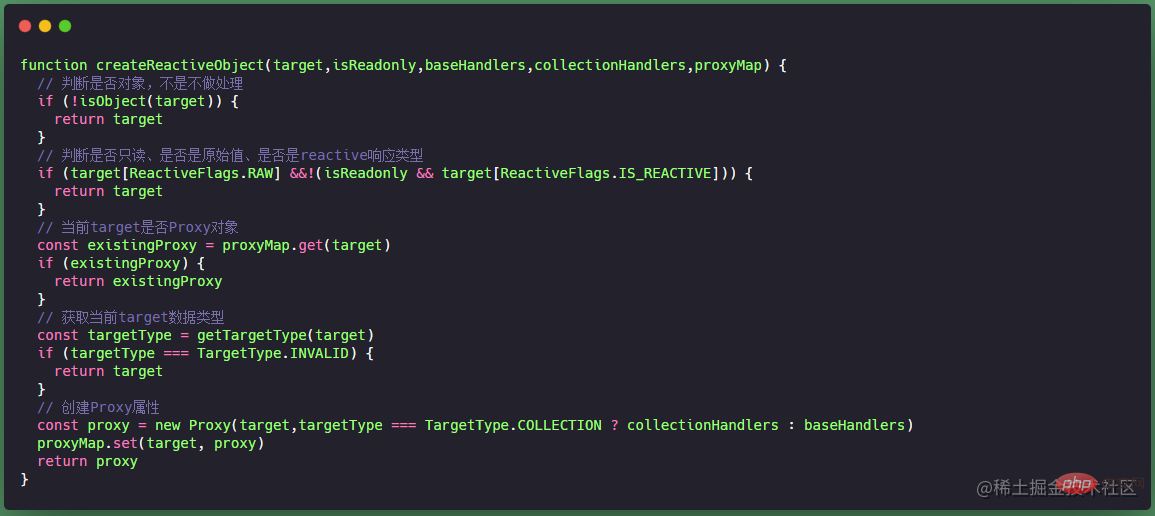
// 源码位置:core-main/packages/reactivity/src/reactive.ts
// Vue3中暴露给开发者的是reactive方法
export function reactive(target: object) {
  // 判断target是否只读,是就不做处理
  if (isReadonly(target)) {
    return target
  }
  return createReactiveObject(
    target,
    false,
    mutableHandlers,
    mutableCollectionHandlers,
    reactiveMap
  )
}createReactiveObject函数主要为了创建Proxy实例对象,参数传了五个属性: target(目标数据)、isReadonly(target是否只读)、mutableHandlers(ProxyHandler)、mutableCollectionHandlers(ProxyHandler类型)、proxyMap(数据集合)。我们先了解一波createReactiveObject函数:
ReactiveFlags:响应式数据标记。
export const enum ReactiveFlags {
  SKIP = '__v_skip',// 标记对象不可进行代理
  IS_REACTIVE = '__v_isReactive',// 是否是Reactive封装的
  IS_READONLY = '__v_isReadonly',// 是否只读
  IS_SHALLOW = '__v_isShallow',// 是否是shallowRef封装的
  RAW = '__v_raw'// 是否是proxy原始的target
}
Copy after loginTargetType:target的数据类型。
const enum TargetType {
  INVALID = 0,
  COMMON = 1,// Array、Object类型
  COLLECTION = 2 // Set、Map、WaekMap、WeakSet类型
}
Copy after loginbaseHandlers:对于Array、Object类型数据,Proxy实例的第二个参数。传入的baseHandlers就是
mutableHandlers。这个函数主要是为了给Proxy对象带上五个属性。// 源码位置:core-main/packages/reactivity/src/baseHandlers.ts export const mutableHandlers: ProxyHandler<object> = { // createGetter() 主要实现依赖收集和Reflect.set(target, key, value, receiver) get, // createSetter() 主要实现通知依赖更新和Reflect.get(target, key, receiver) set, // deleteProperty() 主要是删除target的指定key的属性Reflect.deleteProperty(target, key) deleteProperty, // has() 主要是判断target是否存在指定key的属性,Reflect.has(target, key) has, // ownKeys() 主要是获取target的key数组,Reflect.ownKeys(target) ownKeys }Copy after logincollectionHandlers:对于Set、Map、WaekMap、WeakSet类型数据,Proxy实例的第二个参数。传入的baseHandlers就是
mutableCollectionHandlers。mutableCollectionHandlers主要是对 set、map、weakSet、weakMap 四种类型的对象进行劫持。// 源码位置:core-main/packages/reactivity/src/mutableCollectionHandlers.ts export const mutableCollectionHandlers: ProxyHandler<CollectionTypes> = { get: /*#__PURE__*/ createInstrumentationGetter(false, false) } function createInstrumentationGetter(isReadonly: boolean, shallow: boolean) { const instrumentations = shallow? isReadonly? shallowReadonlyInstrumentations: shallowInstrumentations : isReadonly? readonlyInstrumentations: mutableInstrumentations return (target: CollectionTypes,key: string | symbol,receiver: CollectionTypes) => { ... return Reflect.get( hasOwn(instrumentations, key) && key in target? instrumentations:target, key, receiver ) } }Copy after login总结:
-
ref:定义基本数据类型、引用数据类型的响应式。封装数据类型为ref类型,主要就是
创建了RefImpl实例对象。 -
reactive:定义引用类型数据的响应式,不支持基本数据类型,如果需要写基本数据类型只能是放在对象中。封装数据为reactive类型,主要是
创建了Proxy实例对象,通过Reflect实现数据的获取与修改。
The above is the detailed content of Detailed explanation of the two major responsive tools of Vue3: ref and reactive. For more information, please follow other related articles on the PHP Chinese website!
-
ref:定义基本数据类型、引用数据类型的响应式。封装数据类型为ref类型,主要就是

Hot AI Tools

Undresser.AI Undress
AI-powered app for creating realistic nude photos

AI Clothes Remover
Online AI tool for removing clothes from photos.

Undress AI Tool
Undress images for free

Clothoff.io
AI clothes remover

Video Face Swap
Swap faces in any video effortlessly with our completely free AI face swap tool!

Hot Article
Hot Tools

Notepad++7.3.1
Easy-to-use and free code editor

SublimeText3 Chinese version
Chinese version, very easy to use

Zend Studio 13.0.1
Powerful PHP integrated development environment

Dreamweaver CS6
Visual web development tools

SublimeText3 Mac version
God-level code editing software (SublimeText3)
Hot Topics
 1386
1386
 52
52

 Tutorial on using CSS to implement responsive image automatic carousel effect
Nov 21, 2023 am 08:37 AM
Tutorial on using CSS to implement responsive image automatic carousel effect
Nov 21, 2023 am 08:37 AM
With the popularity of mobile devices, web design needs to take into account factors such as device resolution and screen size of different terminals to achieve a good user experience. When implementing responsive design of a website, it is often necessary to use the image carousel effect to display the content of multiple images in a limited visual window, and at the same time, it can also enhance the visual effect of the website. This article will introduce how to use CSS to achieve a responsive image automatic carousel effect, and provide code examples and analysis. Implementation ideas The implementation of responsive image carousel can be implemented through CSS flex layout. exist
 How to create a responsive tag cloud using HTML, CSS and jQuery
Oct 27, 2023 am 10:46 AM
How to create a responsive tag cloud using HTML, CSS and jQuery
Oct 27, 2023 am 10:46 AM
How to use HTML, CSS and jQuery to create a responsive tag cloud. A tag cloud is a common web element used to display various keywords or tags. It usually displays the importance of keywords in different font sizes or colors. In this article, we will introduce how to use HTML, CSS and jQuery to create a responsive tag cloud, and give specific code examples. Creating the HTML Structure First, we need to create the basic structure of the tag cloud in HTML. You can use an unordered list to represent tags
 Tutorial on implementing responsive sliding menu using CSS
Nov 21, 2023 am 08:08 AM
Tutorial on implementing responsive sliding menu using CSS
Nov 21, 2023 am 08:08 AM
A tutorial on using CSS to implement a responsive sliding menu requires specific code examples. In modern web design, responsive design has become an essential skill. To accommodate different devices and screen sizes, we need to add a responsive menu to the website. Today, we will use CSS to implement a responsive sliding menu and provide you with specific code examples. First, let's take a look at the implementation. We will create a navigation bar that automatically collapses when the screen width is smaller than a certain threshold and expands by clicking the menu button.
 How to create a responsive scrolling notification bar using HTML, CSS and jQuery
Oct 26, 2023 pm 12:12 PM
How to create a responsive scrolling notification bar using HTML, CSS and jQuery
Oct 26, 2023 pm 12:12 PM
How to use HTML, CSS and jQuery to create a responsive scrolling notification bar. With the popularity of mobile devices and the increase in user requirements for website access experience, designing a responsive scrolling notification bar has become more and more important. Responsive design ensures that the website displays properly on different devices and that users can easily view notification content. This article will introduce how to use HTML, CSS and jQuery to create a responsive scrolling notification bar, and provide specific code examples. First we need to create the HTM
 How to create a responsive carousel layout using HTML and CSS
Oct 20, 2023 pm 04:24 PM
How to create a responsive carousel layout using HTML and CSS
Oct 20, 2023 pm 04:24 PM
How to create a responsive carousel layout using HTML and CSS Carousels are a common element in modern web design. It can attract the user's attention, display multiple contents or images, and switch automatically. In this article, we will introduce how to create a responsive carousel layout using HTML and CSS. First, we need to create a basic HTML structure and add the required CSS styles. The following is a simple HTML structure: <!DOCTYPEhtml&g
 Tips for Responsive Website Development with Webman
Aug 14, 2023 pm 12:27 PM
Tips for Responsive Website Development with Webman
Aug 14, 2023 pm 12:27 PM
Tips for Responsive Website Development with Webman In today’s digital age, people are increasingly relying on mobile devices to access the Internet. In order to provide a better user experience and adapt to different screen sizes, responsive website development has become an important trend. As a powerful framework, Webman provides us with many tools and technologies to realize the development of responsive websites. In this article, we will share some tips for using Webman for responsive website development, including how to set up media queries,
 How to use Layui to implement responsive calendar functions
Oct 25, 2023 pm 12:06 PM
How to use Layui to implement responsive calendar functions
Oct 25, 2023 pm 12:06 PM
How to use Layui to implement responsive calendar function 1. Introduction In web development, calendar function is one of the common requirements. Layui is an excellent front-end framework that provides a wealth of UI components, including calendar components. This article will introduce how to use Layui to implement a responsive calendar function and give specific code examples. 2. HTML structure In order to implement the calendar function, we first need to create a suitable HTML structure. You can use the div element as the outermost container, and then within it
 How to use React to develop a responsive backend management system
Sep 28, 2023 pm 04:55 PM
How to use React to develop a responsive backend management system
Sep 28, 2023 pm 04:55 PM
How to use React to develop a responsive backend management system. With the rapid development of the Internet, more and more companies and organizations need an efficient, flexible, and easy-to-manage backend management system to handle daily operations. As one of the most popular JavaScript libraries currently, React provides a concise, efficient and maintainable way to build user interfaces. This article will introduce how to use React to develop a responsive backend management system and give specific code examples. Create a React project first
