

This article brings you some information about front-end drag and drop Knowledge related to effect implementation, which mainly introduces how to use js to achieve a good-looking drag and drop effect? How to type and layout? For those who are interested, let’s take a look below. I hope it will be helpful to everyone.
Recently I saw a video with a drag effect. Many people commented that it didn’t work if they followed the drag effect. Also, the author didn’t reply to some of the questions raised by everyone. In the spirit of knowing it Of course, we need to know the psychology behind it. I have studied the implementation effect and understood its implementation principle. Here I will review the principle for you. What you learn is to make money
Here We need to use font icons, so we directly import
<link>复制代码
Put the structure we need first Write it out
draggable: Make the box draggablestyle="--color:#e63e31"--color Let the box background color be displayed according to --color (linked to the css style below) <div> <div> <i></i> <span>双鱼座</span> </div> <div> <i></i> <span>水平座</span> </div> <div> <i></i> <span>摩羯座</span> </div> <div> <i></i> <span>处女座</span> </div> <div> <i></i> <span>狮子座</span> </div> </div>复制代码
Here, flex is used directly to layout the box
background-color: var(--color);var(--color) is or the color of a custom attributebody{
background-color: #000;
}
.list{ width: 300px; height: 360px; /* padding: 20px 0; */
margin: 100px auto 0; display: flex;
flex-direction: column;
justify-content: space-around;
}
.list-item{ width: 100%; display: flex;
align-items: center; padding: 0 16px;
border-radius: 10px; /* margin-bottom: 20px; */background-color: var(--color);
}
.constellation{
line-height: 2.5em;
font-size: 20px; color: #fff;
}
.list-item-img{ width: 30px; height: 30px;
}
.list-item-title{
margin-left: 20px; color: #fff;
}// 移动动画class.list-item.moving{
background-color: transparent;border: 2px dashed #ccc;
}复制代码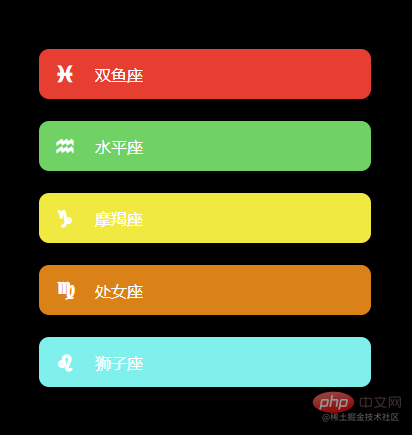
First get the elements you need to use
// 获取整个listconst list = document.querySelector('.list')// 获取每一个盒子const item = document.querySelectorAll('.list-item')复制代码When you start dragging, you need to add the moving class and set the moving effect
// 开始拖动
    list.ondragstart = e => {
        source_node = e.target
        recode(item)        setTimeout(() => {        // 拖拽时样式
            e.target.classList.add('moving')
        }, 0)        // 设置拖动效果
        e.dataTransfer.effectAllowed = 'move'
}复制代码During dragging, you need to determine whether it is from top to bottom or bottom to top, and compare the index of the dragged element with the index of the inserted element, so as to insert a node into the dragged element
Note: Nuggets on the code There will be bugs when going from top to bottom, but not in the browser. I personally think it should be a problem with the Nuggets on the code
 // 拖拽放入有效目标触发
    list.ondragenter = e => {
        e.preventDefault()        console.log(e.target.id, list)        if (e.target === list || e.target === source_node) {            return false
        }        const childer = Array.from(list.children)        const sourceIndex = childer.indexOf(source_node)        const targetIndex = childer.indexOf(e.target)        // console.log(sourceIndex, targetIndex)
        if (sourceIndex <p> Drag After dragging, remove the style during dragging</p><pre class="brush:php;toolbar:false">// 拖放结束
    list.ondragend = e => {
        e.target.classList.remove('moving')
}复制代码There are many unused or less used methods here, here are the explanations
ondragstart: When the user starts dragging an element or text selection, the dragstart event will be triggered ondragover: When the element or text selection is dragged to the effective When the drag and drop target is on (once every few hundred milliseconds), the drag and drop event will be triggered ondragenter: When the dragged element or text selection enters a valid drag and drop target , the dragenter event will be triggered ondragend: The dragend event is triggered when the drag-and-drop operation ends (by releasing the mouse button or clicking the escape key). e.dataTransfer.effectAllowed: Used to set the effect of drag and drop. Common parameters are (move, link, copy) getBoundingClientRect :Return the element's information about the viewportrequestAnimationFrame:Redraw animationcancelAnimationFrame: Used to cancel the requestAnimationFrame call request##EndingThis small case is mainly for us to understand and use the draggable attribute and learn some drag and drop methods. What you learn is what you earn. Welcome everyone to communicate with me and learn togetherRecommended study:《
JavaScript video tutorial》
The above is the detailed content of Teach you step by step to use js to achieve a drag and drop effect. For more information, please follow other related articles on the PHP Chinese website!


![[Web front-end] Node.js quick start](https://img.php.cn/upload/course/000/000/067/662b5d34ba7c0227.png)


