
 Web Front-end
CSS Tutorial
Teach you step by step how to use CSS to create a simple and elegant input box
Web Front-end
CSS Tutorial
Teach you step by step how to use CSS to create a simple and elegant input box
Teach you step by step how to use CSS to create a simple and elegant input box

一个商务简约的登陆界面
前几天在逛codepen的时候,发现了一个很有意思的登陆界面,于是就想着自己实现一下,于是就有了这个demo。
By the way, the login interface of the next website will also be changed to this style.
First the previous rendering:
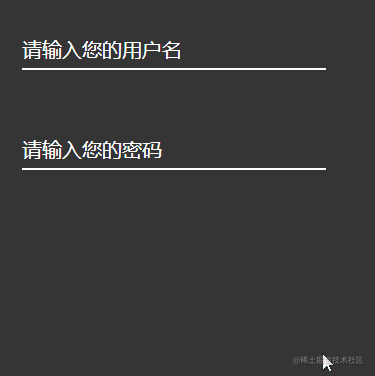
In the rendering we see two input boxes, one for text input box and one for password input frame.
Since the styles of the two input boxes are roughly the same, we only describe the implementation of the first input box.
1. Input box structure
In fact, this input box consists of two parts:
They are the prompt content of the input box and the input box body.
We put the prompt content of the input box into the label label, and add a for attribute to the label label, with the value of the input box The id attribute value.
In this way, when the user clicks on the prompt statement, the cursor will automatically focus on the input box.
    <div class="user_name">
        <label for="userName" class="userNameTip">请输入您的用户名</label>
        <input type="text" id="userName">
</div>So far, the structure of our input box has been set up.
2. Input box style
We first add a relative positioning to the entire big box to facilitate subsequent adjustments to the position of the elements inside. By the way, set the size of the entire box.
    .user_name {
        position: relative;
        width: 400px;
        height: 200px;
}Next we will change the style of the input box. After all, such a default box is too ugly.
.user_name{
    width: 200px;
    height: 50px;
    position: absolute;
    top: 50px;
    left: 30px;
    font-size: 20px;
}Here we first adjust the position of the entire input box, and then set a font size, so that our input box has a basic style.
Let’s start setting the style of the input box:
#userName{
display: inline-block;
width: 300px;
height: 30px;
color: #0FF;
font-size: 20px;
border: 0px transparent;
border-bottom: 2px solid #fff;
background-color: rgb(54, 54, 54);
}Here we set the width, height, font color, font size, border, and background color of the input box.
Because my entire background color is rgb(54, 54, 54), in order to prevent the input box from standing out so much, I set the background color of the input box to match the size of the input box. The background color is the same color.
But this is not enough, because when the input box gets focus, there is a border outside the input box, which will make the input box ugly.
Through the outline property we can set the border style when the input box gets focus.
In the rendering, we can see that when the input box gains focus, there is a blue border below the input box. The width of this border is 2px and the color is #0FF.
We give the input box a style like this:
#userName:focus{
outline: none;
border-bottom: 2px solid #0FF;
}The style of the input box comes out: 
3. Input box prompt
When the input box in the rendering has not gained focus, the prompt statement is in the input box. This is achieved by using absolute positioning. Adjust it to the appropriate position and place the prompt statement in the input box. in.
And the color of the text is white at this time.
.userNameTip{
position: absolute;
top: 0px;
left: 0px;
font-size: 20px;
color: #fff;
}Finally, the style of the entire input box is like this: 
Of course, this is a static input box now without any interaction, we will implement it next The interaction of this input box.
4. Input box interaction
Interaction definitely requires an animation to achieve. Here we find that after the input box gains focus, the prompt text will become smaller, the color will change accordingly, and then move Go to the top of the input box. This is the effect we need to achieve.
After losing focus, we will judge whether there is content in the input box:
If there is content, the animation will not be removed and the animation will remain in the end state; if there is no content, it will be moved. Remove the animation and return to the first acquaintance state.
Then we define an animation:
@keyframes user {
from{
top: 0px;
font-size: 20px;
    }
    to{
    top: -20px;
    font-size: 12px;
    color: #0FF;
    }
}Now there is a question. We click on the input box and finally add this animation to the prompt statement of the input box. So how do we add the animation? ?
I use jquery to implement the class operation, that is, using addClass() and in jQuery removeClass() method to achieve.
So before that, we need to write the animation into a class first, and then operate this class through jQuery.
I simply wrote a class here, and then wrote the animation into it:
.userNameTipA{
animation: user 0.3s linear normal forwards;
animation-iteration-count: 1;
} Then we can operate this class through jQuery :
$('#userName').focus(function () {
    $('.userNameTip').addClass('userNameTipA');
    console.log("点击了");
})
$('#userName').blur(function () {
let val = $('#userName').val();
if (val) {
return;
    } else {
        $('.userNameTip').removeClass('userNameTipA');
    }
});Finally click save and run, and you can see the effect.
Summary
In fact, this demo is still very simple. It uses some positioning to adjust the position of the input box, and then implements animation according to the focus style and defocus style of the input box, and finally jQuery to operate this animation.
Recommended study: "css video tutorial"
The above is the detailed content of Teach you step by step how to use CSS to create a simple and elegant input box. For more information, please follow other related articles on the PHP Chinese website!

Hot AI Tools

Undresser.AI Undress
AI-powered app for creating realistic nude photos

AI Clothes Remover
Online AI tool for removing clothes from photos.

Undress AI Tool
Undress images for free

Clothoff.io
AI clothes remover

Video Face Swap
Swap faces in any video effortlessly with our completely free AI face swap tool!

Hot Article
Hot Tools

Notepad++7.3.1
Easy-to-use and free code editor

SublimeText3 Chinese version
Chinese version, very easy to use

Zend Studio 13.0.1
Powerful PHP integrated development environment

Dreamweaver CS6
Visual web development tools

SublimeText3 Mac version
God-level code editing software (SublimeText3)
Hot Topics
 1393
1393
 52
1207
24
52
1207
24

 How to use bootstrap in vue
Apr 07, 2025 pm 11:33 PM
How to use bootstrap in vue
Apr 07, 2025 pm 11:33 PM
Using Bootstrap in Vue.js is divided into five steps: Install Bootstrap. Import Bootstrap in main.js. Use the Bootstrap component directly in the template. Optional: Custom style. Optional: Use plug-ins.
 The Roles of HTML, CSS, and JavaScript: Core Responsibilities
Apr 08, 2025 pm 07:05 PM
The Roles of HTML, CSS, and JavaScript: Core Responsibilities
Apr 08, 2025 pm 07:05 PM
HTML defines the web structure, CSS is responsible for style and layout, and JavaScript gives dynamic interaction. The three perform their duties in web development and jointly build a colorful website.
 How to write split lines on bootstrap
Apr 07, 2025 pm 03:12 PM
How to write split lines on bootstrap
Apr 07, 2025 pm 03:12 PM
There are two ways to create a Bootstrap split line: using the tag, which creates a horizontal split line. Use the CSS border property to create custom style split lines.
 Understanding HTML, CSS, and JavaScript: A Beginner's Guide
Apr 12, 2025 am 12:02 AM
Understanding HTML, CSS, and JavaScript: A Beginner's Guide
Apr 12, 2025 am 12:02 AM
WebdevelopmentreliesonHTML,CSS,andJavaScript:1)HTMLstructurescontent,2)CSSstylesit,and3)JavaScriptaddsinteractivity,formingthebasisofmodernwebexperiences.
 How to set up the framework for bootstrap
Apr 07, 2025 pm 03:27 PM
How to set up the framework for bootstrap
Apr 07, 2025 pm 03:27 PM
To set up the Bootstrap framework, you need to follow these steps: 1. Reference the Bootstrap file via CDN; 2. Download and host the file on your own server; 3. Include the Bootstrap file in HTML; 4. Compile Sass/Less as needed; 5. Import a custom file (optional). Once setup is complete, you can use Bootstrap's grid systems, components, and styles to create responsive websites and applications.
 How to insert pictures on bootstrap
Apr 07, 2025 pm 03:30 PM
How to insert pictures on bootstrap
Apr 07, 2025 pm 03:30 PM
There are several ways to insert images in Bootstrap: insert images directly, using the HTML img tag. With the Bootstrap image component, you can provide responsive images and more styles. Set the image size, use the img-fluid class to make the image adaptable. Set the border, using the img-bordered class. Set the rounded corners and use the img-rounded class. Set the shadow, use the shadow class. Resize and position the image, using CSS style. Using the background image, use the background-image CSS property.
 How to use bootstrap button
Apr 07, 2025 pm 03:09 PM
How to use bootstrap button
Apr 07, 2025 pm 03:09 PM
How to use the Bootstrap button? Introduce Bootstrap CSS to create button elements and add Bootstrap button class to add button text
 How to resize bootstrap
Apr 07, 2025 pm 03:18 PM
How to resize bootstrap
Apr 07, 2025 pm 03:18 PM
To adjust the size of elements in Bootstrap, you can use the dimension class, which includes: adjusting width: .col-, .w-, .mw-adjust height: .h-, .min-h-, .max-h-
