
 Web Front-end
JS Tutorial
An article explaining the identity authentication of express in Node in detail
Web Front-end
JS Tutorial
An article explaining the identity authentication of express in Node in detail
An article explaining the identity authentication of express in Node in detail

This article will introduce you to the express framework in Node and introduce the identity authentication in express. I hope it will be helpful to you!

Web Development Model
There are currently two mainstream Web development models:
Traditional Web development model based on server-side rendering
The concept of server-side rendering: The HTML page sent by the server to the client is dynamically generated on the server through string splicing. Therefore, the client does not need to use technologies such as Ajax to additionally request page data. [Related tutorial recommendations: nodejs video tutorial, Programming teaching]
The code is as follows:
1 2 3 4 5 6 7 8 |
|
The advantages and disadvantages of server-side rendering
Advantages:
1)The front-end takes less time: Because the server is responsible for dynamic generation For HTML content, the browser only needs to render the page directly. Especially the mobile version is more power-saving.
2) is conducive to SEO: Because the server responds with the complete HTML page content, it is easier for crawlers to crawl and obtain information, which is more conducive to SEO.
Disadvantages:
1)Occupies server-side resources: That is, the server-side completes HTML The splicing of page content will put a certain amount of access pressure on the server if there are many requests.
2)It is not conducive to the separation of front-end and back-end, and the development efficiency is low: Using server-side rendering, division of labor and cooperation cannot be carried out, especially for projects with high front-end complexity. It is not conducive to efficient project development.
New Web development model based on front-end and back-end separation
The concept of front-end and back-end separation: the development model of front-end and back-end separation, dependence Widely used in Ajax technology. In short, the Web development model with separate front-end and back-end is a development model in which the back-end is only responsible for providing API interfaces, and the front-end uses Ajax to call the interface.
The advantages and disadvantages of front-end and back-end separation
Advantages:
1) Development Good experience. The front-end focuses on the development of UI pages, and the back-end focuses on the development of APIs, and the front-end has more selectivity
2) Good user experience. The extensive application of Ajax technology has greatly improved the user experience and can easily realize partial refresh of the page
3) Reduces the rendering pressure on the server side. Because the page is ultimately generated in each user's browser.
Disadvantages:
1) Not good for SE0. Because the complete HTML page needs to be dynamically spliced on the client, the crawler cannot crawl the effective information of the page. (Solution: Using SSR (server side render) technology of front-end frameworks such as Vue and React can solve SEO problems very well!)
How to choose web development Mode
For example, for an enterprise-level website, the main function is display without complex interactions, and requires good SEO, then we need to use server-side rendering; and similar background management projects , the interactivity is relatively strong, and there is no need to consider SEO, so you can use the development model that separates the front and back ends.
Therefore, the specific development model to be used is not absolute. In order to take into account both the rendering speed of the homepage and the development efficiency of front-end and back-end separation, some websites use first-screen server-side rendering + front-end and front-end separation for other pages. development model.
Identity Authentication
Identity Authentication(Authentication) also known as "Identity Verification" and "Authentication" refer to the completion of confirmation of user identity through certain means. In Web development, user identity authentication is also involved, such as: 手机版客户端登录、EMAIL PASSWORD LOGIN## for major websites #, QR code login, etc.
Purpose of identity authentication: To confirm that the user currently claiming a certain identity is indeed the claimed user.
Identity authentication under different development modes
对于服务端渲染和前后端分离这两种开发模式来说,分别有着不同的身份认证方案:
1)服务端渲染推荐使用 Session 认证机制
2)前后端分离推荐使用 JWT 认证机制
Session认证机制
HTTP协议的无状态性:指的是客户端的每次HTTP请求都是独立的,连续多个请求之间没有直接的关系,服务器不会主动保留每次HTTP请求的状态。而要想突破HTTP的无状态的限制,就需要借助Cookie。
Cookie是存储在用户浏览器中的一段不超过4KB的字符串。它由一个名称(Name)、一个值(Value)和其它几个用于控制Cookie有效期、安全性、使用范围的可选属性组成。不同域名下的Cookie 各自独立,每当客户端发起请求时,会自动把当前域名下所有未过期的Cookie一同发送到服务器。

Cookie的特性:自动发送、域名独立、过期时限、4KB限制。
Cookie在身份认证中的作用
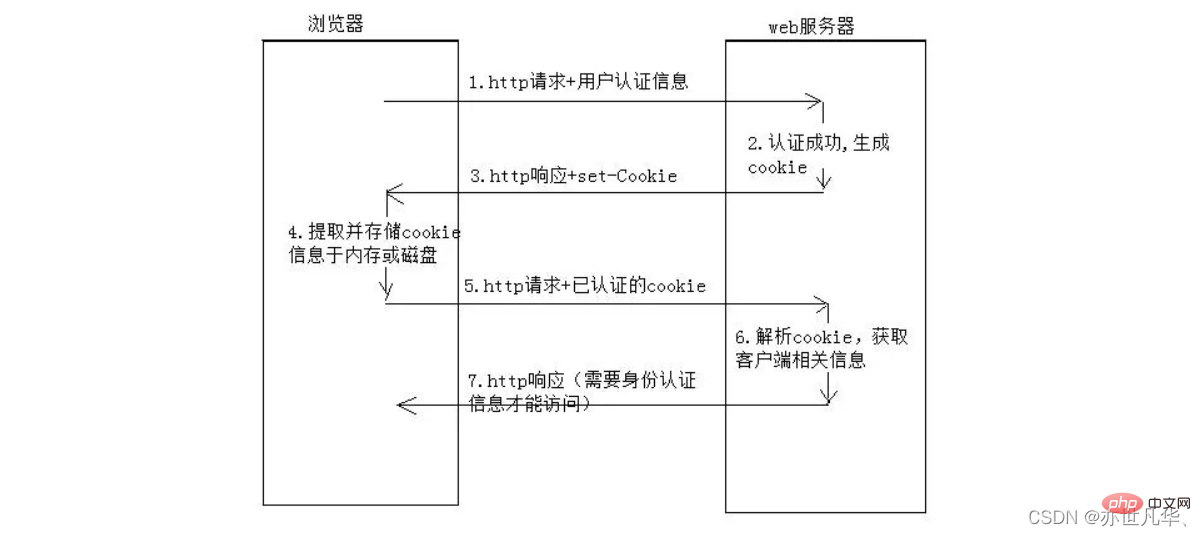
客户端第一次请求服务器的时候,服务器通过响应头的形式,向客户端发送一个身份认证的Cookie,客户端会自动将Cookie保存在浏览器中。随后,当客户端浏览器每次请求服务器的时候,浏览器会自动将身份认证相关的Cookie,通过请求头的形式发送给服务器,服务器即可验明客户端的身份。
Cookie的安全性问题
由于Cookie是存储在浏览器中的,而且浏览器提供了读写Cookie的API,因此Cookie很容易被伪造,不具有安全性。因此不建议服务器将重要的隐私数据,通过Cookie的形式发送给浏览器,所以千万不要使用Cookie存储重要且隐私的数据,比如用户的身份信息、密码等。
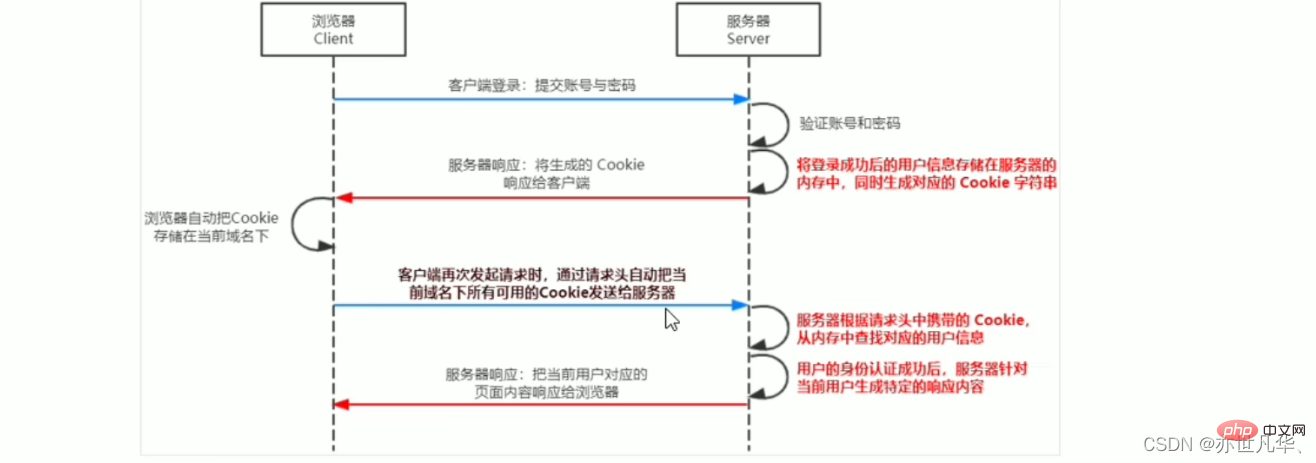
而Session的认证机制就是为了提高cookie安全性的一种认证机制。
Session的工作原理
在Express中使用Session认证
在Express项目中,只需安装 express-session 中间件,即可在项目中使用Session认证:
1 |
|
express-session中间件安装完成后,需要通过app.use()来注册session中间件,代码如下:
1 2 3 4 5 6 7 |
|
当express-session中间件配置成功后,即可通过 req.session 来访问和使用 session 对象,从而存储用户的关键信息:
1 2 3 4 5 6 7 8 9 10 11 12 |
|
当然也可以直接从 req.session 对象上获取之前存储的数据。代码如下:
1 2 3 4 5 6 7 8 |
|
Session认证的局限性:Session认证机制需要配合Cookie 才能实现。由于Cookie默认不支持跨域访问,所以,当涉及到前端跨域请求后端接口的时候,需要做很多额外的配置,才能实现跨域Session认证。
当前端请求后端接口不存在跨域问题的时候,推荐使用Session身份认证机制。
JWT认证机制
JWT(英文全称:JSON Web Token)是目前最流行的跨域认证解决方案。当前端需要跨域请求后端接口的时候,不推荐使用Session身份认证机制,推荐使用JWT认证机制。
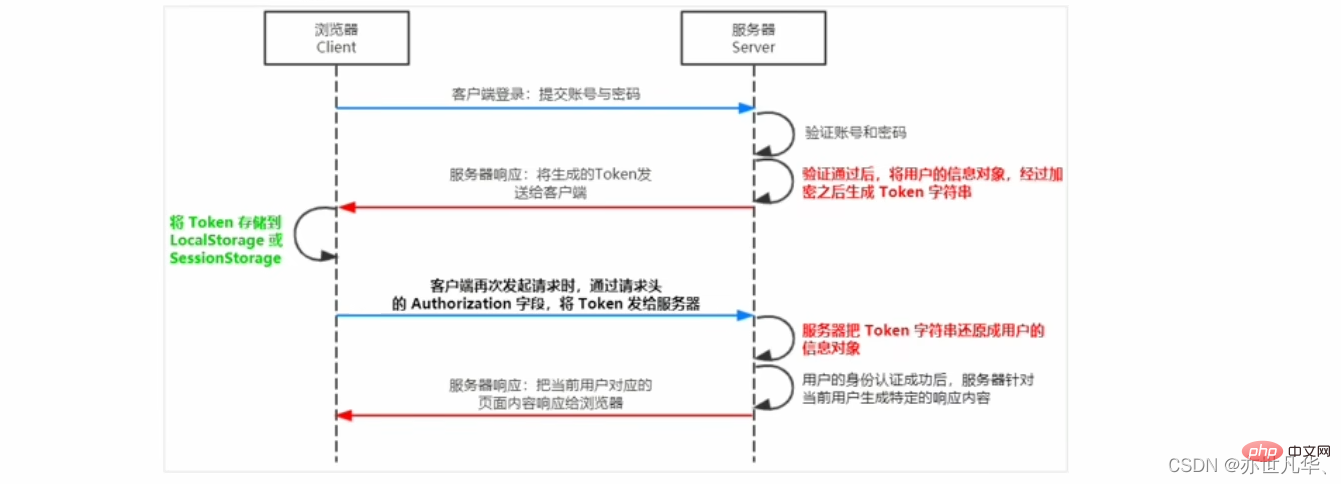
JWT工作原理:用户的信息通过Token字符串的形式,保存在客户端浏览器中。服务器通过还原Token字符串的形式来认证用户的身份。
JWT的组成部分:
Header(头部)、Payload(有效荷载)、Signature(签名)。
Payload部分才是真正的用户信息,它是用户信息经过加密之后生成的字符串。
Header和Signature是安全性相关的部分,只是为了保证Token的安全性。
三者之间使用英文的“.”分隔,格式如下:
1 |
|
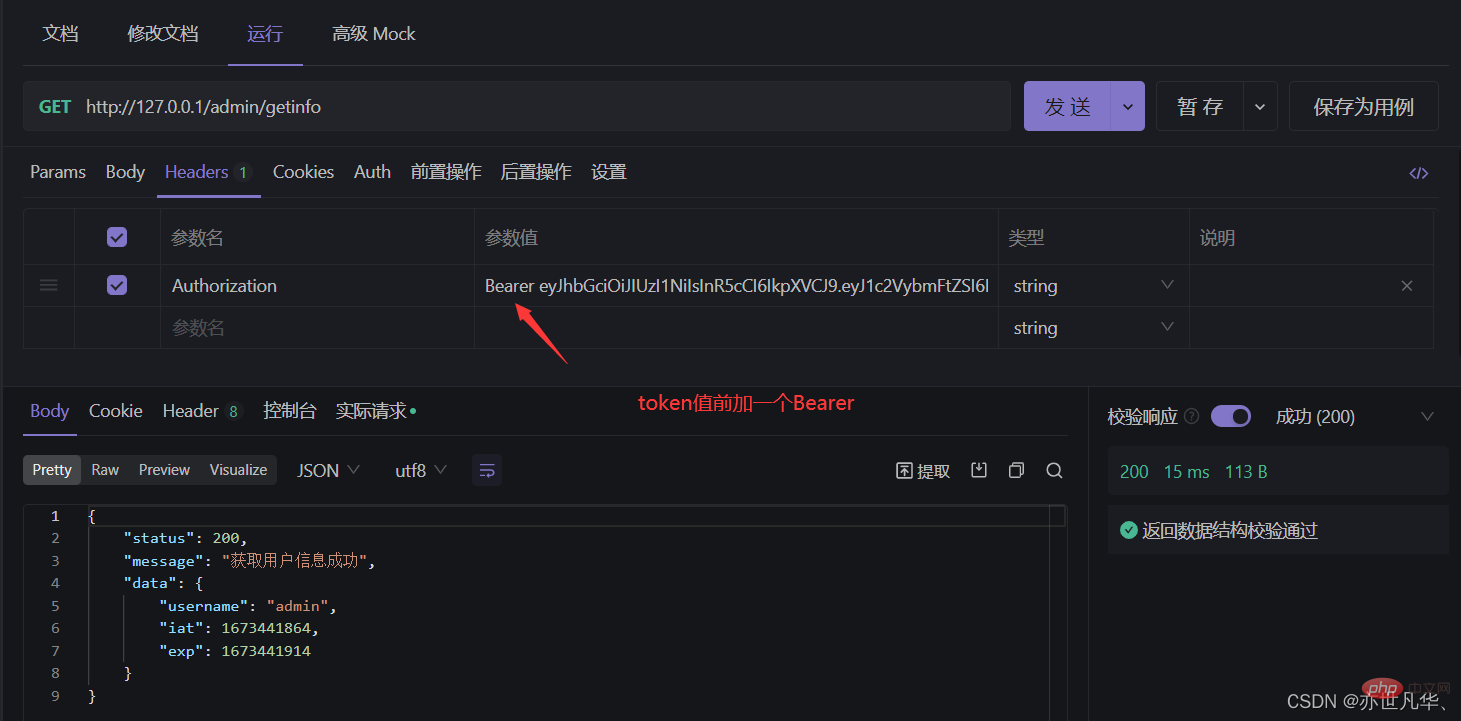
JWT的使用方式: 客户端收到服务器返回的WT之后,通常会将它储存在localStorage或sessionStorage中。此后,客户端每次与服务器通信,都要带上这个WT的字符串,从而进行身份认证。推荐的做法是把JWT放在HTTP请求头的Authorization字段中,格式如下:
1 |
|
在Express中使用JWT
运行如下命令安装两个JWT相关的包:
1 2 3 |
|
定义secret密钥:为了保证JWT字符串的安全性,防止JWT字符串在网络传输过程中被别人破解,我们需要专门定义一个用于加密和解密的secret密钥。
当生成JWT字符串的时候,需要使用 secret 密钥对用户的信息进行加密,最终得到加密好的JWT字符串;当把JWT字符串解析还原成JSON对象的时候,需要使用secret密钥进行解密。
1 2 |
|
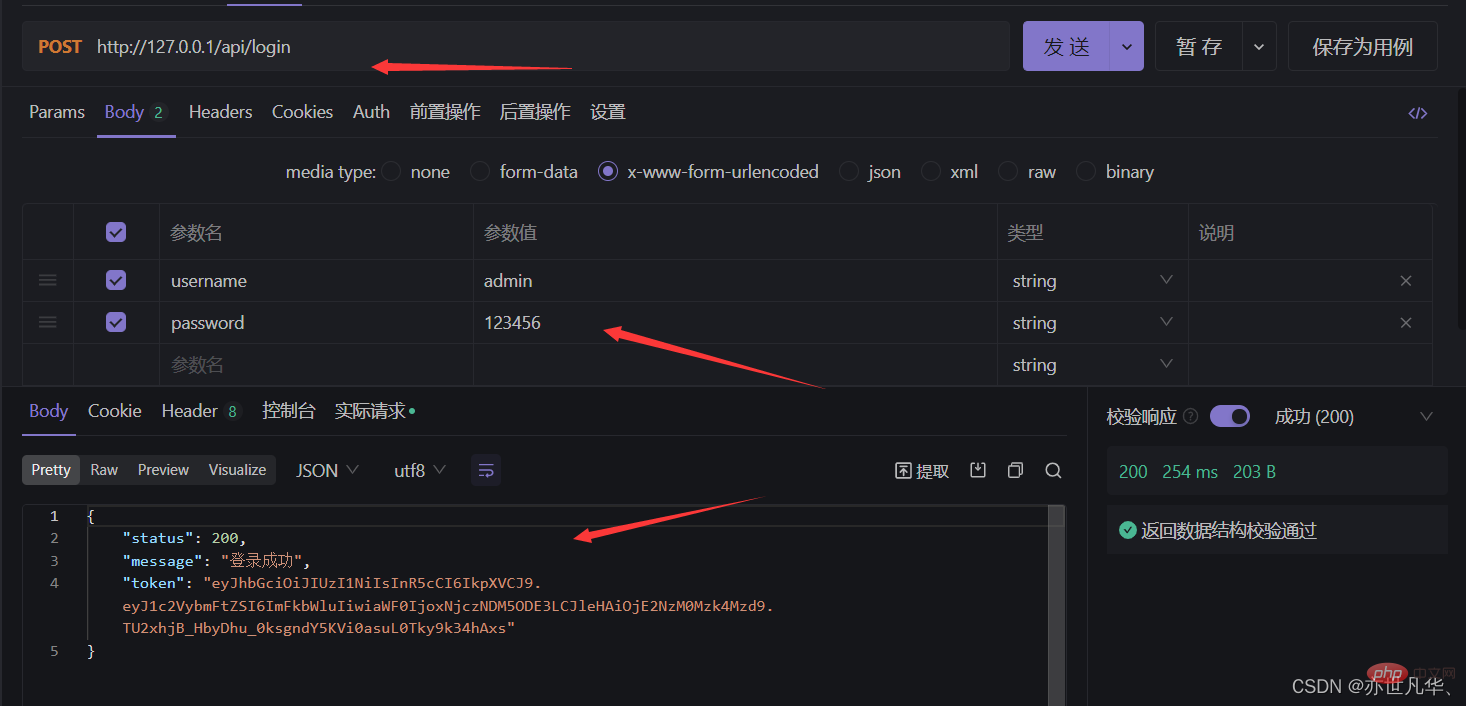
生成JWT字符串:调用jsonwebtoken包提供的sign()方法,将用户的信息加密成JWT字符串,响应给客户端。
1 2 3 4 5 6 7 8 9 10 11 12 13 14 15 16 17 18 19 20 |
|
JWT字符串还原为JSON对象:客户端每次在访问那些有权限接口的时候,都需要主动通过请求头中的Authorization字段将Token字符串发送到服务器进行身份认证。此时,服务器可以通过express-jwt这个中间件,自动将客户端发送过来的Token解析还原成JSON对象。
1 2 3 4 |
|
使用req.user获取用户信息:当express-jwt这个中间件配置成功之后,即可在那些有权限的接口中,使用req.user对象,来访问从WT字符串中解析出来的用户信息了,示例代码如下:
1 2 3 4 5 6 7 8 9 |
|
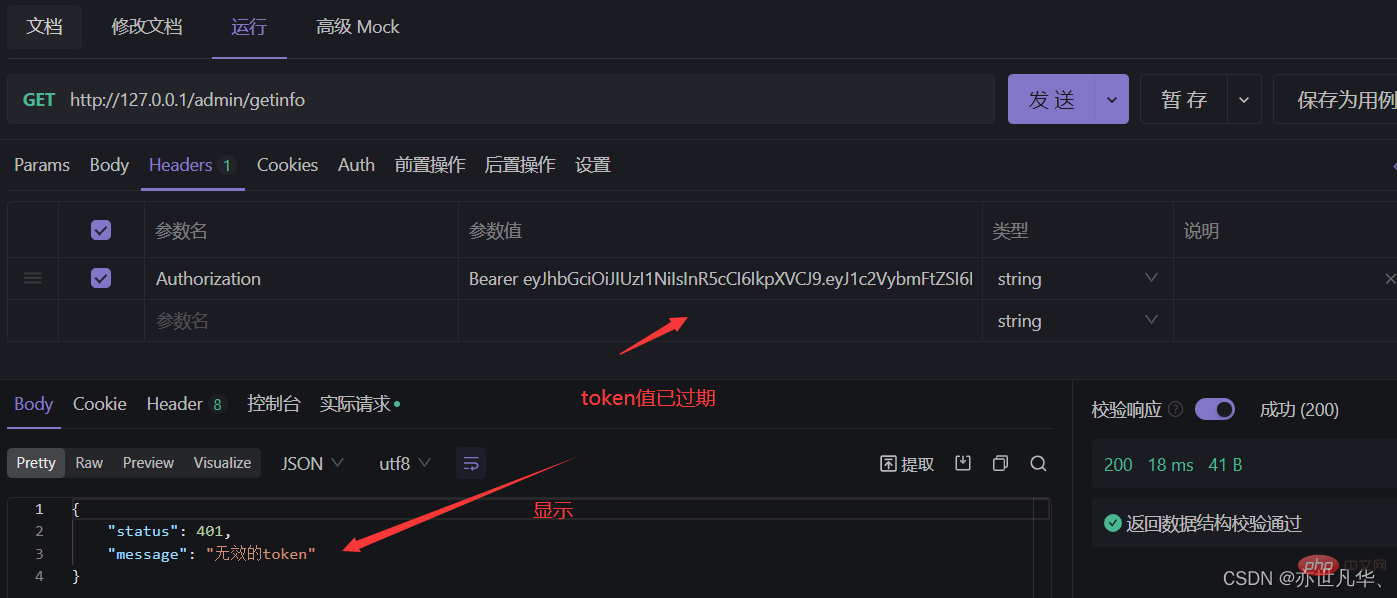
捕获解析JWT失败后产生的错误:当使用express-jwt解析Token字符串时,如果客户端发送过来的Token字符串过期或不合法,会产生一个解析失败的错误,影响项目的正常运行。我们可以通过 Express的错误中间件,捕获这个错误并进行相关的处理,示例代码如下:
1 2 3 4 5 6 7 8 9 10 11 12 13 14 |
|
具体详细代码如下:
1 2 3 4 5 6 7 8 9 10 11 12 13 14 15 16 17 18 19 20 21 22 23 24 25 26 27 28 29 30 31 32 33 34 35 36 37 38 39 40 41 42 43 44 45 46 47 48 49 50 51 52 53 54 55 56 57 58 59 60 61 62 63 64 65 66 67 68 69 70 71 72 73 74 75 76 |
|
更多node相关知识,请访问:nodejs 教程!
The above is the detailed content of An article explaining the identity authentication of express in Node in detail. For more information, please follow other related articles on the PHP Chinese website!

Hot AI Tools

Undresser.AI Undress
AI-powered app for creating realistic nude photos

AI Clothes Remover
Online AI tool for removing clothes from photos.

Undress AI Tool
Undress images for free

Clothoff.io
AI clothes remover

Video Face Swap
Swap faces in any video effortlessly with our completely free AI face swap tool!
Hot Article
Hot Tools

Notepad++7.3.1
Easy-to-use and free code editor

SublimeText3 Chinese version
Chinese version, very easy to use

Zend Studio 13.0.1
Powerful PHP integrated development environment

Dreamweaver CS6
Visual web development tools

SublimeText3 Mac version
God-level code editing software (SublimeText3)
Hot Topics
 1389
1389
 52
52

 How to use express to handle file upload in node project
Mar 28, 2023 pm 07:28 PM
How to use express to handle file upload in node project
Mar 28, 2023 pm 07:28 PM
How to handle file upload? The following article will introduce to you how to use express to handle file uploads in the node project. I hope it will be helpful to you!
 How to delete node in nvm
Dec 29, 2022 am 10:07 AM
How to delete node in nvm
Dec 29, 2022 am 10:07 AM
How to delete node with nvm: 1. Download "nvm-setup.zip" and install it on the C drive; 2. Configure environment variables and check the version number through the "nvm -v" command; 3. Use the "nvm install" command Install node; 4. Delete the installed node through the "nvm uninstall" command.
 An in-depth analysis of Node's process management tool 'pm2”
Apr 03, 2023 pm 06:02 PM
An in-depth analysis of Node's process management tool 'pm2”
Apr 03, 2023 pm 06:02 PM
This article will share with you Node's process management tool "pm2", and talk about why pm2 is needed, how to install and use pm2, I hope it will be helpful to everyone!
 Pi Node Teaching: What is a Pi Node? How to install and set up Pi Node?
Mar 05, 2025 pm 05:57 PM
Pi Node Teaching: What is a Pi Node? How to install and set up Pi Node?
Mar 05, 2025 pm 05:57 PM
Detailed explanation and installation guide for PiNetwork nodes This article will introduce the PiNetwork ecosystem in detail - Pi nodes, a key role in the PiNetwork ecosystem, and provide complete steps for installation and configuration. After the launch of the PiNetwork blockchain test network, Pi nodes have become an important part of many pioneers actively participating in the testing, preparing for the upcoming main network release. If you don’t know PiNetwork yet, please refer to what is Picoin? What is the price for listing? Pi usage, mining and security analysis. What is PiNetwork? The PiNetwork project started in 2019 and owns its exclusive cryptocurrency Pi Coin. The project aims to create a one that everyone can participate
 Let's talk about how to use pkg to package Node.js projects into executable files.
Dec 02, 2022 pm 09:06 PM
Let's talk about how to use pkg to package Node.js projects into executable files.
Dec 02, 2022 pm 09:06 PM
How to package nodejs executable file with pkg? The following article will introduce to you how to use pkg to package a Node project into an executable file. I hope it will be helpful to you!
 What to do if npm node gyp fails
Dec 29, 2022 pm 02:42 PM
What to do if npm node gyp fails
Dec 29, 2022 pm 02:42 PM
npm node gyp fails because "node-gyp.js" does not match the version of "Node.js". The solution is: 1. Clear the node cache through "npm cache clean -f"; 2. Through "npm install -g n" Install the n module; 3. Install the "node v12.21.0" version through the "n v12.21.0" command.
 Token-based authentication with Angular and Node
Sep 01, 2023 pm 02:01 PM
Token-based authentication with Angular and Node
Sep 01, 2023 pm 02:01 PM
Authentication is one of the most important parts of any web application. This tutorial discusses token-based authentication systems and how they differ from traditional login systems. By the end of this tutorial, you will see a fully working demo written in Angular and Node.js. Traditional Authentication Systems Before moving on to token-based authentication systems, let’s take a look at traditional authentication systems. The user provides their username and password in the login form and clicks Login. After making the request, authenticate the user on the backend by querying the database. If the request is valid, a session is created using the user information obtained from the database, and the session information is returned in the response header so that the session ID is stored in the browser. Provides access to applications subject to
 What is a single sign-on system? How to implement it using nodejs?
Feb 24, 2023 pm 07:33 PM
What is a single sign-on system? How to implement it using nodejs?
Feb 24, 2023 pm 07:33 PM
What is a single sign-on system? How to implement it using nodejs? The following article will introduce to you how to use node to implement a single sign-on system. I hope it will be helpful to you!
