What to do if vue file upload error occurs
Solution to vue file upload error: 1. Create a vue project through "vue init webpack demo"; 2. Add an element to upload files; 3. Add "upload(data)" to the method Method; 4. Use FromData to add the required parameters, and use axios to submit the request.

The operating environment of this tutorial: Windows 10 system, vue3 version, DELL G3 computer
What should I do if there is an error when uploading vue files?
The solution to Vue’s failure to upload files
A colleague who developed the front-end in a project used Vue to develop a Module for uploading files, but it cannot submit this POST request to the background service anyway.
The specific phenomenon is that when the front-end interface uploads files,
Content-Type is always application/x-www-form-urlencoded , and then SpringBoot's background service reports an error: Current is not a multipart request. It means that the request is wrong.
In fact, when the post uploads the file, it should be Content-Type: multipart/form-data, but the front end is inside the intranet and is encapsulated. After analysis and testing, there is no problem uploading a file using ordinary HTML. The problem must lie in the VUE submission request process. Because the real development environment is in the company's intranet environment and is isolated from the outside world, I decided to simulate this scenario on my computer to facilitate problem solving.
In order to realize this simulated environment, you need to install a Vue development environment and a Python development environment. These two development installation methods are not the focus of the article, so they are skipped.
General idea:
Use Vue to develop a simple front-end interface to implement the file upload function, and then use Python to develop a Web back-end service.
Step 1: Create a WEB page with Vue
Create a vue project:
vue init webpack demo
To submit a request using axios, you don’t need to install it. Use Just import it directly
Use VSCode to open the newly created vue project
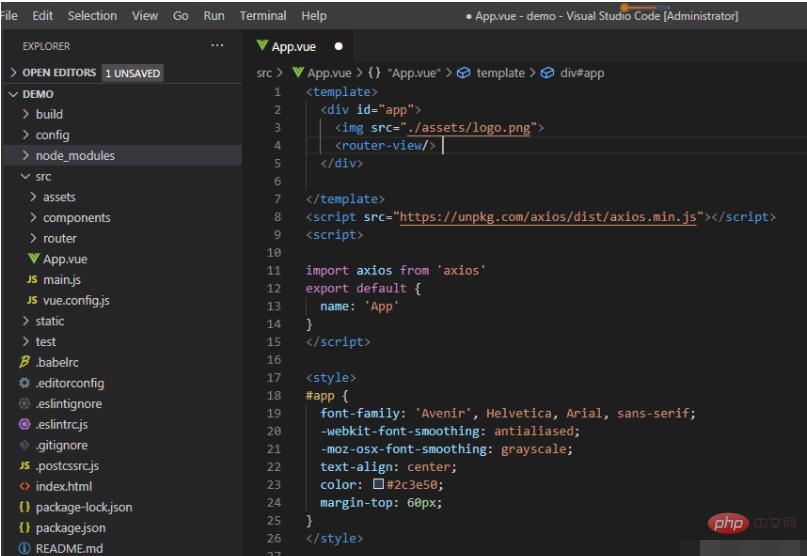
Add an element to upload files:
<template>
<div>
<img src="/static/imghw/default1.png" data-src="./assets/logo.png" class="lazy" alt="What to do if vue file upload error occurs" >
<router-view></router-view>
<input>
</div>
</template>
<script></script>
<script>
import axios from 'axios'
export default {
name: 'App'
}
</script>
<style>
#app {
font-family: 'Avenir', Helvetica, Arial, sans-serif;
-webkit-font-smoothing: antialiased;
-moz-osx-font-smoothing: grayscale;
text-align: center;
color: #2c3e50;
margin-top: 60px;
}
</style>Key points
Then add the control script:
<template>
<div>
<img src="/static/imghw/default1.png" data-src="./assets/logo.png" class="lazy" alt="What to do if vue file upload error occurs" >
<router-view></router-view>
<input>
</div>
</template>
<script></script>
<script>
import axios from 'axios'
export default {
name: 'App',
methods:{
upload(data){
console.log('--->',data)
var formData = new FormData();
formData.append('side', 'front');
formData.append('file',data.target.files[0]);
let config = {
headers: {
'Content-Type': 'multipart/form-data'
}
};
axios.post('http://127.0.0.1:5050/icard/check',formData,config)
.then((response) => {
console.log("OK");
})
}
}
}</script>Add the upload(data) method to the method
Use FromData to add the required parameters and submit it with axios Just request it.
Step 2: Use Python to develop a simple Web service
from flask import Flask, request
from flask_cors import CORS

app = Flask(__name__)

#跨域处理
cors = CORS(app, supports_credentials=True)

@app.route('/icard/check',methods=['POST'])
def deal_request1():
    print('收到post请求')
    side = request.form["side"]
    image = request.files.get('file')

    print("side= %s"% (side))
    print("filename= %s"% (image.filename))

    return "OK"

if __name__ == '__main__':
app.run(host="127.0.0.1", port=5050)Python's Flask is simply too sharp, and it is so easy to create a simple WEB service.
The basic idea is to create a service on the local port 5050. When there is an HTTP request for the URL http://127.0.0.1:5050/idcard/check, it receives parameters and prints out the received parameters.
After starting in jupyter, the following is as follows:
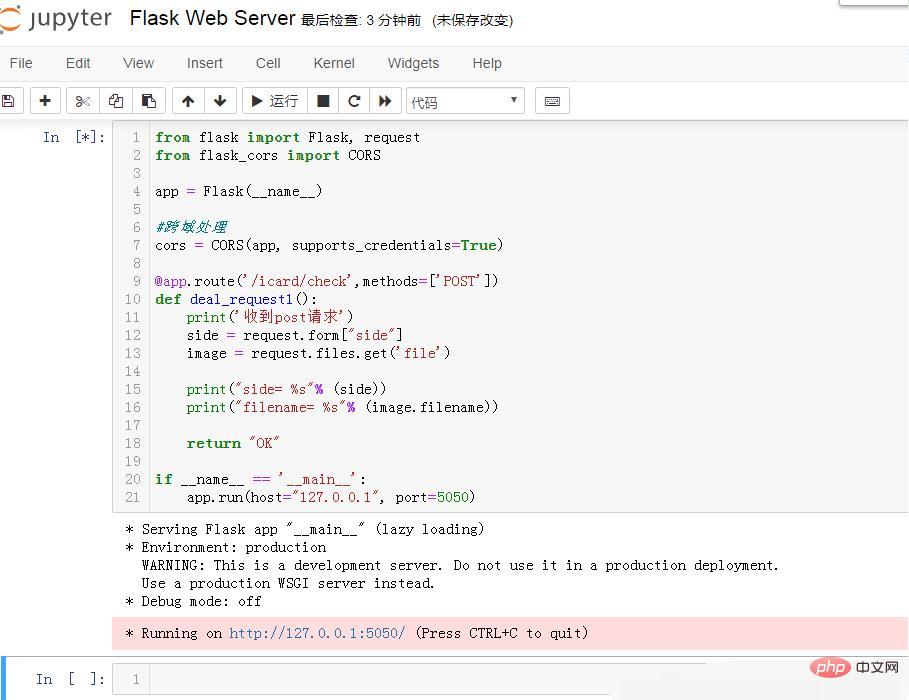
After starting, the prompt: Running on http://127.0.0.1:5050/ (Press CTRL C to quit )
OK, the simple WEB service is started, then start vue,
Open the command line terminal in VSCodel, enter npm run dev to start,
Then Open in the browser https://www.php.cn/link/5ba026c424f718a4808f9d3f75856dab

So you can see the log information in the browser 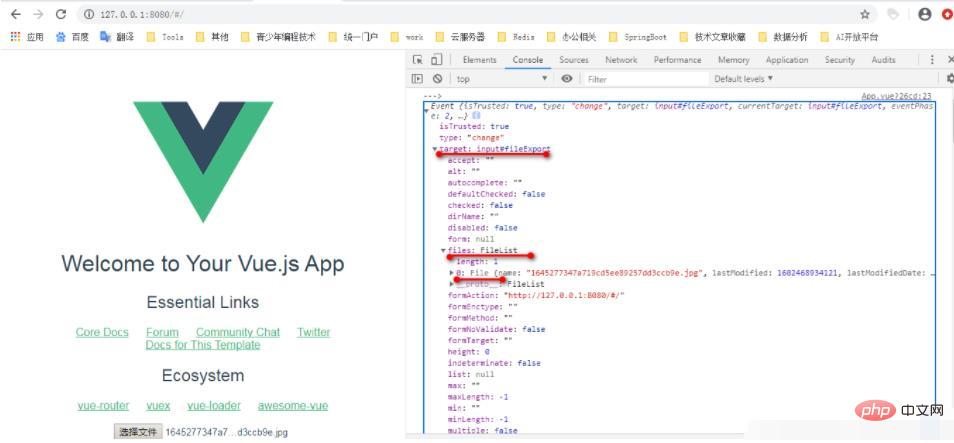
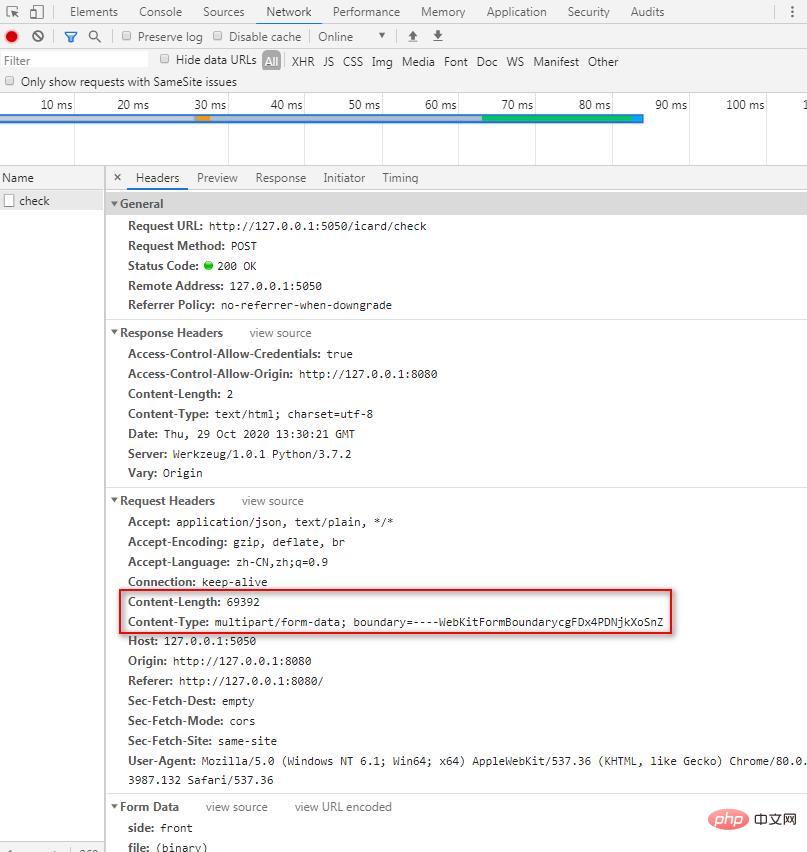
Content-Length: 69392
Content-Type: multipart/form-data; boundary=----WebKitFormBoundarycgFDx4PDNjkXoSnZ
第一行表示上传的文件大小字节数,
Content-Type代表发送端发送的实体数据的数据类型,如果向服务器端发送的是普通的字符串,默认设置为:text/html;
post请求肯定要发送数据包;
因此对数据包的Type有专门的限定:
Content-Type只能是
application/x-www-form-urlencoded,
application/json
multipart/form-data
或 text/plain中的一种。
其他的均不常见。
在看看服务端的情况:

Web 服务端立即输出了相关信息,说明已经得到了上传文件的数据,这里为了做测试仅仅输出了文件名和另一个参数。
在我的电脑上测试上传文件,接收文件都OK。
然后同事根据我的代码修改了内网VUE工程的代码,问题来了,在内网里上传文件时也用console.log(data)输出了event,但是格式和这里不同哦,这是很大的疑惑或许是环境问题吧,
在我的测试工程中用event.target.file[0]可以得到需要上传的文件对象,但是在内网环境下event里面根本木有target这个节点,根据最后需要的是file节点的特征,在raw节点下找到了file节点,然后代码修改为
upload(data){
          console.log('--->',data)
          var formData = new FormData();
          formData.append('side', 'front');
          formData.append('file',data.raw.files[0]);

          let config = {
            // headers: {
            //   'Content-Type': 'multipart/form-data'
            // }
          };
          axios.post('http://127.0.0.1:5050/icard/check',formData,config)
            .then((response) => {
                console.log("OK");
          })
}内网环境下上传文件成功了。并且测试发现,只要这里正确得到了文件对象参数,那么可以不用显式指定Content-Type,这里也会自动把Content-Type设置为multipart/form-data,我不了解Vue底层是如何处理的,可能是发现提交的数据是流,因此把这里的类型自动设置成了multipart/form-data。
推荐学习:《vue视频教程》
The above is the detailed content of What to do if vue file upload error occurs. For more information, please follow other related articles on the PHP Chinese website!

Hot AI Tools

Undresser.AI Undress
AI-powered app for creating realistic nude photos

AI Clothes Remover
Online AI tool for removing clothes from photos.

Undress AI Tool
Undress images for free

Clothoff.io
AI clothes remover

Video Face Swap
Swap faces in any video effortlessly with our completely free AI face swap tool!

Hot Article

Hot Tools

Notepad++7.3.1
Easy-to-use and free code editor

SublimeText3 Chinese version
Chinese version, very easy to use

Zend Studio 13.0.1
Powerful PHP integrated development environment

Dreamweaver CS6
Visual web development tools

SublimeText3 Mac version
God-level code editing software (SublimeText3)

Hot Topics
 1386
1386
 52
52
 How to use bootstrap in vue
Apr 07, 2025 pm 11:33 PM
Using Bootstrap in Vue.js is divided into five steps: Install Bootstrap. Import Bootstrap in main.js. Use the Bootstrap component directly in the template. Optional: Custom style. Optional: Use plug-ins.
 How to add functions to buttons for vue
Apr 08, 2025 am 08:51 AM
You can add a function to the Vue button by binding the button in the HTML template to a method. Define the method and write function logic in the Vue instance.
 How to reference js file with vue.js
Apr 07, 2025 pm 11:27 PM
There are three ways to refer to JS files in Vue.js: directly specify the path using the <script> tag;; dynamic import using the mounted() lifecycle hook; and importing through the Vuex state management library.
 How to use watch in vue
Apr 07, 2025 pm 11:36 PM
The watch option in Vue.js allows developers to listen for changes in specific data. When the data changes, watch triggers a callback function to perform update views or other tasks. Its configuration options include immediate, which specifies whether to execute a callback immediately, and deep, which specifies whether to recursively listen to changes to objects or arrays.
 What does vue multi-page development mean?
Apr 07, 2025 pm 11:57 PM
Vue multi-page development is a way to build applications using the Vue.js framework, where the application is divided into separate pages: Code Maintenance: Splitting the application into multiple pages can make the code easier to manage and maintain. Modularity: Each page can be used as a separate module for easy reuse and replacement. Simple routing: Navigation between pages can be managed through simple routing configuration. SEO Optimization: Each page has its own URL, which helps SEO.
 How to return to previous page by vue
Apr 07, 2025 pm 11:30 PM
Vue.js has four methods to return to the previous page: $router.go(-1)$router.back() uses <router-link to="/" component window.history.back(), and the method selection depends on the scene.
 How to query the version of vue
Apr 07, 2025 pm 11:24 PM
You can query the Vue version by using Vue Devtools to view the Vue tab in the browser's console. Use npm to run the "npm list -g vue" command. Find the Vue item in the "dependencies" object of the package.json file. For Vue CLI projects, run the "vue --version" command. Check the version information in the <script> tag in the HTML file that refers to the Vue file.
 How to use function intercept vue
Apr 08, 2025 am 06:51 AM
Function interception in Vue is a technique used to limit the number of times a function is called within a specified time period and prevent performance problems. The implementation method is: import the lodash library: import { debounce } from 'lodash'; Use the debounce function to create an intercept function: const debouncedFunction = debounce(() => { / Logical / }, 500); Call the intercept function, and the control function is called at most once in 500 milliseconds.


