

An article about readable streams in Node

This article will help you interpret the Node.js stream source code, gain an in-depth understanding of Node's readable streams, and take a look at its basic principles, usage and working mechanisms. I hope it will be helpful to everyone!

1. Basic concepts
##1.1. Historical evolution of streams
Streams are not a concept unique to Nodejs. They were introduced decades ago in the Unix operating system, and programs can interact with each other on streams through the pipe operator (|). The pipe operator (|) can be used in MacOS and Linux based on Unix systems. It can convert the output of the process on the left side of the operator into the input on the right side. In Node, if we use the traditional readFile to read a file, the file will be read into the memory from beginning to end. Only after all the contents have been read will the file be loaded into the memory. File contents are processed uniformly. There will be two disadvantages in doing this:- Memory aspect: taking up a lot of memory
- Time aspect: need to wait for data The data will not be processed until the entire payload of There are three types of streams, they are all instances of EventEmitter in Node.js:
- Writable Stream (Writable Stream)
- Readable and writable full-duplex stream (Duplex Stream)
- Transform Stream (Transform Stream)
- In order to study this part in depth and gradually understand the concept of streams in Node.js, and because the source code part is relatively complicated, I decided to start learning this part from the readable stream.
A stream is an abstract data structure, a collection of data, in which the data stored The type can only be the following types (only for the case where objectMode === false): string
Buffer
- We can think of the stream as These collections of data are just like liquids. We first save these liquids in a container (the internal buffer BufferList of the stream). When the corresponding event is triggered, we pour the liquid inside into the pipe and notify Others have their own containers on the other side of the pipe to catch the liquid inside for disposal.
1.3. What is a Readable Stream 
A readable stream is a stream One type, it has two modes and three statesTwo reading modes:
Flow mode: data will be read from the underlying system and passed through EventEmitter Pass the data to the registered event handler as quickly as possible- Pause mode: In this mode, the data will not be read, and the Stream.read() method must be explicitly called To read data from the stream
- Three states:
- readableFlowing === false: The flow of data will be suspended at this time, but it will not Pause the generation of data, so there will be a data backlog
- readableFlowing === true: generate and consume data normally
2. Basic principles
2.1. Internal state definition (ReadableState)
ReadableState
1 2 3 4 5 6 7 8 9 10 11 12 13 14 15 16 17 18 19 20 21 22 23 24 25 26 27 28 29 30 31 32 |
|
2.2. Internal data storage implementation (BufferList)
BufferList is a container used to store internal data in a stream. It is designed in the form of a linked list. There are three attributes head, tail and length. I represent each node in the BufferList as a BufferNode, and the type of Data inside depends on the objectMode.
This data structure obtains header data faster than Array.prototype.shift().2.2.1. Data storage type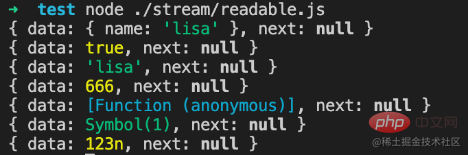
If objectMode === true: Then data can be of any type, and whatever data is pushed will be stored.
objectMode=true
1 2 3 4 5 6 7 8 9 10 11 12 13 14 15 16 17 18 19 20 |
|
If objectMode === false:
Then data can only be string or Buffer or Uint8Array
objectMode=false
1 2 3 4 5 6 7 8 9 10 11 |
|

2.2.2. 数据存储结构
我们在控制台通过node命令行创建一个可读流,来观察buffer中数据的变化:

当然在push数据之前我们需要实现他的_read方法,或者在构造函数的参数中实现read方法:
1 2 3 4 5 |
|
或者
1 2 3 4 5 6 7 |
|
经过readableStream.push('abc')操作之后,当前的buffer为:
可以看到目前的数据存储了,头尾存储的数据都是字符串'abc'的ascii码,类型为Buffer类型,length表示当前保存的数据的条数而非数据内容的大小。
2.2.3. 相关API
打印一下BufferList的所有方法可以得到:

除了join是将BufferList序列化为字符串之外,其他都是对数据的存取操作。
这里就不一一讲解所有的方法了,重点讲一下其中的consume 、_getString和_getBuffer。
2.2.3.1. consume
1 2 |
|
comsume
1 2 3 4 5 6 7 8 9 10 11 12 13 14 15 16 |
|
代码一共有三个判断条件:
如果所消耗的数据的字节长度小于链表头节点存储数据的长度,则将头节点的数据取前n字节,并把当前头节点的数据设置为切片之后的数据
如果所消耗的数据恰好等于链表头节点所存储的数据的长度,则直接返回当前头节点的数据

如果所消耗的数据的长度大于链表头节点的长度,那么会根据传入的第二个参数进行最后一次判断,判断当前的BufferList底层存储的是string还是Buffer
2.2.3.2. _getBuffer
1 2 |
|
comsume
1 2 3 4 5 6 7 8 9 10 11 12 13 14 15 16 17 18 19 20 21 22 23 24 25 26 27 28 29 30 31 32 33 |
|
总的来说就是循环对链表中的节点进行操作,新建一个Buffer数组用于存储返回的数据。
首先从链表的头节点开始取数据,不断的复制到新建的Buffer中,直到某一个节点的数据大于等于要取的长度减去已经取得的长度。
或者说读到链表的最后一个节点后,都还没有达到要取的长度,那么就返回这个新建的Buffer。
2.2.3.3. _getString
1 2 |
|
comsume
1 2 3 4 5 6 7 8 9 10 11 12 13 14 15 16 17 18 19 20 21 22 23 24 25 26 27 28 29 30 |
|
对于操作字符串来说和操作Buffer是一样的,也是循环从链表的头部开始读数据,只是进行数据的拷贝存储方面有些差异,还有就是_getString操作返回的数据类型是string类型。
2.3. 为什么可读流是EventEmitter的实例?
对于这个问题而言,首先要了解什么是发布订阅模式,发布订阅模式在大多数API中都有重要的应用,无论是Promise还是Redux,基于发布订阅模式实现的高级API随处可见。
它的优点在于能将事件的相关回调函数存储到队列中,然后在将来的某个时刻通知到对方去处理数据,从而做到关注点分离,生产者只管生产数据和通知消费者,而消费者则只管处理对应的事件及其对应的数据,而Node.js流模式刚好符合这一特点。
那么Node.js流是怎样实现基于EventEmitter创建实例的呢?
1 2 |
|
legacy
1 2 3 4 5 |
|
然后在可读流的源码中有这么几行代码:
1 2 |
|
legacy
1 2 |
|
首先将Stream的原型对象继承自EventEmitter,这样Stream的所有实例都可以访问到EventEmitter上的方法。
同时通过ObjectSetPrototypeOf(Stream, EE)将EventEmitter上的静态方法也继承过来,并在Stream的构造函数中,借用构造函数EE来实现所有EventEmitter中的属性的继承,然后在可读流里,用同样的的方法实现对Stream类的原型继承和静态属性继承,从而得到:
Readable.prototype.__proto__ === Stream.prototype;
Stream.prototype.__proto__ === EE.prototype
因此:
Readable.prototype.__proto__.__proto__ === EE.prototype
所以捋着可读流的原型链可以找到EventEmitter的原型,实现对EventEmitter的继承
2.4. 相关API的实现
这里会按照源码文档中API的出现顺序来展示,且仅解读其中的核心API实现。
注:此处仅解读Node.js可读流源码中所声明的函数,不包含外部引入的函数定义,同时为了减少篇幅,不会将所有代码都拷贝下来。
Readable.prototype
1 2 3 4 5 6 7 8 9 10 11 12 13 14 15 16 17 18 19 20 21 22 23 24 |
|
2.4.1. push
readable.push
1 2 3 |
|
push方法的主要作用就是将数据块通过触发'data'事件传递给下游管道,或者将数据存储到自身的缓冲区中。
以下代码为相关伪代码,仅展示主流程:
readable.push
1 2 3 4 5 6 7 8 9 10 11 12 13 14 15 16 17 18 19 20 21 22 23 24 25 26 27 28 29 30 31 32 33 34 35 36 37 |
|
push操作主要分为对objectMode的判断,不同的类型对传入的数据会做不同的操作:
- objectMode === false: 将数据(chunk)转换成Buffer
- objectMode === true: 将数据原封不动的传递给下游
其中addChunk的第一个判断主要是处理Readable处于流动模式、有data监听器、并且缓冲区数据为空时的情况。
这时主要将数据passthrough透传给订阅了data事件的其他程序,否则就将数据保存到缓冲区里面。
2.4.2. read
除去对边界条件的判断、流状态的判断,这个方法主要有两个操作
调用用户实现的_read方法,对执行结果进行处理
从缓冲区buffer中读取数据,并触发'data'事件
readable.read
1 2 3 4 5 6 7 8 9 10 11 12 13 14 15 16 17 18 19 20 21 |
|
如果说用户实现的_read方法返回的是一个promise,则调用这个promise的then方法,将成功和失败的回调传入,便于处理异常情况。
read方法从缓冲区里读区数据的核心代码如下:
readable.read
1 2 3 4 5 6 7 8 9 10 11 12 13 14 15 16 17 18 19 20 21 22 |
|
2.4.3. _read
用户初始化Readable stream时必须实现的方法,可以在这个方法里调用push方法,从而持续的触发read方法,当我们push null时可以停止流的写入操作。
示例代码:
readable._read
1 2 3 4 5 6 7 8 9 10 11 12 |
|
2.4.4. pipe(重要)
将一个或多个writable流绑定到当前的Readable流上,并且将Readable流切换到流动模式。
这个方法里面有很多的事件监听句柄,这里不会一一介绍:
readable.pipe
1 2 3 4 5 6 7 8 9 10 11 12 13 14 15 16 17 18 19 20 21 22 23 24 |
|
pipe操作和Linux的管道操作符'|'非常相似,将左侧输出变为右侧输入,这个方法会将可写流收集起来进行维护,并且当可读流触发'data'事件。
有数据流出时,就会触发可写流的写入事件,从而做到数据传递,实现像管道一样的操作。并且会自动将处于暂停模式的可读流变为流动模式。
2.4.5. resume
使流从'暂停'模式切换到'流动'模式,如果设置了'readable'事件监听,那么这个方法其实是没有效果的
readable.resume
1 2 3 4 5 6 7 8 9 10 11 12 13 14 15 16 17 18 19 20 21 22 23 24 25 26 27 28 29 30 |
|
2.4.6. pause
将流从流动模式转变为暂停模式,停止触发'data'事件,将所有的数据保存到缓冲区
readable.pause
1 2 3 4 5 6 7 8 |
|
2.5. 使用方法与工作机制
使用方法在BufferList部分已经讲过了,创建一个Readable实例,并实现其_read()方法,或者在构造函数的第一个对象参数中实现read方法。
2.5.1. 工作机制

Only the general process is drawn here, as well as the mode conversion triggering conditions of the Readable stream.
Among them:
- needReadable(true): pause mode and buffer data
- push: If in flow mode, there is no data in the buffer and the 'data' event will be triggered; otherwise, the data will be saved to the buffer and the 'readable' event will be triggered according to the needReadable status
- read: When reading data with length=0, the data in the buffer has reached hwm or overflowed and needs to trigger the 'readable' event; read the data from the buffer and trigger the 'data' event
- resume: There is a 'readable' listener , this method has no effect; otherwise, the stream will be changed from pause mode to flow mode, and the data in the buffer will be cleared
- readable trigger condition: the 'readable' event is bound and there is data in the buffer, push When there is data in the buffer, and needReadable === true, and when reading data with length=0, the data in the buffer has reached hwm or overflowed
3. Summary
- In order to solve the memory problem and time problem, Node.js implements its own stream, so that the data can be read into the memory in small pieces for consumers to consume
- Streams are not a concept unique to Node.js. They were introduced in the Unix operating system decades ago.
- There are four types of streams: readable stream, writable stream, readable and writable stream , conversion stream, they all inherit the instance methods and static methods of EventEmiiter, and are all instances of EE
- The underlying container of the stream is based on BufferList, which is a customized linked list implementation. The head and tail are A "pointer" points to the next node reference
- The readable stream has two modes and three states. In the flow mode, the data will be sent to the consumer through EventEmitter
- Based on the stream we can achieve Chain processing of data, and different stream processing functions can be assembled to implement various operations on the stream and convert it into the data we want
For more node-related knowledge, please visit:nodejs tutorial!
The above is the detailed content of An article about readable streams in Node. For more information, please follow other related articles on the PHP Chinese website!

Hot AI Tools

Undresser.AI Undress
AI-powered app for creating realistic nude photos

AI Clothes Remover
Online AI tool for removing clothes from photos.

Undress AI Tool
Undress images for free

Clothoff.io
AI clothes remover

Video Face Swap
Swap faces in any video effortlessly with our completely free AI face swap tool!
Hot Article
Hot Tools

Notepad++7.3.1
Easy-to-use and free code editor

SublimeText3 Chinese version
Chinese version, very easy to use

Zend Studio 13.0.1
Powerful PHP integrated development environment

Dreamweaver CS6
Visual web development tools

SublimeText3 Mac version
God-level code editing software (SublimeText3)
Hot Topics
 1389
1389
 52
52

 How to use express to handle file upload in node project
Mar 28, 2023 pm 07:28 PM
How to use express to handle file upload in node project
Mar 28, 2023 pm 07:28 PM
How to handle file upload? The following article will introduce to you how to use express to handle file uploads in the node project. I hope it will be helpful to you!
 How to delete node in nvm
Dec 29, 2022 am 10:07 AM
How to delete node in nvm
Dec 29, 2022 am 10:07 AM
How to delete node with nvm: 1. Download "nvm-setup.zip" and install it on the C drive; 2. Configure environment variables and check the version number through the "nvm -v" command; 3. Use the "nvm install" command Install node; 4. Delete the installed node through the "nvm uninstall" command.
 How to do Docker mirroring of Node service? Detailed explanation of extreme optimization
Oct 19, 2022 pm 07:38 PM
How to do Docker mirroring of Node service? Detailed explanation of extreme optimization
Oct 19, 2022 pm 07:38 PM
During this period, I was developing a HTML dynamic service that is common to all categories of Tencent documents. In order to facilitate the generation and deployment of access to various categories, and to follow the trend of cloud migration, I considered using Docker to fix service content and manage product versions in a unified manner. . This article will share the optimization experience I accumulated in the process of serving Docker for your reference.
 An in-depth analysis of Node's process management tool 'pm2”
Apr 03, 2023 pm 06:02 PM
An in-depth analysis of Node's process management tool 'pm2”
Apr 03, 2023 pm 06:02 PM
This article will share with you Node's process management tool "pm2", and talk about why pm2 is needed, how to install and use pm2, I hope it will be helpful to everyone!
 Pi Node Teaching: What is a Pi Node? How to install and set up Pi Node?
Mar 05, 2025 pm 05:57 PM
Pi Node Teaching: What is a Pi Node? How to install and set up Pi Node?
Mar 05, 2025 pm 05:57 PM
Detailed explanation and installation guide for PiNetwork nodes This article will introduce the PiNetwork ecosystem in detail - Pi nodes, a key role in the PiNetwork ecosystem, and provide complete steps for installation and configuration. After the launch of the PiNetwork blockchain test network, Pi nodes have become an important part of many pioneers actively participating in the testing, preparing for the upcoming main network release. If you don’t know PiNetwork yet, please refer to what is Picoin? What is the price for listing? Pi usage, mining and security analysis. What is PiNetwork? The PiNetwork project started in 2019 and owns its exclusive cryptocurrency Pi Coin. The project aims to create a one that everyone can participate
 Let's talk about how to use pkg to package Node.js projects into executable files.
Dec 02, 2022 pm 09:06 PM
Let's talk about how to use pkg to package Node.js projects into executable files.
Dec 02, 2022 pm 09:06 PM
How to package nodejs executable file with pkg? The following article will introduce to you how to use pkg to package a Node project into an executable file. I hope it will be helpful to you!
 What to do if npm node gyp fails
Dec 29, 2022 pm 02:42 PM
What to do if npm node gyp fails
Dec 29, 2022 pm 02:42 PM
npm node gyp fails because "node-gyp.js" does not match the version of "Node.js". The solution is: 1. Clear the node cache through "npm cache clean -f"; 2. Through "npm install -g n" Install the n module; 3. Install the "node v12.21.0" version through the "n v12.21.0" command.
 Token-based authentication with Angular and Node
Sep 01, 2023 pm 02:01 PM
Token-based authentication with Angular and Node
Sep 01, 2023 pm 02:01 PM
Authentication is one of the most important parts of any web application. This tutorial discusses token-based authentication systems and how they differ from traditional login systems. By the end of this tutorial, you will see a fully working demo written in Angular and Node.js. Traditional Authentication Systems Before moving on to token-based authentication systems, let’s take a look at traditional authentication systems. The user provides their username and password in the login form and clicks Login. After making the request, authenticate the user on the backend by querying the database. If the request is valid, a session is created using the user information obtained from the database, and the session information is returned in the response header so that the session ID is stored in the browser. Provides access to applications subject to
