

An article briefly analyzing routing and various guards in Vue

This article will give you a detailed explanation of routing in Vue and guard these two knowledge points. Friends can conduct related studies based on the content of the article

1.vue-router
A plug-in library for vue, specially used to implement single-server support for SPA applications Single page web application (SPA). There is only one complete page for the entire application. Clicking a navigation link in the page will not refresh the page, but will only partially update the page. Data needs to be obtained through ajax request.
2. What is routing
-
A route is a set of mapping relationships (key: value)
key is the path, value may be function or component
Routing classification
1. Backend routing: value function, used to process requests submitted by the client. Working process: When the server receives a request, it finds the matching function according to the request path to process the request and returns the response data. [Related recommendations: vuejs video tutorial, web front-end development]
2. Front-end routing: value is component, used to display page content . Working process: When the browser path changes, the corresponding component will be displayed.
3. Basic use of routing
1.Install vue-router
npm i vue-router
2.Apply plug-in
Vue.use(VueRouter)
3. Router configuration items
//  引入vueRouter
importvueRouterfrom'vue-router'
// 引入组件
importAboutfrom'../components/About'
importHomefrom'../components/Home'
export default new vueRouter({
     routes: [{
             path: '/about',
             component: About
         },
         {
             path: '/home',
             component: Home
         },
]})
4. Use router-link to switch (Note: router-link will become a tag after passing through the browser)
        <divclass="list-group">
          <!-- 原始写法——使用a标签进行页面的跳转 -->
          <!-- <a class="list-group-item active" href="./about.html">About</a>
          <a class="list-group-item" href="./home.html">Home</a>-->
          <!-- 使用vue-Router提供的标签进行路径的修改,实现路由的切换 -->
          <router-link
            class="list-group-item"
            active-class="active"
            to="/about">About
           </router-link>
          <router-link
            class="list-group-item"
            active-class="active"
            to="/home">Home
           </router-link>
</div>5. Use router-view to implement component presentation (similar to slots)
          <divclass="panel-body">
            <!-- 指定组件的呈现位置 -->
            <router-view>
            </router-view>
</div>Note: 1. Routing components are usually stored in the pages folder, so do not go to the components folder Put it
2. By switching, the "hidden" routing component is destroyed by default, and can be mounted when needed
3. Each component has its own $route attribute, which is stored with its own routing information.
4. There is only one router in the entire application, which can be obtained through the $router property of the component.
4. Multi-level routing
Configure the next level routing in the routing rules and routing. Use children: [ { } ] This form
    routes: [{
            path: '/about',
            component: About
        },
        {
            path: '/home',
            component: Home,
            children: [{
                    path: 'news',
                    component: News
                },
                {
                    path: 'message',
                    component: Message
                }
            ]
        },
]5. Routing parameters
There are two ways. The first is to write the query parameters directly in the path. The second is to pass params
Route naming (simplified code)

You don’t have to write a lot when you go to The path is
##1.params
1. Configure the routing statement to accept params parameters children:[
{
name:'xiangqing',
path:'detail/:id/:title',// 使用占位符声明接收参数
component:Detail,
}
]<!-- 跳转路由并携带params参数,to的字符串写法 -->
<router-link:to="`/home/message/detail/${m.id}/${m.title}`">{{m.title}}</router-link>
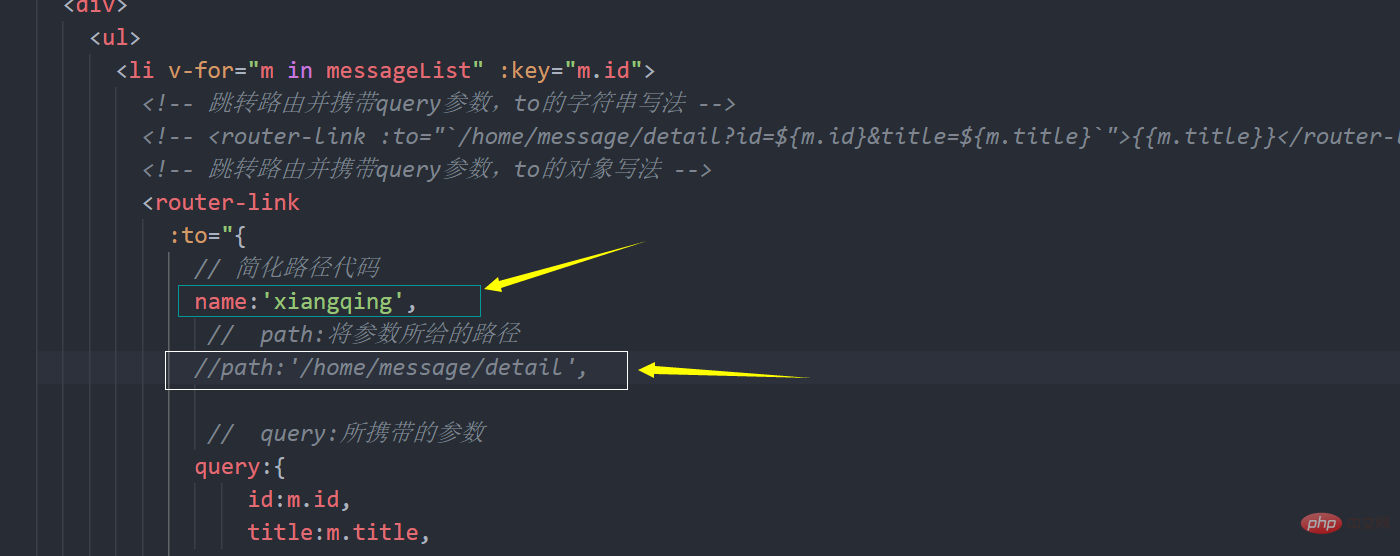
<!-- 跳转路由并携带params参数,to的对象写法 -->
<router-link
:to="{
// 简化路径代码
name:'xiangqing',// 必须使用name,不能使用path
// params:所携带的参数
params:{
id:m.id,
title:m.title,
}
}"
>{{m.title}}</router-link> <div>
<ul>
<!-- params写法 -->
<li>消息:{{$route.params.id}}</li>
<li>编号:{{$route.params.title}}</li>
</ul>
</div>2. Routing props configuration
in total There are three configuration methods, namelyObject type, Boolean type, Functional typeThe purpose is to make the routing component more convenient to receive parameters
children: [{
    name: 'xiangqing',
    // path: 'detail/:id/:title', // 使用占位符声明接收参数
    path: 'detail', // query不使用占位符声明接收参数
    component: Detail,
    // props的第一种写法
    // props:{a:"1",b:"2"},
    // 第二种写法,值为布尔值,若布尔值为真,就会把该路由组件收到的所有params參数,以props的形式传给Detail
    // props:true,
    // props的第三种写法,值为函数
    props($route) {// 使用解构赋值连续写法简化代码
        return {id:$route.query.id,title:$route.query.title}
    }
    // props({query:{id,title}}) {// 使用解构赋值连续写法简化代码
    //     return {id,title}
    // }
}]3.'s replace attribute
1. Function: Control the mode of operating browser history when routing jumps2.浏览器的历史记录有两种写入方式:分别为push和replace,push 是追加历史记录,replace 是替换当前记录。路由跳转时候默认为push,所以为push的时候可以进行后退前进操作,而replace直接就是替换掉之前的那个地址所以在replace的里面智慧存在一个地址,也就是当前所呈现的那个地址,就好比做核算,push是排队的人,replace是做核酸的医务人员
3.如何开启replace模式:

4.编程式路由导航
1.作用:不借助
  methods: {
      //后退
    back() {
      this.$router.back();
    },
      //前进
    forward() {
      this.$router.forward();
    },
      //可以后退也可以前进
    test() {
      this.$router.go(-2);
    }
}5.缓存路由组件
1.作用:让不展示的路由组件保持挂载,不被销毁。
2.具体实现方法
<keep-alivelinclude= "News">
K router-view></router-view>
</keep-alive>
两个新的生命周期钩子
1.作用:路由组件所独有的两个钩子,用于捕获路由组件的激活状态分别是activated 路由组件被激活时触发。deactivated 路由组件失活时触发。
6.路由守卫
作用:对路由进行权限控制
分类:全局守卫、独享守卫、组件内守卫
1.全局守卫
router.beforeEach((to, from, next) => {
    console.log(to, from);
    if (to.meta.isAuth) {//判断是否需要鉴权
        if (localStorage.getItem('school') ==='shanyu') {
            next();
        } else {
            alert('该学校无权限查看此内容')
        }
    } else {
        next()
    }
})
// 后置路由守卫,切换路由后调用
router.afterEach((to, from) => {
    console.log(to, from);
    document.title=to.meta.title||'山鱼屋'
})2.独享路由守卫
专门服务于一个路由的守卫
beforeEnter: (to, from, next) => {
                        console.log(to, from);
                        if (to.meta.isAuth) { //判断是否需要鉴权
                            if (localStorage.getItem('school') ==='shanyu') {
                                next();
                            } else {
                                alert('该学校无权限查看此内容')
                            }
                        } else {
                            next()
                        }
},3.组件内守卫
在进入/离开组件时被激活
//进入守卫:通过路由规则,进入该组件时被调用
beforeRouteEnter (to, from, next) {
},
//离开守卫:通过路由规则,离开该组件时被调用
beforeRouteLeave (to, from, next) {
}4.路由器的两种工作模式
对于一个url来说#其后面的内容就是hash值。

就是这个#后面的
hash的特点及使用
hash值不会带给服务器。
hash模式
1.地址中永远带着#号
2.若以后将地址通过第三方手机app分享,若app校验严格, 则地址会被标记为不合法。
3.兼容性较好。
3.history模式
1.地址干净,美观。
2.兼容性和hash模式相比略差。
3. 应用部署上线时需要后端人员支持,解决刷新页面服务端404的问题。
4.切换history模式

在route文件夹下面的index文件里添加 `mode: 'history'`这句代码即可(默认的是hash模式)
The above is the detailed content of An article briefly analyzing routing and various guards in Vue. For more information, please follow other related articles on the PHP Chinese website!

Hot AI Tools

Undresser.AI Undress
AI-powered app for creating realistic nude photos

AI Clothes Remover
Online AI tool for removing clothes from photos.

Undress AI Tool
Undress images for free

Clothoff.io
AI clothes remover

AI Hentai Generator
Generate AI Hentai for free.

Hot Article
Hot Tools

Notepad++7.3.1
Easy-to-use and free code editor

SublimeText3 Chinese version
Chinese version, very easy to use

Zend Studio 13.0.1
Powerful PHP integrated development environment

Dreamweaver CS6
Visual web development tools

SublimeText3 Mac version
God-level code editing software (SublimeText3)
Hot Topics


 How to use echarts in vue
May 09, 2024 pm 04:24 PM
How to use echarts in vue
May 09, 2024 pm 04:24 PM
Using ECharts in Vue makes it easy to add data visualization capabilities to your application. Specific steps include: installing ECharts and Vue ECharts packages, introducing ECharts, creating chart components, configuring options, using chart components, making charts responsive to Vue data, adding interactive features, and using advanced usage.
 The role of export default in vue
May 09, 2024 pm 06:48 PM
The role of export default in vue
May 09, 2024 pm 06:48 PM
Question: What is the role of export default in Vue? Detailed description: export default defines the default export of the component. When importing, components are automatically imported. Simplify the import process, improve clarity and prevent conflicts. Commonly used for exporting individual components, using both named and default exports, and registering global components.
 How to use map function in vue
May 09, 2024 pm 06:54 PM
How to use map function in vue
May 09, 2024 pm 06:54 PM
The Vue.js map function is a built-in higher-order function that creates a new array where each element is the transformed result of each element in the original array. The syntax is map(callbackFn), where callbackFn receives each element in the array as the first argument, optionally the index as the second argument, and returns a value. The map function does not change the original array.
 The difference between event and $event in vue
May 08, 2024 pm 04:42 PM
The difference between event and $event in vue
May 08, 2024 pm 04:42 PM
In Vue.js, event is a native JavaScript event triggered by the browser, while $event is a Vue-specific abstract event object used in Vue components. It is generally more convenient to use $event because it is formatted and enhanced to support data binding. Use event when you need to access specific functionality of the native event object.
 The role of onmounted in vue
May 09, 2024 pm 02:51 PM
The role of onmounted in vue
May 09, 2024 pm 02:51 PM
onMounted is a component mounting life cycle hook in Vue. Its function is to perform initialization operations after the component is mounted to the DOM, such as obtaining references to DOM elements, setting data, sending HTTP requests, registering event listeners, etc. It is only called once when the component is mounted. If you need to perform operations after the component is updated or before it is destroyed, you can use other lifecycle hooks.
 The difference between export and export default in vue
May 08, 2024 pm 05:27 PM
The difference between export and export default in vue
May 08, 2024 pm 05:27 PM
There are two ways to export modules in Vue.js: export and export default. export is used to export named entities and requires the use of curly braces; export default is used to export default entities and does not require curly braces. When importing, entities exported by export need to use their names, while entities exported by export default can be used implicitly. It is recommended to use export default for modules that need to be imported multiple times, and use export for modules that are only exported once.
 What are hooks in vue
May 09, 2024 pm 06:33 PM
What are hooks in vue
May 09, 2024 pm 06:33 PM
Vue hooks are callback functions that perform actions on specific events or lifecycle stages. They include life cycle hooks (such as beforeCreate, mounted, beforeDestroy), event handling hooks (such as click, input, keydown) and custom hooks. Hooks enhance component control, respond to component life cycles, handle user interactions and improve component reusability. To use hooks, just define the hook function, execute the logic and return an optional value.
 Onmounted in vue corresponds to which life cycle of react
May 09, 2024 pm 01:42 PM
Onmounted in vue corresponds to which life cycle of react
May 09, 2024 pm 01:42 PM
onMounted in Vue corresponds to the useEffect lifecycle method in React, with an empty dependency array [], executed immediately after the component is mounted to the DOM.
