

Take you step by step to handwrite WebSocket protocol using Node


We know that http is a question-and-answer mode. The client sends an http request to the server, and the server returns an http response.
This mode is sufficient for loading resources and data, but it is not suitable for scenarios that require data push.
Some students said, doesn’t http2 have server push?
That's just for pushing resources:
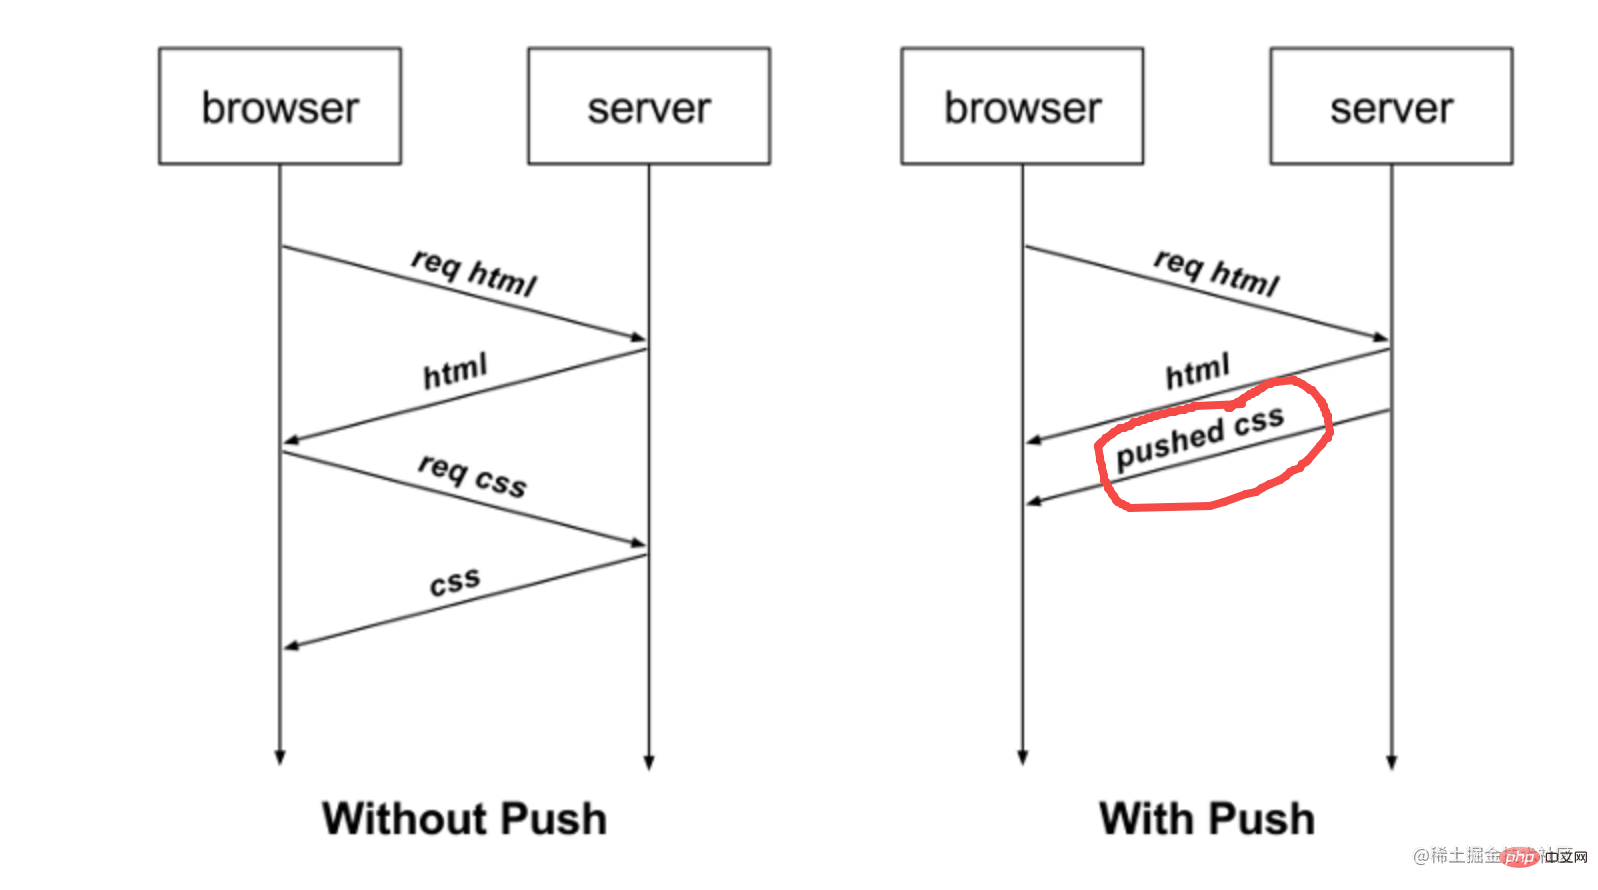
For example, if the browser requests html, the server can push the css to the browser together. The browser can decide whether to accept it or not. [Recommended related tutorials: nodejs video tutorial, Programming teaching]
For scenarios with high real-time requirements such as instant messaging, websocket is needed.
Strictly speaking, websocket has nothing to do with http. It is another protocol format. But a switching process from http to websocekt is required.
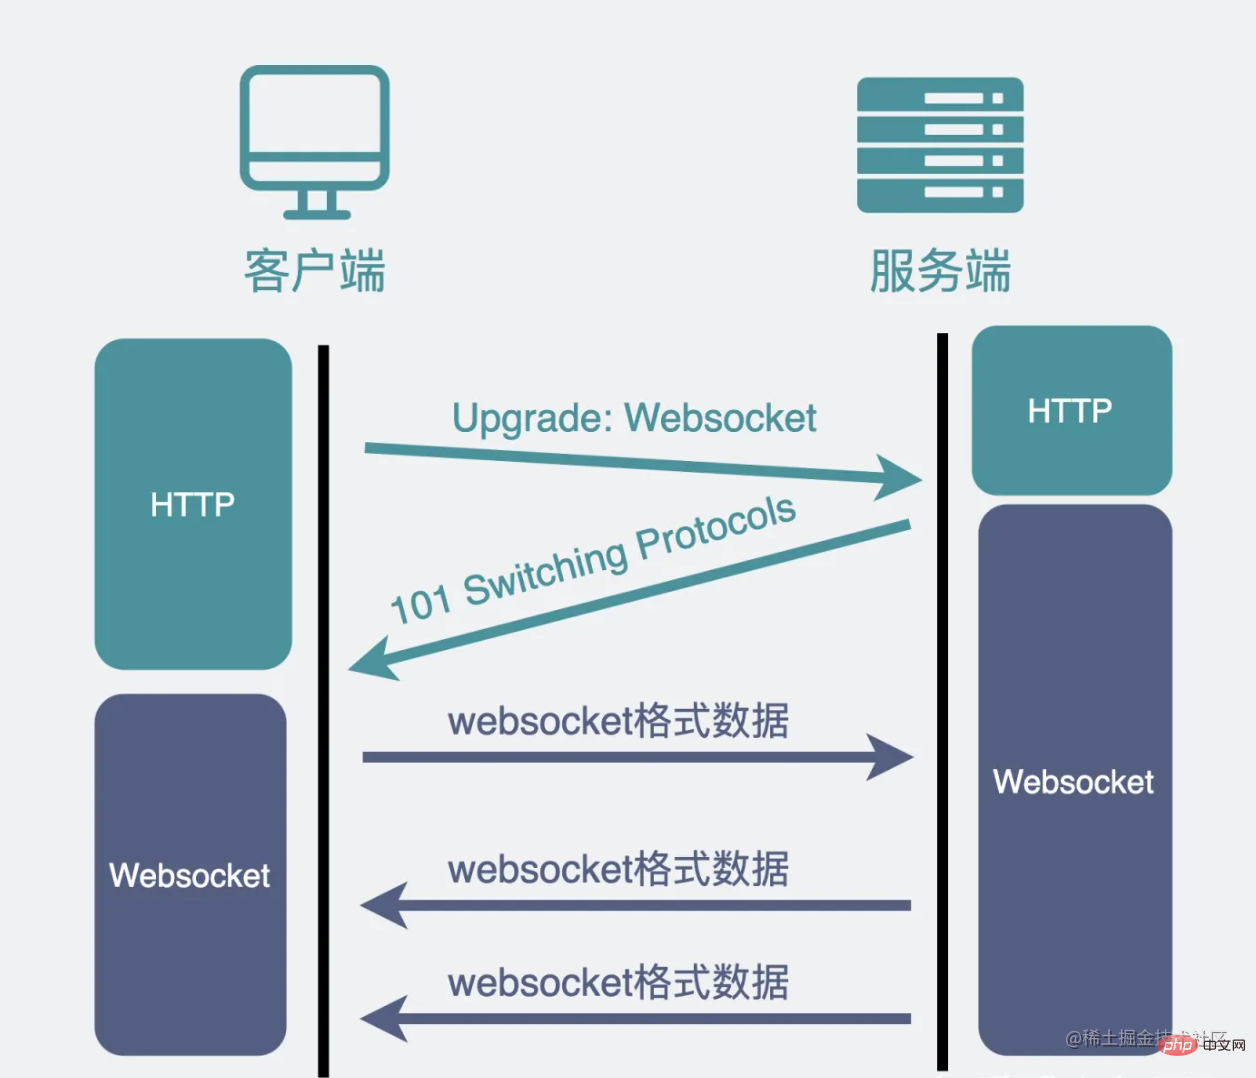
The switching process is as follows in detail:
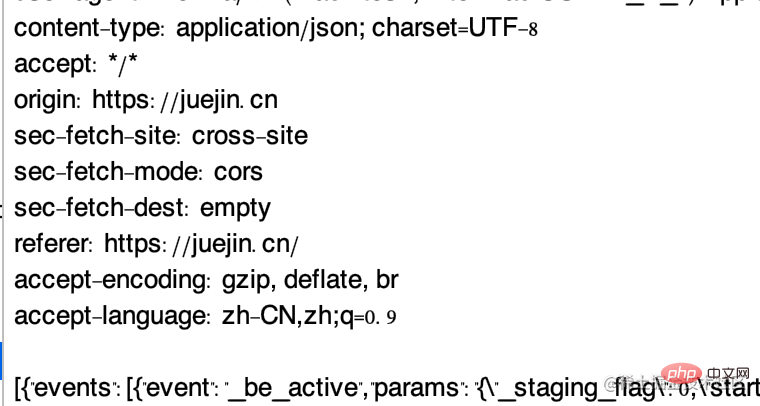
Bring these headers when requesting:
Connection: Upgrade
Upgrade: websocket
Sec-WebSocket-Key: Ia3dQjfWrAug/6qm7mTZOg==
The first two It is easy to understand what it means to upgrade to the websocket protocol.
The third header is a key used to ensure security.
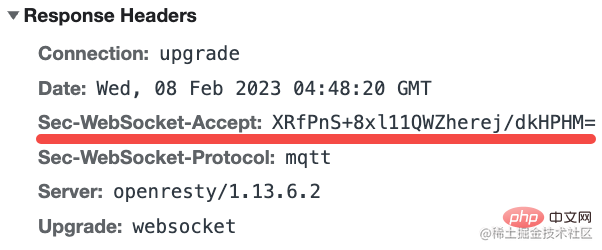
The server returns this header:
HTTP/1.1 101 Switching Protocols
Connection: Upgrade
Upgrade: websocket
Sec-WebSocket-Accept: JkE58n3uIigYDMvC+KsBbGZsp1A=
Similar to the request header, Sec-WebSocket-Accept is the result of processing the Sec-WebSocket-Key brought by the request.
The verification of this header is added to ensure that the other party must have WebSocket capabilities. Otherwise, if the connection is established but there is no message from the other party, then the wait will be in vain.
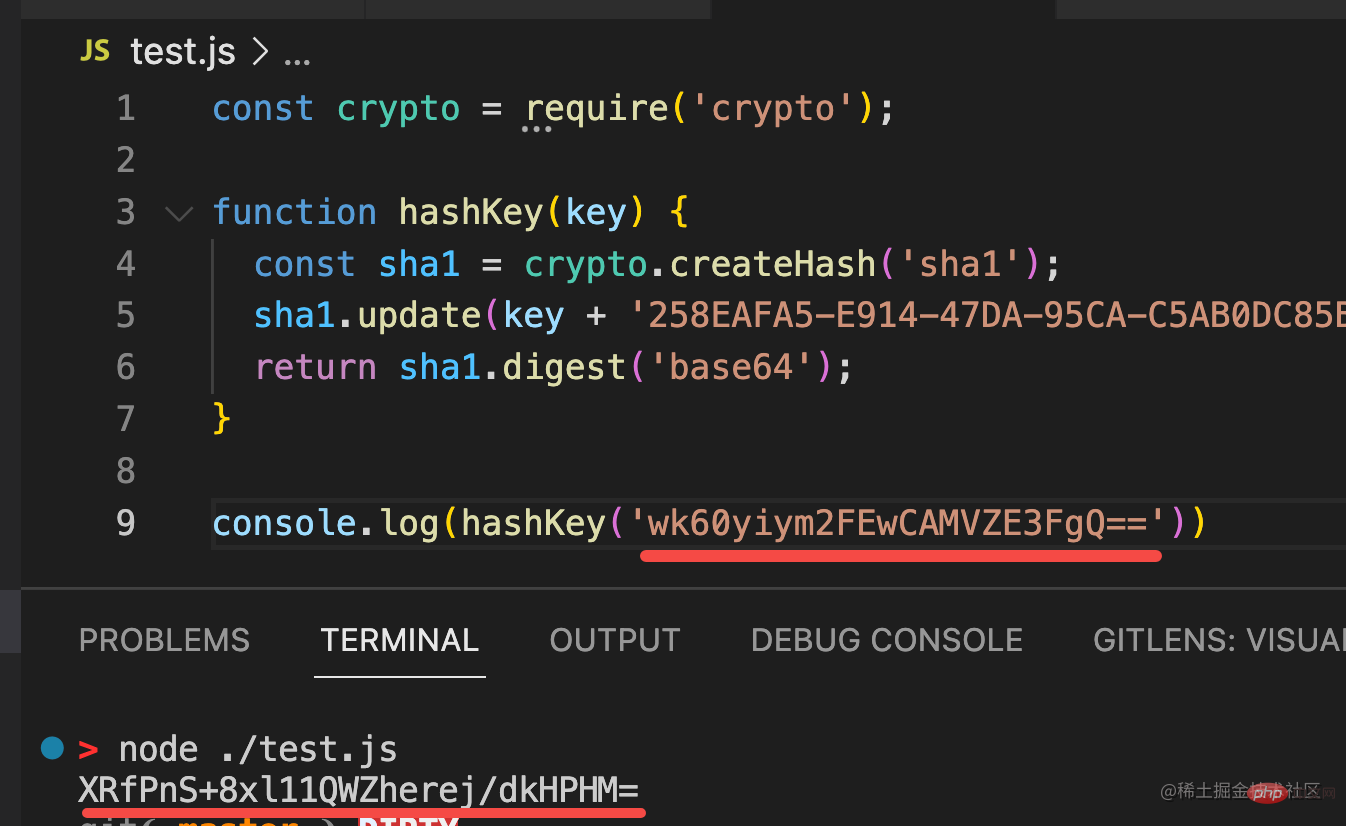
How can Sec-WebSocket-Key be processed to obtain Sec-WebSocket-Accept?
I used node to implement it, and it looks like this:
const crypto = require('crypto');

function hashKey(key) {
  const sha1 = crypto.createHash('sha1');
  sha1.update(key + '258EAFA5-E914-47DA-95CA-C5AB0DC85B11');
  return sha1.digest('base64');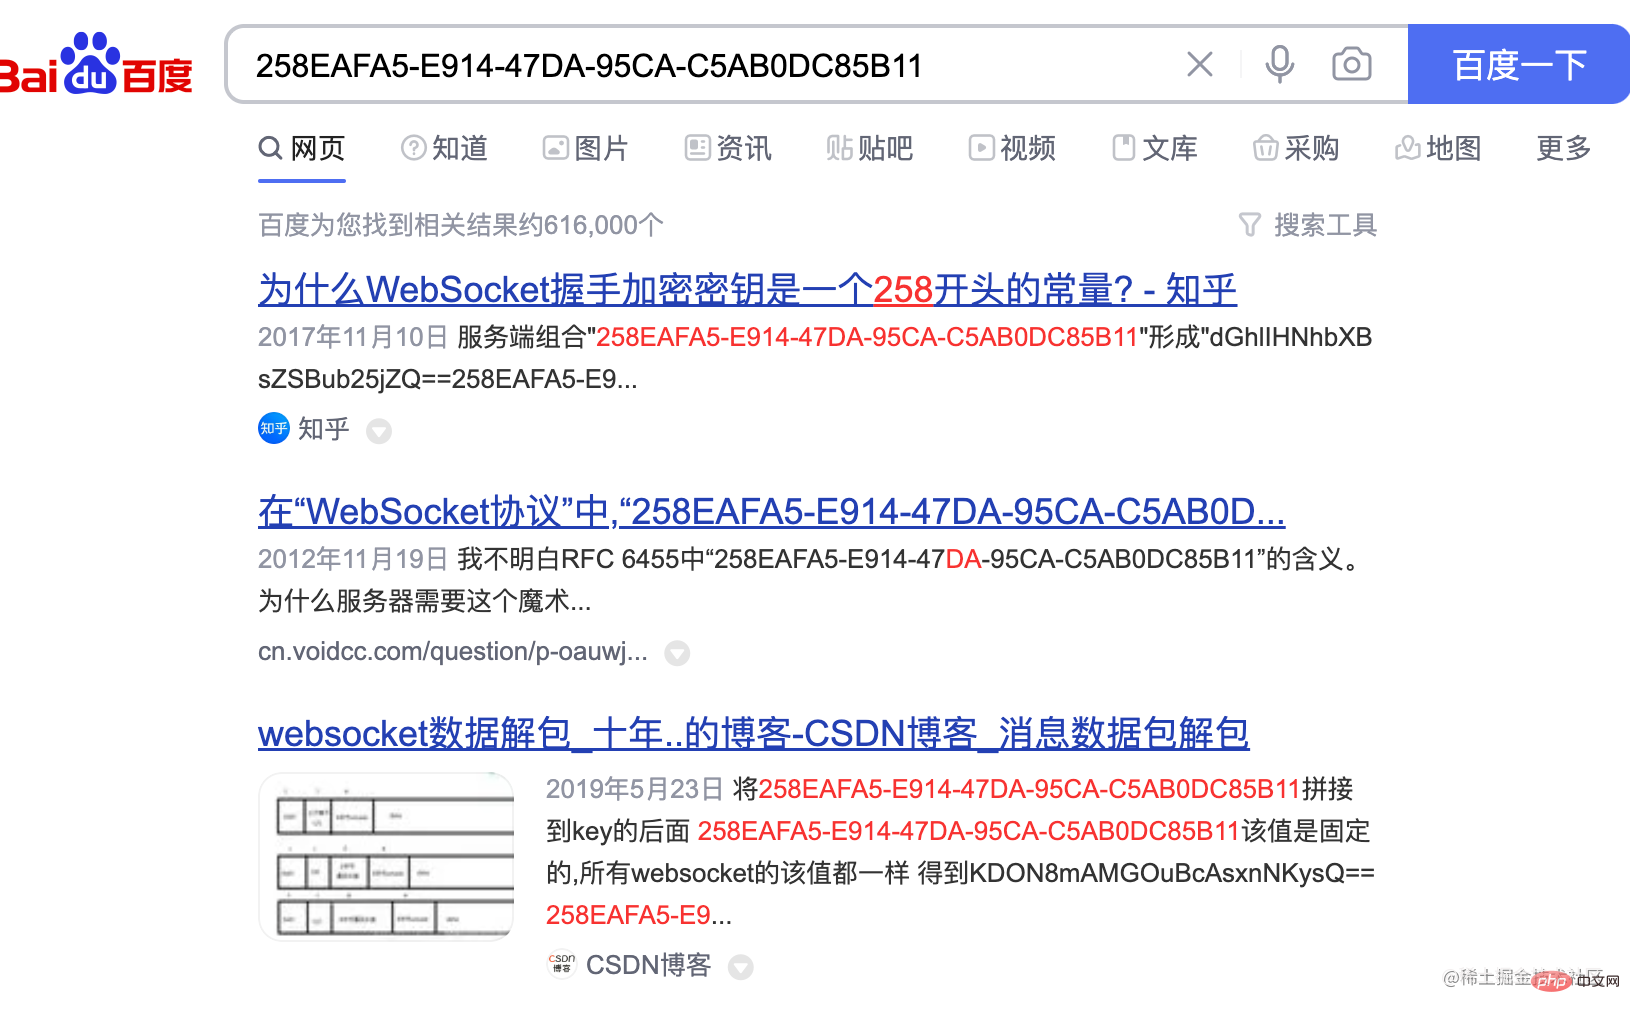
}That is, use the key passed by the client, add a fixed string, and after sha1 encryption, convert it to base64 the result of.
This string 258EAFA5-E914-47DA-95CA-C5AB0DC85B11 is fixed. If you don’t believe it, search it:
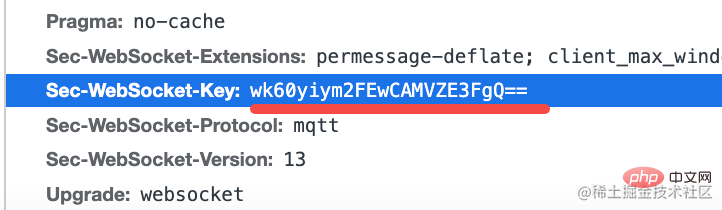
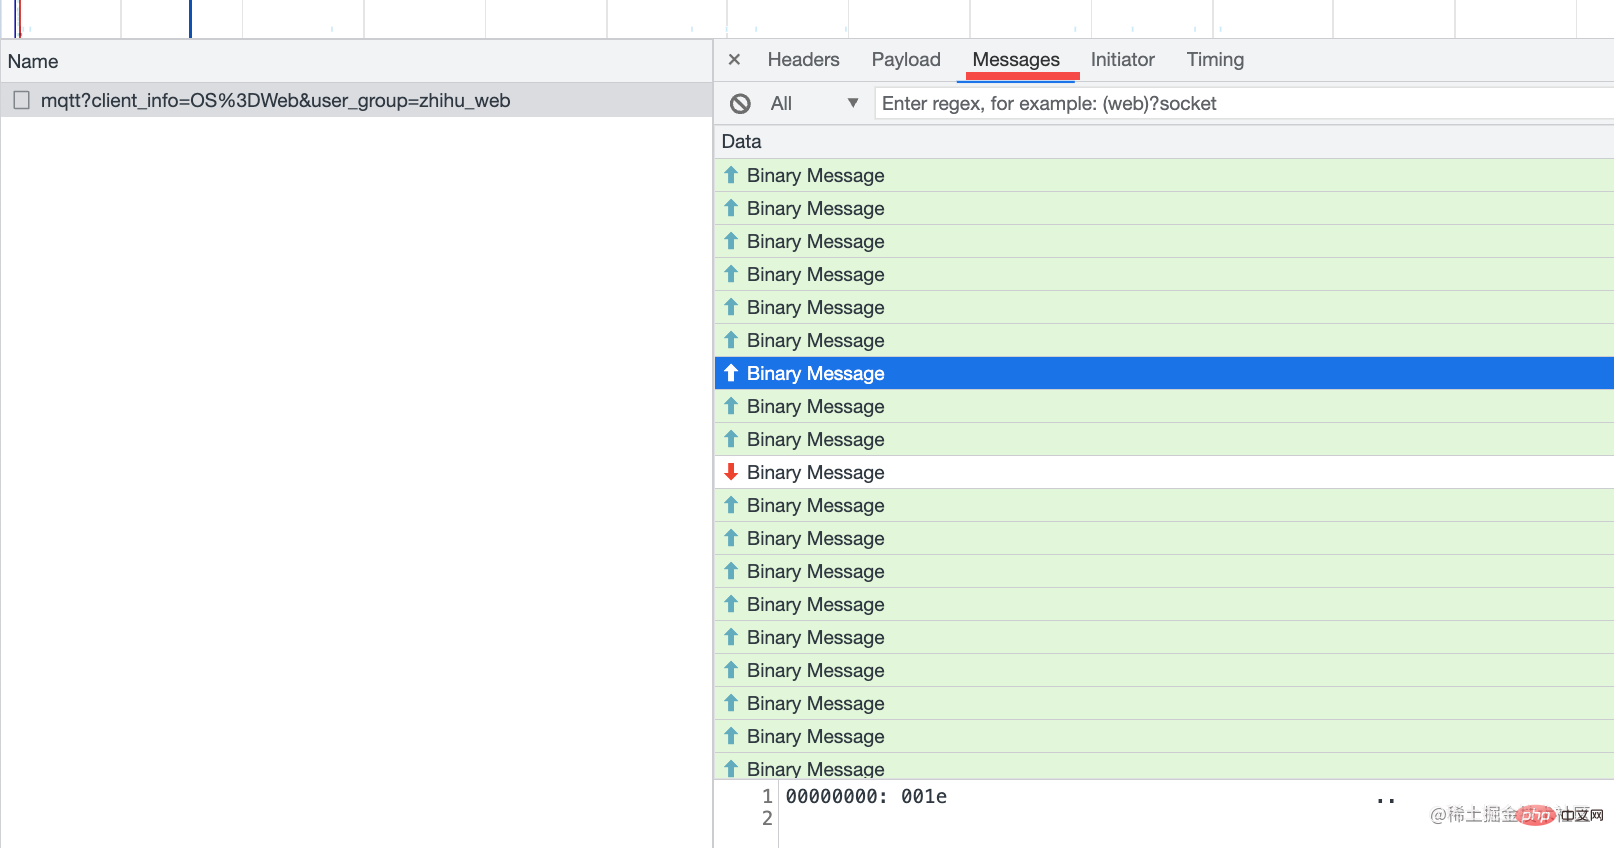
Just find a website with websocket , for example, Zhihu has:

Filter out ws type requests and see if these headers are the ones mentioned earlier.
This Sec-WebSocket-Key is wk60yiym2FEwCAMVZE3FgQ==

这就是 weboscket 的全部流程了。
其实还是挺清晰的,一个切换协议的过程,然后是二进制的 weboscket 协议的收发。
那我们就用 Node.js 自己实现一个 websocket 服务器吧!
定义个 MyWebsocket 的 class:
const { EventEmitter } = require('events');
const http = require('http');

class MyWebsocket extends EventEmitter {
  constructor(options) {
    super(options);

    const server = http.createServer();
    server.listen(options.port || 8080);

    server.on('upgrade', (req, socket) => {

    });
  }
}继承 EventEmitter 是为了可以用 emit 发送一些事件,外界可以通过 on 监听这个事件来处理。
我们在构造函数里创建了一个 http 服务,当 ungrade 事件发生,也就是收到了 Connection: upgrade 的 header 的时候,返回切换协议的 header。
返回的 header 前面已经见过了,就是要对 sec-websocket-key 做下处理。
server.on('upgrade', (req, socket) => {
  this.socket = socket;
  socket.setKeepAlive(true);

  const resHeaders = [
    'HTTP/1.1 101 Switching Protocols',
    'Upgrade: websocket',
    'Connection: Upgrade',
    'Sec-WebSocket-Accept: ' + hashKey(req.headers['sec-websocket-key']),
    '',
    ''
  ].join('\r\n');
  socket.write(resHeaders);

  socket.on('data', (data) => {
    console.log(data)
  });
  socket.on('close', (error) => {
      this.emit('close');
  });
});我们拿到 socket,返回上面的 header,其中 key 做的处理就是前面聊过的算法:
function hashKey(key) {
  const sha1 = crypto.createHash('sha1');
  sha1.update(key + '258EAFA5-E914-47DA-95CA-C5AB0DC85B11');
  return sha1.digest('base64');
}就这么简单,就已经完成协议切换了。
不信我们试试看。
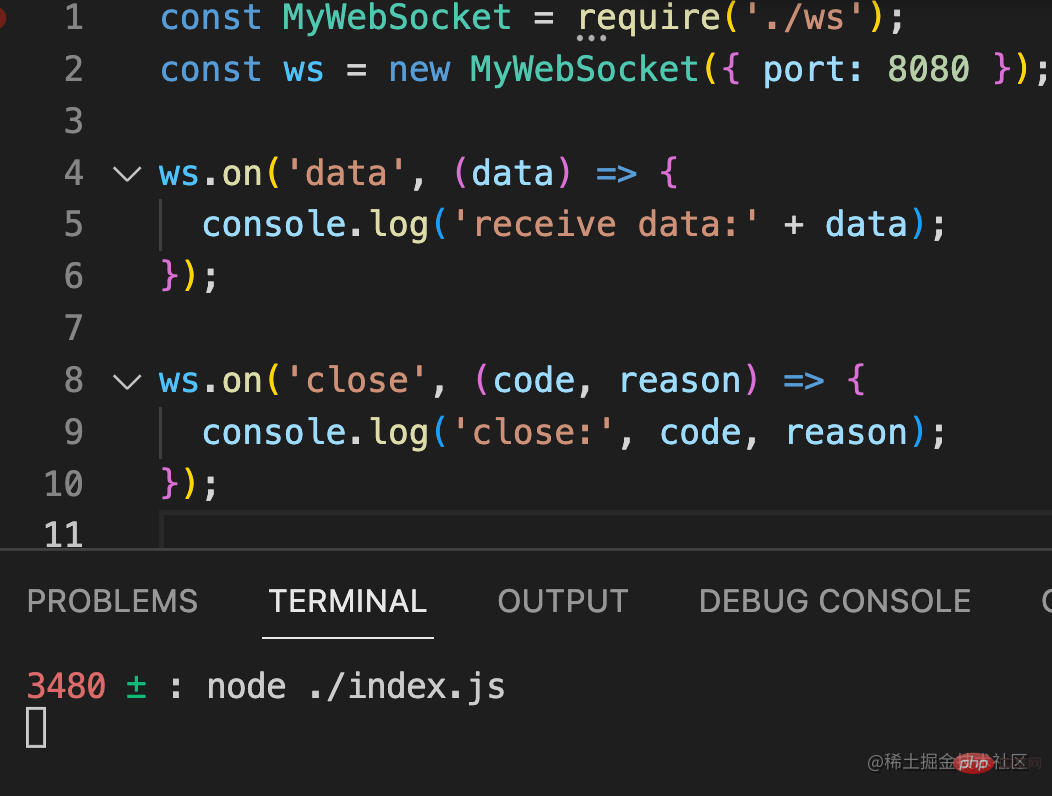
引入我们实现的 ws 服务器,跑起来:
const MyWebSocket = require('./ws');
const ws = new MyWebSocket({ port: 8080 });

ws.on('data', (data) => {
  console.log('receive data:' + data);
});

ws.on('close', (code, reason) => {
  console.log('close:', code, reason);
});
然后新建这样一个 html:
<!DOCTYPE HTML>
<html>
<body>
    <script>
        const ws = new WebSocket("ws://localhost:8080");

        ws.onopen = function () {
            ws.send("发送数据");
            setTimeout(() => {
                ws.send("发送数据2");
            }, 3000)
        };

        ws.onmessage = function (evt) {
            console.log(evt)
        };

        ws.onclose = function () {
        };
    </script>
</body>

</html>用浏览器的 WebSocket api 建立连接,发送消息。
用 npx http-server . 起个静态服务。
然后浏览器访问这个 html:
这时打开 devtools 你就会发现协议切换成功了:

这 3 个 header 还有 101 状态码都是我们返回的。
message 里也可以看到发送的消息:
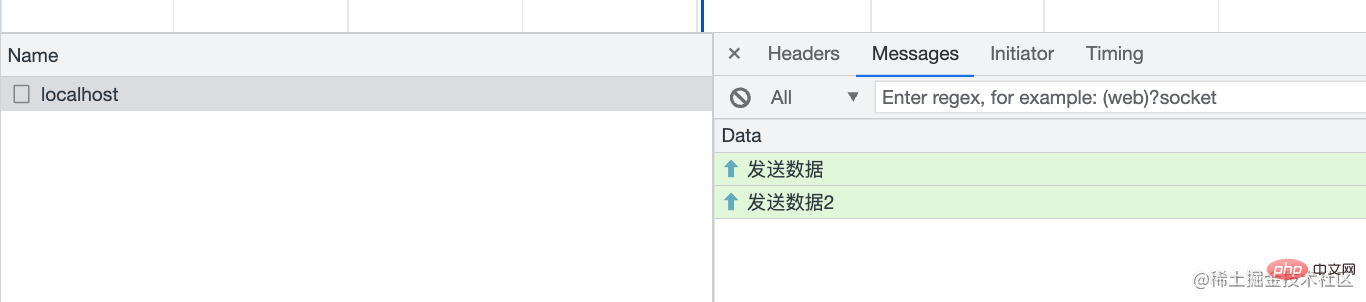
再去服务端看看,也收到了这个消息:
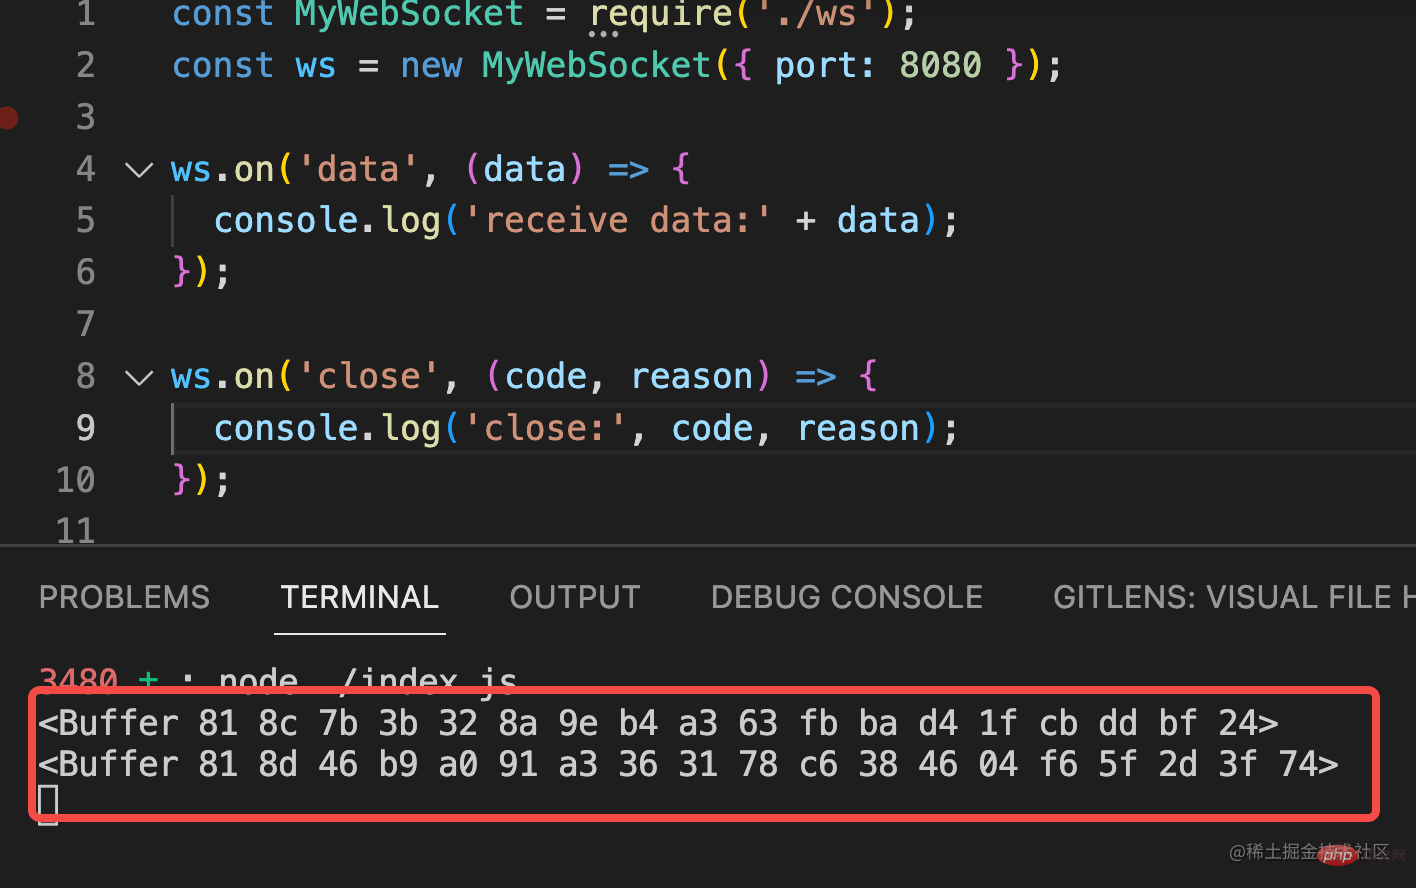
只不过是 Buffer 的,也就是二进制的。
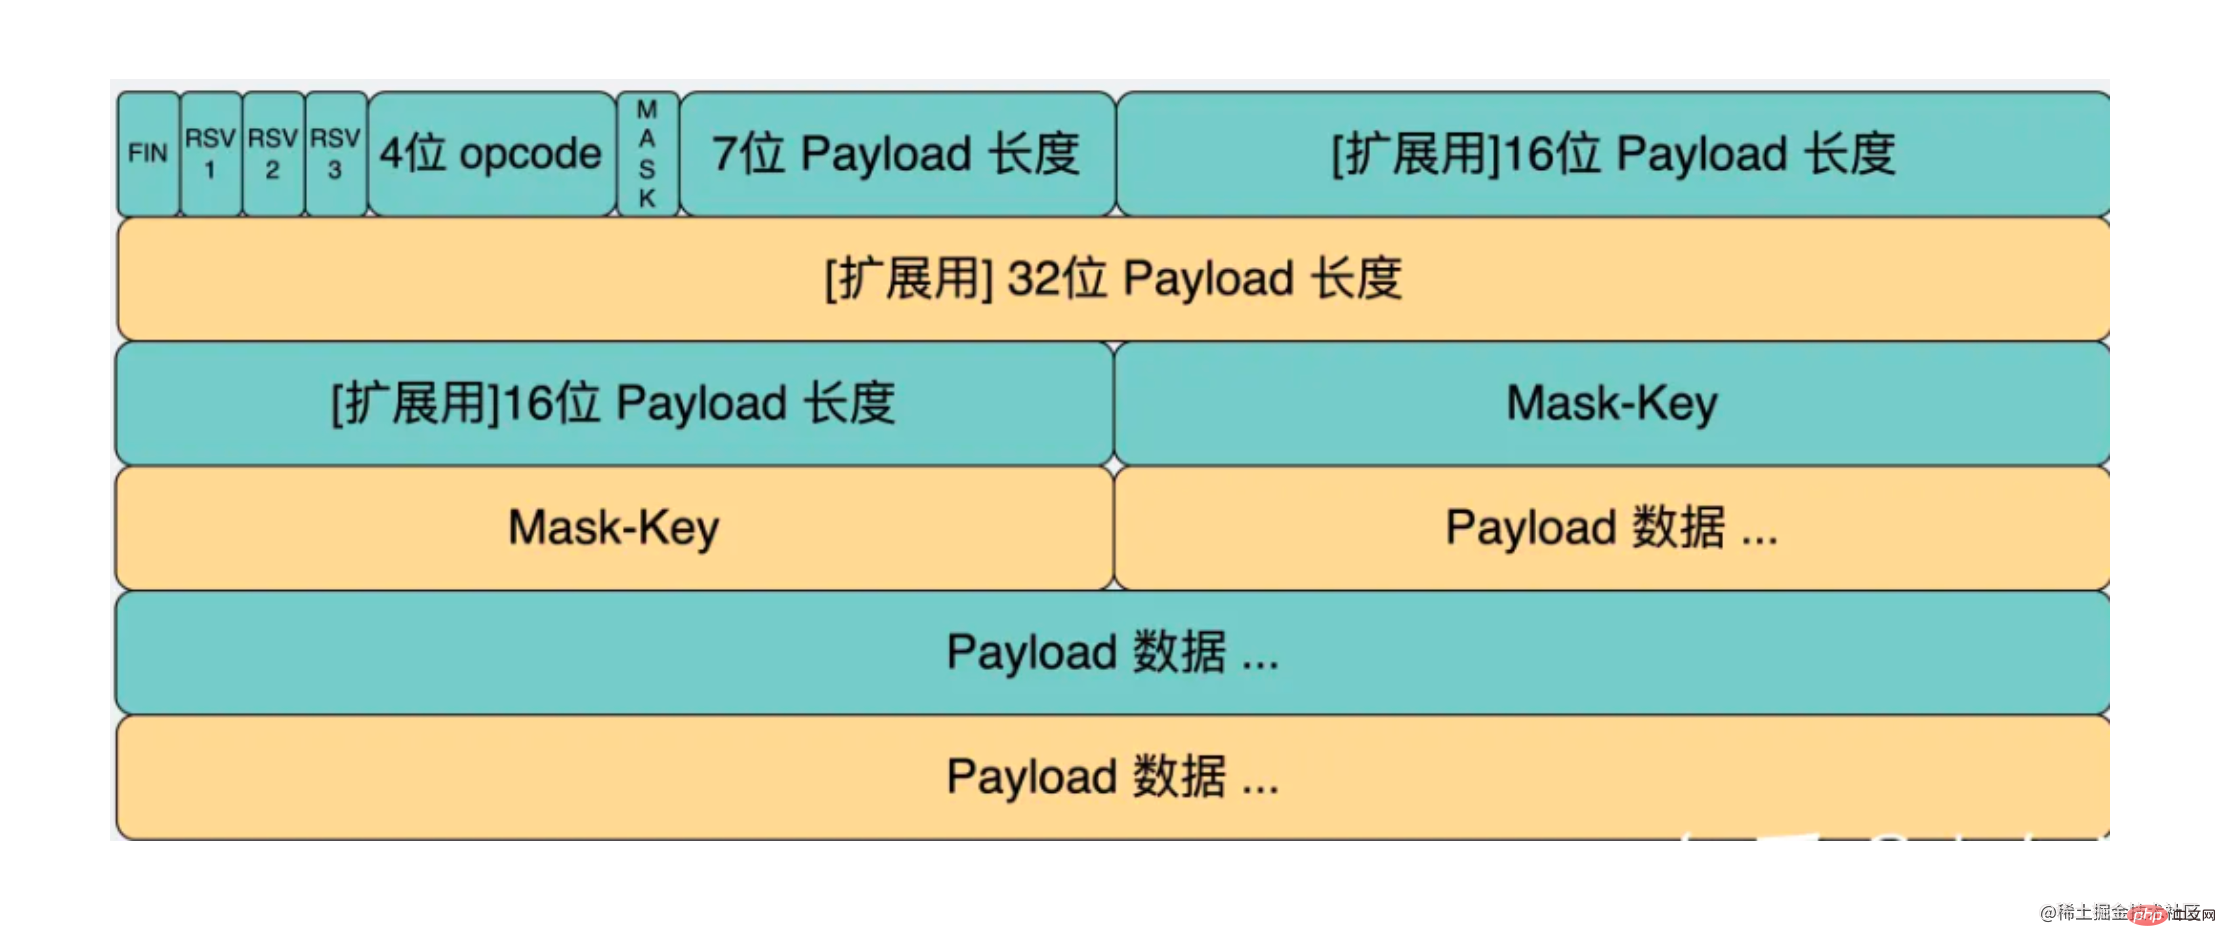
接下来只要按照协议格式解析这个 Buffer,并且生成响应格式的协议数据 Buffer 返回就可以收发 websocket 数据了。
这一部分还是比较麻烦的,我们一点点来看。
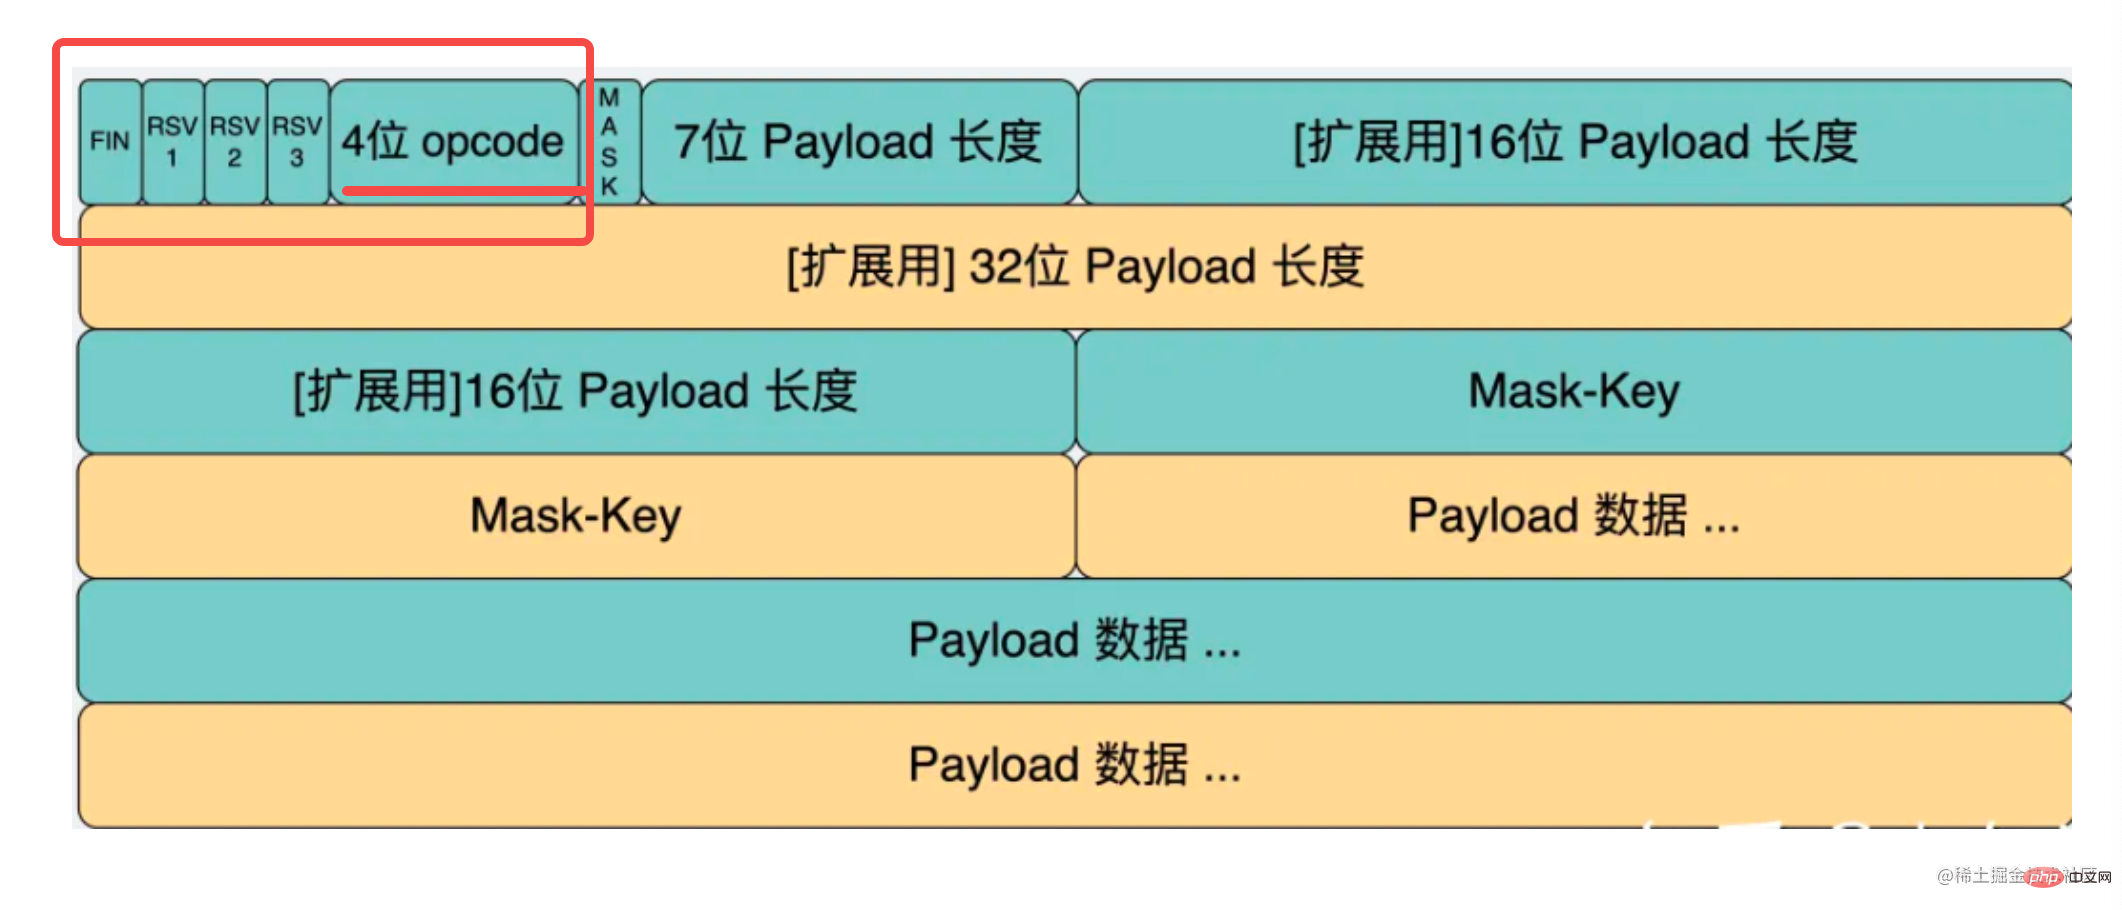
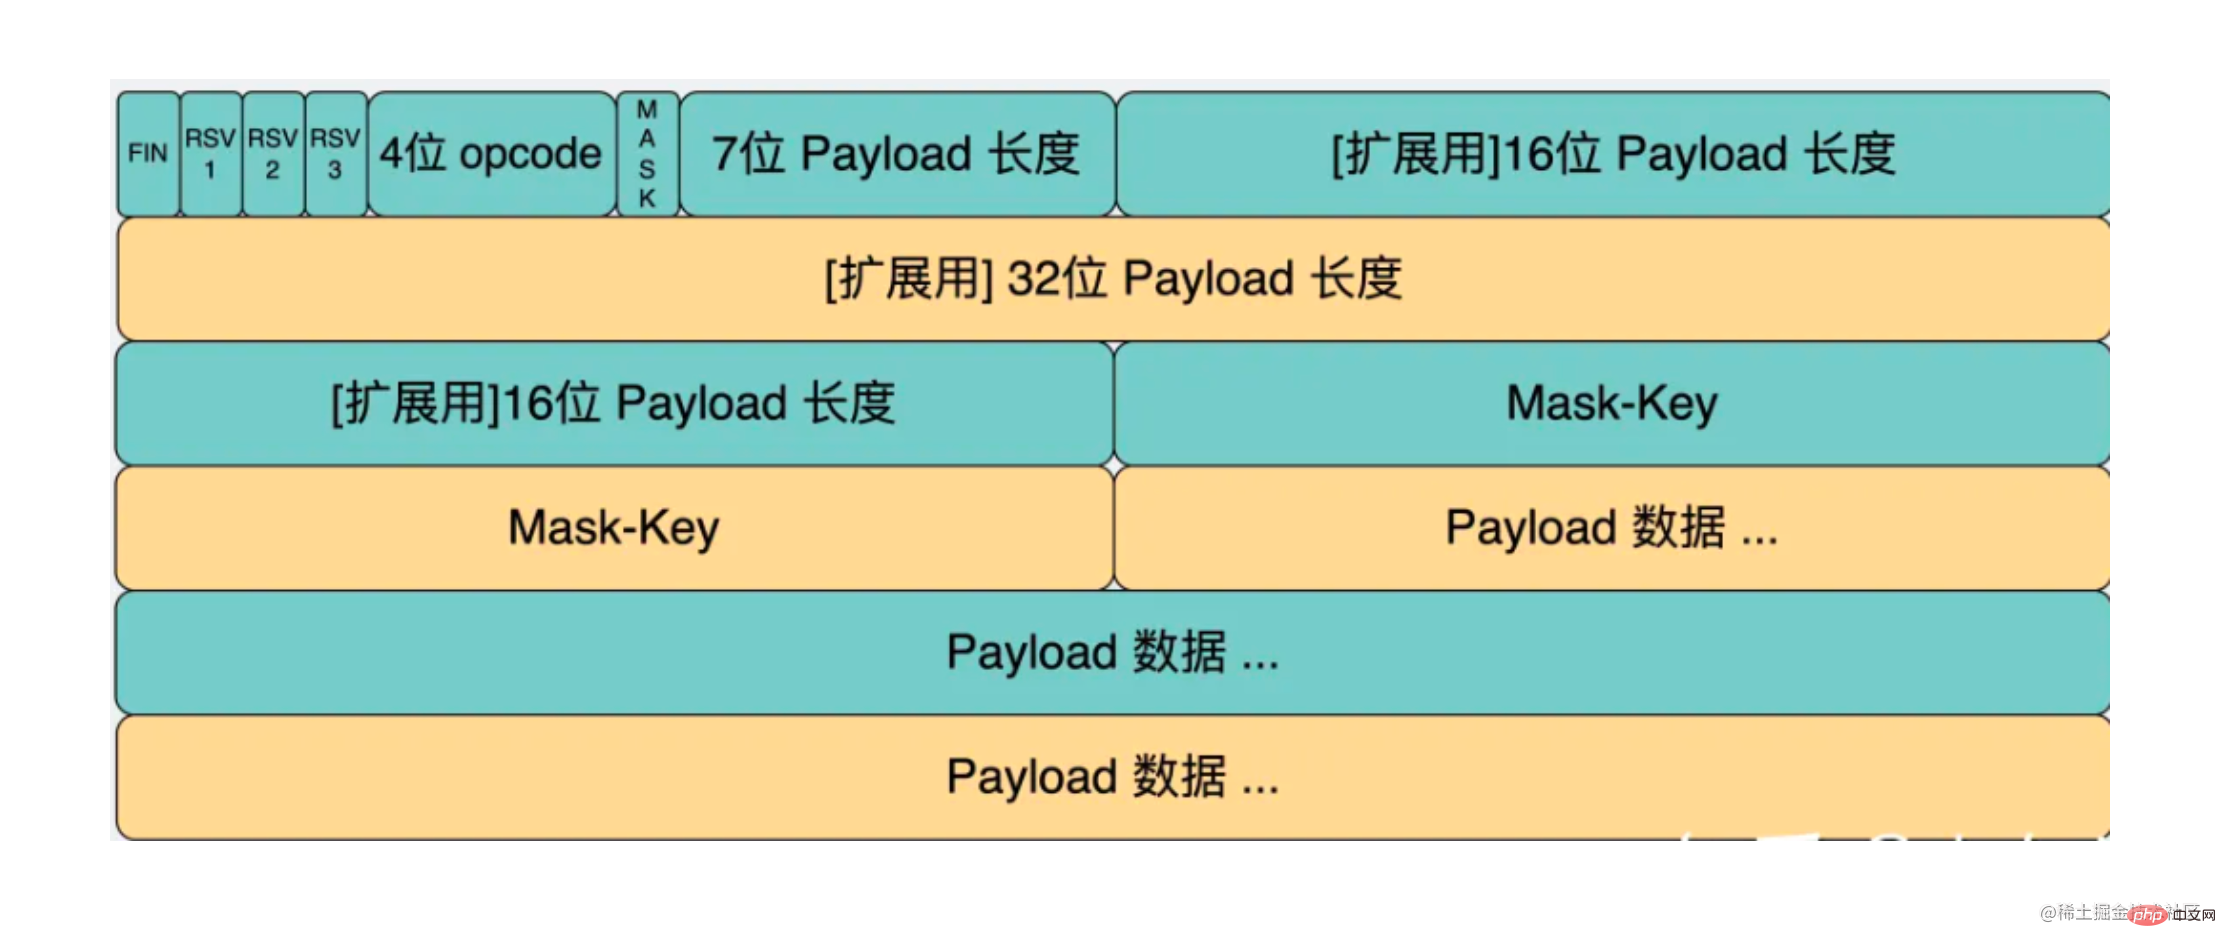
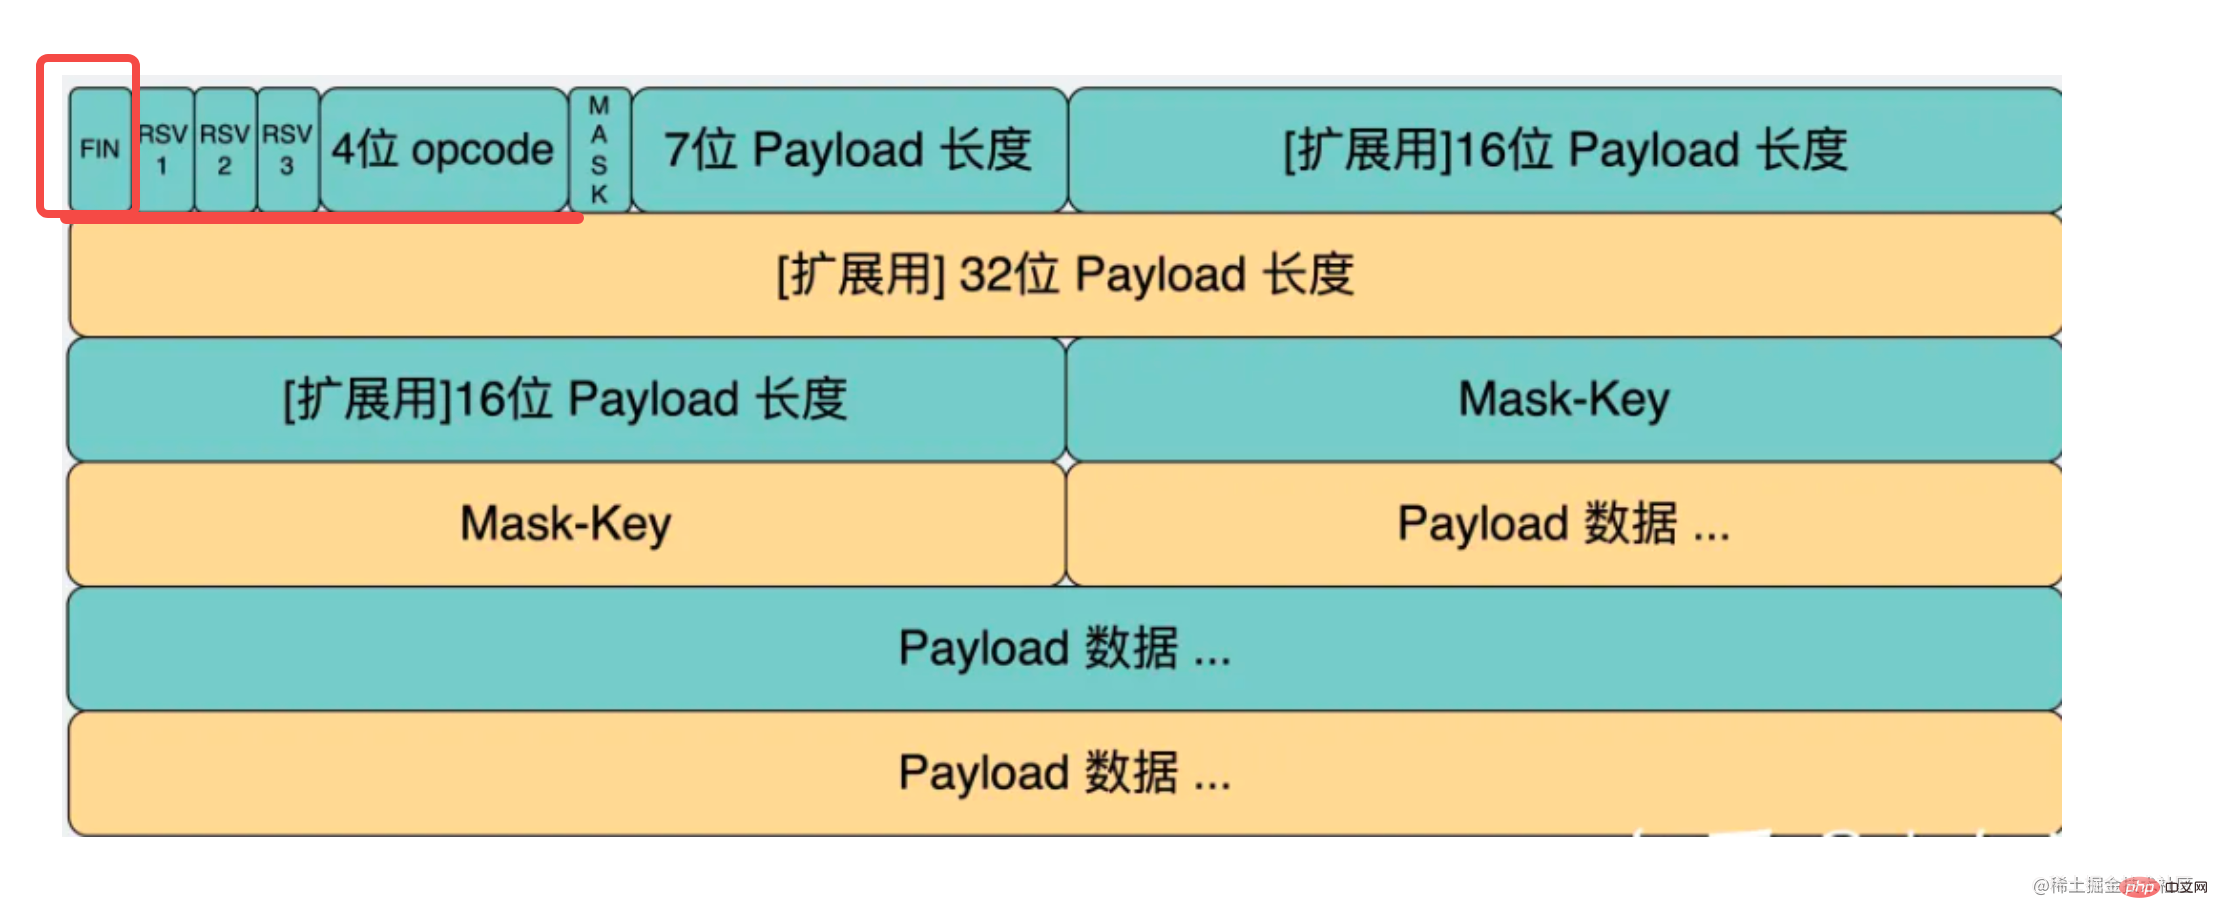
我们需要第一个字节的后四位,也就是 opcode。
这样写:
const byte1 = bufferData.readUInt8(0);
let opcode = byte1 & 0x0f;
读取 8 位无符号整数的内容,也就是一个字节的内容。参数是偏移的字节,这里是 0。
通过位运算取出后四位,这就是 opcode 了。
然后再处理第二个字节:
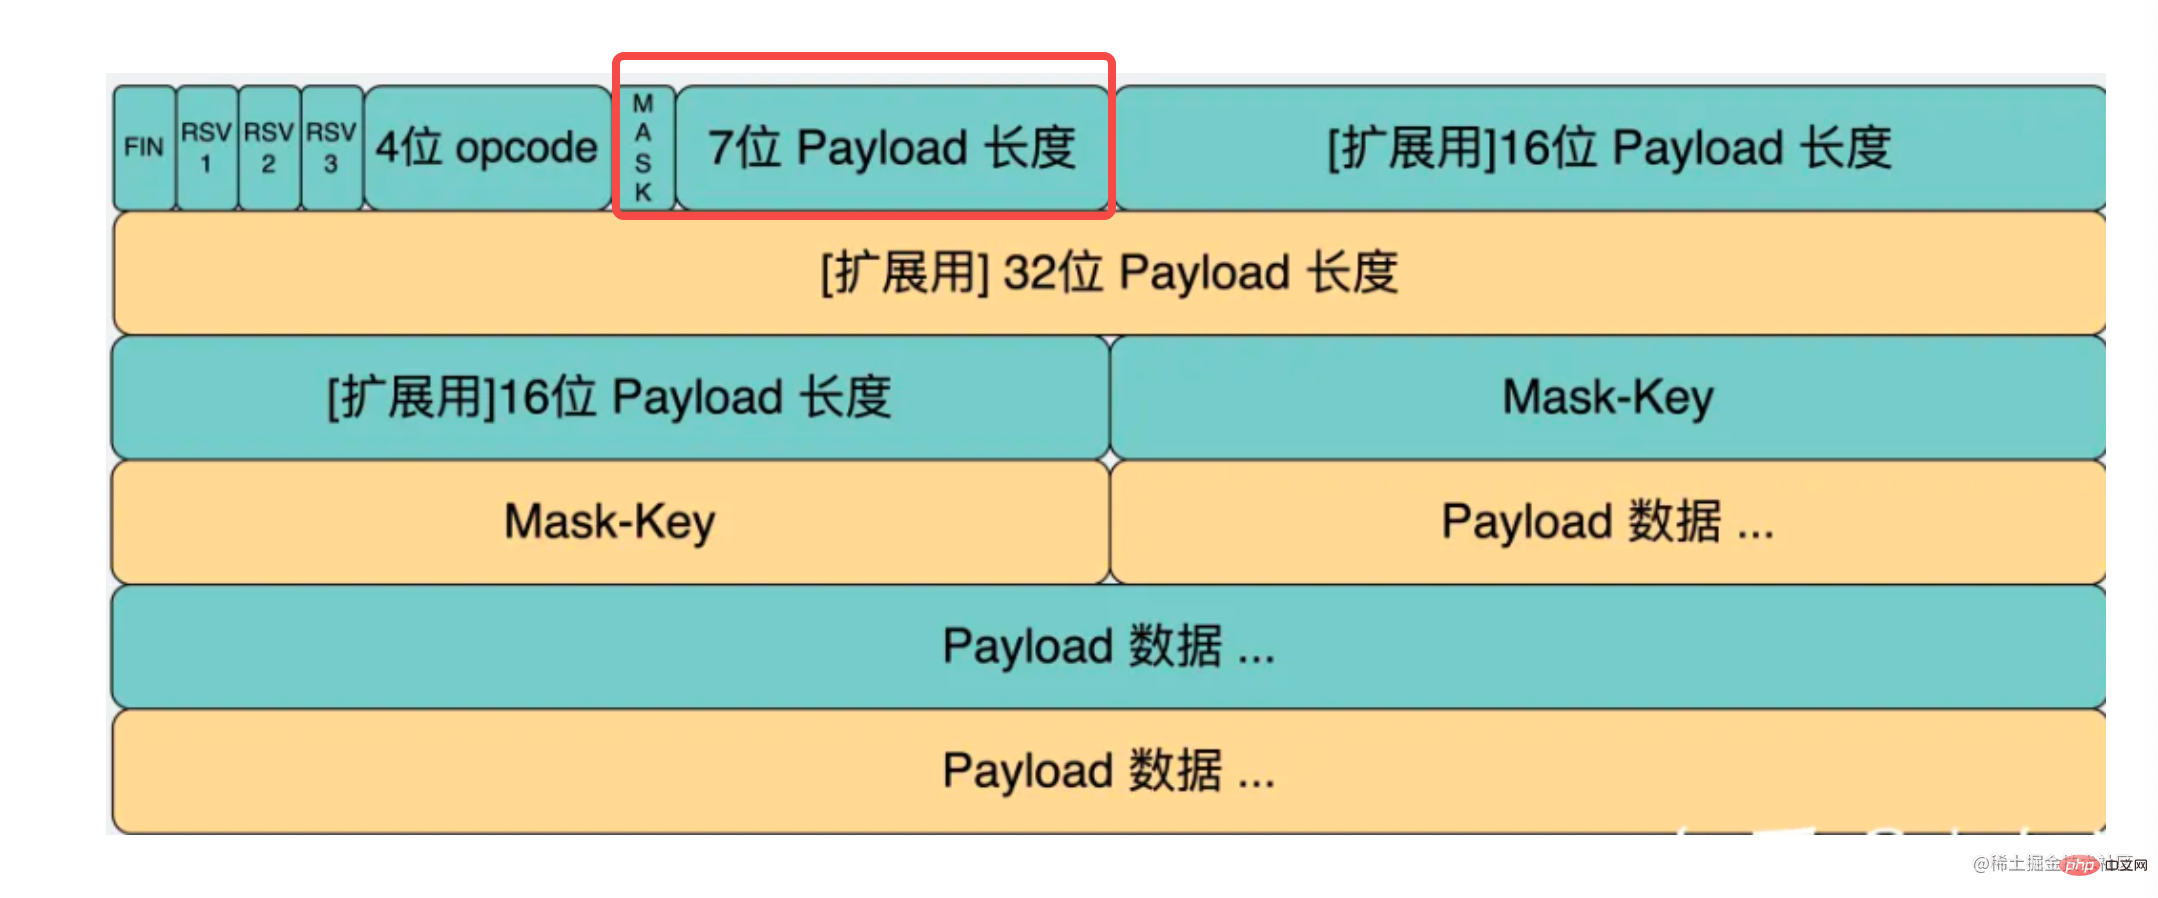
第一位是 mask 标志位,后 7 位是 payload 长度。
可以这样取:
const byte2 = bufferData.readUInt8(1);
const str2 = byte2.toString(2);
const MASK = str2[0];
let payloadLength = parseInt(str2.substring(1), 2);
还是用 buffer.readUInt8 读取一个字节的内容。
先转成二进制字符串,这时第一位就是 mask,然后再截取后 7 位的子串,parseInt 成数字,这就是 payload 长度了。
这样前两个字节的协议内容就解析完了。
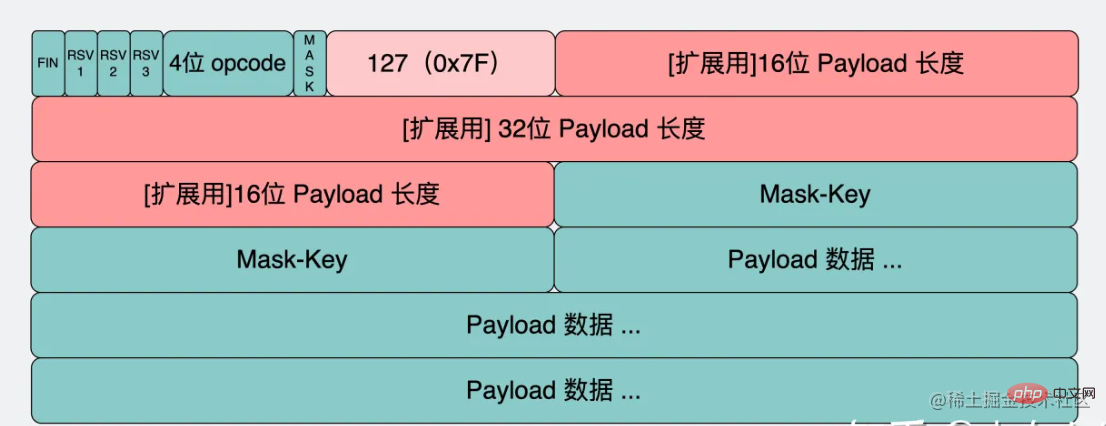
有同学可能问了,后面咋还有俩 payload 长度呢?
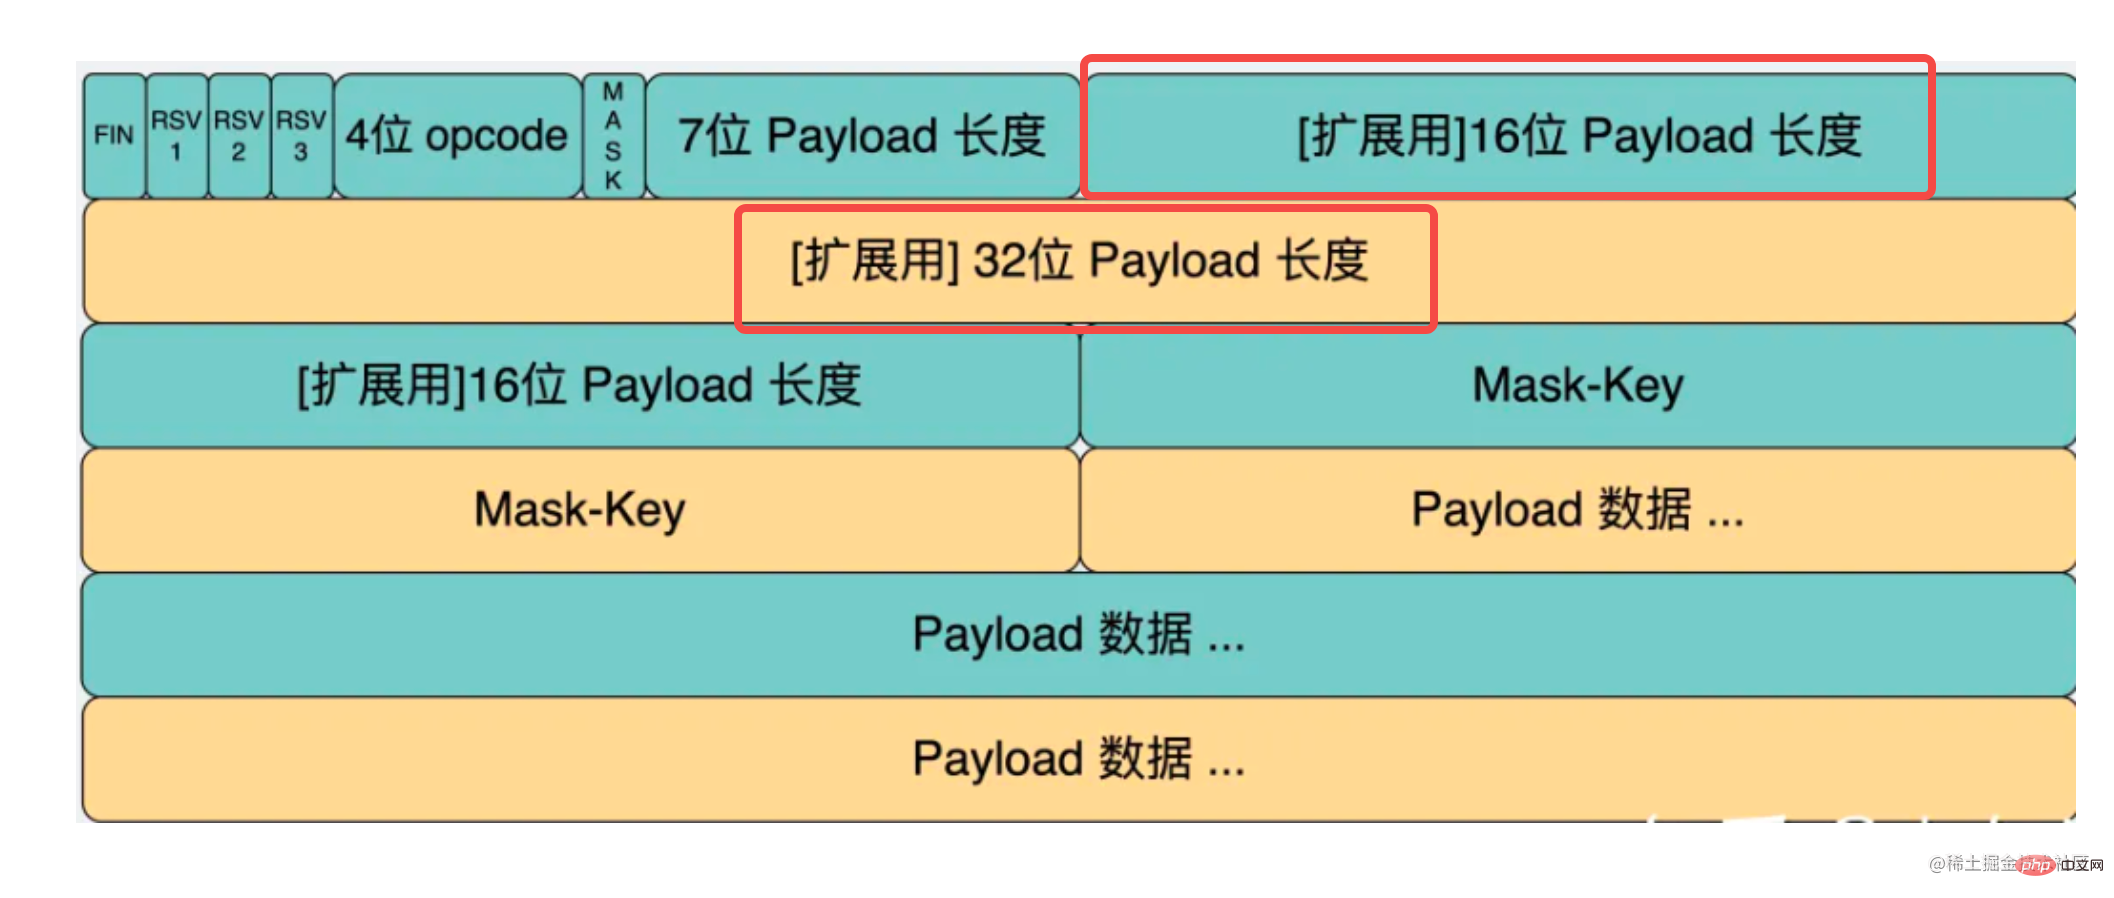
这是因为数据不一定有多长,可能需要 16 位存长度,可能需要 32 位。
于是 websocket 协议就规定了如果那个 7 位的内容不超过 125,那它就是 payload 长度。
如果 7 位的内容是 126,那就不用它了,用后面的 16 位的内容作为 payload 长度。
如果 7 位的内容是 127,也不用它了,用后面那个 64 位的内容作为 payload 长度。
其实还是容易理解的,就是 3 个 if else。
用代码写出来就是这样的:
let payloadLength = parseInt(str2.substring(1), 2);

let curByteIndex = 2;

if (payloadLength === 126) {
  payloadLength = bufferData.readUInt16BE(2);
  curByteIndex += 2;
} else if (payloadLength === 127) {
  payloadLength = bufferData.readBigUInt64BE(2);
  curByteIndex += 8;
}这里的 curByteIndex 是存储当前处理到第几个字节的。
如果是 126,那就从第 3 个字节开始,读取 2 个字节也就是 16 位的长度,用 buffer.readUInt16BE 方法。
如果是 127,那就从第 3 个字节开始,读取 8 个字节也就是 64 位的长度,用 buffer.readBigUInt64BE 方法。
这样就拿到了 payload 的长度,然后再用这个长度去截取内容就好了。
但在读取数据之前,还有个 mask 要处理,这个是用来给内容解密的:
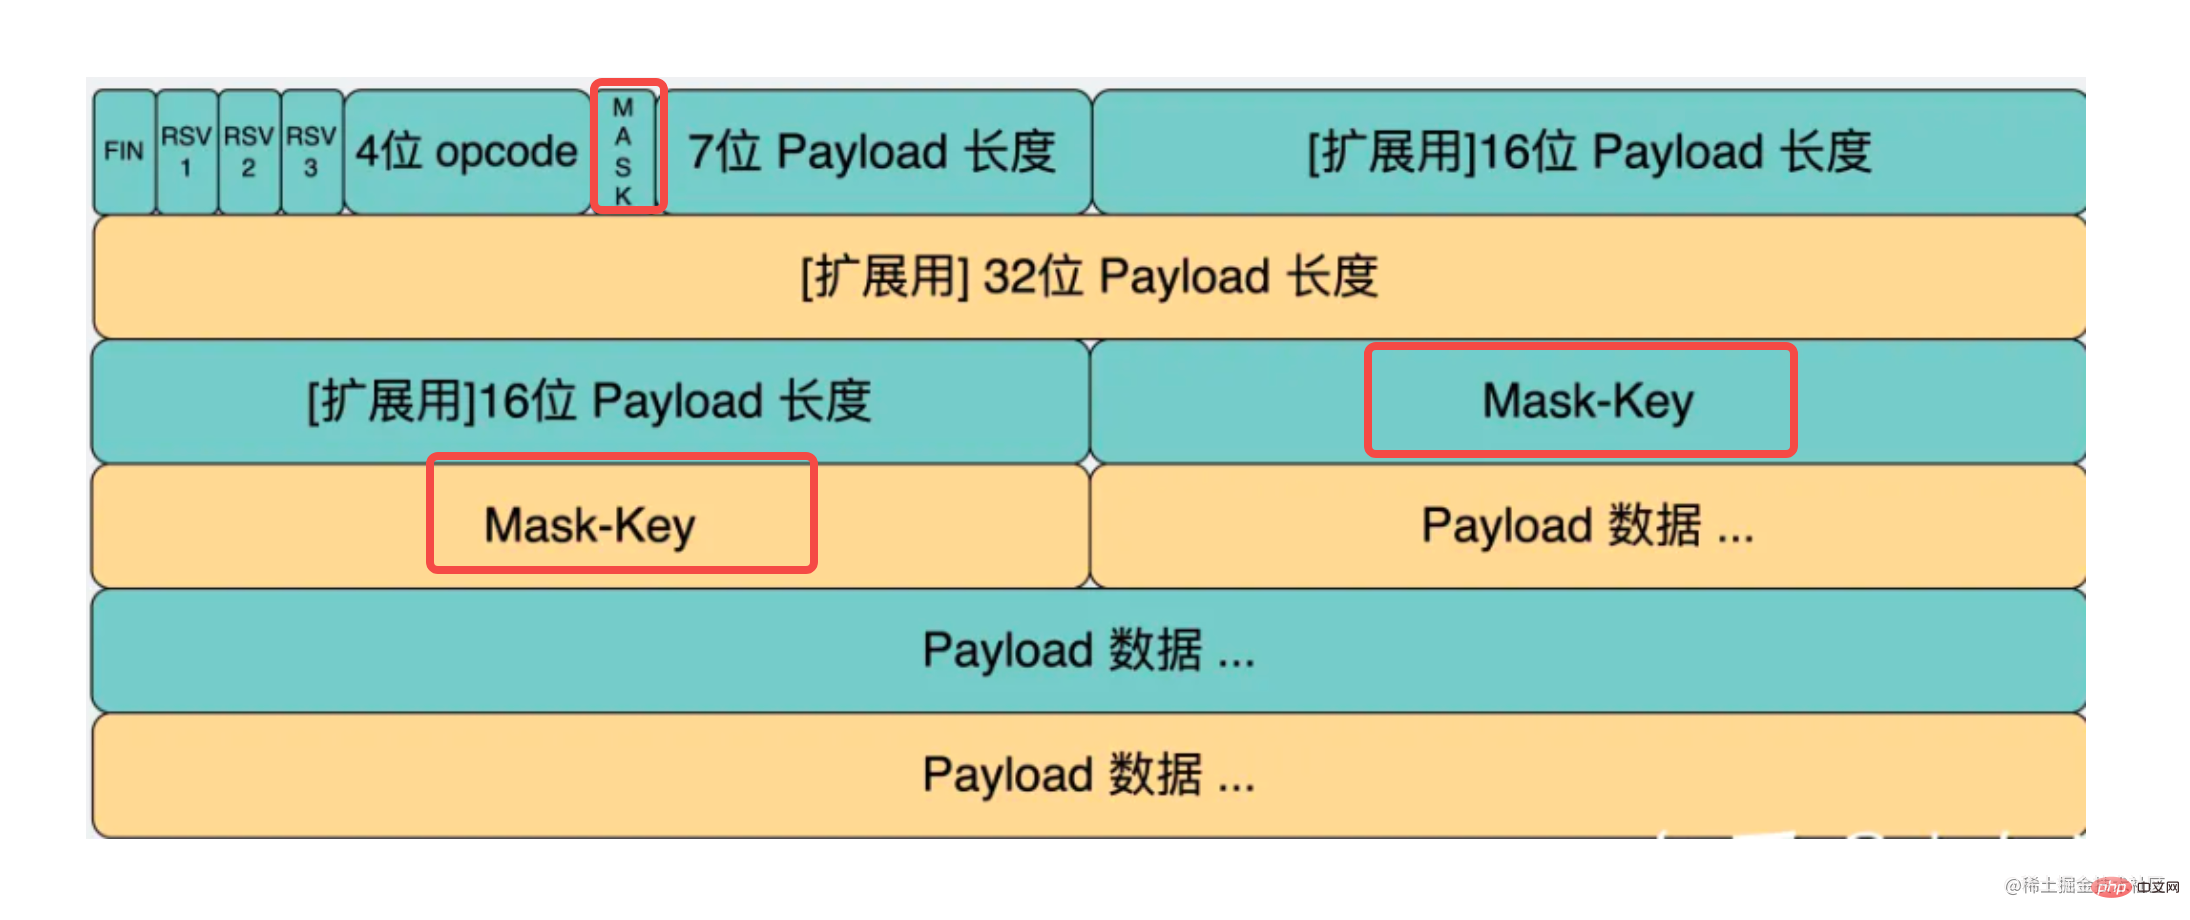
读 4 个字节,就是 mask key。
再后面的就可以根据 payload 长度读出来。
let realData = null;

if (MASK) {
  const maskKey = bufferData.slice(curByteIndex, curByteIndex + 4);
  curByteIndex += 4;
  const payloadData = bufferData.slice(curByteIndex, curByteIndex + payloadLength);
  realData = handleMask(maskKey, payloadData);
} else {
  realData = bufferData.slice(curByteIndex, curByteIndex + payloadLength);;
}然后用 mask key 来解密数据。
这个算法也是固定的,用每个字节的 mask key 和数据的每一位做按位异或就好了:
function handleMask(maskBytes, data) {
  const payload = Buffer.alloc(data.length);
  for (let i = 0; i < data.length; i++) {
    payload[i] = maskBytes[i % 4] ^ data[i];
  }
  return payload;
}这样,我们就拿到了最终的数据!
但是传给处理程序之前,还要根据类型来处理下,因为内容分几种类型,也就是 opcode 有几种值:
const OPCODES = {
  CONTINUE: 0,
  TEXT: 1, // 文本
  BINARY: 2, // 二进制
  CLOSE: 8,
  PING: 9,
  PONG: 10,
};我们只处理文本和二进制就好了:
handleRealData(opcode, realDataBuffer) {
    switch (opcode) {
      case OPCODES.TEXT:
        this.emit('data', realDataBuffer.toString('utf8'));
        break;
      case OPCODES.BINARY:
        this.emit('data', realDataBuffer);
        break;
      default:
        this.emit('close');
        break;
    }
}文本就转成 utf-8 的字符串,二进制数据就直接用 buffer 的数据。
这样,处理程序里就能拿到解析后的数据。
我们来试一下:
之前我们已经能拿到 weboscket 协议内容的 buffer 了:

而现在我们能正确解析出其中的数据:
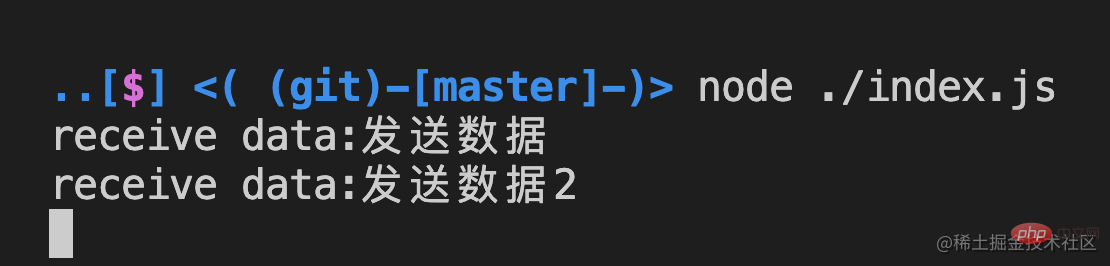
至此,我们 websocket 协议的解析成功了!
这样的协议格式的数据叫做 frame,也就是帧:
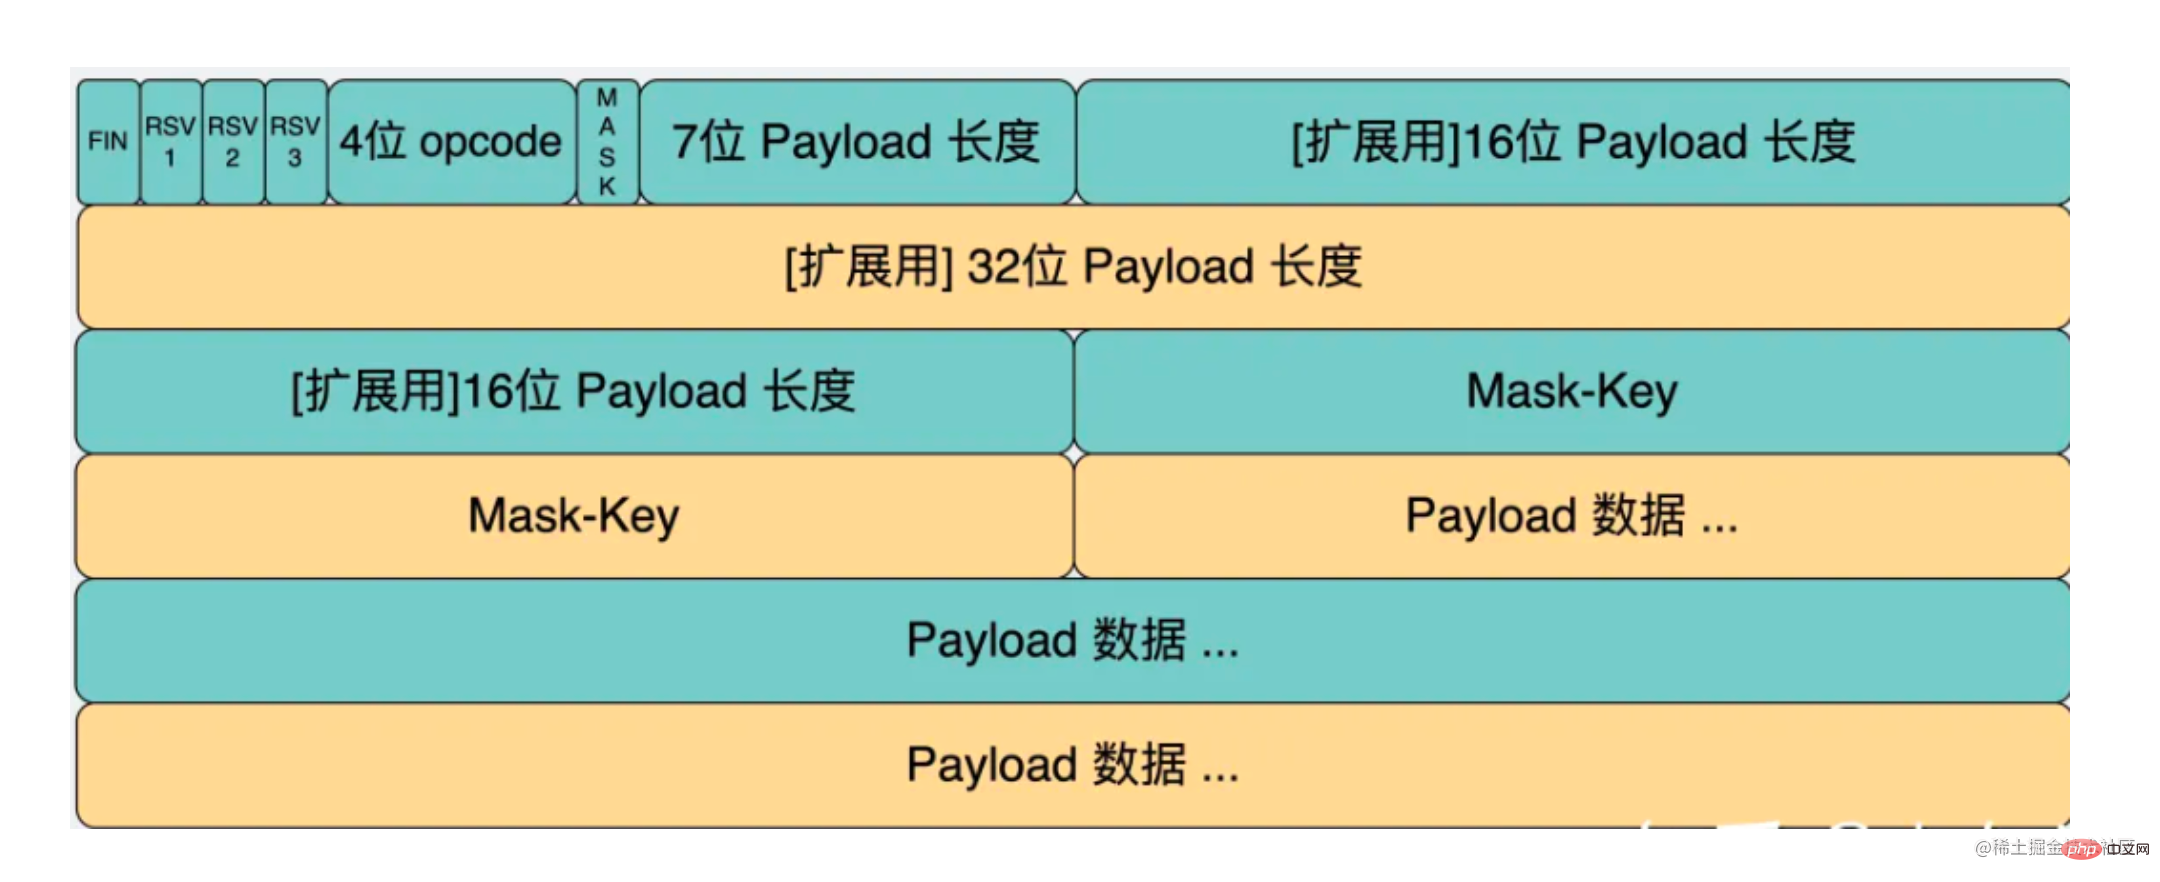
解析可以了,接下来我们再实现数据的发送。
发送也是构造一样的 frame 格式。
定义这样一个 send 方法:
send(data) {
    let opcode;
    let buffer;
    if (Buffer.isBuffer(data)) {
      opcode = OPCODES.BINARY;
      buffer = data;
    } else if (typeof data === 'string') {
      opcode = OPCODES.TEXT;
      buffer = Buffer.from(data, 'utf8');
    } else {
      console.error('暂不支持发送的数据类型')
    }
    this.doSend(opcode, buffer);
}

doSend(opcode, bufferDatafer) {
   this.socket.write(encodeMessage(opcode, bufferDatafer));
}根据发送的是文本还是二进制数据来对内容作处理。
然后构造 websocket 的 frame:
function encodeMessage(opcode, payload) {
//payload.length < 126
let bufferData = Buffer.alloc(payload.length + 2 + 0);;
let byte1 = parseInt('10000000', 2) | opcode; // 设置 FIN 为 1
let byte2 = payload.length;
bufferData.writeUInt8(byte1, 0);
bufferData.writeUInt8(byte2, 1);
payload.copy(bufferData, 2);
return bufferData;
}我们只处理数据长度小于 125 的情况。
第一个字节是 opcode,我们把第一位置 1 ,通过按位或的方式。
服务端给客户端回消息不需要 mask,所以第二个字节就是 payload 长度。
分别把这前两个字节的数据写到 buffer 里,指定不同的 offset:
bufferData.writeUInt8(byte1, 0); bufferData.writeUInt8(byte2, 1);
之后把 payload 数据放在后面:
payload.copy(bufferData, 2);
这样一个 websocket 的 frame 就构造完了。
我们试一下:
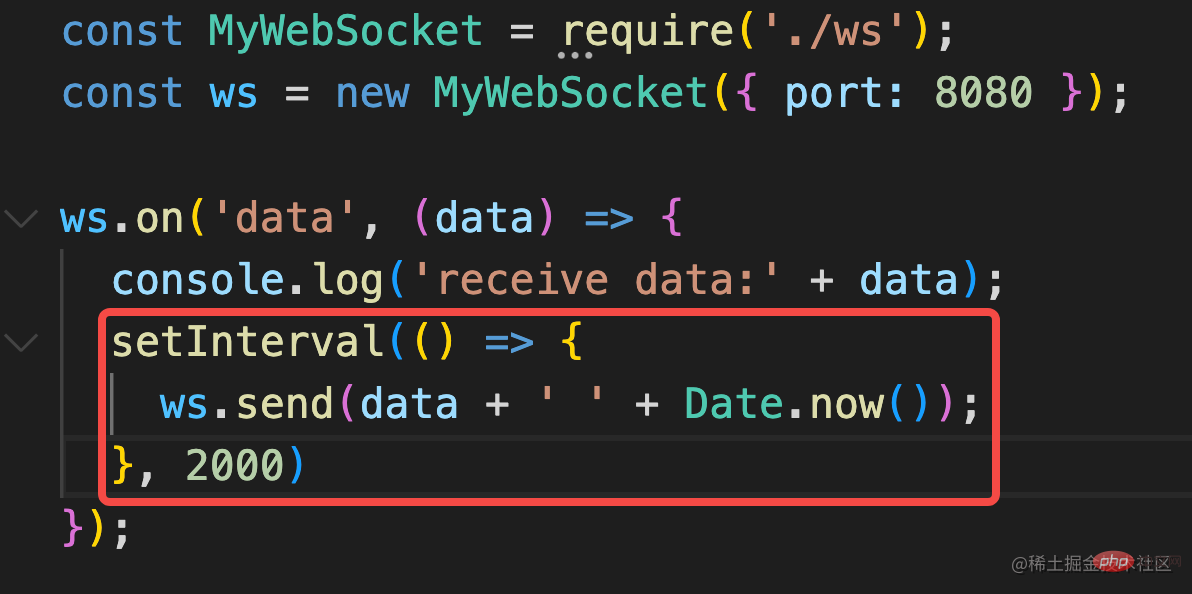
收到客户端消息后,每两秒回一个消息。
收发消息都成功了!
就这样,我们自己实现了一个 websocket 服务器,实现了 websocket 协议的解析和生成!
完整代码如下:
MyWebSocket:
//ws.js
const { EventEmitter } = require('events');
const http = require('http');
const crypto = require('crypto');
function hashKey(key) {
const sha1 = crypto.createHash('sha1');
sha1.update(key + '258EAFA5-E914-47DA-95CA-C5AB0DC85B11');
return sha1.digest('base64');
}
function handleMask(maskBytes, data) {
const payload = Buffer.alloc(data.length);
for (let i = 0; i < data.length; i++) {
payload[i] = maskBytes[i % 4] ^ data[i];
}
return payload;
}
const OPCODES = {
CONTINUE: 0,
TEXT: 1,
BINARY: 2,
CLOSE: 8,
PING: 9,
PONG: 10,
};
function encodeMessage(opcode, payload) {
//payload.length < 126
let bufferData = Buffer.alloc(payload.length + 2 + 0);;
let byte1 = parseInt('10000000', 2) | opcode; // 设置 FIN 为 1
let byte2 = payload.length;
bufferData.writeUInt8(byte1, 0);
bufferData.writeUInt8(byte2, 1);
payload.copy(bufferData, 2);
return bufferData;
}
class MyWebsocket extends EventEmitter {
constructor(options) {
super(options);
const server = http.createServer();
server.listen(options.port || 8080);
server.on('upgrade', (req, socket) => {
this.socket = socket;
socket.setKeepAlive(true);
const resHeaders = [
'HTTP/1.1 101 Switching Protocols',
'Upgrade: websocket',
'Connection: Upgrade',
'Sec-WebSocket-Accept: ' + hashKey(req.headers['sec-websocket-key']),
'',
''
].join('\r\n');
socket.write(resHeaders);
socket.on('data', (data) => {
this.processData(data);
// console.log(data);
});
socket.on('close', (error) => {
this.emit('close');
});
});
}
handleRealData(opcode, realDataBuffer) {
switch (opcode) {
case OPCODES.TEXT:
this.emit('data', realDataBuffer.toString('utf8'));
break;
case OPCODES.BINARY:
this.emit('data', realDataBuffer);
break;
default:
this.emit('close');
break;
}
}
processData(bufferData) {
const byte1 = bufferData.readUInt8(0);
let opcode = byte1 & 0x0f;
const byte2 = bufferData.readUInt8(1);
const str2 = byte2.toString(2);
const MASK = str2[0];
let curByteIndex = 2;
let payloadLength = parseInt(str2.substring(1), 2);
if (payloadLength === 126) {
payloadLength = bufferData.readUInt16BE(2);
curByteIndex += 2;
} else if (payloadLength === 127) {
payloadLength = bufferData.readBigUInt64BE(2);
curByteIndex += 8;
}
let realData = null;
if (MASK) {
const maskKey = bufferData.slice(curByteIndex, curByteIndex + 4);
curByteIndex += 4;
const payloadData = bufferData.slice(curByteIndex, curByteIndex + payloadLength);
realData = handleMask(maskKey, payloadData);
}
this.handleRealData(opcode, realData);
}
send(data) {
let opcode;
let buffer;
if (Buffer.isBuffer(data)) {
opcode = OPCODES.BINARY;
buffer = data;
} else if (typeof data === 'string') {
opcode = OPCODES.TEXT;
buffer = Buffer.from(data, 'utf8');
} else {
console.error('暂不支持发送的数据类型')
}
this.doSend(opcode, buffer);
}
doSend(opcode, bufferDatafer) {
this.socket.write(encodeMessage(opcode, bufferDatafer));
}
}
module.exports = MyWebsocket;Index:
const MyWebSocket = require('./ws');
const ws = new MyWebSocket({ port: 8080 });

ws.on('data', (data) => {
  console.log('receive data:' + data);
  setInterval(() => {
    ws.send(data + ' ' + Date.now());
  }, 2000)
});

ws.on('close', (code, reason) => {
  console.log('close:', code, reason);
});html:
<!DOCTYPE HTML>
<html>
<body>
    <script>
        const ws = new WebSocket("ws://localhost:8080");

        ws.onopen = function () {
            ws.send("发送数据");
            setTimeout(() => {
                ws.send("发送数据2");
            }, 3000)
        };

        ws.onmessage = function (evt) {
            console.log(evt)
        };

        ws.onclose = function () {
        };
    </script>
</body>

</html>总结
实时性较高的需求,我们会用 websocket 实现,比如即时通讯、游戏等场景。
websocket 和 http 没什么关系,但从 http 到 websocket 需要一次切换的过程。
这个切换过程除了要带 upgrade 的 header 外,还要带 sec-websocket-key,服务端根据这个 key 算出结果,通过 sec-websocket-accept 返回。响应是 101 Switching Protocols 的状态码。
这个计算过程比较固定,就是 key + 固定的字符串 通过 sha1 加密后再 base64 的结果。
加这个机制是为了确保对方一定是 websocket 服务器,而不是随意返回了个 101 状态码。
之后就是 websocket 协议了,这是个二进制协议,我们根据格式完成了 websocket 帧的解析和生成。
这样就是一个完整的 websocket 协议的实现了。
我们自己手写了一个 websocket 服务,有没有感觉对 websocket 的理解更深了呢?
更多node相关知识,请访问:nodejs 教程!
The above is the detailed content of Take you step by step to handwrite WebSocket protocol using Node. For more information, please follow other related articles on the PHP Chinese website!

Hot AI Tools

Undresser.AI Undress
AI-powered app for creating realistic nude photos

AI Clothes Remover
Online AI tool for removing clothes from photos.

Undress AI Tool
Undress images for free

Clothoff.io
AI clothes remover

AI Hentai Generator
Generate AI Hentai for free.

Hot Article
Hot Tools

Notepad++7.3.1
Easy-to-use and free code editor

SublimeText3 Chinese version
Chinese version, very easy to use

Zend Studio 13.0.1
Powerful PHP integrated development environment

Dreamweaver CS6
Visual web development tools

SublimeText3 Mac version
God-level code editing software (SublimeText3)
Hot Topics
 1378
1378
 52
52

 PHP and Vue: a perfect pairing of front-end development tools
Mar 16, 2024 pm 12:09 PM
PHP and Vue: a perfect pairing of front-end development tools
Mar 16, 2024 pm 12:09 PM
PHP and Vue: a perfect pairing of front-end development tools. In today's era of rapid development of the Internet, front-end development has become increasingly important. As users have higher and higher requirements for the experience of websites and applications, front-end developers need to use more efficient and flexible tools to create responsive and interactive interfaces. As two important technologies in the field of front-end development, PHP and Vue.js can be regarded as perfect tools when paired together. This article will explore the combination of PHP and Vue, as well as detailed code examples to help readers better understand and apply these two
 Questions frequently asked by front-end interviewers
Mar 19, 2024 pm 02:24 PM
Questions frequently asked by front-end interviewers
Mar 19, 2024 pm 02:24 PM
In front-end development interviews, common questions cover a wide range of topics, including HTML/CSS basics, JavaScript basics, frameworks and libraries, project experience, algorithms and data structures, performance optimization, cross-domain requests, front-end engineering, design patterns, and new technologies and trends. . Interviewer questions are designed to assess the candidate's technical skills, project experience, and understanding of industry trends. Therefore, candidates should be fully prepared in these areas to demonstrate their abilities and expertise.
 Simple JavaScript Tutorial: How to Get HTTP Status Code
Jan 05, 2024 pm 06:08 PM
Simple JavaScript Tutorial: How to Get HTTP Status Code
Jan 05, 2024 pm 06:08 PM
JavaScript tutorial: How to get HTTP status code, specific code examples are required. Preface: In web development, data interaction with the server is often involved. When communicating with the server, we often need to obtain the returned HTTP status code to determine whether the operation is successful, and perform corresponding processing based on different status codes. This article will teach you how to use JavaScript to obtain HTTP status codes and provide some practical code examples. Using XMLHttpRequest
 Is Django front-end or back-end? check it out!
Jan 19, 2024 am 08:37 AM
Is Django front-end or back-end? check it out!
Jan 19, 2024 am 08:37 AM
Django is a web application framework written in Python that emphasizes rapid development and clean methods. Although Django is a web framework, to answer the question whether Django is a front-end or a back-end, you need to have a deep understanding of the concepts of front-end and back-end. The front end refers to the interface that users directly interact with, and the back end refers to server-side programs. They interact with data through the HTTP protocol. When the front-end and back-end are separated, the front-end and back-end programs can be developed independently to implement business logic and interactive effects respectively, and data exchange.
 Exploring Go language front-end technology: a new vision for front-end development
Mar 28, 2024 pm 01:06 PM
Exploring Go language front-end technology: a new vision for front-end development
Mar 28, 2024 pm 01:06 PM
As a fast and efficient programming language, Go language is widely popular in the field of back-end development. However, few people associate Go language with front-end development. In fact, using Go language for front-end development can not only improve efficiency, but also bring new horizons to developers. This article will explore the possibility of using the Go language for front-end development and provide specific code examples to help readers better understand this area. In traditional front-end development, JavaScript, HTML, and CSS are often used to build user interfaces
 Django: A magical framework that can handle both front-end and back-end development!
Jan 19, 2024 am 08:52 AM
Django: A magical framework that can handle both front-end and back-end development!
Jan 19, 2024 am 08:52 AM
Django: A magical framework that can handle both front-end and back-end development! Django is an efficient and scalable web application framework. It is able to support multiple web development models, including MVC and MTV, and can easily develop high-quality web applications. Django not only supports back-end development, but can also quickly build front-end interfaces and achieve flexible view display through template language. Django combines front-end development and back-end development into a seamless integration, so developers don’t have to specialize in learning
 Combination of Golang and front-end technology: explore how Golang plays a role in the front-end field
Mar 19, 2024 pm 06:15 PM
Combination of Golang and front-end technology: explore how Golang plays a role in the front-end field
Mar 19, 2024 pm 06:15 PM
Combination of Golang and front-end technology: To explore how Golang plays a role in the front-end field, specific code examples are needed. With the rapid development of the Internet and mobile applications, front-end technology has become increasingly important. In this field, Golang, as a powerful back-end programming language, can also play an important role. This article will explore how Golang is combined with front-end technology and demonstrate its potential in the front-end field through specific code examples. The role of Golang in the front-end field is as an efficient, concise and easy-to-learn
 How to get HTTP status code in JavaScript the easy way
Jan 05, 2024 pm 01:37 PM
How to get HTTP status code in JavaScript the easy way
Jan 05, 2024 pm 01:37 PM
Introduction to the method of obtaining HTTP status code in JavaScript: In front-end development, we often need to deal with the interaction with the back-end interface, and HTTP status code is a very important part of it. Understanding and obtaining HTTP status codes helps us better handle the data returned by the interface. This article will introduce how to use JavaScript to obtain HTTP status codes and provide specific code examples. 1. What is HTTP status code? HTTP status code means that when the browser initiates a request to the server, the service
