

Does 10th generation CPU support win7 system?

The 10th generation CPU supports win7 system. Win7 can be installed on 400 and 500 series motherboards with 10th generation CPUs. The prerequisite for installation is to turn off "Safe Boot" and enable csm compatibility mode if there is a dedicated graphics card; however, some motherboards no longer have options to support traditional mode and compatibility mode. , the motherboard still needs to be replaced at this time.

The operating environment of this tutorial: Windows 7 system, Dell G3 computer.
400 and 500 series motherboards with 10th generation CPUs can be installed with win7, but USB devices cannot be used during the installation of WIN7. You need to use a new win7 model for installation, and turn off the "Safe Boot" option. If For solid-state drives with NVME interface, a 0x000007b hard drive not found blue screen will appear during the installation of WIN7.
The prerequisite for installing Win7 on 10th generation CPU is to turn off "Safe Boot" and turn on CSM compatibility mode if there is a dedicated graphics card. However, some motherboards no longer have options to support traditional mode and compatibility mode, so the motherboard still needs to be replaced.
The 10th generation CPU paired with the 500 series motherboard needs to be installed with a separate graphics card to install win7. Currently, the 500 series motherboard does not support the integrated graphics driver. Currently, the ones that support win7 integrated graphics are: i3 10100, i3 10105 and some i5 10400 CPUs (CPUs above 10400 need to be equipped with independent graphics cards to install win7). Machines that support integrated graphics can only use 400 series motherboards in advance, and all 500 series motherboards require independent graphics cards.

Even if the above conditions are met, another important point is that due to limitations of Intel, some brand machines will have a 0x000000a5 blue screen when installing win7 due to BIOS limitations. If a 0x000000a5 blue screen appears It must be impossible to install win7. This happened a lot in the Intel 8th generation.
Notes on installing win7 with 10th generation CPU:
1. Machines with 10th generation CPU do not support traditional mode. Win7 can only be installed in uefi mode. Note that compatibility mode cannot be turned on in uefi mode. There is no option to turn it on, so when installing win7, you need to use the image that comes with this site and the solution card LOGO solution. Otherwise, when installing win7, you will be stuck in the startup menu and cannot enter the system. If you have a separate graphics card, remember to turn on the csm compatibility mode first to install WIN7. If the uefi mode does not have a csm compatibility mode, then use the solution to solve the card LOGO.
2. When installing win7 on machines with 10th generation CPU, you need to pay attention to "turn off security enablement" in the bios.
3. When installing win7 in uefi mode on machines with 10th generation CPU, please note that only 64-bit operating systems can be used. When installing win7 in uefi mode, the partition type must be gpt partition.
4. When installing the system, the drive letter of the system cannot have files in it. If there are files, you cannot click Next to continue and you need to format the partition.
5. The entire installation process requires 2 restarts.
6. After the installation is completed, almost all hardware drivers can be obtained through Windows Update, and they can be put into use immediately after the update.
For more related knowledge, please visit the FAQ column!
The above is the detailed content of Does 10th generation CPU support win7 system?. For more information, please follow other related articles on the PHP Chinese website!

Hot AI Tools

Undresser.AI Undress
AI-powered app for creating realistic nude photos

AI Clothes Remover
Online AI tool for removing clothes from photos.

Undress AI Tool
Undress images for free

Clothoff.io
AI clothes remover

AI Hentai Generator
Generate AI Hentai for free.

Hot Article
Hot Tools

Notepad++7.3.1
Easy-to-use and free code editor

SublimeText3 Chinese version
Chinese version, very easy to use

Zend Studio 13.0.1
Powerful PHP integrated development environment

Dreamweaver CS6
Visual web development tools

SublimeText3 Mac version
God-level code editing software (SublimeText3)
Hot Topics
 1377
1377
 52
52

 What should I do if the Win7 taskbar does not display the icon? How to solve the problem of the computer taskbar icon disappearing
Jun 09, 2024 pm 01:49 PM
What should I do if the Win7 taskbar does not display the icon? How to solve the problem of the computer taskbar icon disappearing
Jun 09, 2024 pm 01:49 PM
Recently, many users using Win7 system have found that the icons in the taskbar suddenly disappeared, which makes the operation very inconvenient and they do not know how to solve the problem. This article will introduce to you how to solve the problem of disappearing taskbar icons in Win7 system. Bar! Cause Analysis When encountering such a situation, there are generally two situations: one is that the taskbar on the computer does not really disappear, but is just hidden, and the other is that the taskbar does disappear. Method 1: 1. There is a situation that you need to confirm first, that is, when the mouse is placed at the bottom of the screen, the taskbar will be displayed. You can directly click the mouse on the taskbar and select "Properties". 2. In the dialog box that opens, click & on the "Hide taskbar" option.
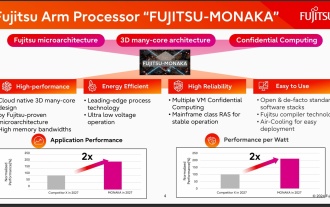 144-core, 3D-stacked SRAM: Fujitsu details next-generation data center processor MONAKA
Jul 29, 2024 am 11:40 AM
144-core, 3D-stacked SRAM: Fujitsu details next-generation data center processor MONAKA
Jul 29, 2024 am 11:40 AM
According to news from this website on July 28, foreign media TechRader reported that Fujitsu introduced in detail the FUJITSU-MONAKA (hereinafter referred to as MONAKA) processor planned to be shipped in 2027. MONAKACPU is based on the "cloud native 3D many-core" architecture and adopts the Arm instruction set. It is oriented to the data center, edge and telecommunications fields. It is suitable for AI computing and can realize mainframe-level RAS1. Fujitsu said that MONAKA will achieve a leap in energy efficiency and performance: thanks to technologies such as ultra-low voltage (ULV) technology, the CPU can achieve 2 times the energy efficiency of competing products in 2027, and cooling does not require water cooling; in addition, the application performance of the processor It can also reach twice as much as your opponent. In terms of instructions, MONAKA is equipped with vector
 The operation process of WIN10 service host occupying too much CPU
Mar 27, 2024 pm 02:41 PM
The operation process of WIN10 service host occupying too much CPU
Mar 27, 2024 pm 02:41 PM
1. First, we right-click the blank space of the taskbar and select the [Task Manager] option, or right-click the start logo, and then select the [Task Manager] option. 2. In the opened Task Manager interface, we click the [Services] tab on the far right. 3. In the opened [Service] tab, click the [Open Service] option below. 4. In the [Services] window that opens, right-click the [InternetConnectionSharing(ICS)] service, and then select the [Properties] option. 5. In the properties window that opens, change [Open with] to [Disabled], click [Apply] and then click [OK]. 6. Click the start logo, then click the shutdown button, select [Restart], and complete the computer restart.
 How to clear all desktop background images in Win7? Tips for deleting personalized background images in Win7
Jun 02, 2024 am 09:01 AM
How to clear all desktop background images in Win7? Tips for deleting personalized background images in Win7
Jun 02, 2024 am 09:01 AM
In Win7 system, many users want to delete personalized desktop background images, but do not know how to delete them. This article will show you how to delete personalized background images in Win7 system. 1. First, open the control panel interface of the Win7 system and click to enter the "Appearance and Personalization" settings; 2. Then, in the opened interface, click the "Change Desktop Background" setting; 3. Then, click below "Desktop background" option; 4. Then, select Select all, and then click Clear all. Of course, you can also use it under "Customize", right-click the theme you want to delete, and then click &q on the shortcut menu
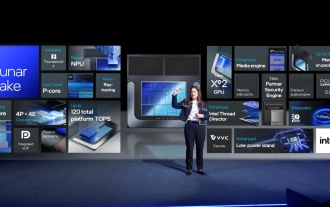 Leak reveals key specs of Intel Arrow Lake-U, -H, -HX and -S
Jun 15, 2024 pm 09:49 PM
Leak reveals key specs of Intel Arrow Lake-U, -H, -HX and -S
Jun 15, 2024 pm 09:49 PM
IntelArrowLakeisexpectedtobebasedonthesameprocessorarchitectureasLunarLake,meaningthatIntel'sbrandnewLionCoveperformancecoreswillbecombinedwiththeeconomicalSkymontefficiencycores.WhileLunarLakeisonlyavailableasava
 AM4 refuses to die, news says AMD will launch Ryzen 9 5900XT/7 5800XT: clocked at up to 4.8GHz
Jun 05, 2024 pm 09:43 PM
AM4 refuses to die, news says AMD will launch Ryzen 9 5900XT/7 5800XT: clocked at up to 4.8GHz
Jun 05, 2024 pm 09:43 PM
According to news from this website on June 1st, the source @CodeCommando tweeted today, sharing some screenshots of AMD’s upcoming presentation documents at the Computex2024 event. The content of the tweet was “AM4 will never die”, and the accompanying picture showed two new Ryzen5000XT series processors. The screenshots show the following two products: Ryzen 95900 Ryzen75800XT It is a faster variant of AMD's existing Ryzen75800X processor. Both processors are clocked up to 4.8G
 Where is the network discovery in Win7? Tips for enabling the network discovery function in Win7
Jun 04, 2024 am 09:02 AM
Where is the network discovery in Win7? Tips for enabling the network discovery function in Win7
Jun 04, 2024 am 09:02 AM
Many computer users know that network discovery is a network setting. This setting will affect whether the computer can find other computers and devices on the network and whether it can find the computer when other computers on the network are found. So how to enable network discovery in win7? The following computer System Home U Disk Installation will introduce you to the tutorial on how to enable network discovery in win7 system. 1. First, click the "Start Menu" icon on the desktop taskbar and choose to open the "Control Panel" interface. 2. Then, in the interface that opens, set "View by" to "Category", and then choose to enter "Network and Internet"
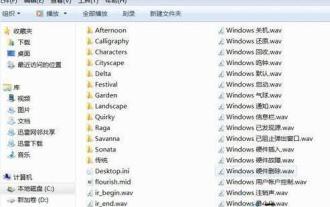 Introduction to how to change the startup sound of Windows 7 computer
Mar 26, 2024 pm 09:30 PM
Introduction to how to change the startup sound of Windows 7 computer
Mar 26, 2024 pm 09:30 PM
1. First copy the file you want to use as boot music to the corresponding directory of C: WindowsMedia. As shown in the figure: 2. Right-click the desktop on a single machine and select Personalize menu; as shown in the figure: 3. Select the sound option; as shown in the figure: 4. In the [Program Events] box in the [Sound] tab of the sound interface Select [Windows Login], then click [Browse]; as shown in the figure: 5. Select the music file that needs to be replaced, click Open, then click Apply and confirm to save the settings. as the picture shows: