In Linux, free is a built-in command to check the memory usage status. It can display the usage status of system physical memory, virtual memory (swap swap partition), shared memory and system cache. The syntax is "free [option] "; The output of the free command is very similar to the memory part of the top command.
#The operating environment of this tutorial: linux7.3 system, Dell G3 computer.
Linux free command: Check memory usage status
The free command is used to display the system memory status, including system physical memory, virtual memory (swap swap partition), and shared memory And the system cache usage, the output is very similar to the memory part of the top command.
The basic format of the free command is as follows:
# free [选项]
Copy after login
Table 1 lists the commonly used options of this command and their respective meanings.
Table 1 Free command common options and their meanings
Options
Meaning
##- b
Displays memory usage in Byte (byte).
-k
Displays memory usage in KB. This option is the default option of the free command.
-m
Displays memory usage in MB.
-g
Displays memory usage in GB.
-t
In the final result of the output, output the total amount of memory and swap partition.
-o
Do not display the system buffer column.
-s Interval seconds
Continue to display memory usage according to the specified interval.
free 命令可以显示系统中剩余及已用的物理内存和交换内存,以及共享内存和被核心使用的缓冲区。
如果加上 -h 选项,输出的结果会友好很多:
有时我们需要持续的观察内存的状况,此时可以使用 -s 选项并指定间隔的秒数:
$ free -h -s 3
Copy after login
The above command outputs memory usage every 3 seconds until you press ctrl c.
Since the free command itself is relatively simple, the focus of this article will be on how to understand the current memory usage of the system through the free command.
Introduction to output
Let’s first explain the output content:
# The
##Mem line (second line) is the memory usage.
Swap line (the third line) is the usage of swap space.
##total column displays the total available physical memory and swap of the system size of space.
##used column shows that it has been Physical memory and swap space used.
##free Columns show how much physical memory and swap space are available for use.
The #shared column shows the amount of physical memory used by sharing.
#buff/cache column displays the physical memory size used by buffer and cache.
The
#available column displays the amount of physical memory that is still available to the application. # I think only after understanding some basic After understanding the concept, the above output can help us understand the memory status of the system.
buff/cache
Let me ask a question first: buffer and cache should be two types of memory, but why does the free command change What about putting them together? Answering this question requires some preparation. Let us first clarify the meaning of buffer and cache.
buffer
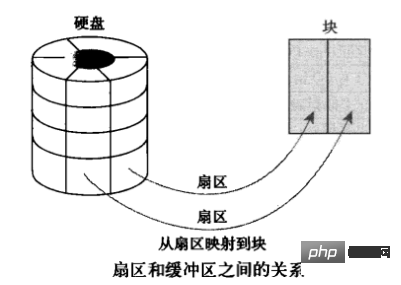
In the operating system, it refers to buffer cache, which is generally translated as "buffer" in Chinese. To understand buffers, two other concepts must be understood: "sector" and
"piece". A sector is the smallest addressing unit of a device, also called a "hard sector" or "device block". Block is the smallest addressing unit of the file system in the operating system, also called "file block" or "I/O
"block". Each block contains one or more sectors, but cannot be larger than a page, so a page can hold one or more blocks in memory. When a block is loaded into memory, it is stored in a buffer area. Each buffer corresponds to a block, which is equivalent to the representation of a disk block in memory (the picture below is from the Internet):
Note that the buffer cache only has the concept of blocks and not files. It just moves the blocks on the disk directly into the memory without caring about what format of files are stored in the blocks.
cache refers to page cache in the operating system, and Chinese is generally translated as "page cache". The page cache is a disk cache implemented by the kernel. It is mainly used to reduce the impact on the disk. I/O operations. Specifically, by caching the data in the disk into physical memory, access to the disk is changed into access to physical memory. The page cache caches memory pages. In the cache Pages come from reading and writing ordinary files, block device files (this refers to the buffer cache) and memory mapped files. We can understand the caching of ordinary files by the page cache in this way: when the kernel To read a file (such as
/etc/hosts), it will first check whether the data of this file is already in the page cache. If so, give up accessing the disk and read directly from memory. This behavior is called a cache hit. If the data is not in the cache, it means a cache miss, and the kernel will schedule the block.
I/O operations read data from disk. The kernel then places the read data into the page cache. This cache targets files recognized by the file system (such as /etc/hosts). The page cache's cache of block device files is the buffer cahce we introduced earlier. Because individual disk blocks are also stored in the page cache through the buffer (the buffer is ultimately hosted by the page cache).
We should be clear at this point: whether it is a buffer or a page cache, they are implemented in the same way. The buffer is just a conceptually special page cache. Then why
Isn't the free command directly called cache instead of buff/cache? This is because buffer and page cache implementations are not inherently unified. in linux
Kernel 2.4
Only then can they be unified. There were two separate disk caches in earlier kernels: the page cache and the buffer cache. The former caches pages and the latter caches buffers. Once you know the story, the names of the columns in the output may no longer matter.
The above is the detailed content of What is free in linux. For more information, please follow other related articles on the PHP Chinese website!
Statement of this Website
The content of this article is voluntarily contributed by netizens, and the copyright belongs to the original author. This site does not assume corresponding legal responsibility. If you find any content suspected of plagiarism or infringement, please contact admin@php.cn
The key differences between CentOS and Ubuntu are: origin (CentOS originates from Red Hat, for enterprises; Ubuntu originates from Debian, for individuals), package management (CentOS uses yum, focusing on stability; Ubuntu uses apt, for high update frequency), support cycle (CentOS provides 10 years of support, Ubuntu provides 5 years of LTS support), community support (CentOS focuses on stability, Ubuntu provides a wide range of tutorials and documents), uses (CentOS is biased towards servers, Ubuntu is suitable for servers and desktops), other differences include installation simplicity (CentOS is thin)
Docker uses Linux kernel features to provide an efficient and isolated application running environment. Its working principle is as follows: 1. The mirror is used as a read-only template, which contains everything you need to run the application; 2. The Union File System (UnionFS) stacks multiple file systems, only storing the differences, saving space and speeding up; 3. The daemon manages the mirrors and containers, and the client uses them for interaction; 4. Namespaces and cgroups implement container isolation and resource limitations; 5. Multiple network modes support container interconnection. Only by understanding these core concepts can you better utilize Docker.
CentOS will be shut down in 2024 because its upstream distribution, RHEL 8, has been shut down. This shutdown will affect the CentOS 8 system, preventing it from continuing to receive updates. Users should plan for migration, and recommended options include CentOS Stream, AlmaLinux, and Rocky Linux to keep the system safe and stable.
How to use Docker Desktop? Docker Desktop is a tool for running Docker containers on local machines. The steps to use include: 1. Install Docker Desktop; 2. Start Docker Desktop; 3. Create Docker image (using Dockerfile); 4. Build Docker image (using docker build); 5. Run Docker container (using docker run).
CentOS installation steps: Download the ISO image and burn bootable media; boot and select the installation source; select the language and keyboard layout; configure the network; partition the hard disk; set the system clock; create the root user; select the software package; start the installation; restart and boot from the hard disk after the installation is completed.
Backup and Recovery Policy of GitLab under CentOS System In order to ensure data security and recoverability, GitLab on CentOS provides a variety of backup methods. This article will introduce several common backup methods, configuration parameters and recovery processes in detail to help you establish a complete GitLab backup and recovery strategy. 1. Manual backup Use the gitlab-rakegitlab:backup:create command to execute manual backup. This command backs up key information such as GitLab repository, database, users, user groups, keys, and permissions. The default backup file is stored in the /var/opt/gitlab/backups directory. You can modify /etc/gitlab
CentOS hard disk mount is divided into the following steps: determine the hard disk device name (/dev/sdX); create a mount point (it is recommended to use /mnt/newdisk); execute the mount command (mount /dev/sdX1 /mnt/newdisk); edit the /etc/fstab file to add a permanent mount configuration; use the umount command to uninstall the device to ensure that no process uses the device.
After CentOS is stopped, users can take the following measures to deal with it: Select a compatible distribution: such as AlmaLinux, Rocky Linux, and CentOS Stream. Migrate to commercial distributions: such as Red Hat Enterprise Linux, Oracle Linux. Upgrade to CentOS 9 Stream: Rolling distribution, providing the latest technology. Select other Linux distributions: such as Ubuntu, Debian. Evaluate other options such as containers, virtual machines, or cloud platforms.