
 Operation and Maintenance
Linux Operation and Maintenance
Which Linux partition is the primary partition?
Operation and Maintenance
Linux Operation and Maintenance
Which Linux partition is the primary partition?
Which Linux partition is the primary partition?

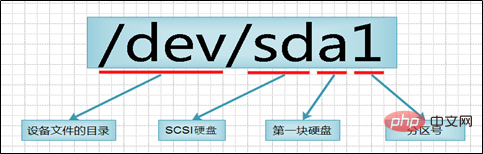
The number "hda1-4" in Linux is the primary partition; the primary partition is mainly used to start the operating system. It mainly stores the startup or boot program of the operating system. The "/boot" partition It is best to put it on the main partition.
#The operating environment of this tutorial: linux5.9.8 system, Dell G3 computer.
Which is the primary partition in Linux?
linux system disk management (primary partition and logical partition)
Summary: Linux system disk management primary partition and logical partition
1. Common sense you should know about Linux system partition
- Hard disk partition is essentially the A format of the hard disk before the hard disk can be used to save various information. When creating a partition, the physical parameters of the hard disk have been set and the hard disk master boot record (Master Boot Record, generally referred to as MBR) has been specified. and the storage location of the boot record backup.
- MBR Overview: The full name is Master Boot Record, which is the master boot record of the hard disk; it is a boot section located at the front of the disk. (Loader) code. It is responsible for determining the legality of partitions and locating partition boot information when the disk operating system (DOS) reads and writes the disk. It is generated by the disk operating system (DOS) when initializing the hard disk.
-The master boot program is the master boot record (MBR) (occupies 446 bytes)
can be found in the FDISK program. It is used to transfer system control to the user-specified file when the hard disk starts and is stored in the partition table. A registered operating system.
-Disk partition table entry (DPT, Disk Partition Table)
consists of four partition table entries (16 bytes each).
is responsible for describing the partition situation on the disk. Its content is determined by the disk media and the user when using FDISK to define the partition. (Details omitted)
-End mark (occupies 2 bytes) (magic number)
The value is AA55. When stored, the low byte is first and the high byte is last, that is, it looks like 55AA (hexadecimal ).
- Partition number: primary partition 1-4, logical partition 5...
## LINUX regulations: Logical partitions must be built on extended partitions, not on primary partitions
##Partition functions:Note: Use the partition tool fdisk to operate, partition and format the disk (key points)①Primary partition: Mainly It is used to start the operating system. It mainly stores the startup or boot program of the operating system. The /boot partition is best placed on the main partition;
- ② The extended partition cannot be used, it is only used as a container for logical partitions If it exists, first create an extended partition and create a logical partition on top of the extended partition;
③ What we actually store data is the primary partition and the logical partition, and a large amount of data is placed in the logical partition.
Note:
The primary partition can only have a maximum of 4 extended partitions.fdisk: Linux partition table operation tool softwareThe extended partition can be 0, and the maximum is 1.
2. Disk management command
The extended partition cannot be used directly. The extended partition must first be created as a logical partition before it can be used.
The logical partition can be 0 and 1 more
n: Add a new partitionp : View partition information
3. View disk command
w: Save and exit
q: Exit without saving
d: Delete partition
t: Change partition type
ls /dev/sd* #查看磁盘
n represents the disk partition number divided on each diskThe working environment is the English environment, which is convenient for everyone to read and demonstrate in the Mandarin environment4. Create a primary partition demonstration:
#第一步:添加磁盘创建主分区

╭─root@localhost.localdomain ~
╰─➤  ls /dev/sd*     #查看磁盘
/dev/sda  /dev/sda1  /dev/sda2  /dev/sdb  /dev/sdc  /dev/sdd  /dev/sde
╭─root@localhost.localdomain ~
╰─➤  fdisk /dev/sdb     #管理分区
欢迎使用 fdisk (util-linux 2.23.2)。

更改将停留在内存中,直到您决定将更改写入磁盘。
使用写入命令前请三思。

Device does not contain a recognized partition table
使用磁盘标识符 0x9fccbf7c 创建新的 DOS 磁盘标签。

命令(输入 m 获取帮助):n   #新建分区
Partition type:       #分区类型
   p   primary (0 primary, 0 extended, 4 free)     #p--->主分区
   e   extended       #e  --->   扩展分区
Select (default p): p     #选择主分区
分区号 (1-4,默认 1):
起始 扇区 (2048-41943039,默认为 2048): #分区磁盘的起始位,默认值,回车就好!
将使用默认值 2048
Last 扇区, +扇区 or +size{K,M,G} (2048-41943039,默认为 41943039):+5G   #磁盘大小选择,加号不能省略,回车即可
分区 1 已设置为 Linux 类型,大小设为 5 GiB

命令(输入 m 获取帮助):P   #查询分区是否创建成功

磁盘 /dev/sdb:21.5 GB, 21474836480 字节,41943040 个扇区
Units = 扇区 of 1 * 512 = 512 bytes
扇区大小(逻辑/物理):512 字节 / 512 字节
I/O 大小(最小/最佳):512 字节 / 512 字节
磁盘标签类型:dos
磁盘标识符:0x9fccbf7c

   设备 Boot        Start         End      Blocks   Id  System
/dev/sdb1            2048    10487807     5242880   83  Linux    #sdb1

命令(输入 m 获取帮助):w    #保存退出
The partition table has been altered!

Calling ioctl() to re-read partition table.
正在同步磁盘。

#第二步:查看磁盘

╭─root@localhost.localdomain ~
╰─➤  ls /dev/sd*
/dev/sda  /dev/sda1  /dev/sda2  /dev/sdb  /dev/sdb1  /dev/sdc  /dev/sdd  /dev/sde

#第三步:格式化成xfs文件系统

╭─root@localhost.localdomain ~
╰─➤  mkfs.xfs /dev/sdb1
meta-data=/dev/sdb1              isize=512    agcount=4, agsize=327680 blks
         =                       sectsz=512   attr=2, projid32bit=1
         =                       crc=1        finobt=0, sparse=0
data     =                       bsize=4096   blocks=1310720, imaxpct=25
         =                       sunit=0      swidth=0 blks
naming   =version 2              bsize=4096   ascii-ci=0 ftype=1
log      =internal log           bsize=4096   blocks=2560, version=2
         =                       sectsz=512   sunit=0 blks, lazy-count=1
realtime =none                   extsz=4096   blocks=0, rtextents=0

#第四步:挂载至本地目录

╭─root@localhost.localdomain ~
╰─➤  mkdir /xfs_du   #创建本地目录
╭─root@localhost.localdomain ~
╰─➤  mount /dev/sdb1 /xfs_du   #使用mount挂载   mount 磁盘 目录

#第五步:查看挂载信息

╭─root@localhost.localdomain ~
╰─➤  df -h
文件系统             容量  已用  可用 已用% 挂载点
/dev/mapper/cl-root   17G  4.7G   13G   28% /
devtmpfs             473M     0  473M    0% /dev
tmpfs                489M   88K  489M    1% /dev/shm
tmpfs                489M  7.1M  482M    2% /run
tmpfs                489M     0  489M    0% /sys/fs/cgroup
/dev/sda1           1014M  173M  842M   18% /boot
tmpfs                 98M  8.0K   98M    1% /run/user/0
/dev/sr0             4.1G  4.1G     0  100% /run/media/root/CentOS 7 x86_64
/dev/sdb1            5.0G   33M  5.0G    1% /xfs_du

#第六步:开机自动挂载

╭─root@localhost.localdomain ~
╰─➤  echo "/dev/sdb1/xfs_du xfs defaults 0 0" >> /etc/fstab

#开机自动挂载方法2:

echo “mount /dev/sdb1 /xfs_du” >> /etc/rc.local
chmod +x /etc/rc.d/rc.local   #给个执行权限


# /etc/rc.local
   是使用者自订开机启动程序的文件,把需要开机自动运行的程序写在这个脚本里
Copy after login
fdisk Partition Demonstration – Creating Logical Partitions
# 第一步:fdisk添加扩展分区

╭─root@du ~
╰─➤ fdisk /dev/sdb
Welcome to fdisk (util-linux 2.23.2).

Changes will remain in memory only, until you decide to write them.
Be careful before using the write command.

Command (m for help): n    #添加新分区
Partition type:
p primary (1 primary, 0 extended, 3 free)
e extended
Select (default p): e     #选择扩展分区
Partition number (2-4, default 2):
First sector (10487808-41943039, default 10487808):
Using default value 10487808
Last sector, +sectors or +size{K,M,G} (10487808-41943039, default 41943039): +5G    #5G大小
Partition 2 of type Extended and of size 5 GiB is set

Command (m for help): P   #查看分区

Disk /dev/sdb: 21.5 GB, 21474836480 bytes, 41943040 sectors
Units = sectors of 1 * 512 = 512 bytes
Sector size (logical/physical): 512 bytes / 512 bytes
I/O size (minimum/optimal): 512 bytes / 512 bytes
Disk label type: dos
Disk identifier: 0xe140b235

Device Boot Start End Blocks Id System
/dev/sdb1 2048 10487807 5242880 83 Linux
/dev/sdb2 10487808 20973567 5242880 5 Extended

Command (m for help): w   #保存退出
The partition table has been altered!

Calling ioctl() to re-read partition table.
Syncing disks.

#第二步:创建逻辑分区

╭─root@du ~
╰─➤ fdisk /dev/sdb
Welcome to fdisk (util-linux 2.23.2).

Changes will remain in memory only, until you decide to write them.
Be careful before using the write command.

Command (m for help): n
Partition type:
p primary (1 primary, 1 extended, 2 free)
l logical (numbered from 5)
Select (default p): l    #创建逻辑分区
Adding logical partition 5
First sector (10489856-20973567, default 10489856):
Using default value 10489856
Last sector, +sectors or +size{K,M,G} (10489856-20973567, default 20973567): +10G   #逻辑分区大小不能超过扩展分区大小
Value out of range.
Last sector, +sectors or +size{K,M,G} (10489856-20973567, default 20973567): +2g
Unsupported suffix: ‘g’.
Supported: 10^N: KB (KiloByte), MB (MegaByte), GB (GigaByte)
2^N: K (KibiByte), M (MebiByte), G (GibiByte)
Last sector, +sectors or +size{K,M,G} (10489856-20973567, default 20973567): +2G
Partition 5 of type Linux and of size 2 GiB is set

Command (m for help): P

Disk /dev/sdb: 21.5 GB, 21474836480 bytes, 41943040 sectors
Units = sectors of 1 * 512 = 512 bytes
Sector size (logical/physical): 512 bytes / 512 bytes
I/O size (minimum/optimal): 512 bytes / 512 bytes
Disk label type: dos
Disk identifier: 0xe140b235

Device Boot Start End Blocks Id System
/dev/sdb1 2048 10487807 5242880 83 Linux
/dev/sdb2 10487808 20973567 5242880 5 Extended
/dev/sdb5 10489856 14684159 2097152 83 Linux

Command (m for help): W
The partition table has been altered!

Calling ioctl() to re-read partition table.
Syncing disks.

#第三步:创建文件系统

╭─root@du ~
╰─➤ ls /dev/sd*
/dev/sda /dev/sda1 /dev/sda2 /dev/sdb /dev/sdb1 /dev/sdb2 /dev/sdb5
╭─root@du ~
╰─➤ mkfs.xfs /dev/sdb5
meta-data=/dev/sdb5 isize=512 agcount=4, agsize=131072 blks
= sectsz=512 attr=2, projid32bit=1
= crc=1 finobt=0, sparse=0
data = bsize=4096 blocks=524288, imaxpct=25
= sunit=0 swidth=0 blks
naming =version 2 bsize=4096 ascii-ci=0 ftype=1
log =internal log bsize=4096 blocks=2560, version=2
= sectsz=512 sunit=0 blks, lazy-count=1
realtime =none extsz=4096 blocks=0, rtextents=0

#第四步:开机自动挂载

╭─root@du ~
╰─➤ echo “mount /dev/sdb5 /xfs_du” >> /etc/rc.local
Copy after login
# 第一步:fdisk添加扩展分区
╭─root@du ~
╰─➤ fdisk /dev/sdb
Welcome to fdisk (util-linux 2.23.2).
Changes will remain in memory only, until you decide to write them.
Be careful before using the write command.
Command (m for help): n #添加新分区
Partition type:
p primary (1 primary, 0 extended, 3 free)
e extended
Select (default p): e #选择扩展分区
Partition number (2-4, default 2):
First sector (10487808-41943039, default 10487808):
Using default value 10487808
Last sector, +sectors or +size{K,M,G} (10487808-41943039, default 41943039): +5G #5G大小
Partition 2 of type Extended and of size 5 GiB is set
Command (m for help): P #查看分区
Disk /dev/sdb: 21.5 GB, 21474836480 bytes, 41943040 sectors
Units = sectors of 1 * 512 = 512 bytes
Sector size (logical/physical): 512 bytes / 512 bytes
I/O size (minimum/optimal): 512 bytes / 512 bytes
Disk label type: dos
Disk identifier: 0xe140b235
Device Boot Start End Blocks Id System
/dev/sdb1 2048 10487807 5242880 83 Linux
/dev/sdb2 10487808 20973567 5242880 5 Extended
Command (m for help): w #保存退出
The partition table has been altered!
Calling ioctl() to re-read partition table.
Syncing disks.
#第二步:创建逻辑分区
╭─root@du ~
╰─➤ fdisk /dev/sdb
Welcome to fdisk (util-linux 2.23.2).
Changes will remain in memory only, until you decide to write them.
Be careful before using the write command.
Command (m for help): n
Partition type:
p primary (1 primary, 1 extended, 2 free)
l logical (numbered from 5)
Select (default p): l #创建逻辑分区
Adding logical partition 5
First sector (10489856-20973567, default 10489856):
Using default value 10489856
Last sector, +sectors or +size{K,M,G} (10489856-20973567, default 20973567): +10G #逻辑分区大小不能超过扩展分区大小
Value out of range.
Last sector, +sectors or +size{K,M,G} (10489856-20973567, default 20973567): +2g
Unsupported suffix: ‘g’.
Supported: 10^N: KB (KiloByte), MB (MegaByte), GB (GigaByte)
2^N: K (KibiByte), M (MebiByte), G (GibiByte)
Last sector, +sectors or +size{K,M,G} (10489856-20973567, default 20973567): +2G
Partition 5 of type Linux and of size 2 GiB is set
Command (m for help): P
Disk /dev/sdb: 21.5 GB, 21474836480 bytes, 41943040 sectors
Units = sectors of 1 * 512 = 512 bytes
Sector size (logical/physical): 512 bytes / 512 bytes
I/O size (minimum/optimal): 512 bytes / 512 bytes
Disk label type: dos
Disk identifier: 0xe140b235
Device Boot Start End Blocks Id System
/dev/sdb1 2048 10487807 5242880 83 Linux
/dev/sdb2 10487808 20973567 5242880 5 Extended
/dev/sdb5 10489856 14684159 2097152 83 Linux
Command (m for help): W
The partition table has been altered!
Calling ioctl() to re-read partition table.
Syncing disks.
#第三步:创建文件系统
╭─root@du ~
╰─➤ ls /dev/sd*
/dev/sda /dev/sda1 /dev/sda2 /dev/sdb /dev/sdb1 /dev/sdb2 /dev/sdb5
╭─root@du ~
╰─➤ mkfs.xfs /dev/sdb5
meta-data=/dev/sdb5 isize=512 agcount=4, agsize=131072 blks
= sectsz=512 attr=2, projid32bit=1
= crc=1 finobt=0, sparse=0
data = bsize=4096 blocks=524288, imaxpct=25
= sunit=0 swidth=0 blks
naming =version 2 bsize=4096 ascii-ci=0 ftype=1
log =internal log bsize=4096 blocks=2560, version=2
= sectsz=512 sunit=0 blks, lazy-count=1
realtime =none extsz=4096 blocks=0, rtextents=0
#第四步:开机自动挂载
╭─root@du ~
╰─➤ echo “mount /dev/sdb5 /xfs_du” >> /etc/rc.localLocal Directory Creating Swap Partition
Step 1: Create Directory
mkdir /swap
Step 2: Create an empty file
dd if=/dev/zero of=/swap/swap bs=2M count=2014
Step 3: Format to swap format
mkswap /swap/swap
Step 4: Write the file /etc/fstab and boot Automatically mount
echo "/swap/swap swap swap defaults 0 0" >> /etc/fstab
Step 5: Modify permissions and mount
chmod 0600 /swap/swap

mount -a
Step 6: Enable swap
swapon -a
[root@node1 ~]# free -h
              total        used        free      shared  buff/cache   available
Mem:           976M        321M         60M        9.5M        594M        466M
Swap:          5.9G        221M        5.7G
Finally: Close swap
swapoff -a
Related recommendations: "
Linux Video TutorialThe above is the detailed content of Which Linux partition is the primary partition?. For more information, please follow other related articles on the PHP Chinese website!

Hot AI Tools

Undresser.AI Undress
AI-powered app for creating realistic nude photos

AI Clothes Remover
Online AI tool for removing clothes from photos.

Undress AI Tool
Undress images for free

Clothoff.io
AI clothes remover

Video Face Swap
Swap faces in any video effortlessly with our completely free AI face swap tool!

Hot Article
Hot Tools

Notepad++7.3.1
Easy-to-use and free code editor

SublimeText3 Chinese version
Chinese version, very easy to use

Zend Studio 13.0.1
Powerful PHP integrated development environment

Dreamweaver CS6
Visual web development tools

SublimeText3 Mac version
God-level code editing software (SublimeText3)
Hot Topics
 1386
1386
 52
52

 How to use docker desktop
Apr 15, 2025 am 11:45 AM
How to use docker desktop
Apr 15, 2025 am 11:45 AM
How to use Docker Desktop? Docker Desktop is a tool for running Docker containers on local machines. The steps to use include: 1. Install Docker Desktop; 2. Start Docker Desktop; 3. Create Docker image (using Dockerfile); 4. Build Docker image (using docker build); 5. Run Docker container (using docker run).
 Difference between centos and ubuntu
Apr 14, 2025 pm 09:09 PM
Difference between centos and ubuntu
Apr 14, 2025 pm 09:09 PM
The key differences between CentOS and Ubuntu are: origin (CentOS originates from Red Hat, for enterprises; Ubuntu originates from Debian, for individuals), package management (CentOS uses yum, focusing on stability; Ubuntu uses apt, for high update frequency), support cycle (CentOS provides 10 years of support, Ubuntu provides 5 years of LTS support), community support (CentOS focuses on stability, Ubuntu provides a wide range of tutorials and documents), uses (CentOS is biased towards servers, Ubuntu is suitable for servers and desktops), other differences include installation simplicity (CentOS is thin)
 What to do if the docker image fails
Apr 15, 2025 am 11:21 AM
What to do if the docker image fails
Apr 15, 2025 am 11:21 AM
Troubleshooting steps for failed Docker image build: Check Dockerfile syntax and dependency version. Check if the build context contains the required source code and dependencies. View the build log for error details. Use the --target option to build a hierarchical phase to identify failure points. Make sure to use the latest version of Docker engine. Build the image with --t [image-name]:debug mode to debug the problem. Check disk space and make sure it is sufficient. Disable SELinux to prevent interference with the build process. Ask community platforms for help, provide Dockerfiles and build log descriptions for more specific suggestions.
 How to view the docker process
Apr 15, 2025 am 11:48 AM
How to view the docker process
Apr 15, 2025 am 11:48 AM
Docker process viewing method: 1. Docker CLI command: docker ps; 2. Systemd CLI command: systemctl status docker; 3. Docker Compose CLI command: docker-compose ps; 4. Process Explorer (Windows); 5. /proc directory (Linux).
 What computer configuration is required for vscode
Apr 15, 2025 pm 09:48 PM
What computer configuration is required for vscode
Apr 15, 2025 pm 09:48 PM
VS Code system requirements: Operating system: Windows 10 and above, macOS 10.12 and above, Linux distribution processor: minimum 1.6 GHz, recommended 2.0 GHz and above memory: minimum 512 MB, recommended 4 GB and above storage space: minimum 250 MB, recommended 1 GB and above other requirements: stable network connection, Xorg/Wayland (Linux)
 Detailed explanation of docker principle
Apr 14, 2025 pm 11:57 PM
Detailed explanation of docker principle
Apr 14, 2025 pm 11:57 PM
Docker uses Linux kernel features to provide an efficient and isolated application running environment. Its working principle is as follows: 1. The mirror is used as a read-only template, which contains everything you need to run the application; 2. The Union File System (UnionFS) stacks multiple file systems, only storing the differences, saving space and speeding up; 3. The daemon manages the mirrors and containers, and the client uses them for interaction; 4. Namespaces and cgroups implement container isolation and resource limitations; 5. Multiple network modes support container interconnection. Only by understanding these core concepts can you better utilize Docker.
 What is vscode What is vscode for?
Apr 15, 2025 pm 06:45 PM
What is vscode What is vscode for?
Apr 15, 2025 pm 06:45 PM
VS Code is the full name Visual Studio Code, which is a free and open source cross-platform code editor and development environment developed by Microsoft. It supports a wide range of programming languages and provides syntax highlighting, code automatic completion, code snippets and smart prompts to improve development efficiency. Through a rich extension ecosystem, users can add extensions to specific needs and languages, such as debuggers, code formatting tools, and Git integrations. VS Code also includes an intuitive debugger that helps quickly find and resolve bugs in your code.
 vscode cannot install extension
Apr 15, 2025 pm 07:18 PM
vscode cannot install extension
Apr 15, 2025 pm 07:18 PM
The reasons for the installation of VS Code extensions may be: network instability, insufficient permissions, system compatibility issues, VS Code version is too old, antivirus software or firewall interference. By checking network connections, permissions, log files, updating VS Code, disabling security software, and restarting VS Code or computers, you can gradually troubleshoot and resolve issues.
