Super fine! Ubuntu20.04 installs Apache+PHP8 environment
This article brings you relevant knowledge about PHP, and mainly shares with you the whole process of installing Apache in the Ubuntu20.04 LTS environment. We will also provide solutions to some of the pitfalls that may arise. Friends who are interested can take a look below. I hope it will be helpful to everyone.
Apache Introduction
Apache is an open source web server software provided by the Apache Foundation. It is a multi-purpose, portable, and A modifiable HTTP server, one of the commonly used Web server software;
Apache server supports mainstream operating systems, including UNIX, Linux , Mac OS X, Windows, etc.
Normally, it can be used in conjunction with MySQL database, Perl and PHP script interpreter to form LAMPArchitecture, you can build a dynamic website system. Apache is the world's number one and most popular Web server-side software. It is the Web server-side software used by the vast majority of websites.
Demo environment
Web page environment: Apache (Others are also available)
PHP version: 8.0
Operating system: Ubuntu 20.04
Install Apache
After entering the ubuntu system, first update apt:
sudo apt update
process You will be prompted whether to continue. Enter y and press Enter to continue.
If you are stuck in this step or have network problems, you can update the apt source to Tsinghua source. For details, see the reference material ( Pay attention to selecting the correct ubuntu version): https://mirrors.tuna.tsinghua.edu.cn/help/ubuntu/ Use the command
lsb_release -ato view the system version information. After modifying/etc/apt/source.list, use the commandsource /etc/profileto refresh the configuration.
Then install Apache, its name in apt is apache2:
sudo apt-get install apache2
After the installation is complete, visit http://localhost/See if the following interface appears:
If you are using a virtual machine, you can query the internal network IP of the current virtual machine through the
ip addrcommand, and then add it from your own Open the web page on your computer to view it. Of course, you can also directly enter localhost in the virtual machine.
At this time, the server only has Apache installed, but php is not installed, so php cannot be parsed temporarily.
We need to install php, just install it in apt source. Here we take php8.0 as an example:
sudo apt-get install php8.0
You may encounter errors when installing directly here:
E: Unable to locate package php8.0
E: Couldn't find any package by glob 'php8.0'
You need to install a third-party PPA source, execute the following commands line by line:
sudo add-apt-repository ppa:ondrej/php
sudo apt-get update
sudo apt-get install php8.0
The method to install php extension is:
sudo apt-get install php8.0-<extension name></extension>, for examplesudo apt-get install php8.0-mysqli.
After the installation is complete, you need to enable php8.0 in Apache. Use the following command to enable it:
a2enmod php8.0复制代码
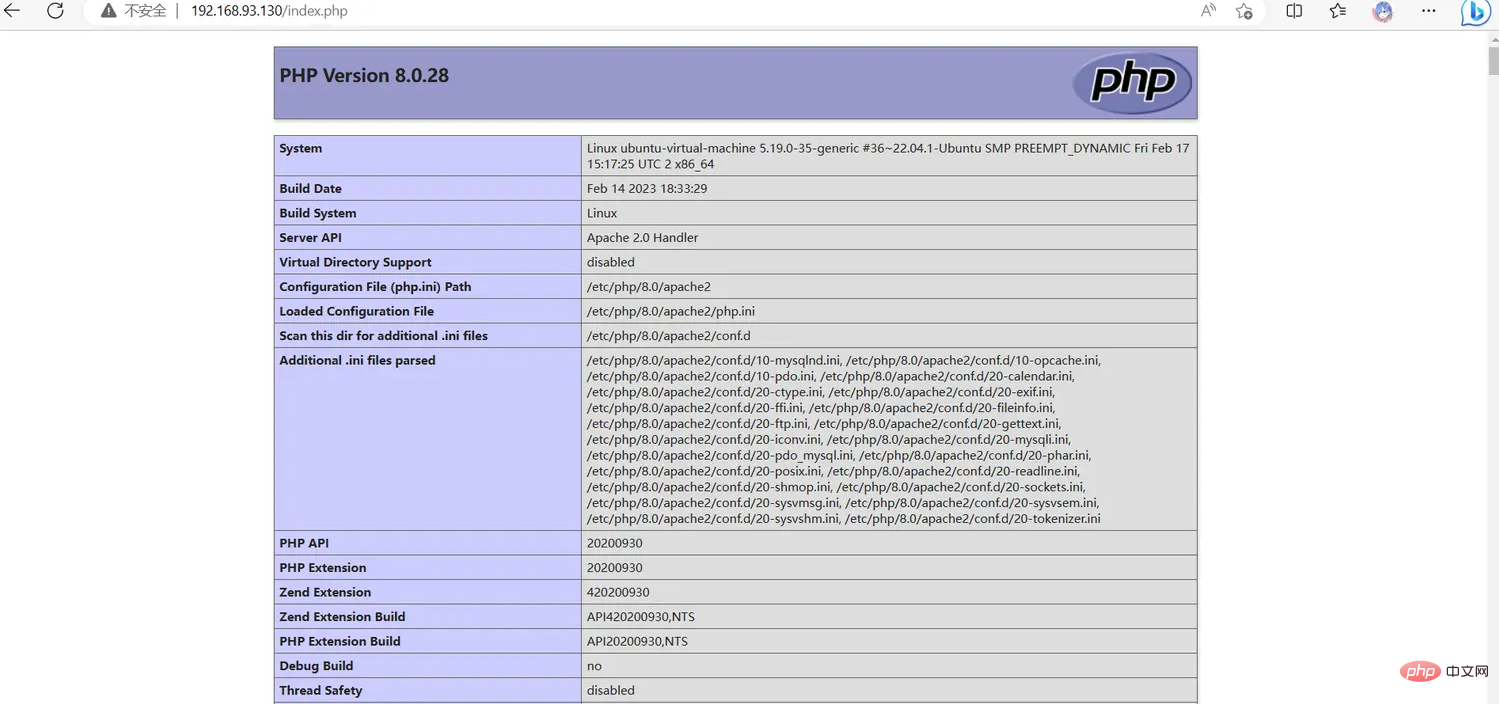
Create a new one in the /var/www/html directory index.php file, write in it:
<?php phpinfo();
?>
The way to create a new file is to first cd to the corresponding directory:
cd /var/www/html, then enter the command:touch index.php.
Now revisit http://localhost/index.php, and you should be able to see php related information.
At this point, you have successfully completed the setup of the Apache server, and the php program is ready to run. .
Common problems and solutions
The following are some common problems and solutions when installing and using Apache:
The web address of Apache is at There?
The default is in /var/www/html. Of course, you can specify different paths for different domain names.
How to restart Apache
Use the command systemctl restart apache2.
如何查看Apache当前启用的mods
可以使用httpd -M命令查看apache的已经启用的mods。
也可以在Apache的安装目录conf/httpd.conf文件中的LoadModule指令中查看。
用指令sudo ls -la /etc/apache2/mods-available/可以查看所有启用的mods。
如何修改php版本
修改对应的mods即可,例如我要从php7.0变为php8.0。
首先安装php8.0:
sudo apt-get install php8.0
同时还要重新安装各种PHP拓展,如果需要的话。
用命令关闭当前的php7.0 mod。
a2dismod php7.0
在用命令开启新的php8.0 mod。
a2enmod php8.0
此时可以用php探针再查一下php版本。
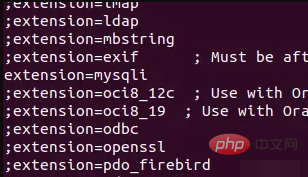
php提示缺少某些拓展怎么办
比如php提示缺少mysqli拓展。
打开/etc/php/8.0/apache2/php.ini,找到extionsion=mysqli并将前面的;删除,重启Apache。
如果还是提示缺少拓展,可能是你没有安装对应的拓展。安装完成后重启Apache即可。
总结
以上是对Apache安装过程的全部教程,感谢大家的阅读。
推荐学习:《PHP视频教程》
The above is the detailed content of Super fine! Ubuntu20.04 installs Apache+PHP8 environment. For more information, please follow other related articles on the PHP Chinese website!

Hot AI Tools

Undresser.AI Undress
AI-powered app for creating realistic nude photos

AI Clothes Remover
Online AI tool for removing clothes from photos.

Undress AI Tool
Undress images for free

Clothoff.io
AI clothes remover

Video Face Swap
Swap faces in any video effortlessly with our completely free AI face swap tool!

Hot Article

Hot Tools

Notepad++7.3.1
Easy-to-use and free code editor

SublimeText3 Chinese version
Chinese version, very easy to use

Zend Studio 13.0.1
Powerful PHP integrated development environment

Dreamweaver CS6
Visual web development tools

SublimeText3 Mac version
God-level code editing software (SublimeText3)

Hot Topics
 1390
1390
 52
52
 PHP and Python: Comparing Two Popular Programming Languages
Apr 14, 2025 am 12:13 AM
PHP and Python each have their own advantages, and choose according to project requirements. 1.PHP is suitable for web development, especially for rapid development and maintenance of websites. 2. Python is suitable for data science, machine learning and artificial intelligence, with concise syntax and suitable for beginners.
 How to set the cgi directory in apache
Apr 13, 2025 pm 01:18 PM
To set up a CGI directory in Apache, you need to perform the following steps: Create a CGI directory such as "cgi-bin", and grant Apache write permissions. Add the "ScriptAlias" directive block in the Apache configuration file to map the CGI directory to the "/cgi-bin" URL. Restart Apache.
 The Enduring Relevance of PHP: Is It Still Alive?
Apr 14, 2025 am 12:12 AM
PHP is still dynamic and still occupies an important position in the field of modern programming. 1) PHP's simplicity and powerful community support make it widely used in web development; 2) Its flexibility and stability make it outstanding in handling web forms, database operations and file processing; 3) PHP is constantly evolving and optimizing, suitable for beginners and experienced developers.
 PHP's Purpose: Building Dynamic Websites
Apr 15, 2025 am 12:18 AM
PHP is used to build dynamic websites, and its core functions include: 1. Generate dynamic content and generate web pages in real time by connecting with the database; 2. Process user interaction and form submissions, verify inputs and respond to operations; 3. Manage sessions and user authentication to provide a personalized experience; 4. Optimize performance and follow best practices to improve website efficiency and security.
 How to start apache
Apr 13, 2025 pm 01:06 PM
The steps to start Apache are as follows: Install Apache (command: sudo apt-get install apache2 or download it from the official website) Start Apache (Linux: sudo systemctl start apache2; Windows: Right-click the "Apache2.4" service and select "Start") Check whether it has been started (Linux: sudo systemctl status apache2; Windows: Check the status of the "Apache2.4" service in the service manager) Enable boot automatically (optional, Linux: sudo systemctl
 PHP in Action: Real-World Examples and Applications
Apr 14, 2025 am 12:19 AM
PHP is widely used in e-commerce, content management systems and API development. 1) E-commerce: used for shopping cart function and payment processing. 2) Content management system: used for dynamic content generation and user management. 3) API development: used for RESTful API development and API security. Through performance optimization and best practices, the efficiency and maintainability of PHP applications are improved.
 What to do if the apache80 port is occupied
Apr 13, 2025 pm 01:24 PM
When the Apache 80 port is occupied, the solution is as follows: find out the process that occupies the port and close it. Check the firewall settings to make sure Apache is not blocked. If the above method does not work, please reconfigure Apache to use a different port. Restart the Apache service.
 PHP: Handling Databases and Server-Side Logic
Apr 15, 2025 am 12:15 AM
PHP uses MySQLi and PDO extensions to interact in database operations and server-side logic processing, and processes server-side logic through functions such as session management. 1) Use MySQLi or PDO to connect to the database and execute SQL queries. 2) Handle HTTP requests and user status through session management and other functions. 3) Use transactions to ensure the atomicity of database operations. 4) Prevent SQL injection, use exception handling and closing connections for debugging. 5) Optimize performance through indexing and cache, write highly readable code and perform error handling.


