How to implement delayed tasks in golang? The following article will share with you a set of delayed task solutions based on golang. I hope it will be helpful to you!

In actual business scenarios, we sometimes encounter some delay requirements: for example, on an e-commerce platform, after the operator adds products in the management background, no need Displayed in the foreground immediately, but not displayed at a later point in time.
Of course, we have many ideas to deal with this problem. For example, add the product information to be released to the db, and then poll the data table through a scheduled task to query the released products at the current point in time; another example is to add all the product information to redis and complete this function through the SortSet attribute. The final choice depends on our business scenario and operating environment.
Here, I would like to share with you a set of delayed task solutions based on golang.
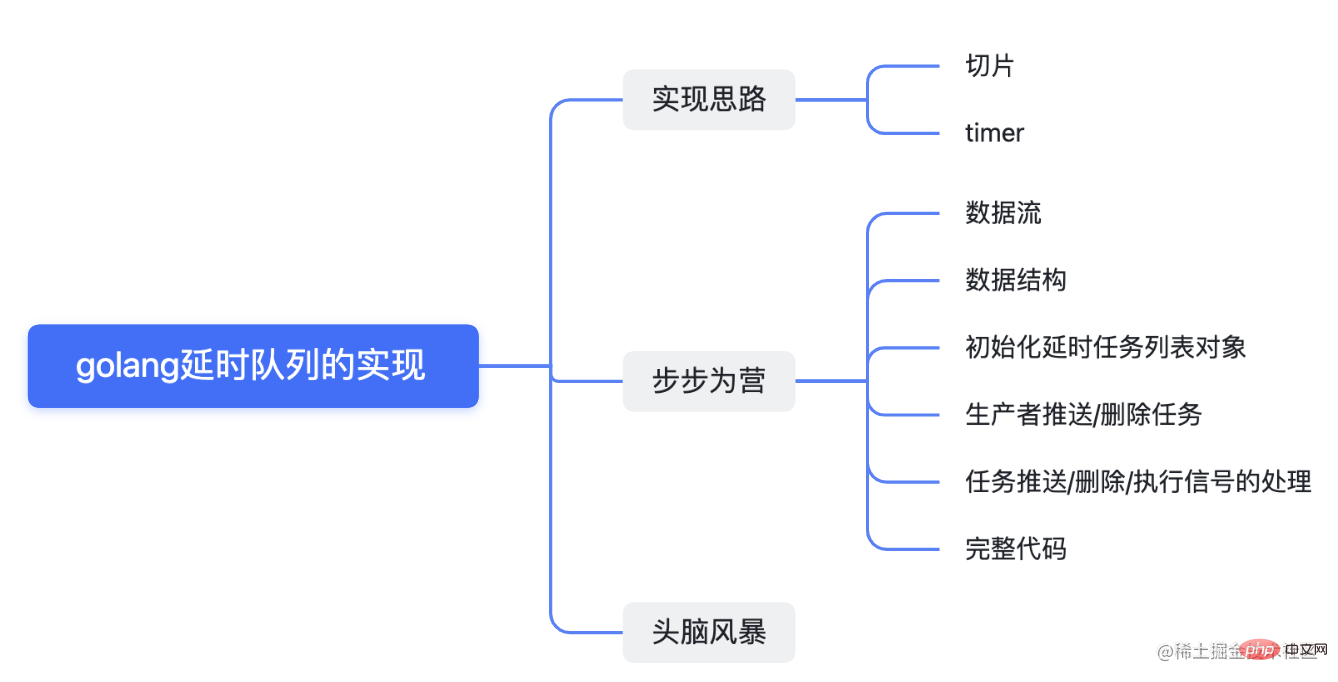
Mind map
In order to give everyone a general impression, I will list the outline of the text below.

Implementation ideas
We all know that any kind of queue actually exists in production of both the author and the consumer. It's just that compared to ordinary queues, delayed tasks have an additional delay feature.
1. Producer
From the perspective of the producer, when the user pushes a task, it will carry the delayed execution time value. In order to allow this task to be executed at the scheduled time, we need to store this task in memory for a period of time, and time is one-dimensional and constantly growing. So, what data structure do we use to store it?
(1) Choose one: map. Since the map is disordered and cannot be sorted according to execution time, we cannot guarantee whether the tasks taken out need to be executed at the current time point, so this option is excluded.
(2) Choice 2: channel. Indeed, channel can sometimes be regarded as a queue. However, its output and input strictly follow the "first in, first out" principle. Unfortunately, advanced tasks may not be executed first, so channel is not suitable.
(3) Choice three: slice. Slicing seems feasible. Because slice elements are ordered, so if we can arrange all slice elements in the order of execution time, then we only need to read the head element of the slice (maybe the tail element) every time. element), we can get the task we want.
2. Consumer
From the perspective of the consumer, the biggest difficulty is how to make each task complete at a specific point in time. be consumed. So, for each task, how do we make it wait for a period of time before executing it?
Yes, it is timer.
To sum up, the combination of "slicing timer" should be able to achieve the purpose.
Step by step
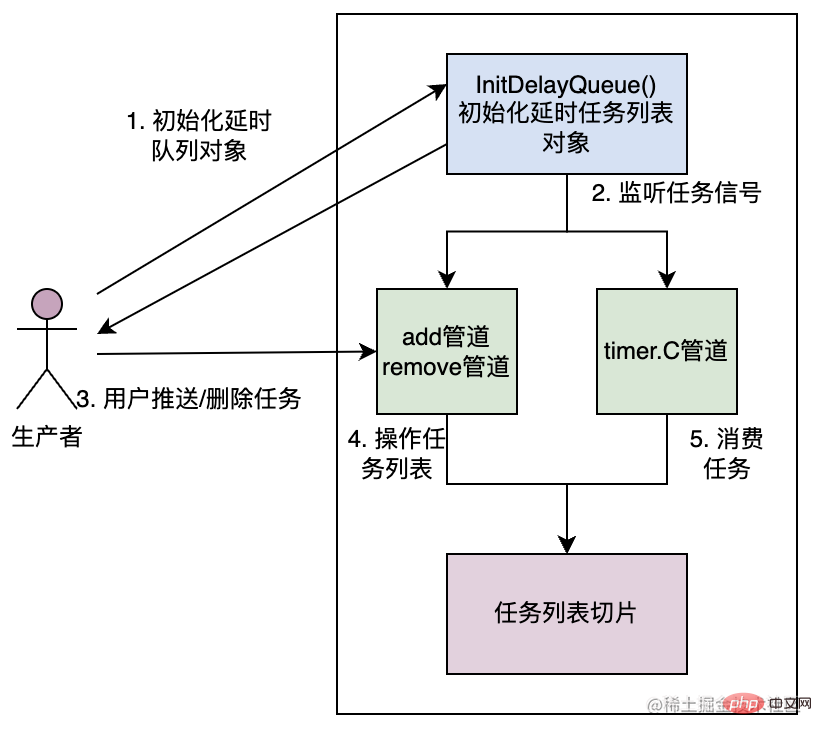
(1) User calls InitDelayQueue () , initialize the delayed task object.
(2) Open the coroutine and listen to the task operation pipeline (add/delete signal) and the execution time pipeline (timer.C signal).
(3) The user sends the add/delete signal.
(4) The coroutine in (2) captures the signal in (3) and changes the task list.
(5) When the time point for task execution arrives (when there are elements output from the timer.C pipeline), execute the task.

(1) Delayed task object
// 延时任务对象
type DelayQueue struct {
   tasks                 []*task             // 存储任务列表的切片
   add                   chan *task          // 用户添加任务的管道信号
   remove                chan string         // 用户删除任务的管道信号
   waitRemoveTaskMapping map[string]struct{} // 等待删除的任务id列表
}Need to pay attention here, there are A waitRemoveTaskMapping field. Since the task to be deleted may still be in the add pipeline and has not been updated in the tasks field in time, it is necessary to temporarily record the ID of the task that the customer wants to delete.
(2) Task object
// 任务对象
type task struct {
   id       string    // 任务id
   execTime time.Time // 执行时间
   f        func()    // 执行函数
}// 初始化延时任务对象
func InitDelayQueue() *DelayQueue {
q := &DelayQueue{
add: make(chan *task, 10000),
remove: make(chan string, 100),
waitRemoveTaskMapping: make(map[string]struct{}),
}
return q
}In this process, we need to check the user’s control of the task Monitor operation signals and task execution time signals.
func (q *DelayQueue) start() {
   for {
      // to do something...

      select {
      case now := <-timer.C:
         // 任务执行时间信号
         // to do something...
      case t := <-q.add:
         // 任务推送信号
         // to do something...
      case id := <-q.remove:
         // 任务删除信号
         // to do something...
      }
   }
}Improve our initialization method:
// 初始化延时任务对象
func InitDelayQueue() *DelayQueue {
   q := &DelayQueue{
      add:                   make(chan *task, 10000),
      remove:                make(chan string, 100),
      waitRemoveTaskMapping: make(map[string]struct{}),
   }

   // 开启协程,监听任务相关信号
   go q.start()
   return q
}When producers push tasks, they only need to add the tasks Just go to the add pipeline. Here, we generate a task id and return it to the user.
// 用户推送任务
func (q *DelayQueue) Push(timeInterval time.Duration, f func()) string {
   // 生成一个任务id,方便删除使用
   id := genTaskId()
   t := &task{
      id:       id,
      execTime: time.Now().Add(timeInterval),
      f:        f,
   }

   // 将任务推到add管道中
   q.add <- t
   return id
}在这里,我们要将用户推送的任务放到延时任务的tasks字段中。由于,我们需要将任务按照执行时间顺序排序,所以,我们需要找到新增任务在切片中的插入位置。又因为,插入之前的任务列表已经是有序的,所以,我们可以采用二分法处理。
// 使用二分法判断新增任务的插入位置
func (q *DelayQueue) getTaskInsertIndex(t *task, leftIndex, rightIndex int) (index int) {
   if len(q.tasks) == 0 {
      return
   }

   length := rightIndex - leftIndex
   if q.tasks[leftIndex].execTime.Sub(t.execTime) >= 0 {
      // 如果当前切片中最小的元素都超过了插入的优先级,则插入位置应该是最左边
      return leftIndex
   }

   if q.tasks[rightIndex].execTime.Sub(t.execTime) <= 0 {
      // 如果当前切片中最大的元素都没超过插入的优先级,则插入位置应该是最右边
      return rightIndex + 1
   }

   if length == 1 && q.tasks[leftIndex].execTime.Before(t.execTime) && q.tasks[rightIndex].execTime.Sub(t.execTime) >= 0 {
      // 如果插入的优先级刚好在仅有的两个优先级之间,则中间的位置就是插入位置
      return leftIndex + 1
   }

   middleVal := q.tasks[leftIndex+length/2].execTime

   // 这里用二分法递归的方式,一直寻找正确的插入位置
   if t.execTime.Sub(middleVal) <= 0 {
      return q.getTaskInsertIndex(t, leftIndex, leftIndex+length/2)
   } else {
      return q.getTaskInsertIndex(t, leftIndex+length/2, rightIndex)
   }
}找到正确的插入位置后,我们才能将任务准确插入:
// 将任务添加到任务切片列表中
func (q *DelayQueue) addTask(t *task) {
   // 寻找新增任务的插入位置
   insertIndex := q.getTaskInsertIndex(t, 0, len(q.tasks)-1)
   // 找到了插入位置,更新任务列表
   q.tasks = append(q.tasks, &task{})
   copy(q.tasks[insertIndex+1:], q.tasks[insertIndex:])
   q.tasks[insertIndex] = t
}那么,在监听add管道的时候,我们直接调用上述addTask() 即可。
func (q *DelayQueue) start() {
   for {
      // to do something...

      select {
      case now := <-timer.C:
         // 任务执行时间信号
         // to do something...
      case t := <-q.add:
         // 任务推送信号
         q.addTask(t)
      case id := <-q.remove:
         // 任务删除信号
         // to do something...
      }
   }
}// 用户删除任务
func (q *DelayQueue) Delete(id string) {
q.remove <- id
}在这里,我们可以遍历任务列表,根据删除任务的id找到其在切片中的对应index。
// 删除指定任务
func (q *DelayQueue) deleteTask(id string) {
deleteIndex := -1
for index, t := range q.tasks {
if t.id == id {
// 找到了在切片中需要删除的所以呢
deleteIndex = index
break
}
}
if deleteIndex == -1 {
// 如果没有找到删除的任务,说明任务还在add管道中,来不及更新到tasks中,这里我们就将这个删除id临时记录下来
// 注意,这里暂时不考虑,任务id非法的特殊情况
q.waitRemoveTaskMapping[id] = struct{}{}
return
}
if len(q.tasks) == 1 {
// 删除后,任务列表就没有任务了
q.tasks = []*task{}
return
}
if deleteIndex == len(q.tasks)-1 {
// 如果删除的是,任务列表的最后一个元素,则执行下列代码
q.tasks = q.tasks[:len(q.tasks)-1]
return
}
// 如果删除的是,任务列表的其他元素,则需要将deleteIndex之后的元素,全部向前挪动一位
copy(q.tasks[deleteIndex:len(q.tasks)-1], q.tasks[deleteIndex+1:len(q.tasks)-1])
q.tasks = q.tasks[:len(q.tasks)-1]
return
}然后,我们可以完善start()方法了。
func (q *DelayQueue) start() {
for {
// to do something...
select {
case now := <-timer.C:
// 任务执行时间信号
// to do something...
case t := <-q.add:
// 任务推送信号
q.addTask(t)
case id := <-q.remove:
// 任务删除信号
q.deleteTask(id)
}
}
}start()执行的时候,分成两种情况:任务列表为空,只需要监听add管道即可;任务列表不为空的时候,需要监听所有管道。任务执行信号,主要是依靠timer来实现,属于第二种情况。
func (q *DelayQueue) start() {
for {
if len(q.tasks) == 0 {
// 任务列表为空的时候,只需要监听add管道
select {
case t := <-q.add:
//添加任务
q.addTask(t)
}
continue
}
// 任务列表不为空的时候,需要监听所有管道
// 任务的等待时间=任务的执行时间-当前的时间
currentTask := q.tasks[0]
timer := time.NewTimer(currentTask.execTime.Sub(time.Now()))
select {
case now := <-timer.C:
// 任务执行信号
timer.Stop()
if _, isRemove := q.waitRemoveTaskMapping[currentTask.id]; isRemove {
// 之前客户已经发出过该任务的删除信号,因此需要结束任务,刷新任务列表
q.endTask()
delete(q.waitRemoveTaskMapping, currentTask.id)
continue
}
// 开启协程,异步执行任务
go q.execTask(currentTask, now)
// 任务结束,刷新任务列表
q.endTask()
case t := <-q.add:
// 任务推送信号
timer.Stop()
q.addTask(t)
case id := <-q.remove:
// 任务删除信号
timer.Stop()
q.deleteTask(id)
}
}
}执行任务:
// 执行任务
func (q *DelayQueue) execTask(task *task, currentTime time.Time) {
if task.execTime.After(currentTime) {
// 如果当前任务的执行时间落后于当前时间,则不执行
return
}
// 执行任务
task.f()
return
}结束任务,刷新任务列表:
// 一个任务去执行了,刷新任务列表
func (q *DelayQueue) endTask() {
if len(q.tasks) == 1 {
q.tasks = []*task{}
return
}
q.tasks = q.tasks[1:]
}delay_queue.go
package delay_queue
import (
"go.mongodb.org/mongo-driver/bson/primitive"
"time"
)
// 延时任务对象
type DelayQueue struct {
tasks []*task // 存储任务列表的切片
add chan *task // 用户添加任务的管道信号
remove chan string // 用户删除任务的管道信号
waitRemoveTaskMapping map[string]struct{} // 等待删除的任务id列表
}
// 任务对象
type task struct {
id string // 任务id
execTime time.Time // 执行时间
f func() // 执行函数
}
// 初始化延时任务对象
func InitDelayQueue() *DelayQueue {
q := &DelayQueue{
add: make(chan *task, 10000),
remove: make(chan string, 100),
waitRemoveTaskMapping: make(map[string]struct{}),
}
// 开启协程,监听任务相关信号
go q.start()
return q
}
// 用户删除任务
func (q *DelayQueue) Delete(id string) {
   q.remove <- id
}
// 用户推送任务
func (q *DelayQueue) Push(timeInterval time.Duration, f func()) string {
// 生成一个任务id,方便删除使用
id := genTaskId()
t := &task{
id: id,
execTime: time.Now().Add(timeInterval),
f: f,
}
// 将任务推到add管道中
q.add <- t
return id
}
// 监听各种任务相关信号
func (q *DelayQueue) start() {
for {
if len(q.tasks) == 0 {
// 任务列表为空的时候,只需要监听add管道
select {
case t := <-q.add:
//添加任务
q.addTask(t)
}
continue
}
// 任务列表不为空的时候,需要监听所有管道
// 任务的等待时间=任务的执行时间-当前的时间
currentTask := q.tasks[0]
timer := time.NewTimer(currentTask.execTime.Sub(time.Now()))
select {
case now := <-timer.C:
timer.Stop()
if _, isRemove := q.waitRemoveTaskMapping[currentTask.id]; isRemove {
// 之前客户已经发出过该任务的删除信号,因此需要结束任务,刷新任务列表
q.endTask()
delete(q.waitRemoveTaskMapping, currentTask.id)
continue
}
// 开启协程,异步执行任务
go q.execTask(currentTask, now)
// 任务结束,刷新任务列表
q.endTask()
case t := <-q.add:
// 添加任务
timer.Stop()
q.addTask(t)
case id := <-q.remove:
// 删除任务
timer.Stop()
q.deleteTask(id)
}
}
}
// 执行任务
func (q *DelayQueue) execTask(task *task, currentTime time.Time) {
if task.execTime.After(currentTime) {
// 如果当前任务的执行时间落后于当前时间,则不执行
return
}
// 执行任务
task.f()
return
}
// 一个任务去执行了,刷新任务列表
func (q *DelayQueue) endTask() {
if len(q.tasks) == 1 {
q.tasks = []*task{}
return
}
q.tasks = q.tasks[1:]
}
// 将任务添加到任务切片列表中
func (q *DelayQueue) addTask(t *task) {
// 寻找新增任务的插入位置
insertIndex := q.getTaskInsertIndex(t, 0, len(q.tasks)-1)
// 找到了插入位置,更新任务列表
q.tasks = append(q.tasks, &task{})
copy(q.tasks[insertIndex+1:], q.tasks[insertIndex:])
q.tasks[insertIndex] = t
}
// 删除指定任务
func (q *DelayQueue) deleteTask(id string) {
   deleteIndex := -1
   for index, t := range q.tasks {
      if t.id == id {
         // 找到了在切片中需要删除的所以呢
         deleteIndex = index
         break
      }
   }

   if deleteIndex == -1 {
      // 如果没有找到删除的任务,说明任务还在add管道中,来不及更新到tasks中,这里我们就将这个删除id临时记录下来
      // 注意,这里暂时不考虑,任务id非法的特殊情况
      q.waitRemoveTaskMapping[id] = struct{}{}
      return
   }

   if len(q.tasks) == 1 {
      // 删除后,任务列表就没有任务了
      q.tasks = []*task{}
      return
   }

   if deleteIndex == len(q.tasks)-1 {
      // 如果删除的是,任务列表的最后一个元素,则执行下列代码
      q.tasks = q.tasks[:len(q.tasks)-1]
      return
   }

   // 如果删除的是,任务列表的其他元素,则需要将deleteIndex之后的元素,全部向前挪动一位
   copy(q.tasks[deleteIndex:len(q.tasks)-1], q.tasks[deleteIndex+1:len(q.tasks)-1])
   q.tasks = q.tasks[:len(q.tasks)-1]
   return
}
// 寻找任务的插入位置
func (q *DelayQueue) getTaskInsertIndex(t *task, leftIndex, rightIndex int) (index int) {
// 使用二分法判断新增任务的插入位置
if len(q.tasks) == 0 {
return
}
length := rightIndex - leftIndex
if q.tasks[leftIndex].execTime.Sub(t.execTime) >= 0 {
// 如果当前切片中最小的元素都超过了插入的优先级,则插入位置应该是最左边
return leftIndex
}
if q.tasks[rightIndex].execTime.Sub(t.execTime) <= 0 {
// 如果当前切片中最大的元素都没超过插入的优先级,则插入位置应该是最右边
return rightIndex + 1
}
if length == 1 && q.tasks[leftIndex].execTime.Before(t.execTime) && q.tasks[rightIndex].execTime.Sub(t.execTime) >= 0 {
// 如果插入的优先级刚好在仅有的两个优先级之间,则中间的位置就是插入位置
return leftIndex + 1
}
middleVal := q.tasks[leftIndex+length/2].execTime
// 这里用二分法递归的方式,一直寻找正确的插入位置
if t.execTime.Sub(middleVal) <= 0 {
return q.getTaskInsertIndex(t, leftIndex, leftIndex+length/2)
} else {
return q.getTaskInsertIndex(t, leftIndex+length/2, rightIndex)
}
}
func genTaskId() string {
return primitive.NewObjectID().Hex()
}测试代码:delay_queue_test.go
package delay_queue

import (
   "fmt"
   "testing"
   "time"
)

func TestDelayQueue(t *testing.T) {
   q := InitDelayQueue()
   for i := 0; i < 100; i++ {
      go func(i int) {
         id := q.Push(time.Duration(i)*time.Second, func() {
            fmt.Printf("%d秒后执行...\n", i)
            return
         })

         if i%7 == 0 {
            q.Delete(id)
         }
      }(i)
   }

   time.Sleep(time.Hour)
}头脑风暴
上面的方案,的确实现了延时任务的效果,但是其中仍然有一些问题,仍然值得我们思考和优化。
1、按照上面的方案,如果大量延时任务的执行时间,集中在同一个时间点,会造成短时间内timer频繁地创建和销毁。
2、上述方案相比于time.AfterFunc()方法,我们需要在哪些场景下作出取舍。
3、如果服务崩溃或重启,如何去持久化队列中的任务。
本文和大家讨论了延时任务在golang中的一种实现方案,在这个过程中,一次性定时器timer、切片、管道等golang特色,以及二分插入等常见算法都体现得淋漓尽致。
The above is the detailed content of A brief analysis of how golang implements delayed tasks. For more information, please follow other related articles on the PHP Chinese website!