

REDIS与MYSQL实现标签的对比_MySQL

这里来演示下REDIS和MYSQL之间的数据转换问题,REDIS 是典型的KEY -VALUE型NOSQL数据库,并且提供了额外丰富的数据类型。这里简单列举了标签类型的应用问题。
比如在MySQL里面,对内容的标签有以下简单的几张表,我这里只列出来拆分过后的表结构
第一,MySQL部分,内容表: CREATE TABLE `content` ( `id` int(10) unsigned NOT NULL, -- 内容ID,唯一。 `name` varchar(60) DEFAULT NULL, -- 内容的名字 `created_timestamp` timestamp NULL DEFAULT NULL, -- 内容的加入时间 PRIMARY KEY (`id`) ) ENGINE=InnoDB DEFAULT CHARSET=latin1 标签表: CREATE TABLE `tag` ( `tag_name` varchar(60) NOT NULL, -- 标签名字,唯一 `visit_count` int(10) unsigned NOT NULL DEFAULT '0', -- 标签的访问次数 PRIMARY KEY (`tag_name`) ) ENGINE=InnoDB DEFAULT CHARSET=latin1 内容与标签的关系,多对多。 CREATE TABLE `content_tag_relation` ( `content_id` int(10) unsigned NOT NULL, -- 内容ID `tag_name` varchar(60) NOT NULL -- 标签名字 ) ENGINE=InnoDB DEFAULT CHARSET=latin1
假设我们有以下的需求:
1. 得到标签对应的文章名字,
SELECT a.name FROM content AS a,content_tag_relation AS b
WHERE a.id = b.content_id AND b.tag_name = 'mysql'
2. 按照访问量显示前三的标签,
SELECT tag_name FROM tag WHERE 1 ORDER BY visit_count DESC LIMIT 3;
下来我们在REDIS里面存储这部分数据。
第二,redis部分,
1. a,内容,我们用STRING类型来做,值用JSON来存储,
	t_girl:6379> set string:content_id:4  '{"name":"test48601","created_timestamp":"2012-01-01 05:41:01"}'
	OK
	t_girl:6379> get string:content_id:4
"{\"name\":\"test48601\",\"created_timestamp\":\"2012-01-01 05:41:01\"}"但是如果想得到内容对应的名字和创建时间,REDIS方面获取困难,就得交给程序来做了。
b,或者也可以用HASH类型来存储,
	t_girl:6379> hset 'hset:content_id:4' name 'test48601'
	(integer) 1
	t_girl:6379> hset 'hset:content_id:4' created_timestamp '2012-01-01 05:41:01'
	(integer) 1
那这时想获取对应的名字以及时间非常容易
	t_girl:6379> hget hset:content_id:4 name
	"test48601"
	t_girl:6379> hget hset:content_id:4 created_timestamp
	"2012-01-01 05:41:01"
	t_girl:6379>
2. 标签,我们用有序集合来做,这么做的好处是可以用REDIS对应的有序来做访问量的排序。
	t_girl:6379> zadd zset:tag 680 database 469 db2
	(integer) 2
比如我们想要得到访问前三的标签名字?
	t_girl:6379> zrevrangebyscore zset:tag +inf 0 limit 0 3
	1) "mongodb"
	2) "sql"
	3) "postgresql"
3. 标签与内容的关系,我们用集合来做,
	t_girl:6379> sadd set:content_id:4 role mongodb role database
	(integer) 3
那么也很容易得到指定内容对应的标签
	t_girl:6379> smembers set:content_id:4
	1) "database"
	2) "role"
	3) "mongodb"
4. a, 如果用上面的设计我们实现稍微复杂些的需求:比如得到标签对应的文章名字。这样的需求貌似没有可以直接拿来用的方法,比如下面我写的一段PYTHON代码来获取:
import redis
content_id_keys = r.keys('set*')
content_id_keys_len = len(content_id_keys)
i = 0
j = 0
content_name_list = []
while i < content_id_keys_len:
if r.sismember(content_id_keys[i],'mysql') == 1:
content_name_list.append(eval(r.get(content_id_keys[i].replace('set','string')))['name'])
print('Content name is :' + content_name_list[j])
j += 1
i += 1 b.那其实我们可以在REDIS里面做一份冗余的集合来存储,这样就可以直接把信息拿出来。
	t_girl:6379> sadd tag:mysql test123 test133 test144 test155
	(integer) 4
	t_girl:6379> smembers tag:mysql
	1) "test133"
	2) "test155"
	3) "test123"
	4) "test144"

Hot AI Tools

Undresser.AI Undress
AI-powered app for creating realistic nude photos

AI Clothes Remover
Online AI tool for removing clothes from photos.

Undress AI Tool
Undress images for free

Clothoff.io
AI clothes remover

AI Hentai Generator
Generate AI Hentai for free.

Hot Article
Hot Tools

Notepad++7.3.1
Easy-to-use and free code editor

SublimeText3 Chinese version
Chinese version, very easy to use

Zend Studio 13.0.1
Powerful PHP integrated development environment

Dreamweaver CS6
Visual web development tools

SublimeText3 Mac version
God-level code editing software (SublimeText3)
Hot Topics
 1376
1376
 52
52

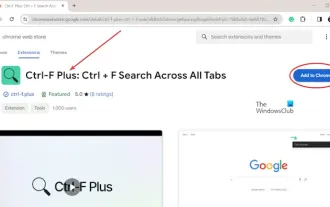 How to search for text across all tabs in Chrome and Edge
Feb 19, 2024 am 11:30 AM
How to search for text across all tabs in Chrome and Edge
Feb 19, 2024 am 11:30 AM
This tutorial shows you how to find specific text or phrases on all open tabs in Chrome or Edge on Windows. Is there a way to do a text search on all open tabs in Chrome? Yes, you can use a free external web extension in Chrome to perform text searches on all open tabs without having to switch tabs manually. Some extensions like TabSearch and Ctrl-FPlus can help you achieve this easily. How to search text across all tabs in Google Chrome? Ctrl-FPlus is a free extension that makes it easy for users to search for a specific word, phrase or text across all tabs of their browser window. This expansion
 How to add tags on Douyin to attract traffic? Which tags on the platform are easiest to attract traffic to?
Mar 22, 2024 am 10:28 AM
How to add tags on Douyin to attract traffic? Which tags on the platform are easiest to attract traffic to?
Mar 22, 2024 am 10:28 AM
As a popular short video social platform, Douyin has a huge user base. For Douyin creators, using tags to attract traffic is an effective way to increase the exposure of content and attract attention. So, how does Douyin use tags to attract traffic? This article will answer this question in detail for you and introduce related techniques. 1. How to add tags on Douyin to attract traffic? When posting a video, make sure to choose tags that are relevant to the content. These tags should cover the topic and keywords of your video to make it easier for users to find your video through tags. Leveraging popular hashtags is an effective way to increase your video’s exposure. Research current popular tags and trends and incorporate them into your video descriptions and tags. These popular tags usually have higher visibility and can attract the attention of more viewers. 3. Label
 What is the clock behind the TikTok label? How to tag Douyin account?
Mar 24, 2024 pm 03:46 PM
What is the clock behind the TikTok label? How to tag Douyin account?
Mar 24, 2024 pm 03:46 PM
When browsing Douyin works, we often see a clock icon behind the tag. So, what exactly is this clock? This article will focus on the discussion of "What is the clock behind the Douyin label", hoping to provide some useful reference for your use of Douyin. 1. What is the clock behind the Douyin label? Douyin will launch some hot topic challenges. When users participate, they will see a clock icon after the tag, which means that the work is participating in the topic challenge and displays the remaining time of the challenge. For some time-sensitive content, such as holidays, special events, etc., Douyin will attach a clock icon after the label to remind users of the validity period of the content. 3. Popular tags: When a tag becomes popular, Douyin will add a clock icon after the tag to indicate that the tag is
 A closer look at the video element in HTML
Feb 24, 2024 pm 08:18 PM
A closer look at the video element in HTML
Feb 24, 2024 pm 08:18 PM
Detailed explanation of the video tag in HTML The video tag in HTML5 is a tag used to play videos on web pages. It can render videos using different formats, such as MP4, WebM, Ogg, and more. In this article, we will introduce the use of video tag in detail and provide specific code examples. Basic Structure The following is the basic structure of the video tag:
 How to delete external contact tags on DingTalk app
Feb 24, 2024 am 08:20 AM
How to delete external contact tags on DingTalk app
Feb 24, 2024 am 08:20 AM
How to delete external contact tags on DingTalk app? DingTalk has a function to delete external contact tags, but most friends don’t know how to delete external contact tags on DingTalk. Next is the DingTalk guide that the editor brings to users. Graphical tutorial on how to delete external contact tags in the Ding app. Interested users can come and take a look! How to delete external contact tags in DingTalk app 1. First open DingTalk APP and click the [Management] function as shown below on the main page; 2. Then enter the enterprise management interface and find [External Contacts]; 3. Then on the external contact setting function page, select the [Label Management] service; 4. Then on the main contact label page, select the type of label group you want to delete; 5. Finally, click on the red label group
 What is the difference between html5 tag head and header?
Jan 17, 2022 am 11:10 AM
What is the difference between html5 tag head and header?
Jan 17, 2022 am 11:10 AM
Differences: 1. The head tag is used to define the head of the document, which is a container for all head elements, and the header tag is used to define the header (introduction information) of the document; 2. All browsers support the head tag, and older versions of browsers None of the browsers support the header tag, and browsers such as IE9+ and above are required to support the header tag.
 How to implement a layout with a fixed navigation menu using HTML and CSS
Oct 26, 2023 am 11:02 AM
How to implement a layout with a fixed navigation menu using HTML and CSS
Oct 26, 2023 am 11:02 AM
How to use HTML and CSS to implement a layout with a fixed navigation menu. In modern web design, fixed navigation menus are one of the common layouts. It can keep the navigation menu always at the top or side of the page, allowing users to browse web content conveniently. This article will introduce how to use HTML and CSS to implement a layout with a fixed navigation menu, and provide specific code examples. First, you need to create an HTML structure to present the content of the web page and the navigation menu. Here is a simple example
 How to implement a labeled input box using Vue?
Jun 25, 2023 am 11:54 AM
How to implement a labeled input box using Vue?
Jun 25, 2023 am 11:54 AM
With the development of web applications, labeled input boxes are becoming more and more popular. This kind of input box allows users to input data more conveniently, and also facilitates users to manage and search the entered data. Vue is a very powerful JavaScript framework that can help us quickly implement labeled input boxes. This article will introduce how to use Vue to implement a labeled input box. Step 1: Create a Vue instance First, we need to create a Vue instance on the page, the code is as follows: &l
