

This article brings you relevant knowledge about Nginx. It mainly introduces how to configure the front-end Nginx and the HTTPS security principle. Interested friends can take a look at it together. I hope it will be helpful to you. help.

For a front-end development, although server development and deployment is not the main business, independent development of front-end projects can only be run after being mounted on the server. You cannot always count on it to run. Wei will do the job. Moreover, as a programmer, it is impossible not to know anything about project deployment.
This article will talk about the basic nginx service that a front-end developer should master.
For the use of nginx with CI, see my article: juejin.cn/post /718351…
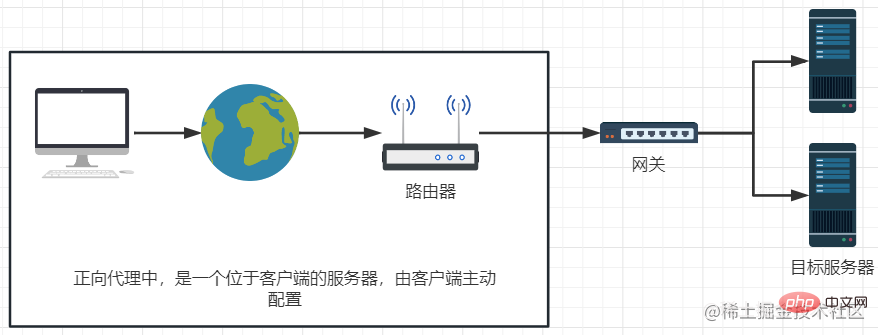
Features: Users actively contact the distribution device, and the distribution device determines the distribution target server. At this time, the user is unknown to the server.
A router is an example of a forward proxy, on one side with the user, with a maximum bandwidth limit.
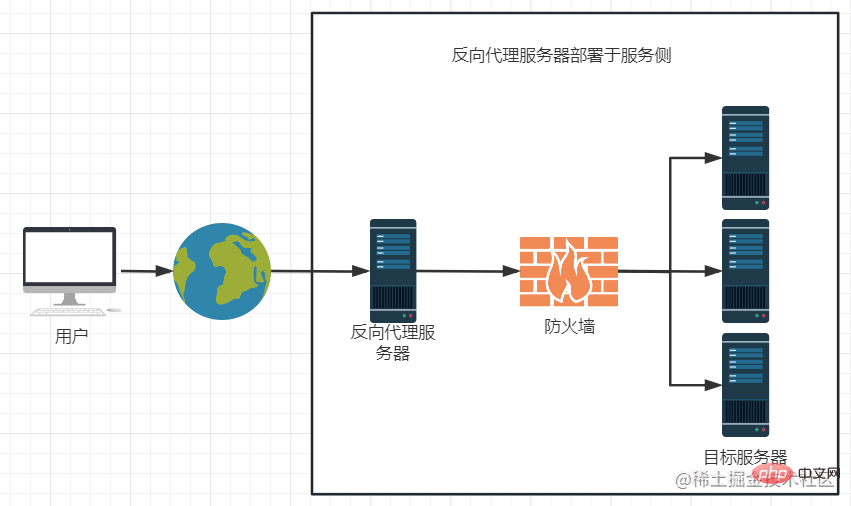
Reverse proxy is generally deployed on the service side. It is much more flexible and can be used for load offloading and expansion. Function etc. But for users, the reverse proxy server is equivalent to the target server, that is, the user can obtain the resources of the target server by directly accessing the reverse proxy server. At this time, the server is unknown to the user , improving security.
nginx is a high-performance HTTP and reverse proxy web server
An example of using nginx is a virtual host: multiple domain names are bound to one host , different resources are forwarded by nginx.
Decompress the installation package and enter the directory

Installation dependencies
yum install -y gcc
yum install -y pcre-devel
yum install -y zlib zlib-devel
Start the installation (installation directory /usr/local/nginx)
./configure --prefix=/usr/local/nginx

make

make install
Successful installation, check the installation directory

Test run
Execute./sbin /nginx (You can also use the global nginx command)
You can see that the process has been started
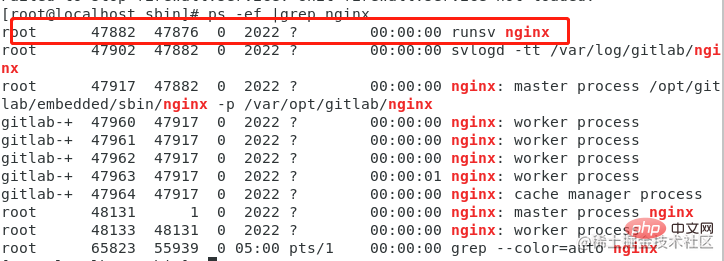
ps -ef | grep nginx
For testing, first turn off the firewall:
systemctl stop firewalld.service
For official online use, you can configure the firewall release port.
Configure nginx configuration file:
vim ./conf/nginx.conf

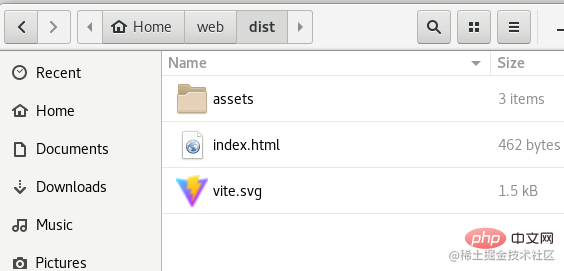
The location root directory location is a vue application that has been built:
Restart
nginx -s reload
Browser view (use the ip addr command to view the ip)

The above is before It is also mentioned in the article. Let’s talk about the use of configuration files in more depth.
The minimum set of configuration files is one that can support nginx The minimum set of configuration items that run normally, together with comments, are written below for your reference:
// ./conf/nginx.conf
worker_process 1; // 并行执行的任务数,一般按照CPU内核配置
events: {
    worker_connections 1024; // 配置单个worker进程最大的连接数,nginx 默认连接数是1024
}

http { // 支持 http 协议访问的服务
    include      mime.types; // 当前目录下的配置的文件类型文件,使用默认即可。图片音频会自动解析给浏览器,不能解析的一律按照二进制流下载
    default_type  application/octet-stream; // 默认文件类型 二进制流下载
    sendfile        on;  // 是否允许目标服务器绕过 nginx 服务器直接返回结果给用户
    keepalive_timeout  65;  // 超时时间

    server { // 隶属于 http 的一个 服务器
        listen       10087;  // 端口
        server_name  localhost;  // 服务部署的ip地址,可以是域名
        charset utf-8;
        location / {  // 配置 uri
	    root   /root/web/dist;  // 自定义的资源目录,可以是绝对目录;若前边不加 /, 则表示相对目录,相对的是 nginx 主目录
            index  index.html index.htm;
        }

        error_page  404             404.html;  // 404页面配置,相对路由
        error_page   500 502 503 504   50x.html; // 同上
        location = /50x.html {
            root   html;  // 50x 时,资源指向 html目录下寻找
        }
        location = /404.html {
            root   html;  // 同上
        }
    } // end server
} // end httpAssuming we have two resource directories, you can understand it as The build directories of the two projects:
/root/web/vue/dist
/root/web/react/dist
We use configuration files to control different access URLs and distribute them to these two resources respectively.
server {
    listen       80;
    server_name  www.vue.com;
    location / {
        root   /root/web/vue/dist;
        index  index.html index.htm;
    }
}

server {
    listen       8080;
    server_name  www.react.com;
    location / {
        root   /root/web/react/dist;
        index  index.html index.htm;
    }
}这样,访问 www.vue.com 就会进入 vue 的项目,访问 www.react.com:8080 会进入 react 的项目。
注意:https 的域名需要在云端配置 ip 绑定为 nginx 的服务器。
server_name 支持模糊匹配和通配符匹配。
所有 .xxx.com 结尾的都可以匹配到
匹配优先级:
如果都不匹配
使用场景:访问同一个域名,但是目标地址可以是多个,根据使用情况和空闲程度自动分配一个使用。upstream 用于设置多台分发主机的集合。
http {
    ...
    upstream my_server {
        server 10.123.345.456:8000;
        server 10.123.345.457:8000;    }

    server {
        location / {
            proxy_pass http://my_server;
        }
}}这样配置后,实际访问 http://192.168.122.1 访问时,系统会在 456 和 457 两个 ip服务选择一个分发,雨露均沾。
当然你也可以配置两个服务器的轮询权重(访问概率)。
server 10.123.345.456:8000 weight=8;
server 10.123.345.457:8000 weight=1;
server 10.123.345.457:8000 backup;  // 标识备用机,实在是没有可用的机器时启用复制代码
如果想要某一个服务器不参与负载均衡,可以如下配置:
server 10.123.345.456:8000 down;复制代码
适合小中型网站,静态资源不太多的场景。原理是用户请求页面时,提取出静态资源,等下次用户访问相同页面时,静态资源可以不用再次找服务器获取,而是取缓存的内容。
配置如下:
http {
    ...
    upstream my_server {
        server 10.123.345.456:8000;
        server 10.123.345.457:8000;    }

    server {
        location / {
            proxy_pass http://my_server;
        }

        location ~.*\.(js|png|jpg|svg|css)$ {  // 静态资源
            root   html;
            index  index.html index.htm;        }
}}用于隐藏服务器真实url路径。
http {
    ...
    upstream my_server {
        server 10.123.345.456:8000;
        server 10.123.345.457:8000;
    }

    server {
        location / {
            rewrite ^/([0-9]+).html$ /index/pageNum=$1 break;
            proxy_pass http://my_server;
        }

    }
}上边就使用了一个 rewrite 来配置了转发。
这个例子隐藏了页面的分页信息:访问 /2.html 就相当于访问了 /index/pageNum=2 路径。
匹配关键字:
盗链(Hotlinking)是指在一个网站上,使用别人网站上的图片或其他媒体资源来装饰自己的网站,而不获得该资源的所有者许可的行为。盗链可以导致被盗用者的带宽和流量受到消耗,甚至可能使其网站速度变慢或崩溃。
防盗链也是资源节省优化的必备配置。nginx 中根据 http 请求头的 referer 判断来源可以做到拦截。
一个配置防盗链的例子如下:
location ~* \.(jpg|jpeg|png|gif)$ {
    valid_referers none blocked xxx.com;
    if ($invalid_referer) {
return 403; }}以上代码表示,如果访问的图片URL的referer不是 xxx.com,则返回 403 禁止访问。如果访问的URL没有referer,则也会被禁止访问。
配置项介绍:
接下来配置错误提示页面:
假设有个页面 : 403.html, 需要配置禁止访问时显示:
error_page 403 /403.html
location = /403.html {
root html; // 资源指向 html目录下寻找}或者在 return 403 时设置:rewrite 到一个配置好的资源也可以。
安全高可用的意义:在不额外添加机器的情况下做到不down机动态切换机器,从而达到服务持续可用
安装
yum install keepalived
编辑配置(/etc/keepalived.conf):
global_defs {
    router_id lb111}vrrp_instance_test {  // 自定义 test 实例
    state MASTER   // 主
    interface eth01  // 你机器上网卡的名字
    virtual_router_id 33  // 虚拟路由id,主从要一样
    priority 100 // 优先级高的机器就为 master
    advert_int 1 // 间隔检测时间
    authentication {  // 认证配置,同一组保持一致即可
        auth_type PASS
        auth_pass 1111
    }
    virtual_ipaddress {
        192.168.44.1  // 本台机器的虚拟地址
}}上面是第一台机器的配置,在第二台虚拟机上也配置一下类似的配置,设置:
global_defs {
    router_id lb110  // 修改路由号}vrrp_instance_test {  // 同一个实例
    state BACKUP   // 从
    interface eth01
    virtual_router_id 33
    priority 50 // 减低优先级
    advert_int 1
    authentication {
        auth_type PASS
        auth_pass 1111
    }
    virtual_ipaddress {
        192.168.44.1  // 本台机器的虚拟地址
}}两台机器分别启动一下:
systemctl start keepalived
此时在外网可以ping通的ip是: 192.168.44.1。
我们让 MASTER 机器关机后,再ping一下 192.168.44.1,发现仍然可以,此时在备份及使用指令 ip addr 查看,可以看到 有一个 192.168.44.1 的虚拟ip。这说明高可用生效了,这种配置叫 ip漂移。
上述情况只能保证 keepalived 进程挂掉时起作用,更高级的用法是跑一个脚本,检测本机的 nginz 服务进程,如果服务异常,则 kill 掉本机的 keepalived 进程。
http 协议往往是不安全的,即使有防火墙,但是没办法防御消息在传输过程中被劫持:
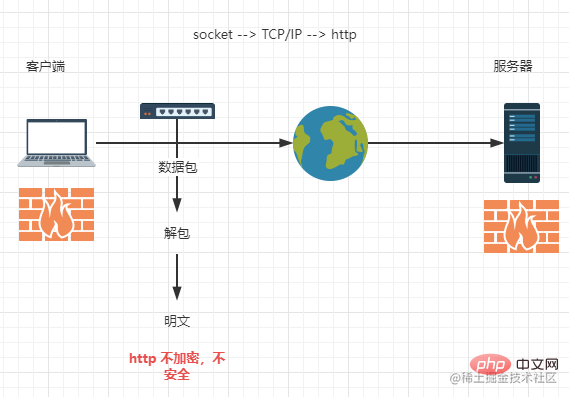
此时就需要对传输过程的消息进行加密。加密方式有对称加密和非对称加密。
对称加密的加密和解密互为逆过程,规则是固定的,存放在服务器端或者客户端,这个加密算法传输过程中也容易被获取,所以并不是太安全。
非对称加密会设置一个公钥,用于传递;服务端和客户端分别设置一个私钥,自己保存,加密步骤如下:
其中需注意,公钥加密的数据公钥自己是解不开的,而且要保证都是公钥加密,私钥解密。
但是,如果服务器被伪造了,公钥是坏人给的,那你的数据加密再好也没用了,这就是中间人攻击。
为了解决中间人攻击,需要对使用者进行身份认证,这就引入了数字证书。常见的方式是找一个第三方公认的好人(CA)来颁发这个证书来认证公钥。
服务器会申请公钥给CA来获取证书,CA判断你是否有所认证机构的管理权限和拥有权限,通过后颁发数字证书(CA自己的私钥+加密算法);服务器拿到证书后,给用户传递的就是这个证书了,用户用CA公钥解密出服务器公钥来使用。
此时,中间人获取不到CA的私钥,所以用户端浏览器就不认这个中间人,以此达到鉴伪。用户只要使用的是正版操作系统和正规浏览器,就能保证数字证书的获取。这期间使用了 TLS 算法生成了两组随机数,通过非对称加密,客户端和服务端达成一致,生成了一个只有他们自己知道的对称加密规则,我这里借用b站 技术蛋老师的解释图:
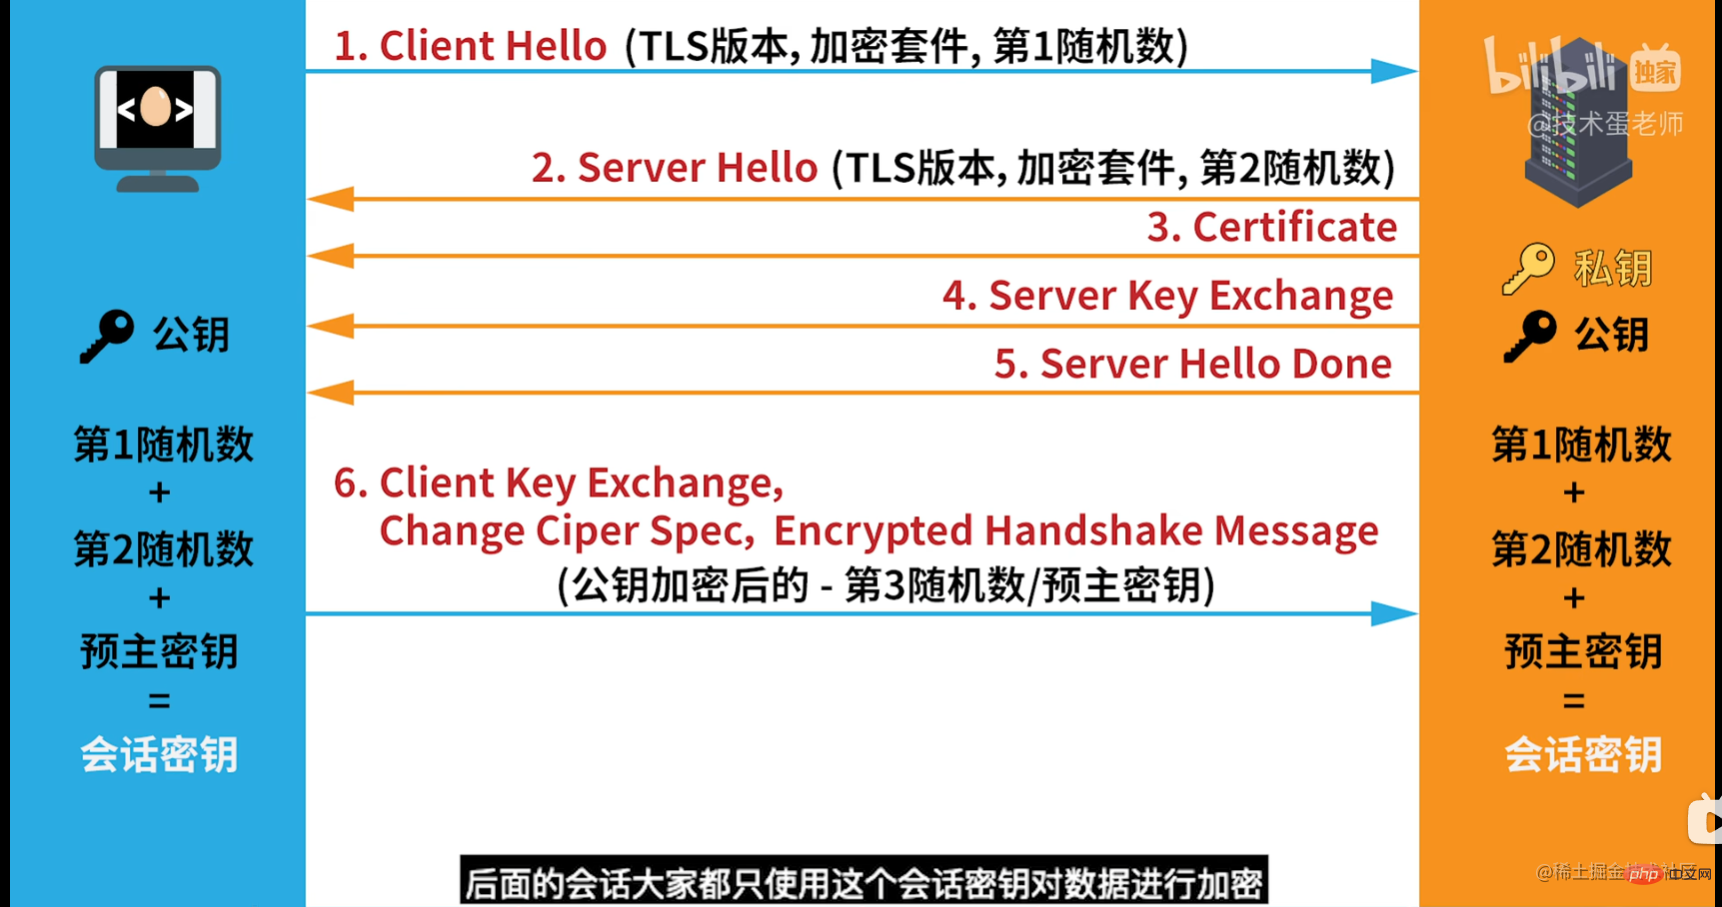
上图的步骤如下:
这里讲一下 nginx 如何配置 https。你需要有一个服务的公网ip(假设 123.456.789.111)和购买的域名(假设 www.abc.com )并申请好了域名解析和数字证书(.key 和 .pem 文件):
server {
    listen 443 ssl;
    server_name localhost;  // 域名已经和ip绑定,写 localhost也是能解析的
    ssl_certificate xxxx.pem;
    ssl_certificate_key xxxx.key;
    underscores_in_headers on; // 允许请求头出现下划线
root html;}跟其他技术的配置文件一样,nginx 也能使用变量:
location / {
    set $name "zhangsan";
    return 200 "$name";
}上面就设置了一个变量叫 name,并且直接返回 200 的请求,在页面上显示 name 的值。其格式是:
set $变量名 变量值
当然了,nginx 也自带了一些变量,可以直接使用,比如:
$request 完整的原始的请求行,例如:GET /nginx/index?a=1&b=2 HTTP/1.1$request_uri 完整的原始请求URI,访问的URL除去域名(或IP)和 port, 如: /nginx/index?a=1&b=2$args 请求行中的全部参数 例如:a=1&b=2$remote_addr 客户端ip地址$remote_port 客户端端口...
nginx 配置文件的变量可以统一设置在文件的顶部,这样在整个文件中都可以使用同一个变量:
set $my_var "hello";
引申:变量值的计算
location / {
    set $my_var 10;
    add_header X-Test $my_var; // 成功响应时,添加响应头
    add_header X-Total $my_var*2;
}上面的例子就是变量简单的数值计算。
现在有上面一个工作,需要配置nginx来完成动态转发的工作,让用户看到不同版本的前端项目。
可以使用一个变量来标识资源地址,在前端服务build的CI中修改这个配置文件,更改变量值。
一个示例:
set $uri "/root/web/vue/dist";

server {
    listen       80;
    server_name  www.test.com;
    location / {
        root   $uri;
index index.html index.htm; }}在 CI 中修改配置文件:set $uri "/root/web/react/dist",重启 nginx 后即可。
大家有更好的办法的话,可以在评论区讨论哦
这个问题有多种解决方式。
可以配置 nginx,高速浏览器不要缓存:
location / {
add_header Cache-Control "no-cache, must-revalidate"}或者配置强制浏览器缓存,常用的办法是添加hash或者版本号来让浏览器重新下载资源:
<link>
The above is the detailed content of An article explaining the configuration of front-end Nginx and HTTPS security principles in detail. For more information, please follow other related articles on the PHP Chinese website!


![[Web front-end] Node.js quick start](https://img.php.cn/upload/course/000/000/067/662b5d34ba7c0227.png)


