 Development Tools
 git
git
 Super detailed! Github usage tutorial (detailed steps with pictures and text)
Super detailed! Github usage tutorial (detailed steps with pictures and text)
This article brings you relevant knowledge about Github. It mainly introduces to you what Github is? How to use Github? Super detailed graphic tutorial~ Friends who are interested can take a look at it below. I hope it will be helpful to everyone.
In recent days, I have discovered that some people are very curious about the Github website, but unfortunately they cannot use it because it is a website for foreigners. First of all, my English is not up to standard. For this, you can actually use Google Chrome to browse Github, which has a one-click translation function. But it is still necessary to introduce some functions and specific operations of Github. Considering that some beginners may not have learned version control tools such as git and svn, I will try not to involve git instructions here.
Without further ado, let’s get to the point.
Github account registration
First search Github on Baidu and enter the Github official website. 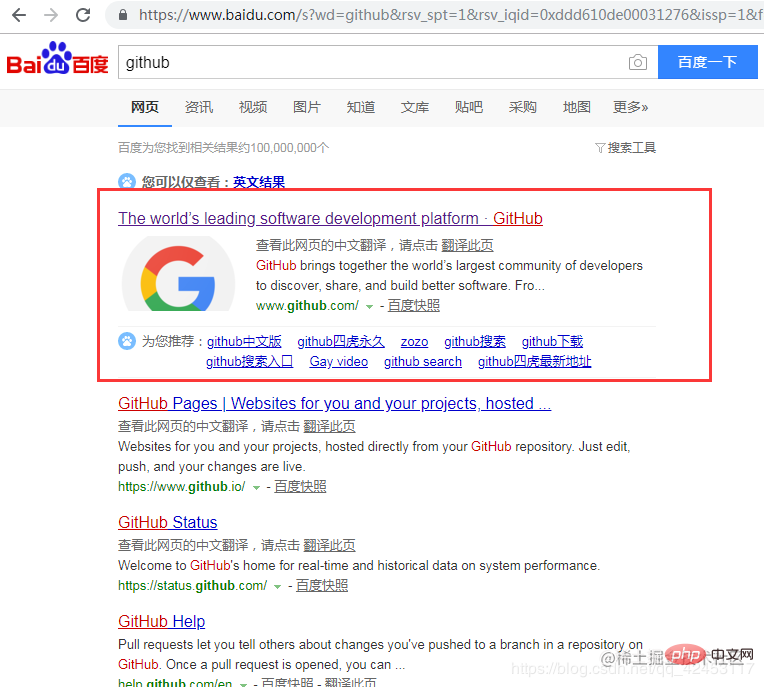 After entering the official website, we click Sign up to register.
 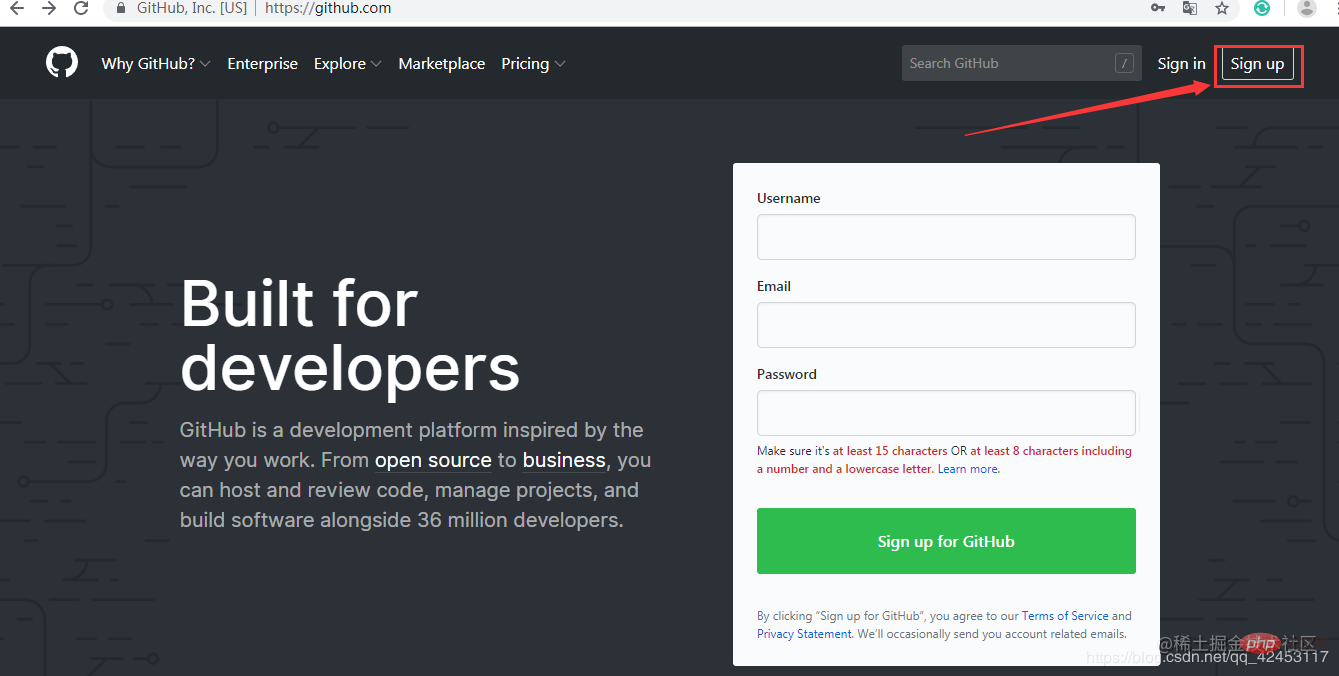 There is nothing to say about this step. Enter the username, your email, and password and then conduct an account test. After completion, click Create an account.
 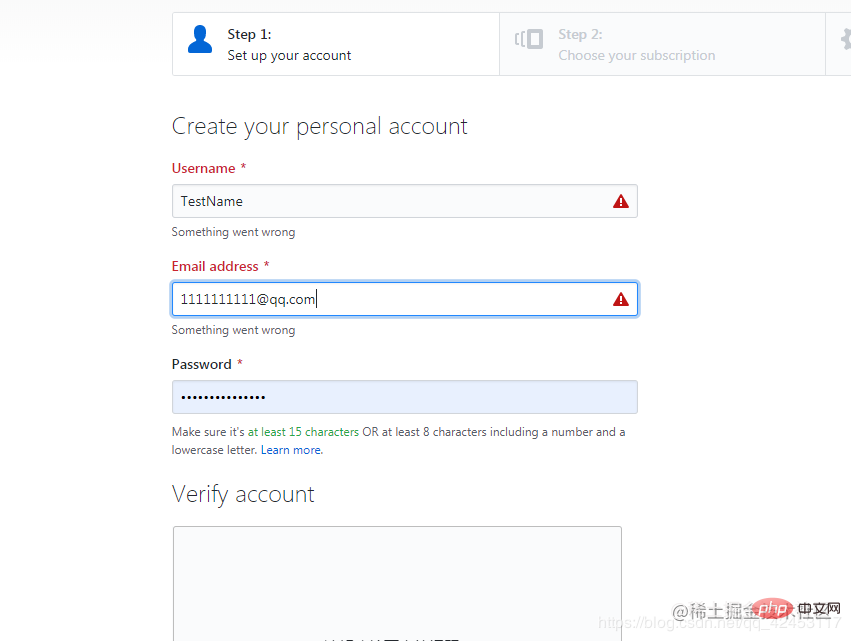 After completion, go to the second step, where of course you choose a free subscription.
 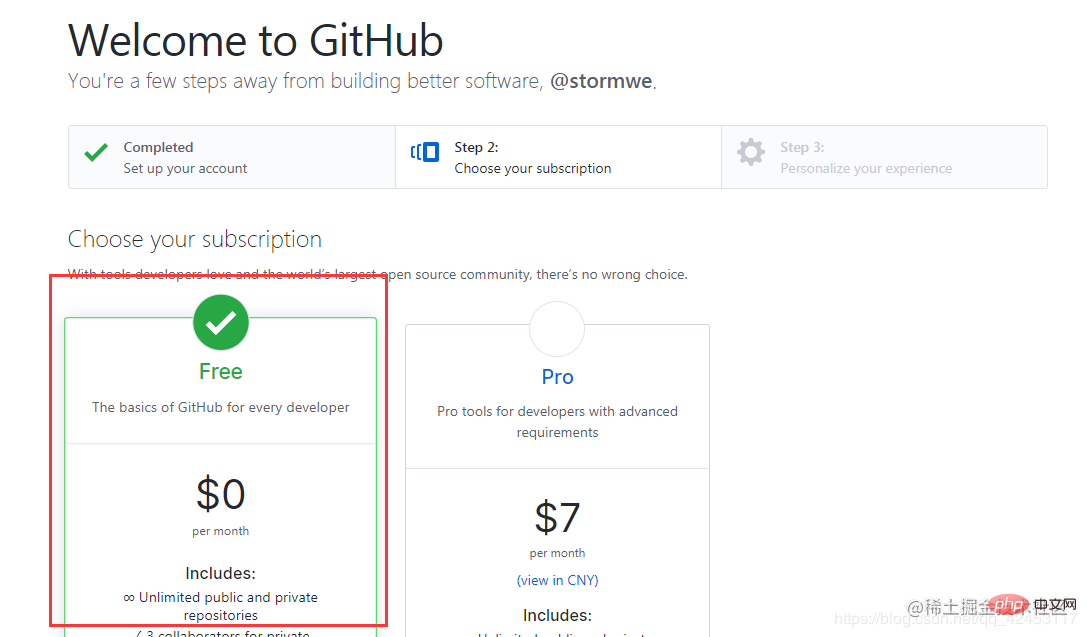 After completing the selection, click Continue to go to the third step.
The third step is just to ask some questions for you to answer, such as how good are you at programming? How do you plan to use Github? etc. If you don’t want to answer, you can scroll to the bottom of the page and select skip.
 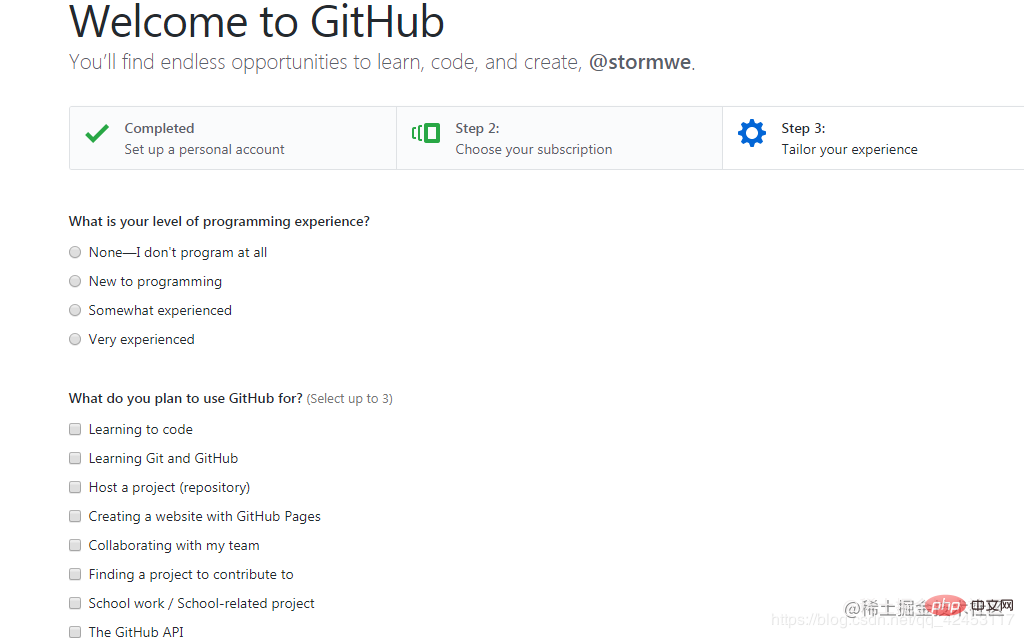 Click Submit after answering.

After submission, Github will send an activation email to your registered email address. Just open the email and click the link inside to activate it, so that the account is created. finished.
Resource Search
We use the newly created account to log in. This page will be displayed after successful login. We can search for resources in the upper left corner. Here I take the open source framework OkHttp as an example. You can select the scope and choose to search within your own repository or the entire Github website. Because I don't have this resource in my own warehouse, it searches the entire website by default.
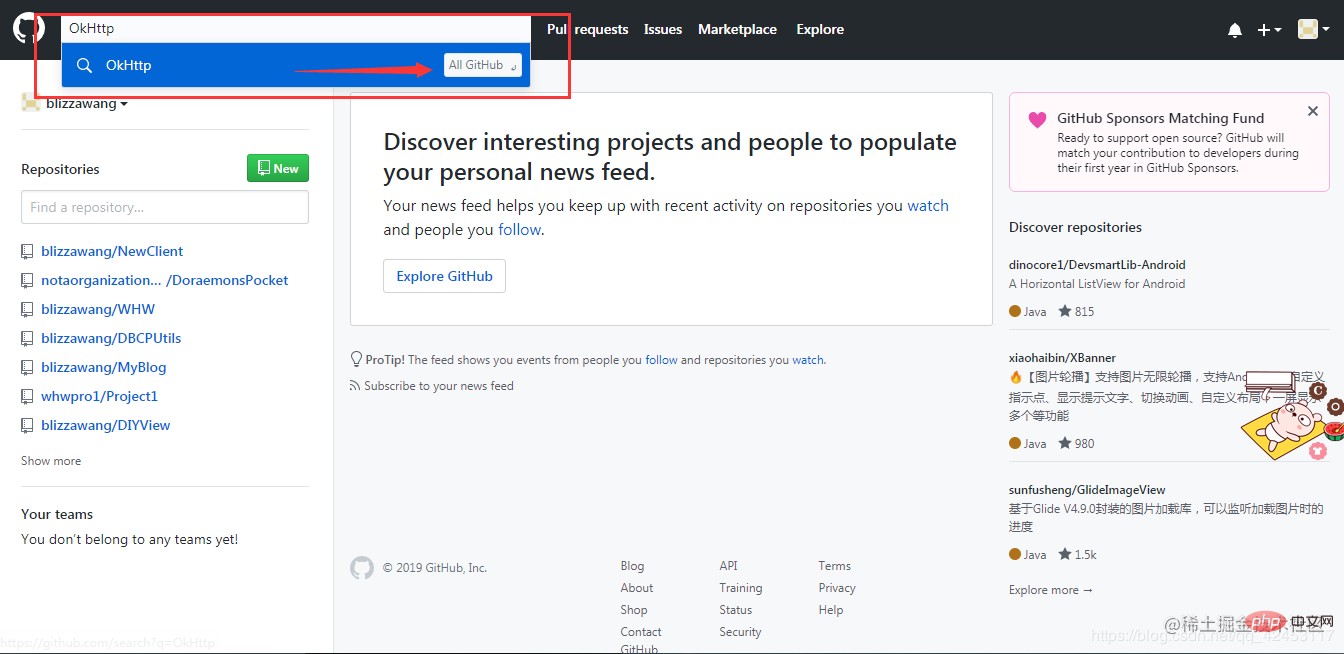
Enter the keyword and press Enter to start the search and then display the search results.
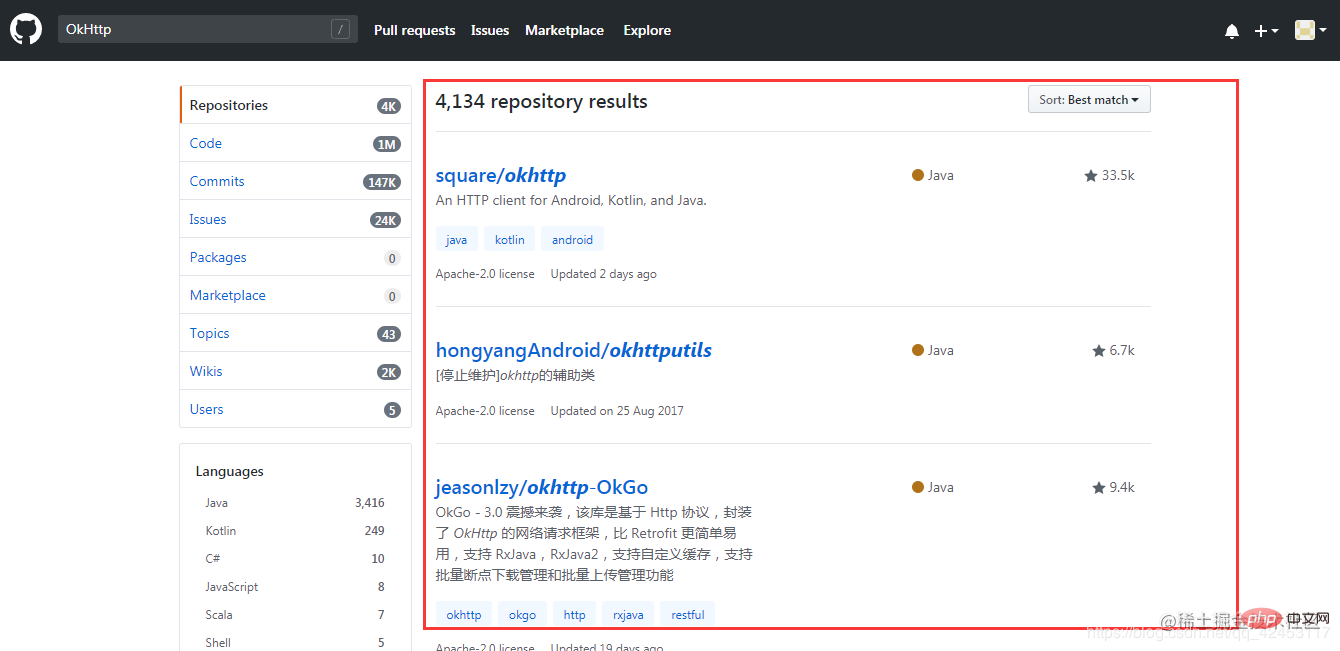
The resource we need is the first one. When we click to enter, we can see the entire project structure and source code. Through this green button we can download resources.
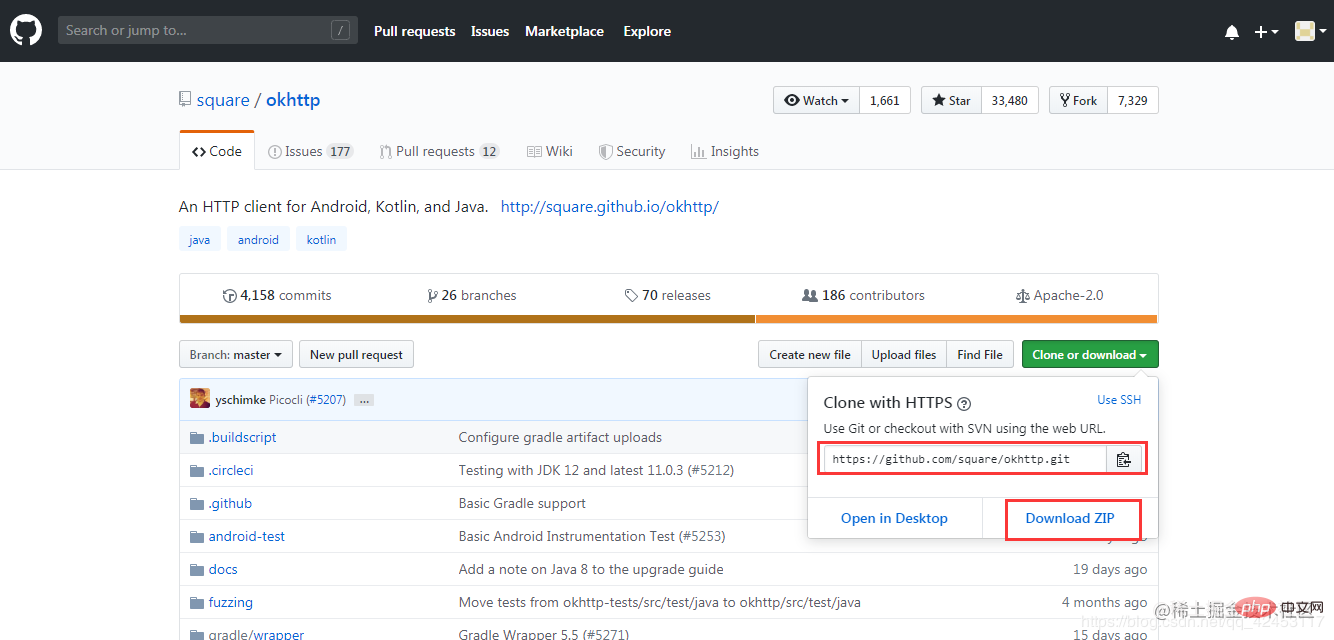
The first red box is the warehouse address, which can be cloned through the git tool. Here we directly select Download ZIP, and the resources are downloaded.
Create a repository
The following describes how to create your own code repository. 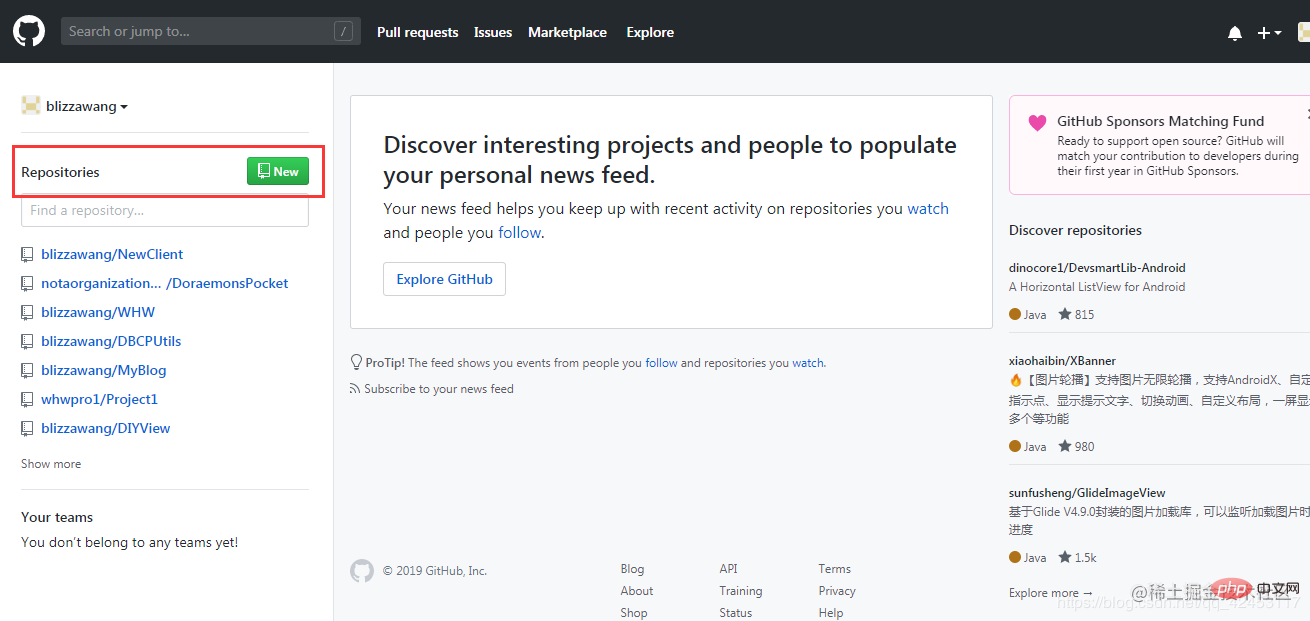
On the left side of the web page is your code warehouse. You can click New to create it.
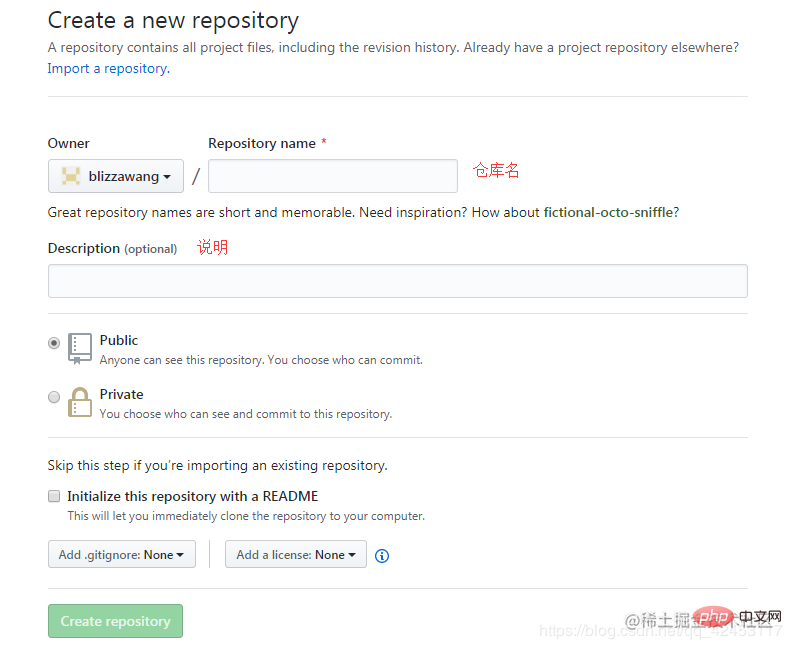 Enter the
warehouse name and description or description of the warehouse, and then click Create repository.
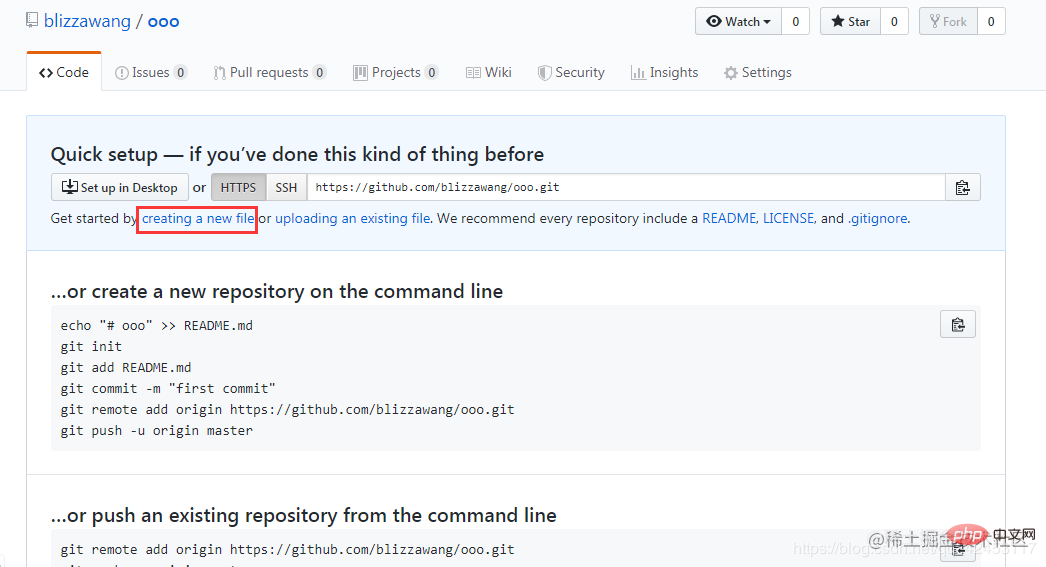
In this way, the warehouse is created, but the current warehouse is empty and there is nothing, so here it is recommended that you import code from other places or push code Come in. We can click create a new file to create a new file.

Fill in the file name, and then write some file content at will. When completed, pull the web page to the bottom.

Fill in the description of the file created this time, and then click Commit new file.
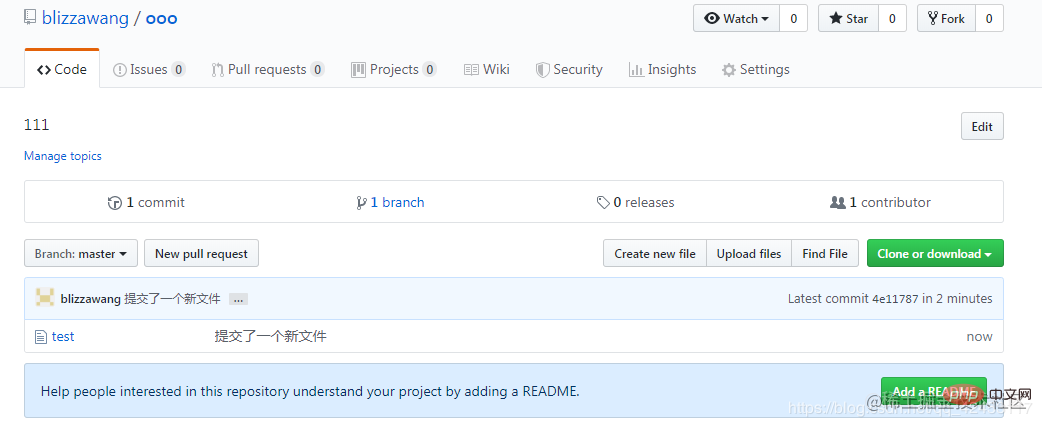
Now you have the content in your repository.
Team collaboration
The advantage of Github is that it allows the broad masses of the people to participate in the writing of various open source projects. So, how to achieve team collaboration on Github? Through some previous operations, we have created a warehouse, so we will use this warehouse as an example for team development. First you have to add your team members to this repository.
 Click Settings to enter the settings page.
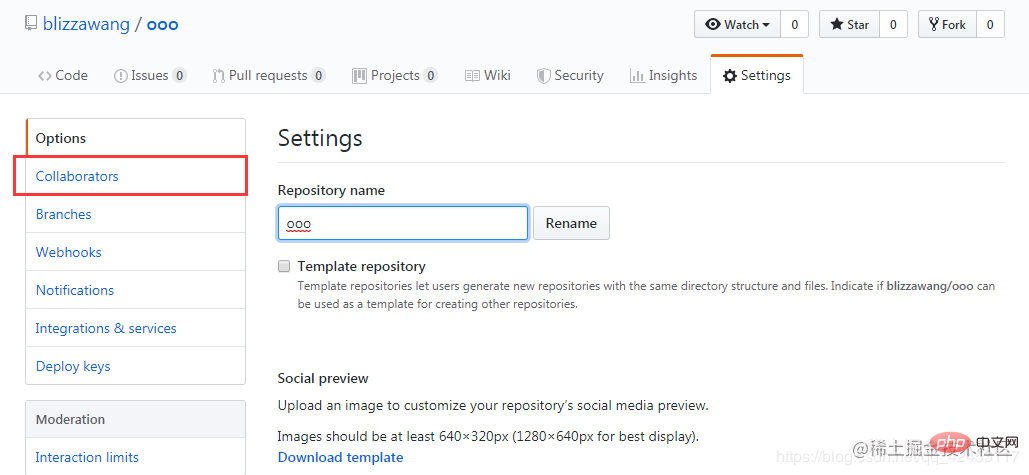
Click Collaborators to enter the collaborators page.
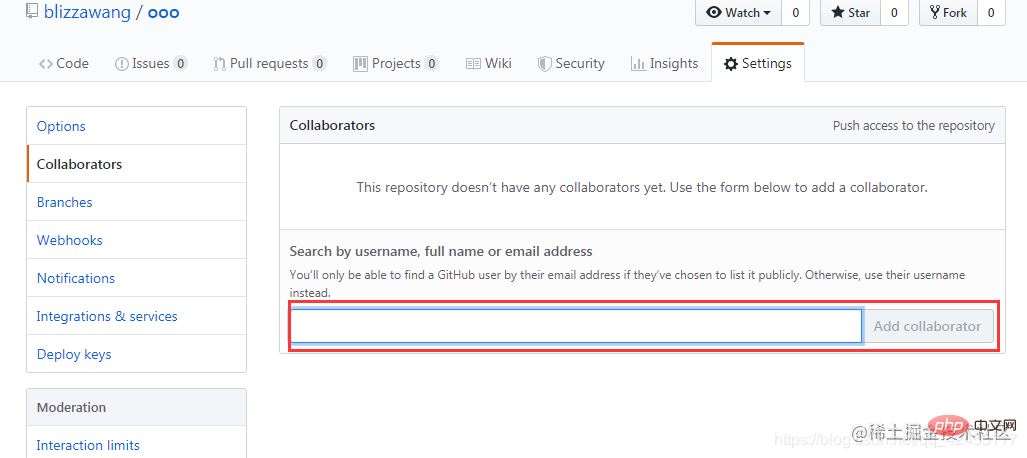
It shows that the warehouse has no collaborators, so we can search for users through the search box below, enter the user's user name or email address to search, and the search is successful. Then click Add collaborator to add the user as a collaborator of this warehouse. At this time, the user will receive a notification, and only if he agrees will he participate in the development of this warehouse. We can also set permissions for members of the team to develop more efficiently.
Participate in open source projects
How to participate in an open source project, such as the extremely popular bootstrap, which is a very powerful CSS framework, we search bootstrap throughout the website, and then enter the warehouse homepage.
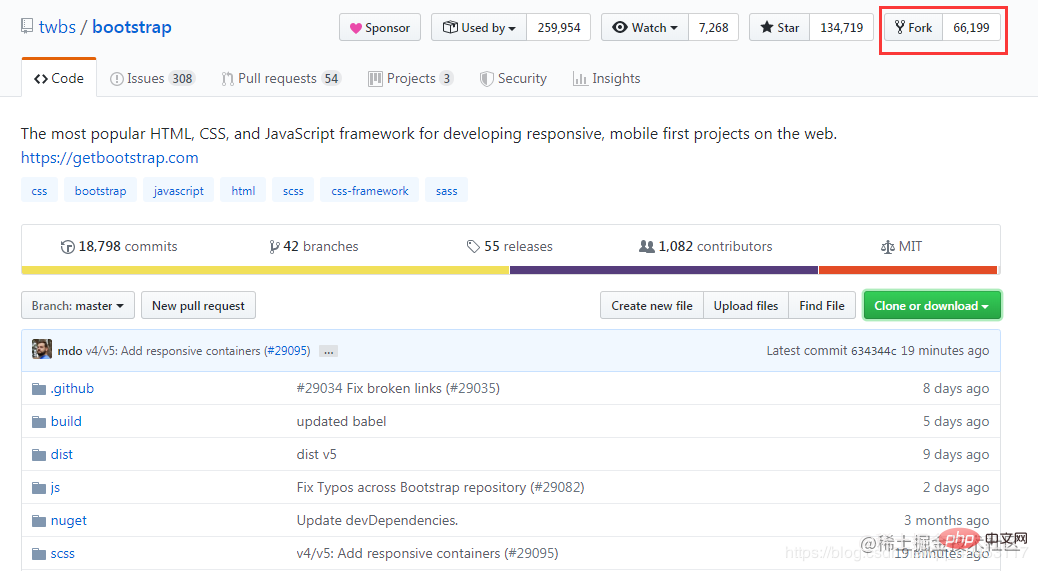
Then click Fork and a bootstrap repository will be cloned under your account. Then clone from your own account. You must use the git tool here. Enter the git command:
<p>git clone https://github.com/blizzawang/bootstrap.git<br></p>
Note that you must clone the repository from your own account so that you can push changes. If you clone the repository from the bootstrap author's Repository address clone, because without permission, you will not be able to push changes unless the author lists you as a collaborator of the repository, but obviously this is not possible. The relationship between Bootstrap’s official repository twbs/bootstrap, the repository my/bootstrap you cloned on GitHub, and the repository you cloned to your local computer is as shown in the figure below:
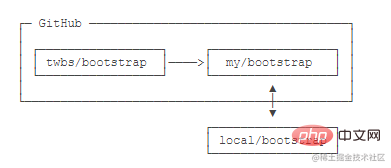
If you want to fix a bug in bootstrap or add a new feature, you can start working on it immediately. After finishing, push it to your own warehouse. If you want the official bootstrap library to accept your modifications, you can initiate a pull request on GitHub. Of course, it doesn’t necessarily matter whether the other party accepts your pull request.
How to merge code
We know that git has extremely powerful cloning and branching functions. In team collaboration, you yourself are the backbone of the team project, and other members are Each has a branch, and everyone works on their own branch without affecting each other, so that the project can be developed most efficiently. When everyone's project functions are completed, it is time to merge the code. When everyone's code is merged and no errors occur, the entire project is completed. So, how to merge code in Github? Taking the warehouse created above as an example, I did some operations here. I used the git tool to clone the warehouse to the desktop. We called it the local warehouse, and then created a new branch in the local warehouse to simulate the operations of the second programmer. , the second programmer created a test2 file and then pushed it to the Github repository through the git tool.
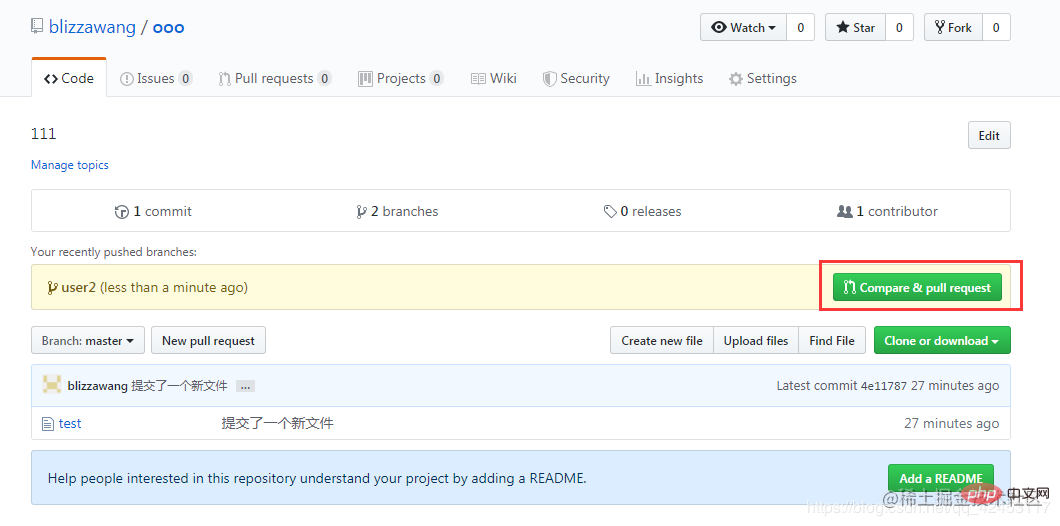 Now we can see that it prompts that the user2 branch has been pushed one minute ago, and then we click Compare&pullrequest to compare and pull the request.

You will find that these branches can be automatically merged because the contents of the current two branches do not conflict with each other, so we can fill in some instructions about this merger below, Then click Create pull request to merge.
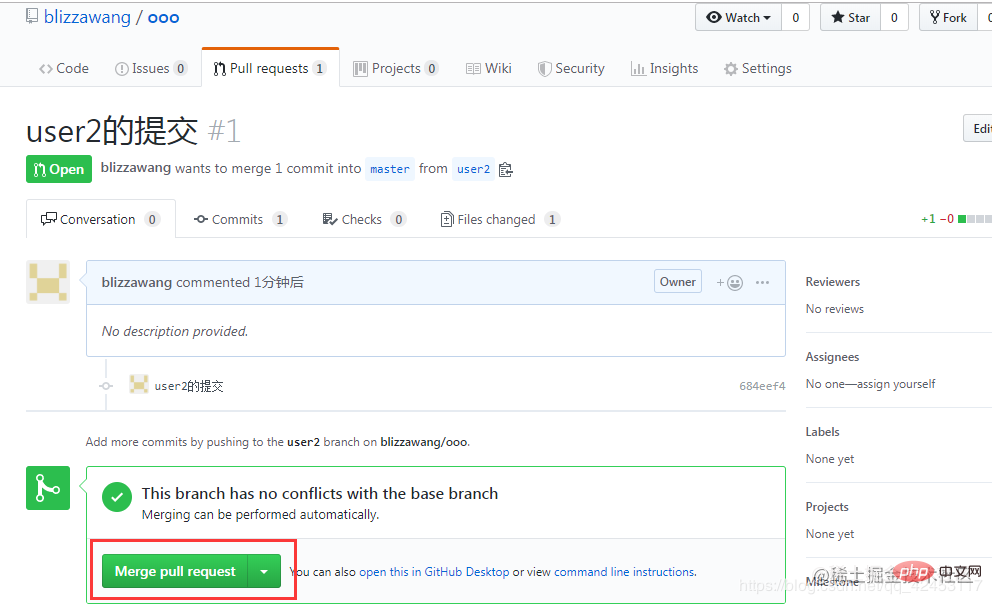
Continue to click Merge pull request.
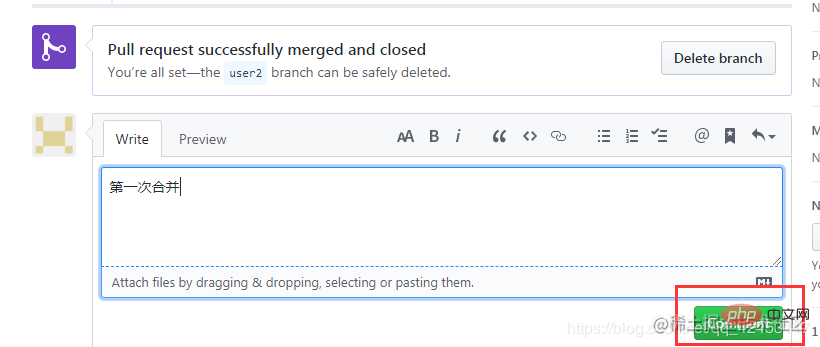
Click Commit to submit. We returned to the warehouse homepage and found that user2's file came in successfully.
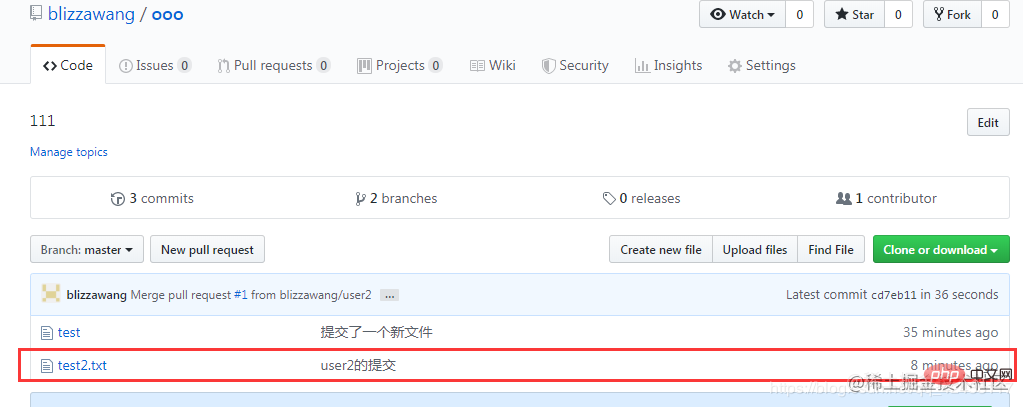
When your submission conflicts with other people's submissions, such as creating a variable at the same time, or modifying the public part of a file at the same time, this Automatic merging is not possible. In this case, you have to use the git tool to update other people's code to your local warehouse, then resolve the conflict locally, and then push it to Github, and others can update their own code.
How to delete the warehouse
Last point, how to delete the created warehouse?
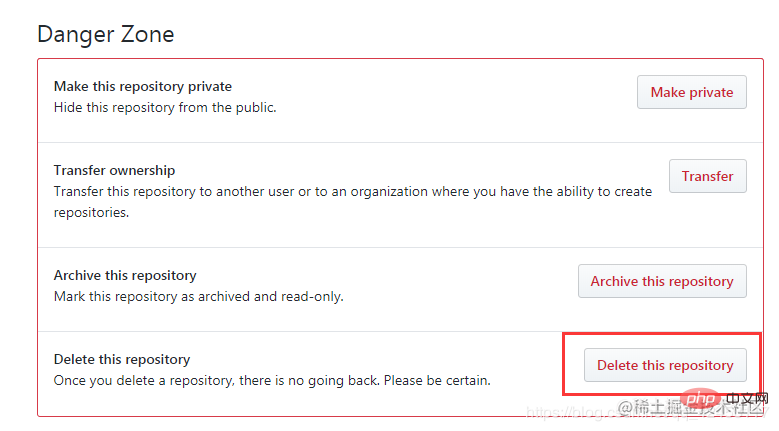
 Click Settings to enter the settings page.
Scroll the web page to the bottom and select Delete this repository.
 Then enter the name of the warehouse and click the button.
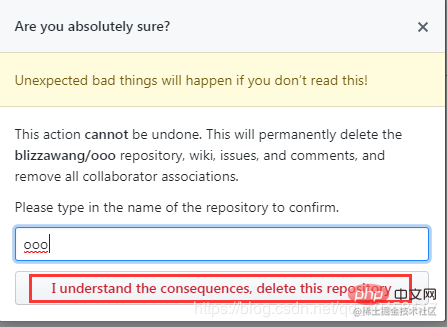
successfully deleted.
 Okay, that’s all about the use of the Github website. Of course, it involves some knowledge of git. Regarding git, I think if you want to use Github, you should learn to use git.
Because this is a foreign website, sometimes the website delay will be very high. I also recommend a website to everyone. Code Cloud Gitee - Cloud software development collaboration platform. This is a domestic code hosting service website, which is also managed through git, and the Internet speed is much faster.
The above is the detailed content of Super detailed! Github usage tutorial (detailed steps with pictures and text). For more information, please follow other related articles on the PHP Chinese website!

Hot AI Tools

Undresser.AI Undress
AI-powered app for creating realistic nude photos

AI Clothes Remover
Online AI tool for removing clothes from photos.

Undress AI Tool
Undress images for free

Clothoff.io
AI clothes remover

AI Hentai Generator
Generate AI Hentai for free.

Hot Article

Hot Tools

Notepad++7.3.1
Easy-to-use and free code editor

SublimeText3 Chinese version
Chinese version, very easy to use

Zend Studio 13.0.1
Powerful PHP integrated development environment

Dreamweaver CS6
Visual web development tools

SublimeText3 Mac version
God-level code editing software (SublimeText3)

Hot Topics
 How to install deepseek
Feb 19, 2025 pm 05:48 PM
There are many ways to install DeepSeek, including: compile from source (for experienced developers) using precompiled packages (for Windows users) using Docker containers (for most convenient, no need to worry about compatibility) No matter which method you choose, Please read the official documents carefully and prepare them fully to avoid unnecessary trouble.
 Summary of FAQs for DeepSeek usage
Feb 19, 2025 pm 03:45 PM
DeepSeekAI Tool User Guide and FAQ DeepSeek is a powerful AI intelligent tool. This article will answer some common usage questions to help you get started quickly. FAQ: The difference between different access methods: There is no difference in function between web version, App version and API calls, and App is just a wrapper for web version. The local deployment uses a distillation model, which is slightly inferior to the full version of DeepSeek-R1, but the 32-bit model theoretically has 90% full version capability. What is a tavern? SillyTavern is a front-end interface that requires calling the AI model through API or Ollama. What is breaking limit
 What are the AI tools?
Nov 29, 2024 am 11:11 AM
AI tools include: Doubao, ChatGPT, Gemini, BlenderBot, etc.
 What are the Grayscale Encryption Trust Funds? Common Grayscale Encryption Trust Funds Inventory
Mar 05, 2025 pm 12:33 PM
Grayscale Investment: The channel for institutional investors to enter the cryptocurrency market. Grayscale Investment Company provides digital currency investment services to institutions and investors. It allows investors to indirectly participate in cryptocurrency investment through the form of trust funds. The company has launched several crypto trusts, which has attracted widespread market attention, but the impact of these funds on token prices varies significantly. This article will introduce in detail some of Grayscale's major crypto trust funds. Grayscale Major Crypto Trust Funds Available at a glance Grayscale Investment (founded by DigitalCurrencyGroup in 2013) manages a variety of crypto asset trust funds, providing institutional investors and high-net-worth individuals with compliant investment channels. Its main funds include: Zcash (ZEC), SOL,
 Delphi Digital: How to change the new AI economy by parsing the new ElizaOS v2 architecture?
Mar 04, 2025 pm 07:00 PM
ElizaOSv2: Empowering AI and leading the new economy of Web3. AI is evolving from auxiliary tools to independent entities. ElizaOSv2 plays a key role in it, which gives AI the ability to manage funds and operate Web3 businesses. This article will dive into the key innovations of ElizaOSv2 and how it shapes an AI-driven future economy. AI Automation: Going to independently operate ElizaOS was originally an AI framework focusing on Web3 automation. v1 version allows AI to interact with smart contracts and blockchain data, while v2 version achieves significant performance improvements. Instead of just executing simple instructions, AI can independently manage workflows, operate business and develop financial strategies. Architecture upgrade: Enhanced A
 As top market makers enter the crypto market, what impact will Castle Securities have on the industry?
Mar 04, 2025 pm 08:03 PM
The entry of top market maker Castle Securities into Bitcoin market maker is a symbol of the maturity of the Bitcoin market and a key step for traditional financial forces to compete for future asset pricing power. At the same time, for retail investors, it may mean the gradual weakening of their voice. On February 25, according to Bloomberg, Citadel Securities is seeking to become a liquidity provider for cryptocurrencies. The company aims to join the list of market makers on various exchanges, including exchanges operated by CoinbaseGlobal, BinanceHoldings and Crypto.com, people familiar with the matter said. Once approved by the exchange, the company initially planned to set up a market maker team outside the United States. This move is not only a sign
 Significantly surpassing SFT, the secret behind o1/DeepSeek-R1 can also be used in multimodal large models
Mar 12, 2025 pm 01:03 PM
Researchers from Shanghai Jiaotong University, Shanghai AILab and the Chinese University of Hong Kong have launched the Visual-RFT (Visual Enhancement Fine Tuning) open source project, which requires only a small amount of data to significantly improve the performance of visual language big model (LVLM). Visual-RFT cleverly combines DeepSeek-R1's rule-based reinforcement learning approach with OpenAI's reinforcement fine-tuning (RFT) paradigm, successfully extending this approach from the text field to the visual field. By designing corresponding rule rewards for tasks such as visual subcategorization and object detection, Visual-RFT overcomes the limitations of the DeepSeek-R1 method being limited to text, mathematical reasoning and other fields, providing a new way for LVLM training. Vis
 Bitwise: Businesses Buy Bitcoin A Neglected Big Trend
Mar 05, 2025 pm 02:42 PM
Weekly Observation: Businesses Hoarding Bitcoin – A Brewing Change I often point out some overlooked market trends in weekly memos. MicroStrategy's move is a stark example. Many people may say, "MicroStrategy and MichaelSaylor are already well-known, what are you going to pay attention to?" This is true, but many investors regard it as a special case and ignore the deeper market forces behind it. This view is one-sided. In-depth research on the adoption of Bitcoin as a reserve asset in recent months shows that this is not an isolated case, but a major trend that is emerging. I predict that in the next 12-18 months, hundreds of companies will follow suit and buy large quantities of Bitcoin


