This article will help you learn git and summarize some common git commands. I hope it will be helpful to you!
![[Organization and Sharing] Some common git commands](https://img.php.cn/upload/article/000/000/068/6423e0654ff65510.jpg)
Official website download address: Click to download
Official website download is too slow Solution: Click to download
Many companies’ code warehouses and Three-party code hosting platforms all use public key-based SSH authentication (public key encryption, private key decryption).
The reason why Git recommends using the SSH protocol: Using the SSH protocol can avoid entering the password every time push. git@github.com starts with the SSH protocol. When using the HTTPS protocol, you must enter your username and password every time.
The public key is an identification method for the code warehouse server to verify the local machine. After joining a new company, the company's git server administrator will ask you to send your git public key to it by email. After configuring it, you will not need to enter your username and password every time you submit code to the remote code repository. La.
Insert a sentence here. If you feel that the git bash window is too small or the font is too small, you can adjust it yourself. The adjustment method is to open the git bash command window, right-click on the title bar of the command window, then select options, install the following operations to set up
// 窗口尺寸设置
options --> windows -->修改行数(高度)+列数(宽度)
// 窗口字体设置
options --> text -->设置字体大小
If used in a company, it is recommended that the username be configured as your own real name, so that it is easier to find the code modifier. The git config command has three scopes.
# 对当前仓库有效
git config  --local
# 对当前登录者有效,对所有仓库都有效
git config  --global
# 对登录这台电脑的人都有效,对所有仓库都有效
git config  --system
If there are many configuration items, you can add the -e parameter after these instructions and open the configuration file for configuration. After editing, press esc first, then press the shift: key combination, and finally enter wq on the command line to save and exit
Obviously you should choose the git config --global configuration command here.
git config --global user.name "用户名"
git config --global user.email "邮箱地址"
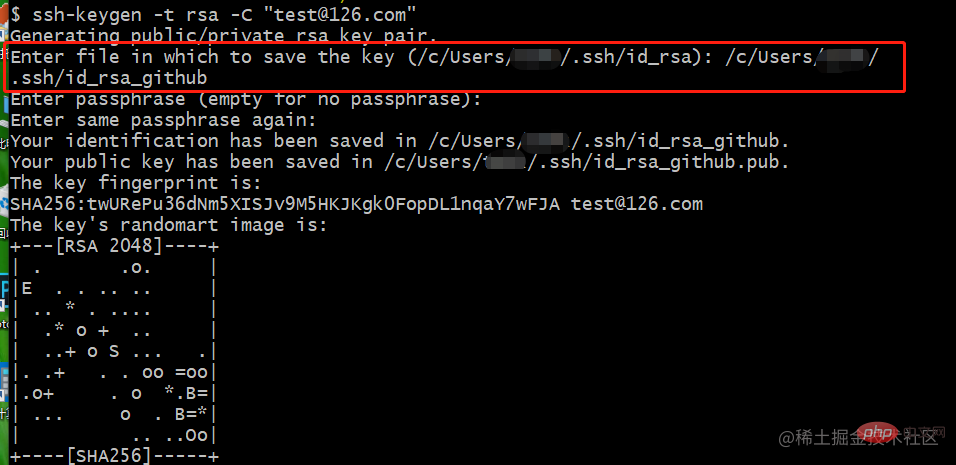
ssh-keygen The process of generating a secret key will involve three inquiries and interactions. The first time is to ask for the generated secret key storage path and name. The default storage location is /c/Users/username/.ssh/id_rsa. If you don’t want to change it, press Enter. The second and third times require you to enter the private key password twice. Used for authentication when viewing the secret key, once to set the password and once to confirm the password. If you do not want to enter the password when using the key, just press Enter to skip it.
ssh-keygen -t rsa -C “上一步的邮箱地址”

 cd ~/.ssh && ls
 cat id_rsa.pub

Log in to the personal or corporate git website, in User Settings-->SSH Public Key, give the public key a meaningful name, and paste the generated public key into the public key input box (note to delete it Blank or newline character at the end of the public key), click Save, and that’s it.

Creation steps:
git config --local user.name "你的名字"
git config --local user.email "你的邮箱"
When the ssh-keygen command generates the SSH-KEY key pair file, you need to enter the file storage path. Give different names to different accounts
ssh-keygen -t rsa -C "test@126.com”
Host github.com
    HostName github.com
    User test@126.com
    PreferredAuthentications publickey
    IdentityFile /c/Users/用户名/.ssh/ssh/id_rsa_github
Host oschina.com
    HostName oschina.com
    User test@126.com
    PreferredAuthentications publickey
    IdentityFile /c/Users/用户名/.ssh/ssh/id_rsa_github
Host gitee.com
  HostName gitee.com
  User test@126.com
  PreferredAuthentications publickey
IdentityFile /c/Users/用户名/~ssh/id_rsa_giteeHostName is the address of the server, User is the user name, PreferredAuthentications is the verification method, IdentityFile is the private key file path
It is divided into two situations, one is that there is no warehouse, and the other is that there is an existing warehouse. Let’s look at the first one first, create a warehouse from scratch, and then push it to the remote
git init 目录名 新建一个本地仓库
git add README.md -- 将README.md文件加入到仓库中
git commit -m "提交描述" -- 将文件提交到本地仓库
git remote add origin "远程仓库地址" -- 添加远程仓库,origin是一个远程主机的别名,名称可以随意取,一个远程主机上可以有多个远程仓库
git push -u origin master -- 将本地仓库push到远程主机origin的master分支,并将origin设为默认远程主机 -u参数设置默认远程主机,后续push代码,不写主机名的话,就是默认主机
git clone /path/to/repository                                                             // 克隆本地库
git clone  git/ssh/http[s]/ftp[s]/file/rsync:username@ip/path/to/repository               // 克隆远端库
git clone的本质就是把Git目录里面的内容拷贝过来,一般Git目录里有成千上万的各种对象(提交对象,树对象,二进制对象, tag对象......),如果逐一复制的话,其效率就可想而知。如果通过git、ssh协议传输,服务器端会在传输前把需要传输的各种对象先打好包再进行传输;而http(s)协议则会反复请求要传输的不同对象。如果仓库里面的提交不多的话,前者和后者的效率相差不多;但若仓库里有很多提交的话,git、ssh协议进行传输效率更高。不过现在Git对http(s)协议传输Git仓库做了一定的优化,http(s)传输现在也能达到ssh协议的效率 。


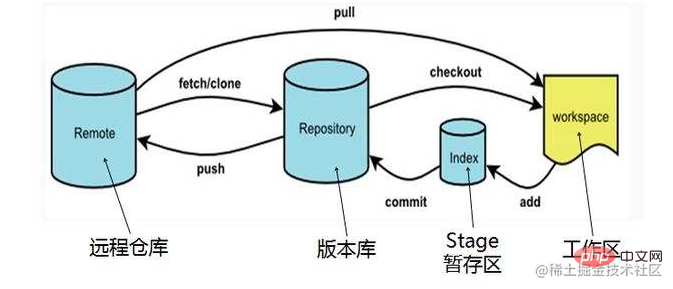
如果你不清楚git add ,git commit ,git push都做了什么,那可能是因为你不知道git仓库存储区管理方式。git将本地的代码保存分为三个存储空间。

分支是用来将特性开发绝缘开来的。在你创建仓库的时候,master 是“默认的”分支。在其它分支上进行开发,完成后再将它们合并到主分支上。

git branch       查看本地所有的分支
git branch -r    查看远程所有分支
git branch -vv   查看本地分支和远程分支的追踪关系
git checkout 分支名
git checkout -b  新分支名  // 从当前所处的本地分支下,创建一个新分支,分支名建议以 feature-YYYYMMDD-开发功能概述-姓名简称,这样的格式命名
git checkout -b  新分支名  远程主机名/远程分支名  // 从远程分支创建一个新分支,并追踪远程分支
git branch -m 旧名称 新名称
git branch -D 分支名 // 先切换到别的分支名下,删除本地分支
git push --delete 远程主机 远程分支名 // 删除远程分支
git merge 当前分支要合并的分支名 -m '合并备注'
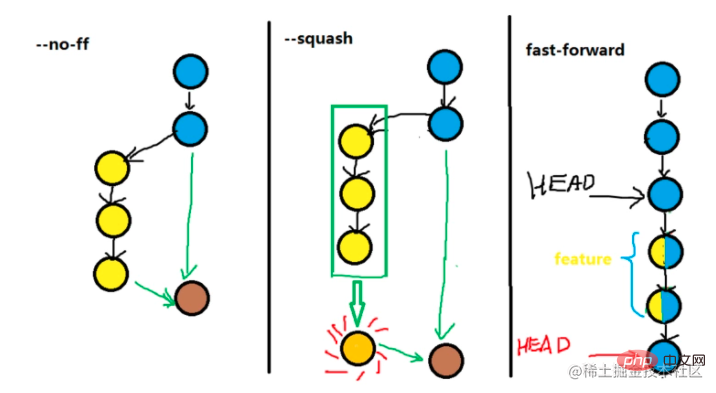
git merge --no-ff  当前分支要合并的分支名 // 保留分支合并之前的历史提交记录
git merge --squash 当前分支要合并的分支名 // 将分支合并之前多次提交记录合并为一次

git rebase -i [startpoint] [endpoint]
其中-i的意思是--interactive,即弹出交互式的界面让用户编辑完成合并操作,[startpoint] [endpoint]则指定了一个编辑区间,如果不指定[endpoint],则该区间的终点默认是当前分支HEAD所指向的commit
以合并最近三次的提交记录为例:
git rebase -i HEAD~3
弹出如下界面:

上面未被注释的部分列出的是我们本次rebase操作包含的所有提交,下面注释部分是git为我们提供的命令说明。每一个commit id 前面的pick表示指令类型,git 为我们提供了以下几个命令:
| 命令 | 说明 |
|---|---|
| pick | 保留该commit(缩写:p) |
| reword | 保留该commit,但我需要修改该commit的注释(缩写:r) |
| edit | 保留该commit, 但我要停下来修改该提交(不仅仅修改注释)(缩写:e) |
| squash | 将该commit和前一个commit合并(缩写:s) |
| fixup | 将该commit和前一个commit合并,但我不要保留该提交的注释信息(缩写:f) |
| exec | 执行shell命令(缩写:x) |
| drop | 我要丢弃该commit(缩写:d) |
根据需要编辑完之后保存即可。
git rebase生成的历史记录线比较好看,merge比rebase有更多的历史记录,一方认为,合并分支不能仅仅为了好看,而要记录某个分支完整开发历史,一根直线的历史,很难分辨出开发历程和工作分配,如果开发过程跌跌撞撞,要进行如实记录,遍于后期改进。
另一方认为,在开发过程中,如果某个分支功能比较多, commit量比较多时,使用rebase可以将当前分支提交记录整理过后再合并回主干,这样主干的演变轨迹线会看着比较美观,比较清晰。如果项目成员对git用得比较熟练,建议使用git rebase,否则建议使用git merge,便于查看提交历史。
冲突的原因是两个不同的开发者改了相同文件相同位置的代码,冲突提示,
$ git merge conflict-branch

Auto-merging index.html

CONFLICT (content): Merge conflict in index.html

Automatic merge failed; fix conflicts and then commit the result.
文件冲突,HEAD到=======之间的是当前分支,=======到>>>>>>>之间的是冲突分支的内容,最后面是冲突分支名
<<<<<<< HEAD
id="footer">contact : email.support@github.com
=======
id="footer"> please contact us at support@github.com
>>>>>>> conflict-branch
合并冲突的原则是取最大公约数,共同的部分只保留一份,有差异的地方多方都保留 遇到冲突,难于解决,想回退到未合并之前的状态,使用
git merge --abort
解决完冲突文件之后,要重新添加文件到暂存区和本地版本库。
另外一种场景是git pull最新的代码后,git stash pop引起冲突,想回退到最新没冲突之前的代码,使用指令
git reset --hard HEAD
追踪分支主要用来对比当前和远程分支的版本, 比如说origin/master分支比master多提交了两次,意味着你需要将origin/master的分支更新到master。
git branch --set-upstream-to=远程主机名/远程分支名 本地分支名(可不写,不写表示当前分支)
在仓库根目录下新建.gitignore文件,文件名不可更改。在Win系统下,不允许新建以.开头的文件或文件夹,因此需要在Git Bash中新建,命令如下:
cd 本地代码仓库目录
vim .gitignore
# 以#开头的行都是注释
# 忽略*.o和*.a文件(常见的编译过程中产生的文件)
 *.[oa]
# 忽略*.c和*.C文件,somefile.c除外,!用于在在某规则之后增加例外
*.[cC]
!somefile.c
# 忽略somepath文件和somepath目录
somepath
# 只忽略somepath目录,不忽略somepath文件
somepath/ # 只忽略somepath文件,不忽略somepath目录
somepath
!somepath/
# 只忽略当前目录下的somepath文件和目录,子目录的somepath不在忽略范围内
/somepath
7.3 忽略文件的原则
7.4 忽略已经添加到远程仓库的文件 ( 如果文件重要,要提前备份)
git rm –cached xxx
git rm -r –cached
在.gitignored中添加需要过滤的文件
commit, push提交.gitignore 配置这个后其他成员pull后working directory中对应的文件会删除,
git 切换分支时,如果当前分支的功能没有开发好,不具备提交的条件, 如果不对这些内容做暂存处理,会被带入到切换之后的分支,给代码管理带来不必要的麻烦。这时就需要对尚未开发完成的进度进行存储操作。
git stash save "备注说明"    // 暂存尚未开发完成的进度
git stash list              // 查看暂存进度
git stash pop stash@{1}     // 恢复指定进度到工作区,stash_id是通过git stash list命令得到的,如果不指定,恢复最新的进度到工作区
git stash drop [stash_id]   // 如果不指定stash_id,则默认删除最新的存储进度。
git stash clear // 删除所有暂存内容git add dir1 # 添加dir1这个目录,目录下的所有文件都被加入 git add f1 f2 # 添加f1,f2文件 git add -u # -u是update的缩写,只监听已经被加入的文件,包括修改和删除,不包括新增的文件和.gitignore中设置的忽略文件 添加到暂存区 git add . # 监听工作区的状态树,把工作区状态树的所有变化提交到暂存区, 包括新增的和修改的,不包括删除的文件和.gitignore中设置的忽略文件 git add -A # 等于 git add . + git add -u 不包括.gitignore中要忽略的文件 git add * # 等同git add -A
git commit -m    "代码提交信息"
git commit -a -m "代码提交信息"      # -a是把unstaged的文件变成staged(不包括新建的文件),然后commit
git commit --amend                 # 修改提交的commit(没有push)
git commit --amend -m "comment"    # 修改commit注释
 git push   <远程主机名> <本地分支名>:<远程分支名>
 git push -f <远程主机名> <本地分支名>:<远程分支名> // 强制推送
git push命令使用时常见的四种情况:
| git push | If the remote branch is omitted, as above, it means pushing the local branch to it There is a remote branch with a tracking relationship (usually both have the same name). If the remote branch does not exist, it will be created |
|---|---|
| git push | If the local branch name is omitted, it means deleting the specified remote branch, because this is equivalent to pushing an empty local branch to the remote branch, which is equivalent to git push origin -- delete remote branch |
| git push | If there is a tracking relationship between the current branch and the remote branch, both the local branch and the remote branch can be omitted. Push the current branch to the corresponding branch on the remote host |
| git push | If the current branch has only one remote branch, the host name can be omitted |
git fetch <远程主机名> <远程分支名>:<本地分支名>
git pull   <远程主机名> <远程分支名>:<本地分支名>  // 等于git fetch+git merge
git pull 常见的四种省略参数的情况,与git push比较类似。这里就不再赘述。git pull除了更新和自动合并当前代码之外,还有更新仓库所有分支的功能,注意是更新分支,不是更新分支上的代码。
回退命令
git checkout --  #撤销工作区修改,省略filename,就是放弃工作区所有的改动

git log --pretty=oneline --abbrev-commit    #查看version_hash

git reset version_hash --[soft|mixed|hard]  #本地仓库回退到某个版本
# --soft       回退commit,stage和workspace仍旧保留改动
# --mixed      回退commit和stage,git reset默认的模式,只有工作区保留改动
# --hard       回退commit stage workspace 所有的改动都会丢失

git push  -f 远程主机名 远程分支  #强制远程仓库回退到本地仓库版本
回退流程
1.备份当前分支
git checkout -b the_branch_backup
2.本地仓库版本回退
git log --pretty=oneline --abbrev-commit #查看回退版本号
git reset --hard the_commit_id #本地仓库版本回退复制代码
3.远程仓库回退
git push origin :the_branch //删除远程 the_branch
4. 用回滚后的本地分支重新建立远程分支
git push origin the_branch
5.回退成功,删除本地备份分支
git branch -D the_branch_backup
Git的版本回退速度非常快,因为Git在内部有个指向当前版本的HEAD指针,当你回退版本的时候,Git仅仅是把HEAD从指向回退版本
提交代码时提交错了分支的处理方法
git log --pretty=oneline --abbrev-commit   #查看 提交之前的commit_id
git reset commit_id                        #本地版本库回退
git stash                                  #暂存工作区和暂存区改动
git checkout target_branch                 #切换到正确的分支
git stash pop                              #恢复代码
git add -A && git commit - m '备注'
(1) git reset只能针对本地操作,如果本地删除的内容已经推送到远程仓库,下一次更新时,被删除的内容会恢复。git revert可以对对远程服务器执行回退操作。下一次更新时,本地被删除的文件,不会恢复。
(2) git revert会使提交记录增多,git revert是撤销指定版本的提交,会产生一个新的提交记录,git reset会使提交记录减少,git reset是回卷,会撤销指定版本之后的所有提交记录
revert后如果不想撤销了,看一下log,reset就可以回去了。
git log                         # 查看commit_id
git reset --hard commit_d       # 回退本地仓库,暂存区,工作区
reset后后悔了怎么办,没有log了,怎么办? 没关系,用git reflog命令可以查到更多commit_id:
git reflog                       # 查看所有的命令操作记录,可以查询到git reset之前的commit_id
git reset --hard commit_id       # 就可以回退会reset以前状态了。
在git中,总是有后悔药可以吃的,git reflog 记录你操作的每一条指令,HEAD指向的版本是当前版本,Git允许我们使用命令git reset --hard commit_id在历史版本之间穿梭。穿梭前,用git log可以查看提交历史,以便确定要回退到哪个版本。要重返未来,用git reflog查看命令历史,以便确定要回到未来的哪个版本。
git cherry-pick命令的作用,就是在当前分支上,把其它分支的提交记录合并过来,这在两个版本刚开始说要一起上线,后来一个版本不上线了,而代码都搅合在发布分支,要撤销不上线的代码时,配合git reset指令,可以轻松实现发布分支不上线功能的代码下撤。
 a1 - a2 - a3 - a4       A
         \
b1 - b2 - b3 B现在将b2提交应用到A分支。
# 切换到 A 分支$ git checkout A# Cherry pick 操作$ git cherry-pick b2复制代码
操作完成以后,代码库就变成:
 a1 - a2 - a3 - a4 - b2     A
         \
b1 - b2 - b3 B合并多个提交的操作指令是:
git cherry-pick <Hash-b1> <Hash-bN>
当我们需要删除暂存区或版本库上的文件, 同时工作区也不需要这个文件了, 可以使用git rm
git rm file_path
git commit -m 'delete somefile'
git push
当我们需要删除暂存区或版本库的文件, 但本地又需要使用, 只是不希望这个文件被版本控制, 可以使用 git rm --cached
git rm --cached file_path
git commit -m 'delete remote somefile'
git push
推荐两条简写提交日志格式设置参数, lm-不显示提交记录汇总信息 lms-会现在提交记录汇总信息
# 提交记录hash值是红色 提交描述是蓝色 提交日期是绿色 提交者是深蓝色 git config --global alias.lm "log --no-merges --color --date=format:'%Y-%m-%d %H:%M:%S' --pretty=format:'%Cred%h %Creset- %Cblue%s %Cgreen(%cd) %C(bold blue)<%an>'" # 有提交记录汇总信息 提交记录hash值是红色 提交描述是蓝色 提交日期是绿色 提交者是深蓝色 git config --global alias.lms "log --no-merges --color --stat --date=format:'%Y-%m-%d %H:%M:%S' --pretty=format:'%Cred%h %Creset- %Cblue%s %Cgreen(%cd) %C(bold blue)<%an>'"
命令浅析:
--no-merges:不显示分支合并日志
%h:简短hash提交字符串
%cd:提交日期
%an:提交者
%s:提交说明
%C+颜色值+内容=给内容设置相应的颜色
看看这两种风格的注释是不是看着更优雅,更舒服![[Organization and Sharing] Some common git commands](https://img.php.cn/upload/article/000/000/068/58683c54539523372672d262d9a3f0f6-9.png)
![[Organization and Sharing] Some common git commands](https://img.php.cn/upload/article/000/000/068/232a9a8aa37ecf0f54883e9fa38042f0-10.png)
在软件发布时创建标签,建一个发布版本的里程碑,是被推荐的。
#查询版本号
git log --pretty=oneline --abbrev-commit

#创建tag
git tag v1.0.0 1b2e1d63ff  -m '20210123 created'

#推送某个tag到远程仓库
git push origin tag_name

# 一次性推送所有tag到远程服务器
git push origin --tags
# 查看某个tag记录
git show tag-name

# 查看所有的tag
git tag -ln  # 加-ln,查看tag简略信息
// 取出打过tag的某个版本
 git checkout -b branch_name tag_name
#删除本地的tag命令是
git tag -d tag-name

#删除远程tag的命令是
git push origin --delete tag-name
#镜像名称不是随意起的,要与docker配置名称对应
image: node:lts

# 要缓存的东西
cache:
  key: ${CI_COMMIT_REF_SLUG}
  paths:
    - node_modules/
    - .yarn-cache/

variables:
  APP_NAME: 'alp-crm-ng'

stages:
  - format
# 预处理命令
before_script:
  - echo "before_script"
  - node -v
  - yarn -v
  - yarn install --cache-folder .yarn-cache

format:
  stage: format
  script:
- yarn formatgit checkout 的分支不存在.git文件夹引起的
git rm -r --cached .
3. 合并代码,推荐用如下命令,比git merge更好用。
git pull origin remote_need_merge_branch_name
 git pull --tags origin hotfix/20210707-hide-fund-rate
From gitlab.tengmoney.com:tengmoney-fe/caizhi-minipro-cscb
 * branch            hotfix/20210707-hide-fund-rate -> FETCH_HEAD
 ! [rejected]        v1.2.0     -> v1.2.0  (would clobber existing tag)
这是因为tag被删除了,又新建了一个一模一样的tag,解决方案是,强制刷新一下远程的所有tag
git fetch --tags -f
5. .gitignore文件中设置的忽略文件不生效的解决方法,.gitignore中设置的忽略规则,是针对未添加到版本管理的文件而言,对已添加到版本库的文件不生效。解决方法是将所有文件先从版本库删除,再重新添加一遍。

git rm --cached 要删除的xxx文件夹或文件
6. Could not retrieve the pipeline status. ---- 无法检索流水线状态。
这种报错是因为没有流水线文件所致。
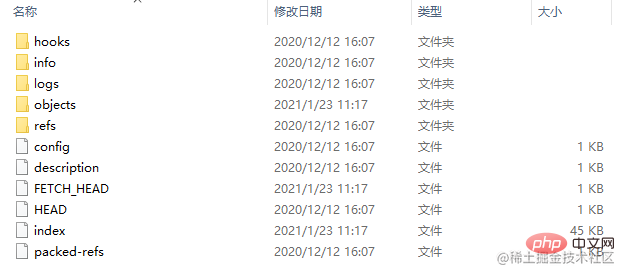
原因:git工程的.git/refs目录下跟踪的某些git分支,在pull时候发现与远程仓库对应的分支refs不同,因此导致 git pull 失败
$ git push -force了test这个分支,导致远程仓库的分支被覆盖,而你本地的refs则会与远程仓库的分支不一致,产生问题;解决方法:
git update-ref -d xxx 删除本地.git下的xxx文件8. The following untracked working tree files would be overwritten by merge,
原因: 远端将某个文件加入了仓库,本地把这个文件从仓库中移除了,就会出现这样的提示。一般是同名文件,刚开始命名不规范,比如说文件名首字母大写,后面改成了小写文件。window系统不区分文件大小写,就出现这个问题。
解决方法:
方法1
git rm --cached filename
git push origin remote_branch
方法2
git clean -d -fx "src/httpTypes"
其中 d----删除未被添加到git的路径中的文件 x---删除忽略文件 对git来说不识别的文件 f ---强制运行 ,强制合并的思路走不通。
9. git默认对文件名称大小写不敏感,如果将原来小驼峰命名的文件改成了大驼峰,会发现本地git的改动文件提示,没有任何修改。解决方法就是执行
git config core.ignorecase false
删除之前小驼峰文件的操作指令是
git mv readme.md README.md
解决方法:删除重名分支 12. git checkout -b 创建新分支时,报fatal: cannot lock ref xxx
git 把分支信息存放在 .git/refs/heads 目录中,每个分支是一个文件。如果.git/refs/heads下存在同名目录,就会报这个错误。
![[Organization and Sharing] Some common git commands](https://img.php.cn/upload/article/000/000/068/7c723363938ce878aaf9a4c87fedbc92-12.png)
解决方法:
从一开始创建分支时,如果要创建一个以xxx为前缀的开发名,就要创建成xxx/test1这种格式。![[Organization and Sharing] Some common git commands](https://img.php.cn/upload/article/000/000/068/7c723363938ce878aaf9a4c87fedbc92-13.png)
更多编程相关知识,请访问:编程视频!!
The above is the detailed content of [Organization and Sharing] Some common git commands. For more information, please follow other related articles on the PHP Chinese website!
 Build your own git server
 The difference between git and svn
 git undo submitted commit
 Is python front-end or back-end?
 How to implement instant messaging on the front end
 The difference between front-end and back-end
 Introduction to the relationship between php and front-end
 How to undo git commit error