
 Web Front-end
Vue.js
Detailed explanation of how to use vue to encapsulate a custom calendar component
Web Front-end
Vue.js
Detailed explanation of how to use vue to encapsulate a custom calendar component
Detailed explanation of how to use vue to encapsulate a custom calendar component

How to develop a custom calendar vue component. The following article will teach you step by step how to encapsulate a custom calendar component. I hope it will be helpful to everyone!

As we all know, generally speaking, if a calendar component is needed in a project, it is often found in third-party UI libraries or ready-made components. Other third-party plug-ins. For many friends, when they first see the calendar component, they subconsciously think it is very complicated and have no way to start. But when I read the source code of this calendar plug-in, I found that it was not as complicated as I thought. I used to foolishly think that if I wanted to make a calendar component, I would need to obtain calendar data for at least ten years before and after the current year before proceeding with the next step of development.
However, after I tried to read the source code of dycalendar.js, on the one hand, I felt that I was too stupid and thought of the problem too complicated. I also admire the author's clear thinking. After reading it, I felt that I benefited a lot.
After sorting out the author's idea logic, I developed a vue component based on this idea. As shown in the picture below:
#Next, follow me to see how to develop your own calendar component. [Related recommendations: vuejs video tutorial, web front-end development]
Core code implementation
1. Sorting out ideas
- Get the target date data
- Get the important attributes of the current date, such as
current year,current month,current date,The current day of the week,The total number of days in the current month,The first day of the current month corresponds to the day of the week,The total number of days in the last month How many daysto wait. - Based on these attributes, generate a specific
calendar date data list, and then render it into the template in a loop. - When switching months, obtain various key data corresponding to the new target date. After vue detects changes in calendar attributes, the notification page is updated.
2. Data required for initialization
Generally speaking, in mature calendar components, the date is a two-way bound variable. For ease of use, we also use two-way binding.
<script>import { reactive, ref, computed, watch } from "vue";const props = defineProps({  modelValue: Date,
});const emits = defineEmits(["update:modelValue"]);/**
 * 最小年份
 */const MIN_YEAR = 1900;/**
 * 最大年份
 */const MAX_YEAR = 9999;/**
 * 目标日期
*/const targetDate = ref(props.modelValue);复制代码</script>Next, we also need to initialize some constants to represent the month and date:
/**
 * 有关月度的名称列表
 */const monthNameList = {  chineseFullName: [    "一月",    "二月",    "三月",    "四月",    "五月",    "六月",    "七月",    "八月",    "九月",    "十月",    "十一月",    "十二月",
  ],  fullName: [    "January",    "February",    "March",    "April",    "May",    "June",    "July",    "August",    "September",    "October",    "November",    "December",
  ],  mmm: [    "Jan",    "Feb",    "Mar",    "Apr",    "May",    "Jun",    "Jul",    "Aug",    "Sep",    "Oct",    "Nov",    "Dec",
  ],
};/**
 * 有关周几的名称列表
 */const dayNameList = [
  {    chineseFullName: "周日",    chineseShortName: "日",    fullName: "Sunday",    shortName: "Sun",    dayNumber: 0,
  },
  {    chineseFullName: "周一",    chineseShortName: "一",    fullName: "Monday",    shortName: "Mon",    dayNumber: 1,
  },
  {    chineseFullName: "周二",    chineseShortName: "二",    fullName: "Tuesday",    shortName: "Tue",    dayNumber: 2,
  },
  {    chineseFullName: "周三",    chineseShortName: "三",    fullName: "Wednesday",    shortName: "Wed",    dayNumber: 3,
  },
  {    chineseFullName: "周四",    chineseShortName: "四",    fullName: "Thursday",    shortName: "Thu",    dayNumber: 4,
  },
  {    chineseFullName: "周五",    chineseShortName: "五",    fullName: "Friday",    shortName: "Fri",    dayNumber: 5,
  },
  {    chineseFullName: "周六",    chineseShortName: "六",    fullName: "Saturday",    shortName: "Sat",    dayNumber: 6,
  },
];复制代码Next, prepare several vue responsive data:
/**
 * 今日
 */const today = new Date();/**
 * 日历的各项属性
 */const calendarProps = reactive({  target: {    year: null,    month: null,    date: null,    day: null,    monthShortName: null,    monthFullName: null,    monthChineseFullName: null,    firstDay: null,    firstDayIndex: null,    totalDays: null,
  },  previous: {    totalDays: null,
  },
});/**
 * 用于展现的日历数据
*/const calendarData = ref([]);复制代码3 , Initialize the various attributes of the calendar
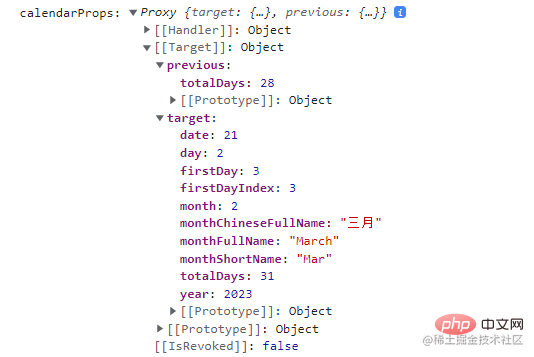
Next, obtain the various attributes of the calendar through the setCalendarProps method, and fill in the data in calendarProps one by one:
function setCalendarProps() {  if (!targetDate.value) {
    targetDate.value = today;
  }  // 获取目标日期的年月日星期几数据
  calendarProps.target.year = targetDate.value.getFullYear();
  calendarProps.target.month = targetDate.value.getMonth();
  calendarProps.target.date = targetDate.value.getDate();
  calendarProps.target.day = targetDate.value.getDay();  if (
    calendarProps.target.year  MAX_YEAR
  ) {    console.error("无效的年份,请检查传入的数据是否是正常");    return;
  }  // 获取到目标日期的月份【中文】名称
  let dateString;
  dateString = targetDate.value.toString().split(" ");
  calendarProps.target.monthShortName = dateString[1];
  calendarProps.target.monthFullName =
    monthNameList.fullName[calendarProps.target.month];
  calendarProps.target.monthChineseFullName =
    monthNameList.chineseFullName[calendarProps.target.month];  // 获取目标月份的第一天是星期几,和在星期几中的索引值
  const targetMonthFirstDay = new Date(
    calendarProps.target.year,
    calendarProps.target.month,    1
  );
  calendarProps.target.firstDay = targetMonthFirstDay.getDay();
  calendarProps.target.firstDayIndex = dayNameList.findIndex(    (day) => day.dayNumber === calendarProps.target.firstDay
  );  // 获取目标月份总共多少天
  const targetMonthLastDay = new Date(
    calendarProps.target.year,
    calendarProps.target.month + 1,    0
  );
  calendarProps.target.totalDays = targetMonthLastDay.getDate();  // 获取目标月份的上个月总共多少天
  const previousMonth = new Date(
    calendarProps.target.year,
    calendarProps.target.month,    0
  );
  calendarProps.previous.totalDays = previousMonth.getDate();
}复制代码One thing to note is that when getting the number of days in this month and the number of days in last month, the date value is set to
0. This is because when the date value is0, the returned Date object is the last day of the previous month. So, in order to get the number of days in this month, you need to add1to the month value of this month.
After executing this method, the value of calendarProps at this time is:
4. Generate calendar dates based on calendar attributes The data
When we already knowThe day of the week index value corresponding to the first day of this month,How many days are there in this monthandThe total number of days in last month How many daysAfter these three core data, you can start to generate the corresponding calendar data.
The idea is as follows:
- Since in most cases, the first day of this month does not start from the beginning, the previous part is the date of the previous month . So the first line needs to be processed separately.
- Set a public date value, and the initial value is set to
1. Then start incrementing from the day of the week index value corresponding to the first day of this month. Set an algorithm to calculate dates before and after this month. In order to facilitate date switching and style differentiation later, the generated data is processed into an object, which contains the date type - - dateType
, indicating whether it is this month, the previous month, or the next month;
/**
 * 生成日历的数据
 */function setCalendarData() {  let i;  let date = 1;  const originData = [];  const firstRow = [];  // 设置第一行数据
for (i = 0; i calendarData.
5. Add the template and style part
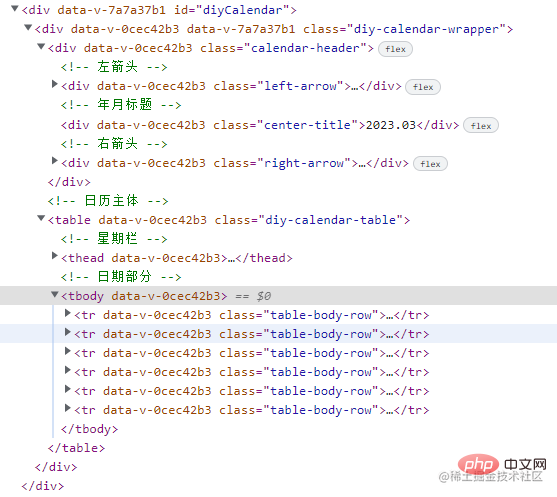
Generally speaking, calendar components have a grid-like structure, so I choose the table method for rendering. But if you ask me if there are other ways, there are still some, such as using flex layout or grid layout, but if this method is used, the data structure of calendarData will not be what it is now.
The dom structure is as shown below:
As for the flowing effect of the button border, I made it with reference to Su Su’s article. For details, please see:
Clip-path implements button flowing border animationjuejin.cn/post/719877…
Then the remaining style part can be improvised or based on UI design Just draw the picture. I believe you all have experienced the exquisite design drawings of UI sisters (heehee
The specific code part will not be posted in the article. If necessary, you can directly view the complete source code below
Conclusion
Some components that feel very troublesome may have core logic that is not so Complex. Sometimes, you may just need some patience, disassemble the code line by line, read it, and clarify the ideas.
(Learning video sharing: vuejs introductory tutorial,Basic Programming Video)
The above is the detailed content of Detailed explanation of how to use vue to encapsulate a custom calendar component. For more information, please follow other related articles on the PHP Chinese website!

Hot AI Tools

Undresser.AI Undress
AI-powered app for creating realistic nude photos

AI Clothes Remover
Online AI tool for removing clothes from photos.

Undress AI Tool
Undress images for free

Clothoff.io
AI clothes remover

Video Face Swap
Swap faces in any video effortlessly with our completely free AI face swap tool!

Hot Article
Hot Tools

Notepad++7.3.1
Easy-to-use and free code editor

SublimeText3 Chinese version
Chinese version, very easy to use

Zend Studio 13.0.1
Powerful PHP integrated development environment

Dreamweaver CS6
Visual web development tools

SublimeText3 Mac version
God-level code editing software (SublimeText3)
Hot Topics
 1387
1387
 52
52

 PHP and Vue: a perfect pairing of front-end development tools
Mar 16, 2024 pm 12:09 PM
PHP and Vue: a perfect pairing of front-end development tools
Mar 16, 2024 pm 12:09 PM
PHP and Vue: a perfect pairing of front-end development tools. In today's era of rapid development of the Internet, front-end development has become increasingly important. As users have higher and higher requirements for the experience of websites and applications, front-end developers need to use more efficient and flexible tools to create responsive and interactive interfaces. As two important technologies in the field of front-end development, PHP and Vue.js can be regarded as perfect tools when paired together. This article will explore the combination of PHP and Vue, as well as detailed code examples to help readers better understand and apply these two
 Graphviz Tutorial: Create Intuitive Data Visualizations
Apr 07, 2024 pm 10:00 PM
Graphviz Tutorial: Create Intuitive Data Visualizations
Apr 07, 2024 pm 10:00 PM
Graphviz is an open source toolkit that can be used to draw charts and graphs. It uses the DOT language to specify the chart structure. After installing Graphviz, you can use the DOT language to create charts, such as drawing knowledge graphs. After you generate your graph, you can use Graphviz's powerful features to visualize your data and improve its understandability.
 Questions frequently asked by front-end interviewers
Mar 19, 2024 pm 02:24 PM
Questions frequently asked by front-end interviewers
Mar 19, 2024 pm 02:24 PM
In front-end development interviews, common questions cover a wide range of topics, including HTML/CSS basics, JavaScript basics, frameworks and libraries, project experience, algorithms and data structures, performance optimization, cross-domain requests, front-end engineering, design patterns, and new technologies and trends. . Interviewer questions are designed to assess the candidate's technical skills, project experience, and understanding of industry trends. Therefore, candidates should be fully prepared in these areas to demonstrate their abilities and expertise.
 Is Django front-end or back-end? check it out!
Jan 19, 2024 am 08:37 AM
Is Django front-end or back-end? check it out!
Jan 19, 2024 am 08:37 AM
Django is a web application framework written in Python that emphasizes rapid development and clean methods. Although Django is a web framework, to answer the question whether Django is a front-end or a back-end, you need to have a deep understanding of the concepts of front-end and back-end. The front end refers to the interface that users directly interact with, and the back end refers to server-side programs. They interact with data through the HTTP protocol. When the front-end and back-end are separated, the front-end and back-end programs can be developed independently to implement business logic and interactive effects respectively, and data exchange.
 Exploring Go language front-end technology: a new vision for front-end development
Mar 28, 2024 pm 01:06 PM
Exploring Go language front-end technology: a new vision for front-end development
Mar 28, 2024 pm 01:06 PM
As a fast and efficient programming language, Go language is widely popular in the field of back-end development. However, few people associate Go language with front-end development. In fact, using Go language for front-end development can not only improve efficiency, but also bring new horizons to developers. This article will explore the possibility of using the Go language for front-end development and provide specific code examples to help readers better understand this area. In traditional front-end development, JavaScript, HTML, and CSS are often used to build user interfaces
 Django: A magical framework that can handle both front-end and back-end development!
Jan 19, 2024 am 08:52 AM
Django: A magical framework that can handle both front-end and back-end development!
Jan 19, 2024 am 08:52 AM
Django: A magical framework that can handle both front-end and back-end development! Django is an efficient and scalable web application framework. It is able to support multiple web development models, including MVC and MTV, and can easily develop high-quality web applications. Django not only supports back-end development, but can also quickly build front-end interfaces and achieve flexible view display through template language. Django combines front-end development and back-end development into a seamless integration, so developers don’t have to specialize in learning
 Visualization technology of PHP data structure
May 07, 2024 pm 06:06 PM
Visualization technology of PHP data structure
May 07, 2024 pm 06:06 PM
There are three main technologies for visualizing data structures in PHP: Graphviz: an open source tool that can create graphical representations such as charts, directed acyclic graphs, and decision trees. D3.js: JavaScript library for creating interactive, data-driven visualizations, generating HTML and data from PHP, and then visualizing it on the client side using D3.js. ASCIIFlow: A library for creating textual representation of data flow diagrams, suitable for visualization of processes and algorithms.
 Combination of Golang and front-end technology: explore how Golang plays a role in the front-end field
Mar 19, 2024 pm 06:15 PM
Combination of Golang and front-end technology: explore how Golang plays a role in the front-end field
Mar 19, 2024 pm 06:15 PM
Combination of Golang and front-end technology: To explore how Golang plays a role in the front-end field, specific code examples are needed. With the rapid development of the Internet and mobile applications, front-end technology has become increasingly important. In this field, Golang, as a powerful back-end programming language, can also play an important role. This article will explore how Golang is combined with front-end technology and demonstrate its potential in the front-end field through specific code examples. The role of Golang in the front-end field is as an efficient, concise and easy-to-learn
