

An in-depth analysis of Node's process management tool 'pm2”

This article will share with you Node's process management tool "pm2", and talk about why pm2 is needed, how to install and use pm2, I hope it will be helpful to everyone!

PM2 Introduction
PM2 is a node process management tool with a built-in load balancer. You can use it to simplify many tedious tasks of node application management, such as performance monitoring, automatic restart, load balancing, etc., and it is very simple to use. PM2 is perfect when you want your standalone code to utilize all CPUs on all servers and ensure that the process is always alive with 0-second reloads.
PM2 official website address: https://pm2.keymetrics.io/docs/usage/quick-start/
Why do you need pm2?
There are many pain points in Nodejs development at present, because node itself is a single-threaded application. Its characteristic is that all methods are executed serially at once, and node does not have the ability to create alone like Java. A new thread is used to implement asynchronous operations. If it encounters blocking during I/O execution, it will reduce the execution efficiency of the entire application, leading to unfavorable reasons such as high CPU usage. [Related tutorial recommendations: nodejs video tutorial, Programming teaching]
Therefore, in this mode, one thread can only process one task. If you want to improve throughput Must pass multithreading. Although single-threading has many benefits, such as avoiding problems such as thread synchronization or deadlock, state synchronization, etc., as applications and computing power requirements are increasing day by day, the biggest disadvantage of single-threading is that it cannot take advantage of multi-core CPUs. advantages to improve operational efficiency. pm2 can deploy your application to all CPUs of the server, effectively solving this problem
Features
Built-in load balancing (using Node cluster cluster module)
Background operation
0 seconds downtime for reloading (no downtime required for maintenance and upgrades) ).
Startup script with Ubuntu and CentOS
Stop unstable processes (avoid infinite loops)
Console detection
Provide HTTP API
Remote control and real-time interface API (Nodejs module, allowing and PM2 process Manager interaction)
Installation
Just use npm to install globally. Of course, you can also use yarn to install
// npmnpm install -g pm2

// yarnyarn global add pm2
Basic commands
// 启动命令
pm2 start app.js // 启动nodeJs应用,进程的默认名称为文件名app
pm2 start app.js--name mynode // 启动node,并指定进程名称为mynode
pm2 start app.js - i max // 根据有效CPU数目启动最大进程数目
pm2 start app.js - i 3 // 启动3个进程
pm2 start app.js--watch // 实时监控的方式启动,app.js文件有变动时,pm2会自动reload
pm2 start app.js - x // 用fork模式启动 app.js 而不是使用 cluster
pm2 start app.js - x– - a 23 // 用fork模式启动 app.js 并且传递参数(-a 23)
pm2 start app.json // 启动进程, 在app.json里设置选项
pm2 start app.js - i max– - a 23 // 在 – 之后给 app.js 传递参数
pm2 start app.js - i max - e err.log - o out.log // 启动并生成一个配置文件

// 查看与监视进程
pm2 list | pm2 ls // 显示所有进程;
pm2 show 0 | pm2 info 0 // 查看进程id为0的详细信息
pm2 monit // 进入监视页面,监视每个node进程的CPU和内存的使用情况

// 停止、删除进程
pm2 stop 0 // 停止id为0的进程
pm2 stop all // 停止所有进程
pm2 delete 0 // 删除id为0的进程
pm2 delete all // 删除所有进程

// 重启、重载
pm2 restart 0 // 重启id为0的进程
pm2 restart all // 重启所有进程
pm2 reload 0 // 0秒停机重载id为0进程(用于 NETWORKED 进程)
pm2 reload all // 重载所有进程

// 日志操作
pm2 logs // 显示所有进程的日志
pm2 logs 0 // 显示进程id为0的日志
pm2 flush // 清空所有日志文件
pm2 reloadLogs // 重载所有日志
pm2 startup // 产生init脚本,保持进程活着

// 杀死PM2进程
pm2 kill
pm2 usage
There are two main ways to use pm2: command line and configuration file. Although the method of using the configuration file still requires the use of the command line to start, the main difference between the two is: (1) The command line method requires various configuration parameters to be entered on the command line. (2) The configuration file method places various configuration parameters in the configuration file.
For example: you need to start an application, specify the application name as newApp, and set the entry file path to index.js. Let’s take a look at how to change the application name and entry file path in two ways. Bring in two parameters
【1】Command line method
pm2 start index.js --name newApp
【2】Configuration file method
First we need to create a configuration file (pm2.config.js) , the content is as follows:
// 文件名为 pm2.config.js
module.exports = {
    apps: [{
        name: "newApp", // 应用名称
        script: "./index.js" // 入口文件
    }]
}Then enter the following content on the command line to indicate that the application will be started with the specified configuration file
pm2 start pm2.config.js
[3] Summary
By comparing the above two In this form, you can see that by using the configuration file, various parameters, environment variables and other contents can be persistently retained in the file, which facilitates batch management of various applications and avoids errors due to forgetting, mistakes, etc. on the command line. The reason is that the startup parameters are uncontrollable.
How to create a configuration file
You can create a Javascript file yourself or use the following command to generate a configuration file. One thing to note is that pm2 It is required that the file name of the configuration file must end with .config.js.
【1】Command generation
pm2 ecosystem
The name of the configuration file generated by the command is economy.config.js, and the format is as follows. You can find that this file exports an object, which has the apps attribute. This It is a list, each item in it corresponds to an application, and the configuration parameters of the corresponding application are set in the object of each sub-item. You can configure multiple applications in the configuration file.
module.exports = {
  apps : [{
    script: 'index.js',
    watch: '.'
  }, {
    script: './service-worker/',
    watch: ['./service-worker']
  }],

  deploy : {
    production : {
      user : 'SSH_USERNAME',      host : 'SSH_HOSTMACHINE',
      ref  : 'origin/master',
      repo : 'GIT_REPOSITORY',
      path : 'DESTINATION_PATH',      'pre-deploy-local': '',      'post-deploy' : 'npm install && pm2 reload ecosystem.config.js --env production',      'pre-setup': ''
    }
}};【2】Create by yourself
If you create a Javascript file by yourself, just create it according to the above format. Note that the file name must end with config.js.
[3] Note
Whether this configuration file is created through a command or created manually, there is no difference between the two as long as it conforms to the syntax. In addition to configuration files in the form of .js, pm2 also supports configuration files in the form of .json and .yml. There is essentially no difference in the forms of these three configuration files, and the parameter names are also exactly the same. The only difference lies in the way the parameters are presented.
案例
我们先创建几个项目文件用于演示,目录结构如下,demo1目录存放的项目project1用命令行方式使用pm2,demo2目录存放的项目project2和project3用配置文件方式使用pm2, 三个项目都是node.js项目,index.js是非常基础的 Koa 项目入口文件,ecosystem.config.js是配置文件,各自的 node_modules 文件中只安装了 koa 框架
pm2
├── demo1
    └── project1
|       ├── index.js
|       └── node_modules
└── demo2
    ├── ecosystem.config.js
    ├── project2
    │   ├── index.js
    │   └── node_modules
    └── project3
        ├── index.js
└── node_modules入口文件index.js代码如下,三个项目的port分别为 8001、8002、8003
'use strict'

const Koa = require('koa')
const app = new Koa()

const PORT = 8001 // 三个项目分别为 8001,8002,8003

app.use(ctx => {
    ctx.body = {
        NODE_ENV: process.env.NODE_ENV,
        url: ctx.url,
        port: PORT,
    }
})

app.listen(PORT)配置文件ecosystem.config.js 代码如下
module.exports = {
    apps: [{
        cwd: '../demo2/project2',
        name: 'project2',
        script: 'index.js',
        watch: ['.']
    },
        cwd: '../demo2/project3',
        name: 'project3',
        script: 'index.js',
        watch: ['.']
    }]
}【1】启动应用
命令行方式:pm2 start xxx.js
配置文件方式:pm2 start || pm2 start ecosystem.config.js
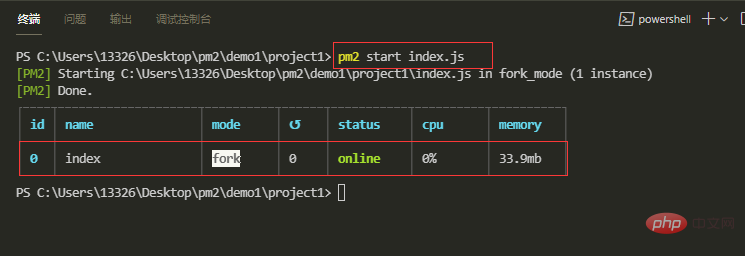
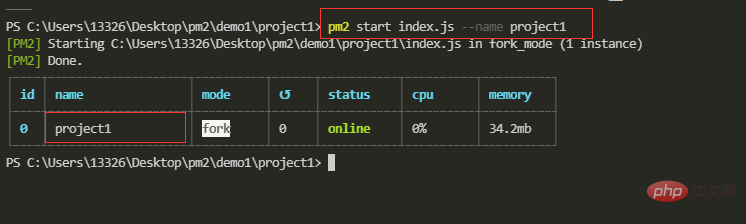
我们使用命令行方式启动project1应用,进入到project文件目录,运行pm2 start index.js命令,我们没有在命令中设定任何参数,pm2 会自动按照默认参数值进行执行。例如自动将入口文件的文件名index作为应用名称。几乎每一次命令执行完成后,pm2 都会显示一个应用列表(如下图所示),接着你就可以在网页中输入:localhost:8001查看project1项目
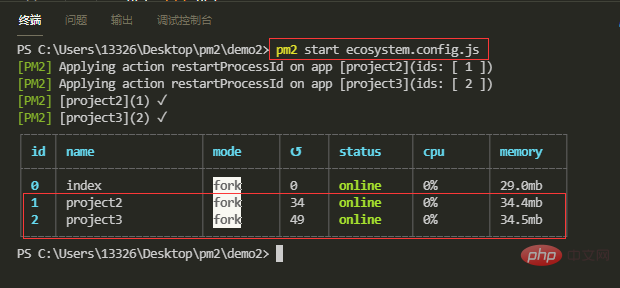
我们接着使用配置文件方式启动project2和project3应用,因为两个应用的配置在同一个文件,因此我们只需要运行一次配置文件,启动成功后可在网页中访问localhost:8002和localhost:8003
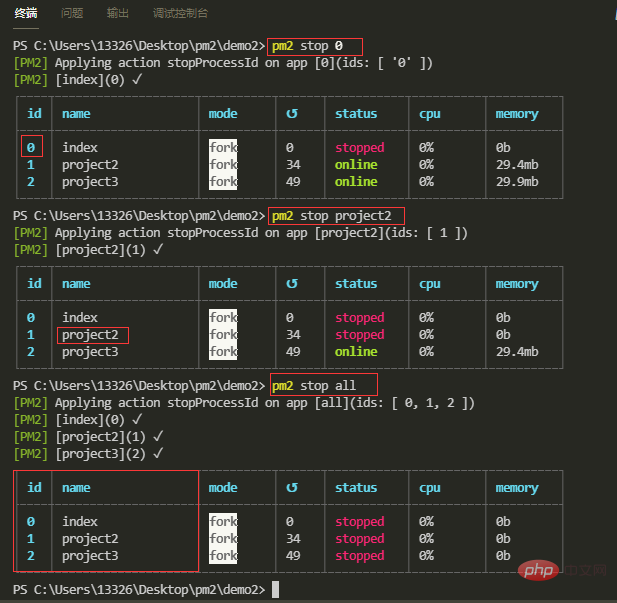
【2】停止应用
使用id停止:pm2 stop
使用name停止:pm2 stop
停止所有应用:pm2 stop all
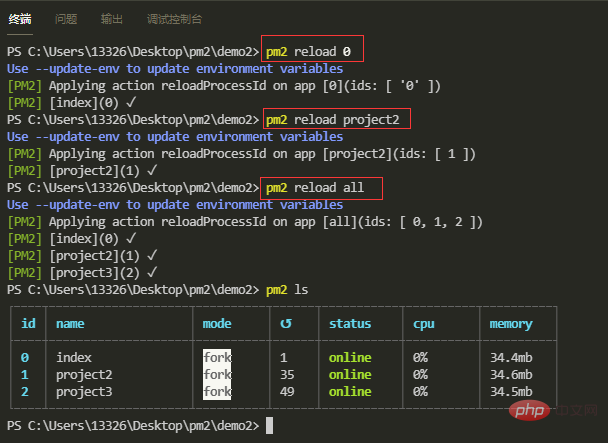
【3】重启应用
使用id重启:pm2 reload
使用name重启:pm2 reload
重启所有应用:pm2 reload all
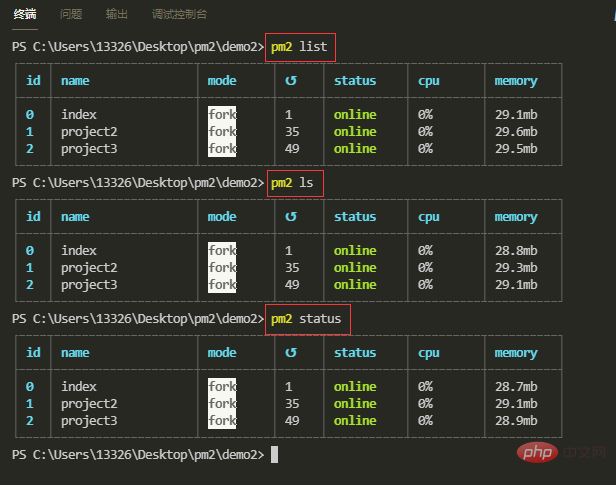
【4】显示应用列表
pm2 list
pm2 ls
pm2 status
【5】以JSON格式显示应用列表
pm2 jlist
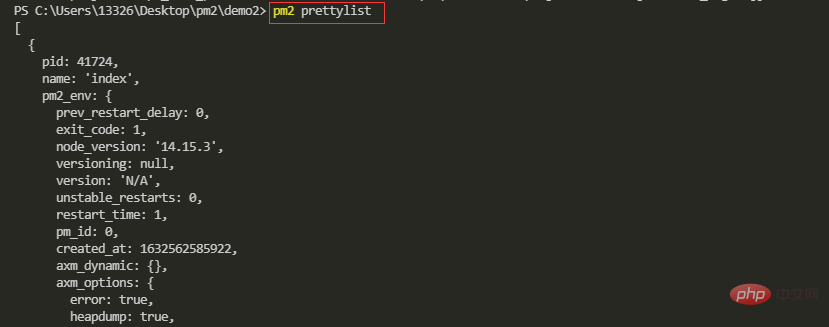
pm2 prettylist
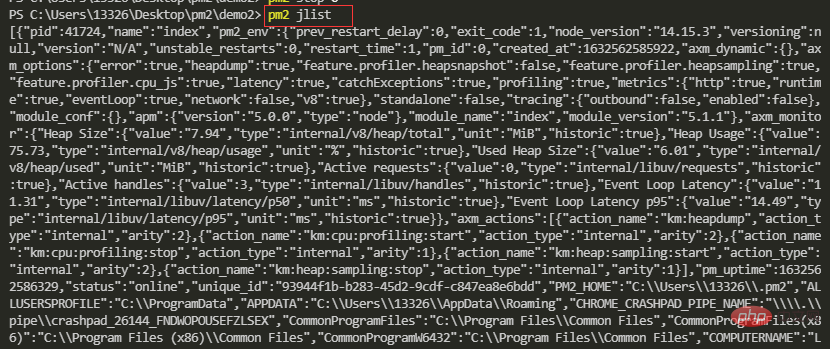
使用 pm2 jlist 命令,你会发现输出的内容很乱,你可以使用 pm2 prettylist 命令来输出优化过的 JSON 格式内容
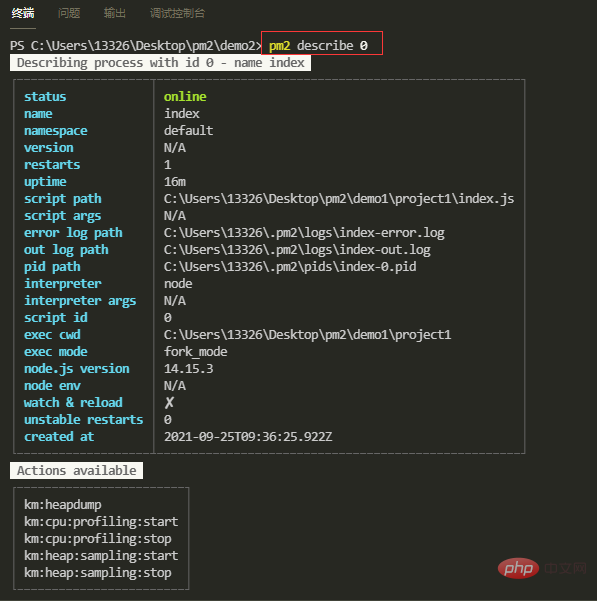
【6】查看应用信息
pm2 describe id
pm2 describe name
上述的 JSON 格式应用列表,输出了所有应用的信息,而且信息十分凌乱,我们可以使用 pm2 describe 命令来查看指定应用的信息
【7】实时打印日志
打印日志:pm2 logs
指定日志行数:pm2 logs --lines (指定显示的日志行数)
清空日志:pm2 flush
对于线上正在运行的应用,有的时候需要打印实时日志来进行调试排查问题,虽然日志会自动添加到日志文件里面,但是总之不太方便。pm2 提供了logs命令,可以直接实时打印日志。
注意:当前命令行页面使用了该命令后,当前命令行会一直处于监听状态,你需要再新开一个命令行去敲其他命令
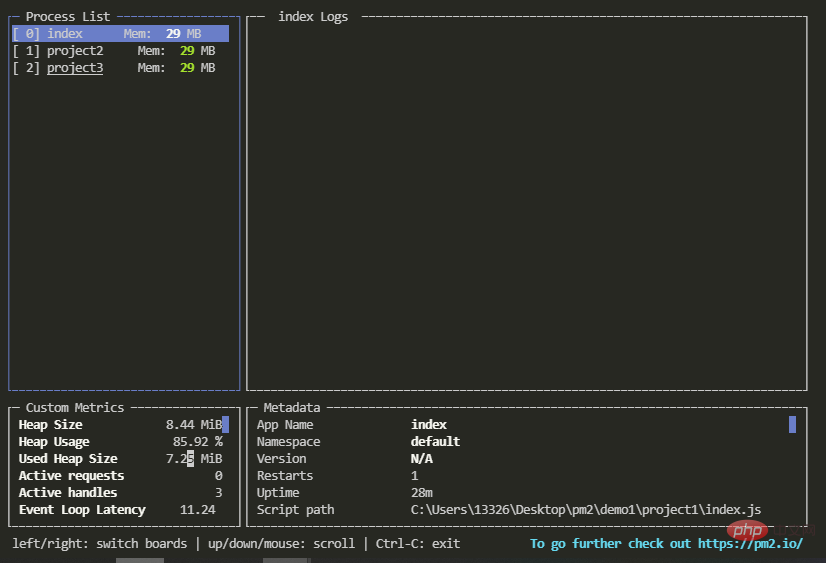
【8】显示仪表盘
pm2 monit
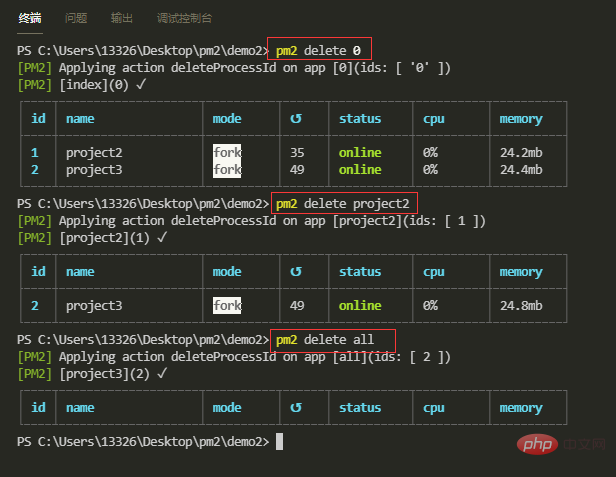
【9】删除应用
通过Id删除:pm2 delete id
通过name删除:pm2 delete name
删除所有应用:pm2 delete all
删除应用几乎不会造成任何后果,只是在管理列表中删除了这一项,并不会删除项目文件
【10】配置参数-应用名称
--name
在命令行方式中,使用 --name
【11】配置参数-监听目录
监听目录:--watch
指定目录不被监听:--ignore-watch
监听目录用于当指定监听目录文件发生变化时,pm2 将会自动重启应用

除了指定一个监听目录外,还可以再继续指定某个目录不被监听,例如上述的例子,指定了project1目录为监听目录,然后你把日志文件放在了这个目录下,比如为 logs 目录,这个目录不希望被监听,否则会形成死循环,这时候就需要用到另一个参数 --ignore-watch,输入一下命令
pm2 start 0 --watch --ignore-watch './logs'
【12】配置参数-最大内存数
--max-memory-restart xxx(K|M|G)
设置最大内存数,当应用运行时占用的内存超出该数值后,应用将自动重启。命令行方式通过 --max-memory-restart 参数设定应用运行最大内存,后续跟上数值和单位,单位只能是 K,M,G 三个值,分别表示 KB,MB,GB 。

【13】配置参数-日志存放路径
--log
日志默认会放置在 $HOME/.pm2/logs/ 目录下,使用 --log
pm2 start index.js --log ./logs/mylog.log
更多node相关知识,请访问:nodejs 教程!
The above is the detailed content of An in-depth analysis of Node's process management tool 'pm2”. For more information, please follow other related articles on the PHP Chinese website!

Hot AI Tools

Undresser.AI Undress
AI-powered app for creating realistic nude photos

AI Clothes Remover
Online AI tool for removing clothes from photos.

Undress AI Tool
Undress images for free

Clothoff.io
AI clothes remover

AI Hentai Generator
Generate AI Hentai for free.

Hot Article
Hot Tools

Notepad++7.3.1
Easy-to-use and free code editor

SublimeText3 Chinese version
Chinese version, very easy to use

Zend Studio 13.0.1
Powerful PHP integrated development environment

Dreamweaver CS6
Visual web development tools

SublimeText3 Mac version
God-level code editing software (SublimeText3)
Hot Topics


 The difference between nodejs and tomcat
Apr 21, 2024 am 04:16 AM
The difference between nodejs and tomcat
Apr 21, 2024 am 04:16 AM
The main differences between Node.js and Tomcat are: Runtime: Node.js is based on JavaScript runtime, while Tomcat is a Java Servlet container. I/O model: Node.js uses an asynchronous non-blocking model, while Tomcat is synchronous blocking. Concurrency handling: Node.js handles concurrency through an event loop, while Tomcat uses a thread pool. Application scenarios: Node.js is suitable for real-time, data-intensive and high-concurrency applications, and Tomcat is suitable for traditional Java web applications.
 The difference between nodejs and vuejs
Apr 21, 2024 am 04:17 AM
The difference between nodejs and vuejs
Apr 21, 2024 am 04:17 AM
Node.js is a server-side JavaScript runtime, while Vue.js is a client-side JavaScript framework for creating interactive user interfaces. Node.js is used for server-side development, such as back-end service API development and data processing, while Vue.js is used for client-side development, such as single-page applications and responsive user interfaces.
 Is nodejs a backend framework?
Apr 21, 2024 am 05:09 AM
Is nodejs a backend framework?
Apr 21, 2024 am 05:09 AM
Node.js can be used as a backend framework as it offers features such as high performance, scalability, cross-platform support, rich ecosystem, and ease of development.
 What is the difference between npm and npm.cmd files in the nodejs installation directory?
Apr 21, 2024 am 05:18 AM
What is the difference between npm and npm.cmd files in the nodejs installation directory?
Apr 21, 2024 am 05:18 AM
There are two npm-related files in the Node.js installation directory: npm and npm.cmd. The differences are as follows: different extensions: npm is an executable file, and npm.cmd is a command window shortcut. Windows users: npm.cmd can be used from the command prompt, npm can only be run from the command line. Compatibility: npm.cmd is specific to Windows systems, npm is available cross-platform. Usage recommendations: Windows users use npm.cmd, other operating systems use npm.
 Is nodejs a back-end development language?
Apr 21, 2024 am 05:09 AM
Is nodejs a back-end development language?
Apr 21, 2024 am 05:09 AM
Yes, Node.js is a backend development language. It is used for back-end development, including handling server-side business logic, managing database connections, and providing APIs.
 What are the global variables in nodejs
Apr 21, 2024 am 04:54 AM
What are the global variables in nodejs
Apr 21, 2024 am 04:54 AM
The following global variables exist in Node.js: Global object: global Core module: process, console, require Runtime environment variables: __dirname, __filename, __line, __column Constants: undefined, null, NaN, Infinity, -Infinity
 How to connect nodejs to mysql database
Apr 21, 2024 am 06:13 AM
How to connect nodejs to mysql database
Apr 21, 2024 am 06:13 AM
To connect to a MySQL database, you need to follow these steps: Install the mysql2 driver. Use mysql2.createConnection() to create a connection object that contains the host address, port, username, password, and database name. Use connection.query() to perform queries. Finally use connection.end() to end the connection.
 Is there a big difference between nodejs and java?
Apr 21, 2024 am 06:12 AM
Is there a big difference between nodejs and java?
Apr 21, 2024 am 06:12 AM
The main differences between Node.js and Java are design and features: Event-driven vs. thread-driven: Node.js is event-driven and Java is thread-driven. Single-threaded vs. multi-threaded: Node.js uses a single-threaded event loop, and Java uses a multi-threaded architecture. Runtime environment: Node.js runs on the V8 JavaScript engine, while Java runs on the JVM. Syntax: Node.js uses JavaScript syntax, while Java uses Java syntax. Purpose: Node.js is suitable for I/O-intensive tasks, while Java is suitable for large enterprise applications.
